Appearance
Apex
I'm not a rigger. I self identify as a Houdini 'everything is points' person. Kinefx at its core was immediately understandable, even if the fancier rigging stuff was a bit complex.
Apex feels like a whole different beast, all the initial docs and masterclasses are aimed squarely at Maya riggers. That's great, but what about folk like me, grumpy Vex nerds?
My intent with these notes is to be a bridging guide for Houdini people into the new world of Apex. Hopefully by the time these notes are done, you can watch tutorials from Esther at SideFX or Max Rose on Youtube and follow along. Let me know if it works, or if there's stuff still missing!
So, Apex...
Apex is a way to separate building a network of nodes from cooking it. This allows for more modular control of networks, fast character rigs, and other tricks that vanilla sops or compile blocks don't allow.
That all sounds very vague and hand wavey, it's easiest to explain up front with an example.
Oh, I have to give massive thanks to Henry Dean who took a lot of time explaining stuff to me, bouncing hips back and forth, being an amazing sounding board. He also happens to be the main guy behind both Kinefx and Apex, so bonus points there. What a megadude.
Contrived example of Kinefx vs Apex
Download hip: apex_overview_v02.hip
Best to start with an example.
Hopefully you've checked out the kinefx page, and know that you can do something simple like:
- make a joint chain with a skeleton sop,
- append a rigpose,
- put * in the name parameter,
- use @Time*0.1 for rotate x.
If you play, the bone chain will gradually curl up on itself.
For 5 bones, or 20 bones, or 50 bones, this will play back at 120fps fine.
But lets push this. Swap the skeleton sop for a line and a rigdoctor with 'initialize transforms' enabled, and push the joint count higher. A quick Google search suggests a character rig is usually around 400 joints. Push the line point count to 400, performance will start to dip.
Now insert a copy and transform sop, and make 3 copies of the joint chain.
Kinefx will drop to 10fps, while Apex will playback at 120fps.
A full production rig might have the equivalent of 1000 joints when you include helpers, fk/ik, bendy limbs, face joints etc.
Kinefx will playback at 4fps with that many joints.
Apex will still playback at 120fps, and will continue to do so at 2000, 3000, 4000 joints per 'character'.
Spoilers on how contrived this example is
It's very contrived. I explain in the next section how the rigpose sop is doing a lot of work, Henry hinted that it also does a lot of tricks to stay fast despite throwing lots of stuff at it. The first example I made had a rigpose in a for loop, and I thought it was running it individually for each joint. In fact it was rotating ALL the joints all at once, 1000 times per loop, and even then it wasn't as slow as I'd expected!
To get past the rigpose tricks I had to use a rig wrangle. This definitely slows things down, and I get to maintain some cred. But not much cred.
Why Kinefx rigs get slow
There's more tech details than I pretend to understand, but here's what's been explained to me:
Sops has a speed limit: Sops is optimized for millions of points. In that scenario each sop cooking is the bulk of the processing time, passing results between sops is relatively quick. But if the total point count is low, say under 10,000, and the number of sops is high, that inter-processing becomes the bottleneck. If your polybevel/extrude/scatter/etc network runs at 10fps, you don't mind, but its not good enough for character rigs.
Rigpose is doing many things under the hood: The interface is a multiparm, so it has to be ready to adapt to however many parms you multi. Those parms can have wildcards, even more branching possibilities. And ultimately it has to work with that potentially varying list of joints, find the parent, rotate it, pass that rotated matrix to its child, rotate that, and so on. That on-the-fly dynamism and matrix chaining is expensive.
Dynamic code is slow compared to static code: I've watched enough youtube videos on shader code, openCL, Cuda etc to recognise tricks for fast code; basically static linear code runs faster than dynamic branching code. Sops is super flexible, you can wire anything to anything and it'll work, but that comes at a performance cost.
The Apex equivalent of a Rigpose
Open a Apex Network View (make a new pane, Animation -> Apex Network View) and select the first Apex edit graph in the example hip, you'll see this:
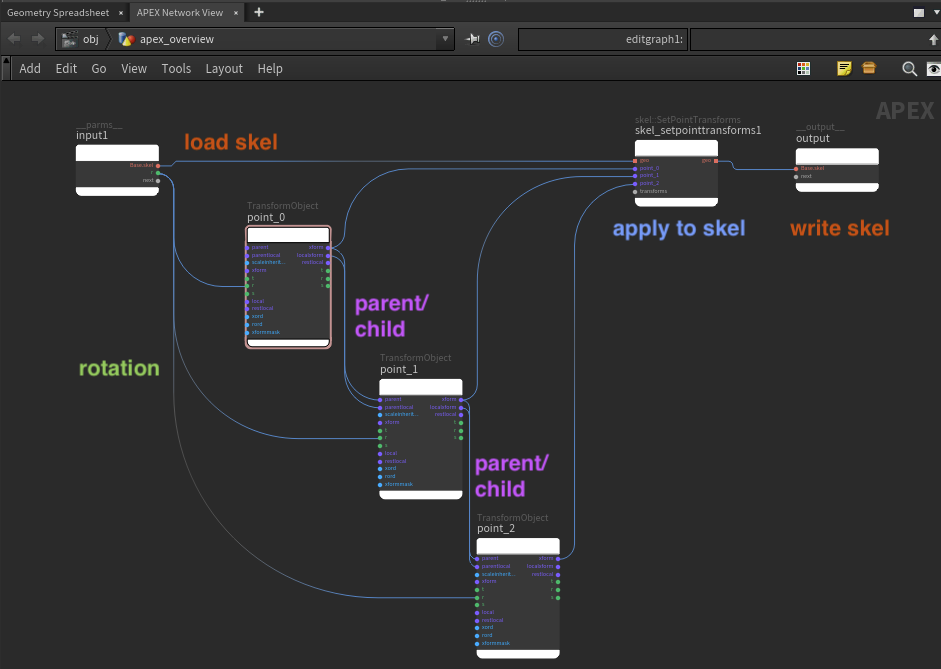
You can see that it does the rigpose steps I outlined, but as explicit operations:
- The incoming skeleton is loaded via orange geo ports
- A TransformObject node represents each joint matrix
- Each TransformObject node is wired to its child explicitly to represent the parent/child relationship
- The input green rotation is bound to the inputs of the graph, like a vop bind
- The results of these modified transforms are written back to the skeleton with an explicit SetPointTransforms node
- Finally the result is written back out with an output node, again very similar to a bind export in vops.
What IS an Apex graph?
The graph looks like a Vop network right? Press tab while in the edit graph, you'll see that there's lots of nodes to play with; some look like sop nodes, others look like vop nodes. This is how I built the first example graph, it's a good way to understand the basics of Apex.
Set the display flag to the the Apex edit graph node. Nothing happens. There's nothing animating, there's not even joints; the 3d view is a spiderweb of lines and points:
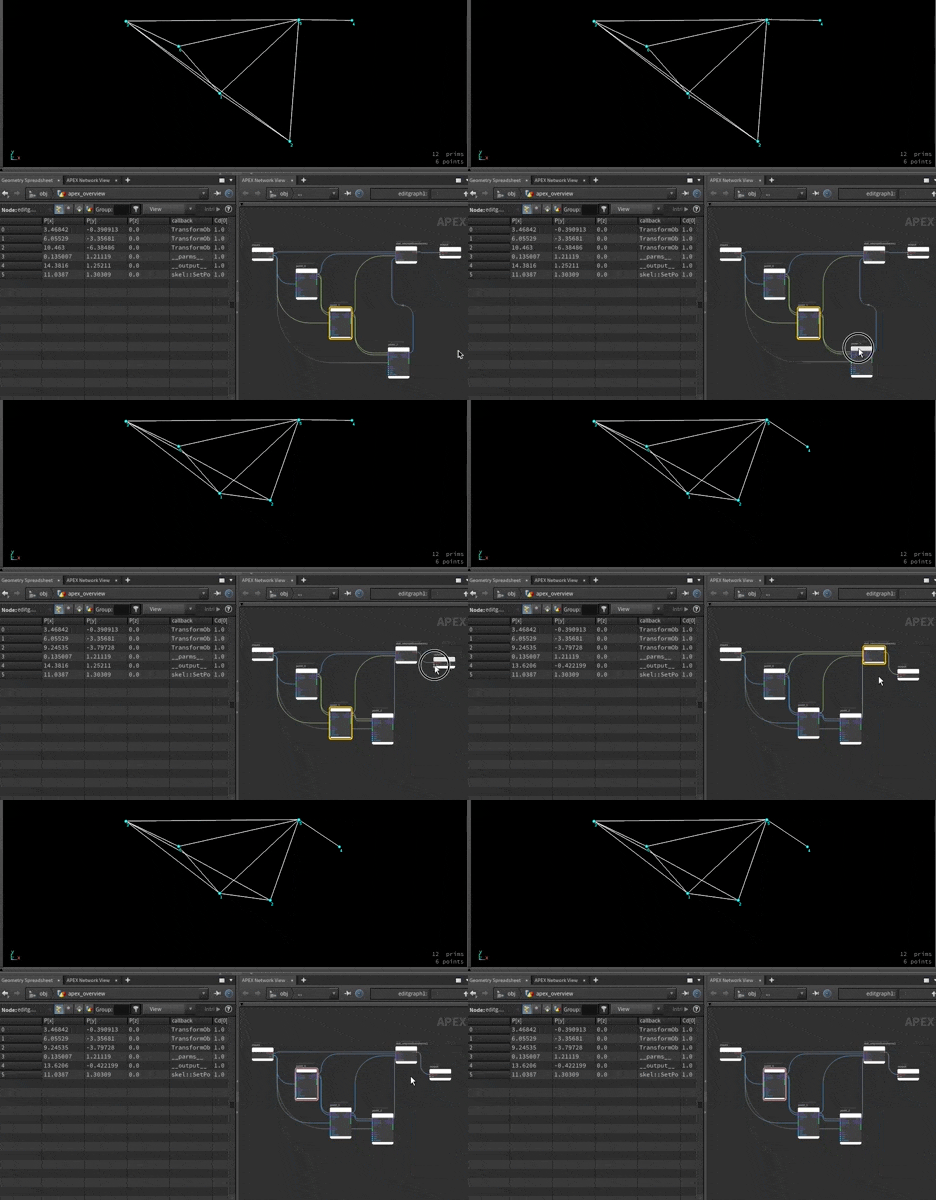
If you look at the Apex graph AND the 3d view AND the geo spreadsheet all at once, you'll see that what is in the viewport IS the Apex graph. The nodes in the graph are points, the connections between the nodes are lines. The geo spreadsheet will confirm this; @P is the position of nodes in the graph, node types are stored with a @callback attribute, vertices store connections between points just like in regular polyline prims.
The lines and points implies a big distinction between Apex graphs and vop networks. A vop network is designed and compiled all at once; when you make a change to the network, the nodes are converted into a Vex binary immediately.
By comparison an Apex graph does nothing, its just lines and points. The Apex network view is a dummy viewport, it translates the underlying points and lines into a human readable graph of nodes and attributes.
This is key, an Apex graph doesn't actually do anything, it does no calculation until...
Apex invoke graph
...until that graph is passed to an Invoke node. This node will convert the lines and points into an executable format, and do calculations, move joints, do stuff.
'Great' you say, 'but what does this give us?'
This means that unlike the Kinefx rigs where every sop node is cooking individually and passing its results to the next sop node on every frame and every time you make a change, the invoke graph executes the graph only when required, once, and runs the graph in a tight fast loop.
This separation of designing the graph vs executing the graph is a key to Apex's speed, but has a few other advantages. In fact, here comes one right now.
Create Apex nodes with Vex
If an Apex graph is lines and points, we don't need to make it with the Apex edit graph node. We could use whatever houdini tricks we're familiar with, be it sops or Vex or python. In the hip I've included an example to do this in Vex. Assuming the input to a point wrangle is a joint chain, and I need to make a TransformObject Apex node for each, and the node is stored as a @callback attribute, I can use
Vex
s@callback = 'TransformObject';s@callback = 'TransformObject';View that with an Apex network view, hey presto, Apex nodes are created. The layout matches the layout of the joints though, the graph uses @P to set the position in the graph. If you wanted to lay these out horizontally, and to have each node staggered down in y, you could add
Vex
@P.x = (1+@ptnum)*2;
@P.y = -@P.y*10;@P.x = (1+@ptnum)*2;
@P.y = -@P.y*10;Now play with the joint count on the line sop, and watch the Apex graph. It makes TransformObject nodes on the fly, and you can push the numbers silly high, and everything keeps up. Again because creating the graph has been separated from executing the graph, this is about as fast as using a point generate or a scatter sop; 100, 1000, 10000 Apex nodes is no problem.
Also note a little reminder that the graph view doesn't do any cooking, doesn't do anything smart. You can change the line to
Vex
s@callback = 'strawberry';s@callback = 'strawberry';And it will happily make the nodes for you. The nodes have no parameters because of course that's not a real Apex node, but you can see Apex doesn't throw any errors or do anything strange.
In fact you can even go and view the Invoke graph, and you'll get no errors there either. You also won't get any rig or animation, but this is another key design choice of Apex; it will act on things it understands, and ignore things it doesn't. More on this later.
Connecting Apex nodes with Vex
If you've done some of the addpoint/addprim examples elsewhere on this wiki, you'll recognize these statements:
Making new points from points with a point wrangle is easy.
Making individual points with a detail wrangle is easy.
Making precise polylines between points with specific attributes and wiring with Vex is surprisingly difficult!
Here's the full list of connections we need to make:
- Wire 2 connections between each TransformObject to setup parent/child links
- Wire the rotation input in to each TransformObject
- Wire all the TransformObjects outputs to the SetPointTransform
- Wire the input to the graph and the output of the graph.
And here's the ugly Vex required to make all that happen:
Expand Vex code (hidden because it's long and boring...)
Vex
// create parms input
int  parms = addpoint(0,{0,1,0});
setpointattrib(0,'name',parms, 'parm');
setpointattrib(0,'callback',parms, '__parms__');

// create setpointtransforms
int spt = addpoint(0,{11,1,0});
setpointattrib(0,'name',spt, 'setpointtransforms');
setpointattrib(0,'callback',spt, 'skel::SetPointTransforms');

// create output
int  output = addpoint(0,{13,1,0});
setpointattrib(0,'name',output, 'output');
setpointattrib(0,'callback',output, '__output__');

int pr;
int verts[];

// connect geo from input to spt to output
pr = addprim(0,'polyline',parms, spt, verts);
setvertexattrib(0,'portname', verts[0], -1, 'Base.skel');
setvertexattrib(0,'portname', verts[1], -1, 'geo');
setvertexattrib(0,'portindex', verts[0], -1, -1);
setvertexattrib(0,'portindex', verts[1], -1, -1);
pr = addprim(0,'polyline', spt, output, verts);
setvertexattrib(0,'portname', verts[0], -1, 'geo');
setvertexattrib(0,'portname', verts[1], -1, 'Base.skel');
setvertexattrib(0,'portindex', verts[0], -1, -1);
setvertexattrib(0,'portindex', verts[-1], -1, -1);

// wire up all the transforms as parent/child
// wire up rotations to input
// wire up xforms to setpointtransforms
for (int i = 0; i < npoints(0); i++) {
    pr = addprim(0,'polyline',i,i+1, verts);
    setvertexattrib(0,'portname', verts[0], -1, 'xform');
    setvertexattrib(0,'portname', verts[1], -1, 'parent');
    setvertexattrib(0,'portindex', verts[0], -1, -1);
    setvertexattrib(0,'portindex', verts[1], -1, -1);
    pr = addprim(0,'polyline',i,i+1, verts);
    setvertexattrib(0,'portname', verts[0], -1, 'localxform');
    setvertexattrib(0,'portname', verts[1], -1, 'parentlocal');
    setvertexattrib(0,'portindex', verts[0], -1, -1);
    setvertexattrib(0,'portindex', verts[1], -1, -1);
    pr = addprim(0,'polyline',parms,i, verts);
    setvertexattrib(0,'portname', verts[0], -1, 'r');
    setvertexattrib(0,'portname', verts[1], -1, 'r');
    setvertexattrib(0,'portindex', verts[0], -1, -1);
    setvertexattrib(0,'portindex', verts[1], -1, -1);
    pr = addprim(0,'polyline',i,spt, verts);
    setvertexattrib(0,'portname', verts[0], -1, 'xform');
    setvertexattrib(0,'portname', verts[1], -1, 'transforms');
    setvertexattrib(0,'portalias', verts[1], -1,'point_'+itoa(i));
    setvertexattrib(0,'portindex', verts[0], -1, -1);
    setvertexattrib(0,'portindex', verts[1], -1, i);

    matrix localxform = point(0, 'localtransform', i);
    dict parms = set('restlocal', localxform);
    setpointattrib(0, 'parms', i, parms);
 }
// create parms input
int parms = addpoint(0,{0,1,0});
setpointattrib(0,'name',parms, 'parm');
setpointattrib(0,'callback',parms, '__parms__');
// create setpointtransforms
int spt = addpoint(0,{11,1,0});
setpointattrib(0,'name',spt, 'setpointtransforms');
setpointattrib(0,'callback',spt, 'skel::SetPointTransforms');
// create output
int output = addpoint(0,{13,1,0});
setpointattrib(0,'name',output, 'output');
setpointattrib(0,'callback',output, '__output__');
int pr;
int verts[];
// connect geo from input to spt to output
pr = addprim(0,'polyline',parms, spt, verts);
setvertexattrib(0,'portname', verts[0], -1, 'Base.skel');
setvertexattrib(0,'portname', verts[1], -1, 'geo');
setvertexattrib(0,'portindex', verts[0], -1, -1);
setvertexattrib(0,'portindex', verts[1], -1, -1);
pr = addprim(0,'polyline', spt, output, verts);
setvertexattrib(0,'portname', verts[0], -1, 'geo');
setvertexattrib(0,'portname', verts[1], -1, 'Base.skel');
setvertexattrib(0,'portindex', verts[0], -1, -1);
setvertexattrib(0,'portindex', verts[-1], -1, -1);
// wire up all the transforms as parent/child
// wire up rotations to input
// wire up xforms to setpointtransforms
for (int i = 0; i < npoints(0); i++) {
pr = addprim(0,'polyline',i,i+1, verts);
setvertexattrib(0,'portname', verts[0], -1, 'xform');
setvertexattrib(0,'portname', verts[1], -1, 'parent');
setvertexattrib(0,'portindex', verts[0], -1, -1);
setvertexattrib(0,'portindex', verts[1], -1, -1);
pr = addprim(0,'polyline',i,i+1, verts);
setvertexattrib(0,'portname', verts[0], -1, 'localxform');
setvertexattrib(0,'portname', verts[1], -1, 'parentlocal');
setvertexattrib(0,'portindex', verts[0], -1, -1);
setvertexattrib(0,'portindex', verts[1], -1, -1);
pr = addprim(0,'polyline',parms,i, verts);
setvertexattrib(0,'portname', verts[0], -1, 'r');
setvertexattrib(0,'portname', verts[1], -1, 'r');
setvertexattrib(0,'portindex', verts[0], -1, -1);
setvertexattrib(0,'portindex', verts[1], -1, -1);
pr = addprim(0,'polyline',i,spt, verts);
setvertexattrib(0,'portname', verts[0], -1, 'xform');
setvertexattrib(0,'portname', verts[1], -1, 'transforms');
setvertexattrib(0,'portalias', verts[1], -1,'point_'+itoa(i));
setvertexattrib(0,'portindex', verts[0], -1, -1);
setvertexattrib(0,'portindex', verts[1], -1, i);
matrix localxform = point(0, 'localtransform', i);
dict parms = set('restlocal', localxform);
setpointattrib(0, 'parms', i, parms);
}So while it's totally possible, there's probably a better way to do this.
But check the result; pin the Apex graph at the wrangle, and go and change the number of points in the original line. You'll see the network adds and subtracts nodes instantly, and can scale to ridiculous numbers. If you display the invoke node, you'll see it happily updates and animates the joints regardless of how many points or copies of the line you set.
Python and ApexScript
Python is generally frowned upon by Houdini folk, but here it makes sense. Riggers are very familiar with it, its object oriented nature means its a better way to work with nodes and connections, and while using python in sops is usually slow and best avoided, its plenty fast enough if we're just making lines and points. There's an example of using houdini python to recreate this same graph.
That said, Sidefx realized this could be made even easier. By sprinkling some syntax sugar on top of python, they could have a language designed to make editing graphs very clean, and feel very pythonic. This is what Apex script is.
Here's the Apexscript code to do what the earlier Vex does, much tidier and easier to read.
python
graph = ApexGraphHandle()

input = graph.addNode('parms', '__parms__')
output = graph.addNode('output', '__output__')

spt = graph.addNode('SetPointTransforms','skel::SetPointTransforms')
spt.geo_in.promoteInput('Base.skel')
spt.geo_out.promoteOutput('Base.skel')

tos = ApexNodeIDArray()

for p in geo.points():
    name = geo.pointAttribValue(p, 'name', valuetype=String)
    to = graph.addNode(name, 'TransformObject')
    to.r_in.promoteInput('r')
    spt_in = spt.transforms_in.subport(name)
    to.xform_out.connect(spt_in)
    tos.append(to)

    # get rest transform
    localxform = geo.pointAttribValue_Matrix4(p, 'localtransform')
    to.setParms({'restlocal': localxform})

for i, to in enumerate(tos):
    if i is not 0:
        child = tos[i]
        parent = tos[i-1]
        graph.addWire(parent.xform_out, child.parent)
        graph.addWire(parent.localxform_out, child.parentlocal)


graph.sort(True)
graph = ApexGraphHandle()
input = graph.addNode('parms', '__parms__')
output = graph.addNode('output', '__output__')
spt = graph.addNode('SetPointTransforms','skel::SetPointTransforms')
spt.geo_in.promoteInput('Base.skel')
spt.geo_out.promoteOutput('Base.skel')
tos = ApexNodeIDArray()
for p in geo.points():
name = geo.pointAttribValue(p, 'name', valuetype=String)
to = graph.addNode(name, 'TransformObject')
to.r_in.promoteInput('r')
spt_in = spt.transforms_in.subport(name)
to.xform_out.connect(spt_in)
tos.append(to)
# get rest transform
localxform = geo.pointAttribValue_Matrix4(p, 'localtransform')
to.setParms({'restlocal': localxform})
for i, to in enumerate(tos):
if i is not 0:
child = tos[i]
parent = tos[i-1]
graph.addWire(parent.xform_out, child.parent)
graph.addWire(parent.localxform_out, child.parentlocal)
graph.sort(True)Try the same trick as with the Vex example, change the number of points in the line, change the number of lines, the graph updates instantly, the invoke graph happily keeps up.
Apex and Sop Verbs
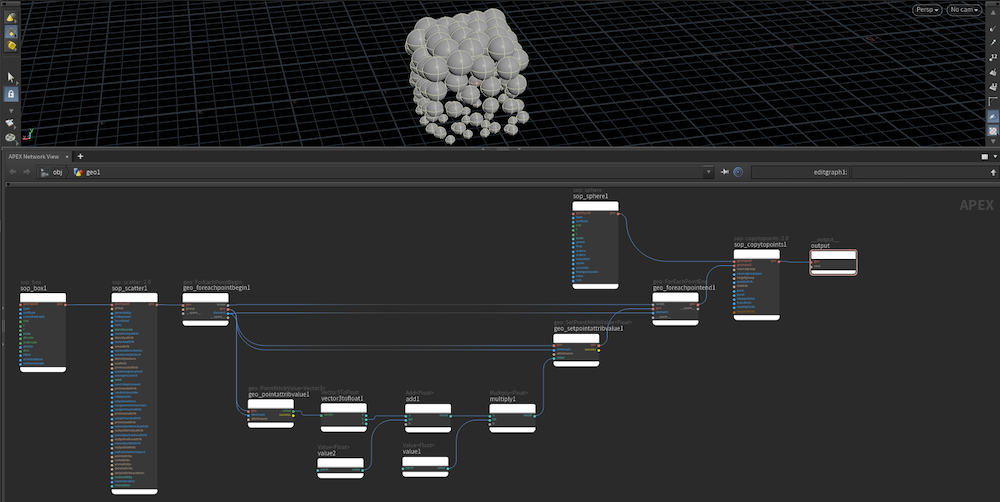
Download hip: apex_copy_to_points.hip
A production rig in Kinefx isn't just kinefx nodes; you use circles sops as handles, wrangles to tweak names, various other multipurpose sop nodes to do things.
If Apex's is to be a rigging toolkit, it also needs access to sops. But this presents an issue; so far all the nodes we've used in Apex have been rigging specific. If we make reference to nodes outside of Apex, that would cause a huge performance hit. I mean sure, maybe Apex could have a couple of sop style nodes built in for handles. But expecting Apex to have equivalents of every sop node is madness right?
Amazingly Sidefx have done exactly this. In an edit graph sop, hit tab and type 'sop', and you'll see a surprising amount of sop nodes available natively in Apex. (As an aside you might've heard of 'sop verbs' before, this is what allows Apex access to all these nodes.)
This example shows a simple copytopoints setup, but implemented in Apex. It uses a sop box, sphere, scatter and copytopoints to scatter spheres over a box.
It's also possible to take a sop network and convert it to Apex (sort of). The edit graph has a button on its UI to import sops; click it, use the op browser to select several sops, and they'll appear in the sop graph. There's a few notable nodes it doesn't support, usually for good reasons if you think about it (eg the multiparm madness of a rigpose, or the open-ended nature of a point wrangle).
This hip shows that there's ways to work around this if you're keen. For example you can't just use a wrangle to set @pscale based on @P.y, but if you can remember the arcane ways of setting up for loops in vops, you can do it in Apex.
This setup uses a for loop to iterate over the scattered points. Within the loop it reads @P, splits into floats, fits @P.y to go between 0 and 1, and saves it as a new @pscale attribute.
It's a lot of work, and if the native sops version runs at 60fps, there's no benefit to porting it to Apex. But if you have a long involved sop network that runs at 8fps, and its a relatively small number of points, Apex might be worth looking into. A great early example of this is the Natsura toolkit, allowing for complicated tree and plant generation at nearly interactive rates.
For emphasis: Apex is not just about rigging! The name Apex derives from 'All Purpose Execution', it's used in Copernicus, in viewport interaction tools, and will appear in more and more parts of Houdini where speed is important.
Apex and Vex
You wouldn't be a red blooded Houdini person without loving Vex, you might be wondering where Vex plays into all this.
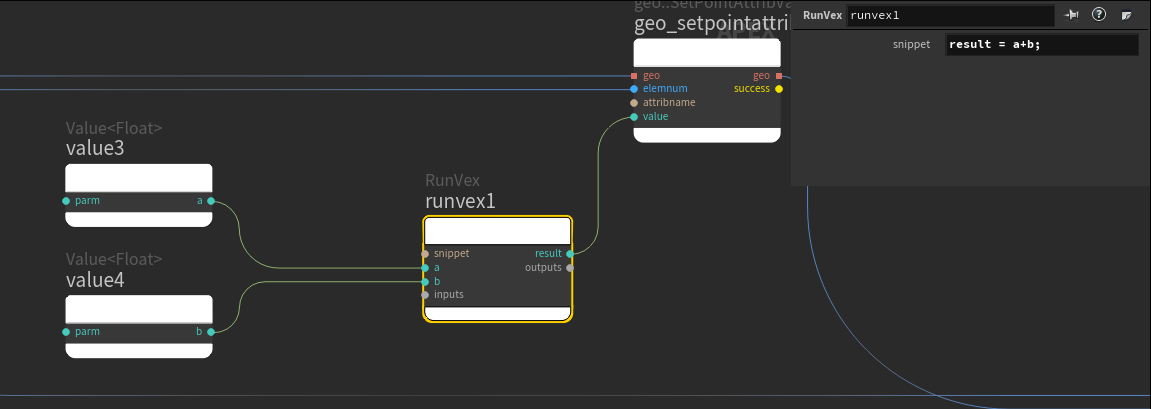
Initially Vex was not going to be supported in Apex; remember that while Vex is designed for handling millions of points in parallel, Apex is about relatively small numbers of points executing quickly. Buuuut Vex is a lovely glue language that's hard to let go of, so sure enough, there's a RunVex node available. It behaves similar to the snippet vop; it has no @ support, it purely works on named inputs and named outputs.
To make this example meant lots of ctrl-middle click action:
- create the runvex node
- create the input nodes
- connect the inputs and outputs
- ctrl-middle click the inputs to rename them
aandb, and ctrl-middle click the output to name itresult - now you can replace the snippet on the runvex node with
result = a + b;
Apex and Vops
Daniel Fitzgerald shared a great tip. He writes:
You can also use the sop::attribvop node, with VEX source set to snippet. It's not the same as RunVex in that it works on geometry, not APEX values, but it can fill in a lot of gaps for geo deformation if there isn't a sop verb available.
Thanks Daniel!
Apex and everything else
Apex can do rig logic, vector maths, sops, parameters, and if you browse the node list, it can handle channels, copernicus, and a few other things that usually are locked away in their own contexts. Apex allows for a 'contextless' houdini environment that a few people have wanted for a while. Lots of interesting possibilities.
Strictness
You'll also notice in that same tab menu an almost overwhelming variety of nodes, and a lot of seemingly very similar nodes. 20 float nodes? 30 array nodes? Why?
As mentioned before, one of the other reasons Sops performance is limited is because it's so permissive; you can connect anything to anything, merge any kind of geometry with anything else, sops silently does a ton of conversion and data managing on your behalf.
But for rigs to run fast, there has to be as little of this automatic conversion as possible. Hence, every possible data type and conversion node is available as a separate node, forcing you to be explicit and clear about what you need to process.
For emphasis; Apex isn't about replacing Sops; artists appreciate the flexibility Sops provides, its still the core of Houdini. But if you decide you need performance, or graph construction flexibility, that's where Apex steps in.
Apex Script WYSIWYG
If you've been following along with the hip linked at the top of this page, it works in a straightforward manner. You can click on the Apex script nodes, see the generated nodes in the Apex network view, and if you set the display flag to the invoke sop, you see the rig animating.
This isn't the default behavior for the apexscript node. Henry had to walk me through the various adjustments required, I assume there's reasons why the defaults are as they are, maybe I'll find out why later.
For now, if you want apexscript nodes to be more WYSIWYG:
- Enable Header, set template to
Graph- this sets the Apex script header code to read from that input binding, make it availble in code as 'geo'. - Invocation, Input1 Bindings, Bind to Geometry should be
geo- this makes it read the incoming stream, so that you can convert incoming joints to Apex nodes. - Invocation, set Bind Output Geometry to
output:geo- this takes the result of the graph and writes it out to the geo stream. - Visualizer, set Show to
Output1- this makes the Apex network view display the result of the graph, not the graph to make the graph (more on that below)
Apex as a graph to make graphs
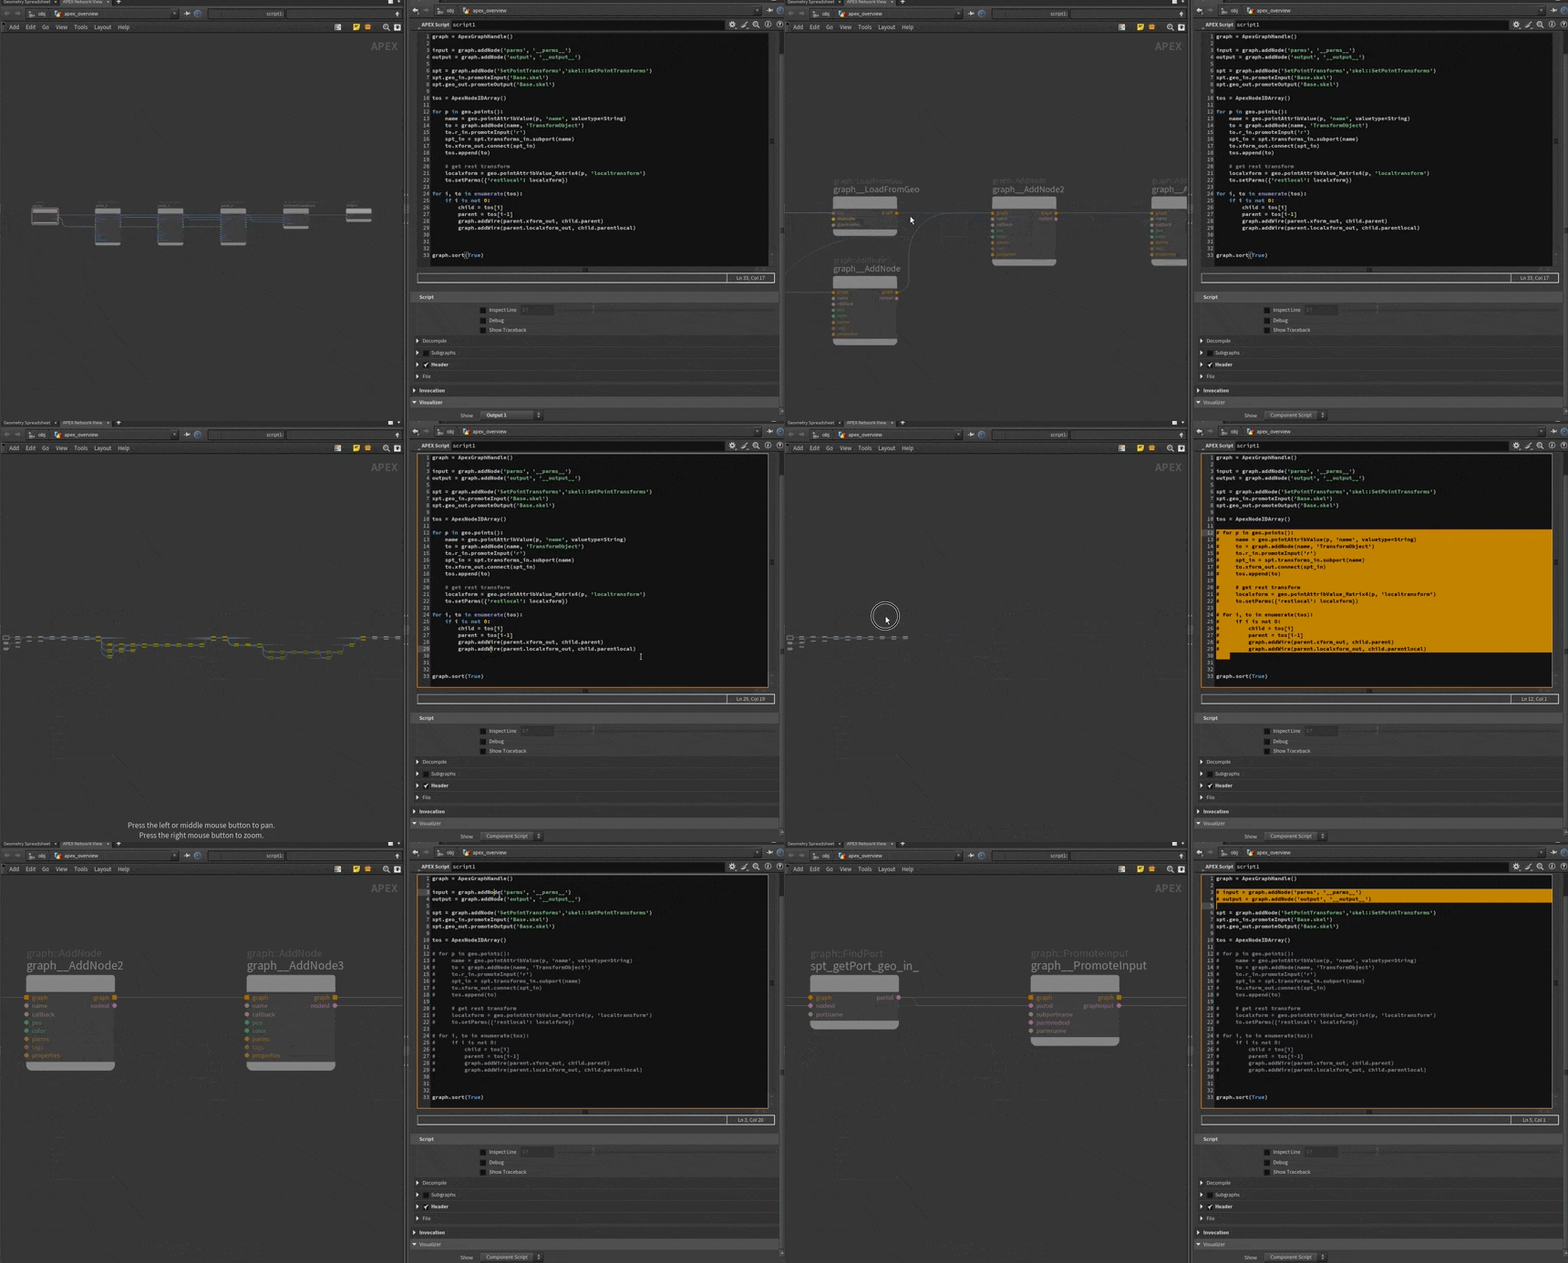
That last point in the previous section, if you flip the visualizer mode back to component script and look closer at the Apex network view, you'll see that each node is related to a line of Apex script. Try commenting and uncommenting lines, you'll see nodes appear and disappear in the graph.
The component script view shows how Apex binds lines of python directly to nodes. This also gives a clue that Apex can be nodes to represent sops, or nodes to represent matrices, or nodes to represent logic, but it can also be nodes to represent things to edit an Apex graph. The snake eats its own tail!
Esther does a good overview at this time offset in this video: https://youtu.be/1WYqRcz_bq8?t=761
Graph inputs and outputs
If you create a fresh Apex edit graph node, you'll see that unlike a vop network, it doesn't give you default input and output nodes. Use the tab menu to create an input node (of type __parms__), and an output node (of type __output__).
These will both have a connector called next, the usual indication that you can wire multiple connections to it. So if you expected your Apex graph to import geo, do work on it, export geo, you could, for example, create a SetPointTransforms node, send the left side to the input node, and the right side to the output node.
This works, but you can see that the input and output are both called 'geo'. Usually references to skeletons assume the input will be 'Base.skel'. How can you rename the input to reflect this?
The manual way is to control+middle mouse click on the parm name. That brings up a dialog, type the new name, done.
That said the times you'll be manually wiring up and naming connections like this is pretty small, apexscript has built in functions to create inputs and outputs, and name them.
Oh you wanna know it? Fine. This Apexscript snippet creates a setPointTransform, and promotes its input as 'Base.skel', which implicitly creates an input node for you:
python
spt = graph.addNode('SetPointTransforms','skel::SetPointTransforms')
spt.geo_in.promoteInput('Base.skel')spt = graph.addNode('SetPointTransforms','skel::SetPointTransforms')
spt.geo_in.promoteInput('Base.skel')Similarly this will connect to an output node if it exists, or make one and connect if it doesn't exist.
python
spt.geo_out.promoteOutput('Base.skel')spt.geo_out.promoteOutput('Base.skel')Kinefx rigs vs Apex autorigs
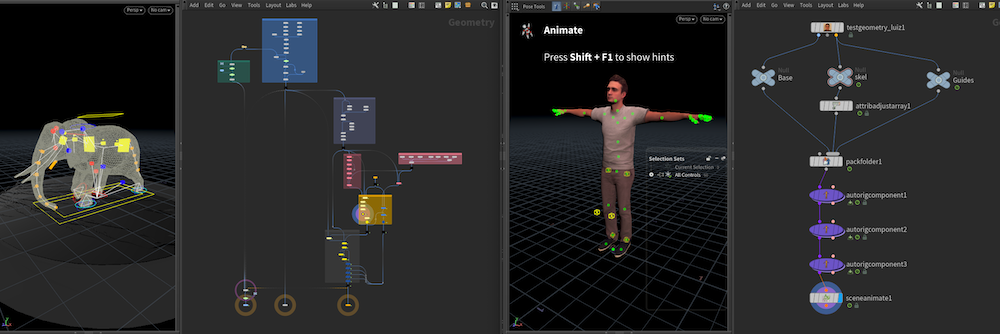
I downloaded the elephant masterclass hip built in Houdini 19, pre Apex. It's a really nicely designed network, but is a good example of the limitations of kinefx. The network is quite complicated to follow; a section imports animation, then creates a base skeleton, then creates a control rig, then exposes some rigpose nodes, then feeds to 2 iksolvers, then multiple skelton blends to combine the IK and FK animation. If you wanted to add more controls, its not simply appending to the bottom of the network; you need to grab geo from high up in the chain before the IK solvers, then from the middle, then from the end to blend results.
Compare to a simple example of taking Luiz and giving him fk and ik controls. From the sop level, its 3 nodes. Very clean, very fast. Under the hood of course there's lots going on, but this ability to abstract away the details is something that was very hard to do in kinefx; even if you tried to wrap up parts of the rig in HDA's, you'd still have to be referencing geo from multiple places in a large network flow. If you've carefully read all the sections so far, you'll have an understanding of why this is easier in Apex...
Wiring in start/middle/end of Apex networks

We know by now that until you invoke it, an Apex graph isn't really a graph, its just lines and points. We also know that apexscript nodes and code don't just make nodes, but can make nodes to make nodes, or if required, delete nodes. Or replicate nodes. Or move them out of the way and do whatever.
Look at the gif above, you can see the the fk autorig node does what you'd expect, makes a bunch of TransformObject nodes, and wires them up.
The ik autorig node is interesting. It's able to insert nodes towards the start of the flow, and append some towards the end of the flow. It can query the incoming skeleton for attributes, and generate the extra nodes needed build ik functionality.
Finally the joint deform autorig adds a few more nodes at the start, and some more at the end.
You can almost think of this as taking a step back from sops, and having nodes and code redesigning the sop network itself based on requirements. You pay no cooking overhead for this until you invoke it.
Autorig nodes
We're now ready to talk about the autorig workflow, which should be the last thing you need to be able to read the rest of the Apex docs and follow along with Apex tutorials.
Packed folder
Let's start with a vague question. What is a character? At its simplest it is a mesh and a skeleton. Ideally you want to represent that as a single thing in Houdini. Houdini already has a notion of this with packed geometry, the Apex autorig workflow conforms to this idea.
To start with we can just pack the skeleton. A Packed Folder sop is a helper node to take multiple inputs and pack each one, trying to guess names based on the input. Here I take just the skeleton from Luiz for now, wire it to a packed folder:
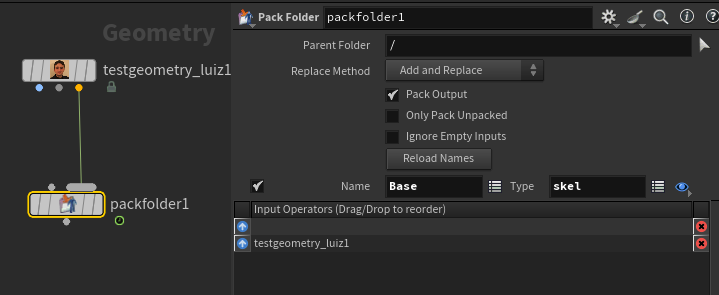
For skeletons, the autorig tools expect the skeleton to be named Base. The packed folder workflow also introduces the idea of a suffix to tell you the type. There's a few to choose from, you can use the dropdown for 'skeleton' which will then use the suffix skel.
FK transform
Now that we have our packed skeleton, we can wire it to an autorig node. Append one, connect the packed geo. Set it's display flag and hit enter to active its state. Because we haven't yet told the autorig to do anything you shouldn't see anything.
Set the autorig component dropdown to fktransform. You should immediately see the skeleton appear, with dots on each joint to tell you they can be interacted with. Tap one, you'll get a rotate handle.
On the surface, this is pretty underwhelming. It's taken a skeleton and shown us a skeleton. But take a look at the Apex graph. Like with the explanation of what goes on under the hood of a rigpose node, this has created and wired up a bunch of TransformObject Apex nodes and a SetPointTransform. In other words, it has recreated a rigpose in Apex.
Further, it's also executing the graph right on the node. This is a preview, you're not expected to animate with this viewport state, it's to let you wiggle some controls and see that you're getting the expected output.
Base.rig
I didn't think to query if the rig logic (the apex lines and points) got any special treatment with the autorig tools. Yet it does, it gets packed into its own thing, Base.rig. You don't pack this yourself because its the job of the autorig nodes to make it.
Multi IK
Append another autorig, set its component to multik, and view it. You'll see... no change. Why?
An ik system for a leg needs to know where the hip, knee and ankle joints are. Have you told the autorig node where the legs are? No you haven't. Lets see what it expects.
Look in the driven tab, you'll see a segments parm looking for *Leg. This is a hint, it expects info on the joints named 'something-Leg'.
While this could be a @name attribute, or @ik, autorig has gone for a system where you have @tags, a string array. You could set this with a wrangle before the pack if you want, but the attribute adjust array sop was designed for exactly this.
Attribute adjust array
Insert an attribute adjust array before the pack, display it, hit enter to get into its viewport state. Set the attribute class to point. The viewport will again highlight the joint dots to imply they can be interacted with.
Marquee select the left hip, knee, ankle, tap A. You'll get a little text field. Click it, type L_Leg, hit enter. You should now see a tag next to those joints.
Jump down to the last autorig node, you should now see ik controls! Grab the box control around the ankle, drag it around.
Go back and create R_Leg tags for the other leg, and jump down to the autorig node, bam, double ik. Sweet.
Remember earlier I said that Apex 'will act on things it understands, and ignore things it doesn't'? This is part of that. The multiik component looks for the right tags to create an ik system. If it doesn't find anything, it does nothing, and passes the unchanged rig to the next sop. This means if you config your autorig components the right way, they'll adapt dynamically to your changing character structure. Even cooler, this happens almost instantly. If you've seen any production rigging frameworks for Maya you'll know that building a rig could take from 5 seconds to 5 minutes, and its treated more like baking a sim more than this live setup. Apex is a paradigm shift from existing rigging tools.
Bone deform
Finally we need to bind the mesh. Append another autorig, set component to bonedeform. Display the node and, as expected, you'll see no change. This makes sense, as we haven't packed the mesh yet.
To fix, go back to the top and connect the mesh to the pack folder sop. It will make a new entry named after the luiz node, change this to 'Base', and the type should be 'shp'.
Jump down to the last node again, and you should see Luiz's mesh, and it will deform as you move the rig.
Try going back and disabling different autorig nodes, trying different tags, deleting different parts of the skeleton before packing, you should see the rig update with the changes you make.
If you were to send this to an animator, you'd append a Scene Animate node, this is basically the same as an invoke, but just sends results to the viewport.
Guides
Oh, one more thing. Some autorig components expect one more input, a guide skeleton, which is where the little boxes and circles and spheres that animators expect to interact on a control rig live. I know from skimming a few tutorials that you use a copy of the main skeleton for this, so just drag another wire from your skeleton to the pack folder, and name it Guides, suffix skel.
Normally you wouldn't wire it backwards like I've done here, you'd just go mesh, skeleton, guides, named Base.shp, Base.skel, Guides.skel.
I can never remember this, and always have to go poking around the autorig nodes to see the names. Maybe you'll have better luck than me.
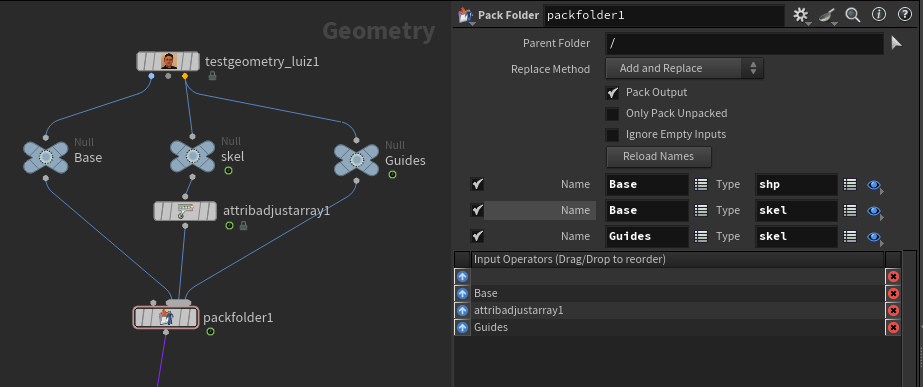 Say this over and over, Base Base Guides, shp skel skel.
And there you have it, all I know about Apex! Go be a rigger!
For Loop Unrolling
TBD
Three lines example with autorig
Download hip: apex_autorig_3_lines_v01.hip
You might've noticed the original setup has an issue where the lines get translated off the groundplane. That's because I'm not doing any logic for the parenting, it just parents every joint to the previous joint, so the start of the second line is parented to the end of the first line, and similarly for the third to the second.
Now that I know fractionally more than I knew at the start of this journey, I wondered if I could fix this. What I needed was the 'fk all the things' behavior of the fktransform autorig component, but I also needed to keyframe all the joints with a single parameter.
Short version:
- Pack Base.skel
- Autorig, fktransform
- Unpack Base.rig
- Tweak apexscript node to read input, dump output
- 2 lines of apexscript to find every node named point_*, promote its rotate to 'r'
Long version:
First step was simple; pack the skeleton, autorig, fktransform.
Next was how to edit this. I appended an apexscript node, and was confused for a while as to why I couldn't see anything. I then remembered the autorig nodes are packed in Base.rig, so figured I better unpack that. Look at the unpack folder sop to see that I refer to the rig by name.
Next the apexscript node needed a bit of work. This took some fiddling, but made sense in hindsight:
- Header enabled, template in
Graphmode - Input1 Bindings, enable 'Bind To Geometry', set the path to
geo - Invocation, set Bind Output Geometry to
output:geo - Visualizer, set Show to
Output1
We're editing a graph, so makes sense that the header should be in graph mode to assign the geo and graph variables. Base.rig has been unpacked, so there's no names here, its just 'geo', same for the output. And we want to see the graph, so set the visualiser mode.
With all that done, I could add this 2 liner snippet:
python
for n in graph.matchNodes('point_*'):
    n.r_in.promoteInput('r')
for n in graph.matchNodes('point_*'):
n.r_in.promoteInput('r')Pretty simple.
That said, I was curious about performance; this locks up Houdini for a few seconds on a Macbook, I was curious if the hang was from python or from Apex itself. I went and wrote a matching ugly vex call to do the same as the 2 liner apexscript:
vex
int parms = findattribval(0,'point','name','parms');
if (match('point_*', @name)) {
    int verts[];
    int pr = addprim(0,'polyline',parms, @ptnum, verts);
    setvertexattrib(0,'portname', verts[0], -1, 'r');
    setvertexattrib(0,'portname', verts[1], -1, 'r');
    setvertexattrib(0,'portindex', verts[0], -1, -1);
    setvertexattrib(0,'portindex', verts[1], -1, -1);
}
int parms = findattribval(0,'point','name','parms');
if (match('point_*', @name)) {
int verts[];
int pr = addprim(0,'polyline',parms, @ptnum, verts);
setvertexattrib(0,'portname', verts[0], -1, 'r');
setvertexattrib(0,'portname', verts[1], -1, 'r');
setvertexattrib(0,'portindex', verts[0], -1, -1);
setvertexattrib(0,'portindex', verts[1], -1, -1);
}Interestingly it takes about the same time, so the slowdown isn't Apexscript.
I'm sure there's a more elegant way to do this. I see that second input labelled 'component script' on the autorig nodes, maybe that's the answer? Regardless I was pleased that I could take the limited knowledge of Apex I have so far and do something with it.
(Not much) Time Passes
Well dur, yes, Max Rose has a whole video on it, it is indeed component script: https://youtu.be/qxXyJUQ26gQ?si=5AAvSRSJABfHGueO
I suspect I'd prefer to do this kind of thing with apexscript though, I reckon that'll be my next chapter in here.
Bonus video content for supporters
These notes covered quite a bit of ground. To get the thoughts down quickly I recorded explainer videos for myself, co-workers, the cgwiki discord, what you've just read is a summary of those videos. I think I captured everything, but I know a lot of people prefer videos to text.
I figured that even though they're not of a good enough quality for a public release, it'd better to have them viewable somewhere instead of locked away on my laptop. If you support me via Patreon or Paypal, you get access to the discord where you'll find an Apex playlist in the #masterclass channel, as well as bunch of other videos from myself and the rest of the discord folk.
C'mon, join, you know you want to...
Concepts and Analogies
Useful things to keep in mind, these should probably be sprinkled through the doc, but keeping them here for now. I had a followup section that linked these concepts back to kinefx and apex, but being at the end here, you should be able to make those connections in your brain. Use them to dazzle your co-workers when you're selling apex to them. 😃
Kinefx joints as points: Seems obvious now, but when it was first released this was a powerful concept. Bones were an obj thing, somehow separate to the rest of sops. Kinefx said 'no, a skeleton is basically just lines and points, if we can move that into sops, regular Houdini folk will understand it, and it opens up lots of opportunities'. Reducing any problem down to lines and points is a very houdini way to approach problems.
Tops cook vs generate: If you've used tops, you know that it intentionally separates editing the graph (generate) from executing the graph (cooking). This allows you to design workflows that would otherwise lock up your machine for hours if it was all executing live all the time.
Sops cook-n-pass-along: Sops/Dops implicitly cook all the time. Each node has to cook, pass its results down to the next node, it cooks, pass its results down etc.. if you're working with millions of points, the cook time per node is the bulk of the workload. But if you have a few hundred points, the overhead of the 'pass results between nodes' becomes a substantial part of the total execution time.
Manual vs auto update cook: When editing large sop networks, it can be useful to change the cool mode in the lower right from 'auto update' to 'manual'. It's a brute force way of separating designing the sop network from executing the network.
Compiled sops: You might've heard about for loops and compiled sop wrappers. I'm hazy on the details, but I know the general gist is that it bypasses the cook-n-pass method of regular sops, anything in the loop is sharing memory, a lot of the overhead of sops is skipped, so stuff that might run in minutes can run in seconds.
Limits of HDA modularity: Hda's are a standard way to wrap up bits of functionality, but they're generally not compiled, and they may not give the flexibility you need; say a particular hda needs some attributes, the hda needs to run at the end of the chain, but the attributes need to be set at the start of the sop network. That's not really possible with HDA's.