Appearance
Ableton
A section to store my limited Ableton Live stuff.
Scratcher
 )
)
Download Max for Live instrument: Download file: scratcher_v1_0.zip
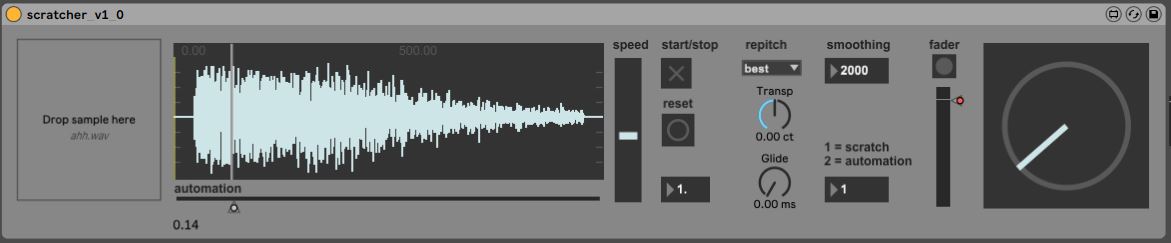
A scratch instrument I put together in Max for Live. It's rough, but I figure I may as well release it and others can play with it, hopefully improve it.
If you like it, please support me via patreon or paypal.
Here's a video of it in action:
https://www.youtube.com/watch?v=lJKptAVHGwE
And a little tutorial of how to use it:
https://www.youtube.com/watch?v=vtiqltH64Uo
At some point I'll write up how it works under the hood. It's my first Max patch so it's pretty ugly, but it works.
Features
- Drag and drop samples
- Easy (ish) automation recording and editing using standard Ableton tools
- Speed and repitch controls
- Visual turntable indicator (not interactive yet)
- Smoothness control, which both controls deck 'intertia', and graininess of the sample playback
Installation
- Unzip the instrument, save it in Documents\Ableton\User Library\Presets\Instruments\Max Instrument
Workflow from scratch
- Drag this instrument onto a new track, append an EQ3 and take out all the bass
- Drag a sample into the drop zone
- Press any midi note to open the fader, you'll hear the sample
- Drag and let go of the playback head on the sample waveform to scratch
- Slow the track tempo down to something you're comfortable scratching over
- Set the speed control to match
- Record with automation
- Set the scratch/automation control to 2
- Right click on the number under the automation line beneath the waveform, choose 're enable automation'
- Enjoy your scratching
- Open the automation waveform, select it all, right click, 'simplify envelope'
Example project
Download file: scratcher_project.zip
This is my first Max project, I've found that while the example project loads fine for me, it needs some massaging to work on a new machine. The steps are similar to the ones outlined above, relink the sample, relink the automation.
- If the plugin doesn't appear when the project is launched, drag it in from your User Library
- Drag the aaaah.wav sample into the drop zone
- Set the scratch/automation mode to 2
- Right click on the number under the automation line beneath the waveform, choose 're enable automation'
For some reason the scratch is delayed, so you can see I've moved the clips earlier by a small amount. It might be due to adding the repitch controls. Something to fix at a later date...
Todo
- tidy up the internals, its a mess
- add a relative location mode, so if you click on the waveform it stops playback wherever the playhead is. Right now its absolute, so will jump the playhead to your cursor. Handy for some things (makes fast cuts easy), but hampers other tricks
- set more behaviors via midi notes, eg one octave might flip the fader so its press-to-close instead of press-to-open
- ability to expand and zoom the waveform window. Can Max for Live do this?
Scratch with real deck into Ableton
Setup notes so I can recreate this later...
- Omni deck in DVS mode, plugged in via USB-C to mac laptop
- Mac running Ableton 12 and DJ Player pro (DJPP)
- Also running Soundsource app and BlackHole audio helper apps
DJPP
- Output, Audio device is default
- Input+DVS device is DVS 1+2 channels
- Ensure pitch is at default before starting
- Map fader as per youtube instructions
- Latency set to 3ms, seems to be fine
Soundsource
- when DJPP is active, reroute it to multi-output device
- input is blackhole 2ch
- output external headphones
Ableton
- Input is blackhole 2ch
- Output is Use system (so shoudl use external headphones)
- Should now be able to play another track, and arm an audio track to record ext.in, channels 1+2, and scratch
Audio Midi setup
- Blackhole nothing special
- Aggregate device (input) blackhole 2ch and microphone active
- Multi output device lists external headphones and blackhole 2ch
- Here can confirm that input (mic icon) is blackhole, output (speaker icon) is external headphones
Ampero Control
The Ampero Control is a little midi box that has 4 stomp switches on it, can take 2 regular expression pedals or sustain pedals, midi in and out, usb, midi bluetooth. I had an old midi guitar (a yamaha ez-ag) that uses old style midi connectors, I thought this looked like the perfect device to connect it to Ableton. I bought a sustain pedal and expression pedal cos I thought, hell, why not?
Midi instrument to usb is NOT supported
So first thing, it doesn't support the guitar. While the website implies it can move midi data fluidly between midi/usb/bluetooth, this one use case isn't supported. 5 pin midi in can't be sent over USB. Ugh. Support told me maybe in the future, but not right now. I bought a midimate-ex cable instead, that works great.
Expression pedals over usb IS supported
Support assured me that it would be possible to get the expression pedal and sustain pedal to work with Ableton, so I had a go.
Here's everything I learned in order to get it working, hope this helps others:
The iOS app
You program the device via an app that connects via bluetooth. Pairing is fast and easy, but the app itself isn't very well designed. There's no documentation, and the default settings are aimed more at controlling the other Ampero devices rather than a computer running Ableton.

The bar across the top is the banks, a bank being a collection of presets you save for the buttons and pedals. There's 000 to 999, way too many, I just picked 000 and stuck with it.
The default behavior for all the buttons and pedals is to send no data! This was super confusing when trying to monitor with MIDI-OX. You have to manually setup everything.
To actually get data to send, click the + button in the lower right. Now you have an event bound to the button on channel 27.
But even this won't work! Edit the event, on the next screen you'll see that it only outputs to the 5pin midi port by default. Turn on USB mode.
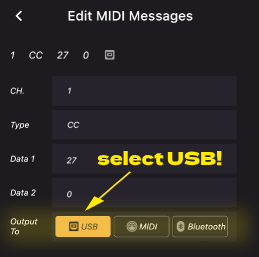
EVEN THEN IT WON'T WORK! You need to save this (upper right on the main screen), which will send those bank settings to the device. Now you should see events appear in MIDI-OX.
The default behavior when setting up data is to alway send on #27. Ugh. Make sure to spread them out, I set my stomp switches to send on 27, 28, 29, 30. Why does it start at 27 by default? Damned if I know.
Expression pedal
This requires more setup, and more shouting at the app. Plug in the pedal, set the type to 'EXP pedal', use the + button to bind it. Edit the binding. Once again be amazed that the default channel is still 27. I set it to channel 2.
But there's even more strange defaults; the min and max of the pedal range are set to 0! This took me AGES to figure out. Set 'data 2 min' (why is it called data 2? No idea) to 0, 'data 2 max' to 127, the output to USB, and save.
If this doesn't work, you might need to calibrate the pedal which is covered in the PDF. Unplug power from the device (which for me meant just unplugging the USB cable), press and hold the 4th button, plug power back in. The display will show PDL, the pedal calibration mode. Swing the expression pedal back and forth 3 times, then press the 4th button again, which will go back into regular mode.
Sustain pedal
Also confused me. I assumed it would need to setup as a switch, but after several attempts without success, tried as an expression pedal, that worked.
Same deal as before, I calibrated it just to be sure, set the range to 0 and 127, output to USB. To function as a sustain pedal needs a specific channel, #64. Save, check that it appears in midi-ox, close the ios app and hope to never touch it again.
Accidental bank switching
All the previous confusion was made worse when I'd see no data was being sent, I'd look down, and see the device had swapped to bank 999. I blamed the app, I blamed phantom midi data from Ableton taking over the device, it was none of those things. It was me.
Pressing 1+2 together will go to the previous bank, 3+4 together will go to the next bank. I was wearing fat ugg boots when doing this setup, and didn't notice I was doing this. Dur me.
Ableton setup
With all that done, midi-ox showing data was being sent, I was confident enough to close midi-ox and start Ableton.
I think by this stage it was all fairly straightforward. The Ampero shows up as a midi device in the preferences. Some people have said that you need to enable 'remote' for it to fully work, I've turned it that on.
With that done, the sustain pedal seems to just work, which is nice. The expression pedal works with the regular ableton midi mapping, so find a parameter like a wah pedal or autofilter, map it, tap the pedal, and it gets mapped.
The 4 stomp switches appear to map, but didn't actually do anything to control the transport controls. Something to investigate further...