Appearance
Niagara
Overview
These notes are a little old, I haven't checked out Niagara in a while, sorry!
Wyeth explains it well in his GDC talk, from 8m30s in: https://www.youtube.com/watch?v=mNPYdfRVPtM&t=8m30s
Then he explains it even better in the 4.25 deep dive: https://www.youtube.com/watch?v=tMPwXotnl5I&feature=emb_title&ab_channel=UnrealEngine
For Houdini folk, it maps pretty nicely into a dops vs vops analogy. Modules (the coloured horizontal bars you see in the Niagara UI) are pop dops. Double click most of them, and you're dropped into a node editor, which is a graph for making compiled mini plugins. Ie, its like vops. Even the UI data flow is similar, modules flow top to bottom, node subgraphs flow left to right.
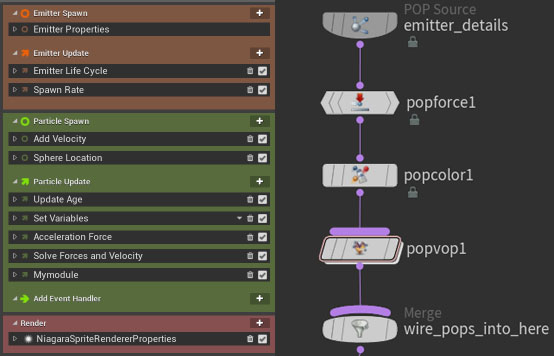 Niagara module stack on the left, Houdini pop dop network on the right
 Niagara module subnetwork on the left, Houdini pop vop network on the right
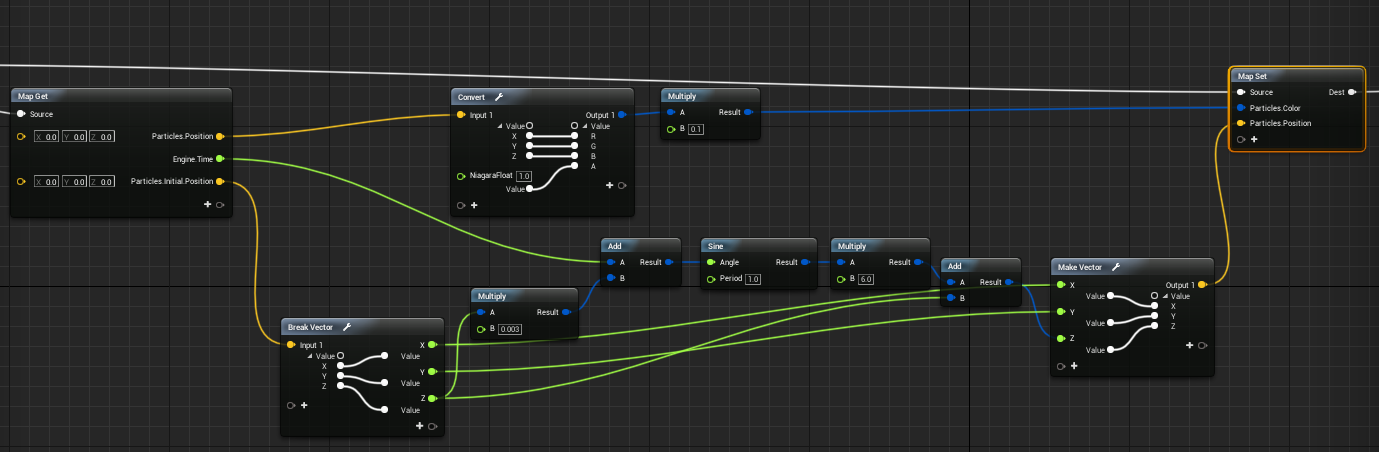
The node graphs use 'map get' and 'map set' nodes in the way houdini uses 'bind' and 'bind export' vops. What's quite nice is you can have many attributes sitting on the get and set nodes. I've never thought about it too hard, but Houdini kind of misses a trick in that the global attrib vops can't be customised much (you can hide attribs you're not using, but you can't add to them). Treat the map get and map set as empty globalattribs that you can customise as you require.
Make a simple module
Assuming you've enabled the niagara plugin already...

- Content browser, rmb, FX -> Niagara Module Script. Name it 'pos_to_col'.
- Double click it, you're dropped into the node editor
- Can see the default graph ready to go, a map get and map set ready to read and write attributes.
- Click the plus on the bottom of the map get, find Particles -> Particles.Position. There you go, @P bound and ready to play with.
- Click the plus on the bottom of the map set, find Particles -> Particles.Color. Mmm, @Cd ready. I wonder whats coming next...
- Drag from the yellow Position of the get, to the Color input of the set.
- Oh hey, a convert node has been made for you, neat. Position is a vector, Color in Niagara is a vector4, so its connected z to alpha too. Can't have that.
- Click the plus on the input side of the Convert node, choose 'float'
- Woo, a built in float constant is there now. Set it to 1, connect it's Value pint to the output A.
- Save
Done! Now to make an emitter and add this module to test it works. Close the editor and get back to the main UE4 interface.
Make an emitter and test the module
- Content browser, rmb, FX -> Niagara Emitter. Double click it to open the editor, see particles spraying away.
- Above the modules on the right, rmb on the big 'Emitter' title and choose 'Collapse to headers'. This tidies up the stack, bit easier to read.
- For this setup, we want the colour to update as the particles move, so we'll insert our module in the green section, 'particle update' middle bit.
- Click the + next to 'particle update', browse the module menu, look in Uncatagorized -> pos_to_col. Click it, that will be appended at the bottom of the particle update stack.
- That's it! Niagara will recompile, and you'll be rewarded with coloured particles.
Initial Attributes
My next intuition was to do a vex/vops style blobby sine wave distort. After playing with it for a bit, I remembered this is a sim, and therefore I couldn't just keep getting and setting position and run it through a sine function, it will be additive and run away.
Instead I needed to run everything off the initial position, turns out there's a trick for that. In the stack view all attributes have an Initial variant. It's not exposed directly in the node graph in 4.26, but hidden behind a namespace. Get the initial position you add Particles.Position on the map get node as you've done already, then r.click on it and choose the 'Initial' namespace. That's it, now you're using the birth pos, and you have a more deterministic setup, if you need that kind of thing.
Expose controls to the module stack
Any attributes in the format Module.attribute will be exposed as controls in the module stack. This is similar to promoting parameters in vops. These can either be made from the Parameters pane in the node view, or from the menu when clicking the plus icon on the Map Get node. Search for a type, eg vector, and choose the one under the Module category:

Custom HLSL wrangle

This is the good stuff. Create a 'Custom HLSL' node, use the slightly spartan but functional text area it gives you, you have a Niagara wrangle.
- Create a Custom HLSL node
- Click the plus for the inputs, choose a type, say float.
- Right click on the 'NiagaraFloat' title that's been created, rename it to something less unwieldy, say 't'
- Repeat this process for all the inputs you need, and an output too
- Now you can connect in attributes, it won't crash, and write code
- put in a comment with lots of text after it, and hit enter a few times to give you some more room to type
- To make Niagara aware that you've made code changes, click anywhere outside the text field, then the 'Apply' button will be enabled at the top of the editor. The apply button is the equivalent of ctrl-enter in a vex wrangle.
Shazam! Wrangle! Now all you gotta do is learn HLSL... which actually isn't too much of a stretch, Vex is pretty similar.
Note the order of operations in that above list. Don't do what I do every time, and wire an output from a Get Map to the tempting 'connect me!' new input plug, it will crash Niagara every time. First create a type, then connect. My vop muscle memory refuses to learn this, I assume after the 100th crash I might learn...
Also, be careful; while the syntax of HLSL and vex is similar the comfort zones of each language is VERY different. A thing that bit me really badly was conditionals and branching statements. I'd prototyped a wrangle with a few if statements, brought that over to Niagara, crash. Kept reducing it down, even a single if would be really unstable.
After talking to some realtime folk and doing some reading, GPU's really don't like branching code much. Imagining how code path options can get complicated quickly, and considering a GPU is essentially millions of really simple processors instead of a single complex processor, you have to structure your code accordingly. This was all in 4.20/4.21, I'm just about to jump back in with 4.25, will report if things have changed.
Keyframe Niagara Parameters
Trick in this post: https://realtimevfx.com/t/niagara-unreal-gdc/4359/79
You can keyframe things, but its a few levels of misdirection at the moment. Use a parameter under the User namespace (eg User.mycontroller) within your module. Put the module in an emitter, the emitter in a system, the system in your map.
Now make a level sequencer, add the system to the sequence, and after a few track clicks and sub-clicks, you can expose that User parameter and keyframe it.
Sample Vertex Color
CPU only in 4.20.
Export a fbx from houdini that has point Cd. Import to UE4, ensure Asset import Data -> Mesh -> Vertex Color Import Option is set to 'replace', and if you want to see it in the mesh editor window, you have the giant 'Vert Colors' button pressed in the main toolbar. Thanks Tristan for the tip!
In Niagara, start with a default emitter, remove most of the modules to keep this simple. Retain emitter properties and emitter life cycle from the brown section, set variables in the green section, and niagara sprite render properties in the red section, delete the rest.
In emitter update, create a spawning -> spawn burst instantaneous, set it to 1000 particles.
In particle spawn, create a static mesh location, it will prompt you to also create a sample static mesh. Set the default mesh to your mesh, you should get particles on it.
In particle spawn, create a color module. By default this is a constant, but we'll link it to the mesh colour. Click the little inverted triangle, link inputs -> Particle Inputs -> Particles.SampleStaticMesh.MeshColor. You should now see the mesh vertex colours linked to the particles.
Sample Texture Color
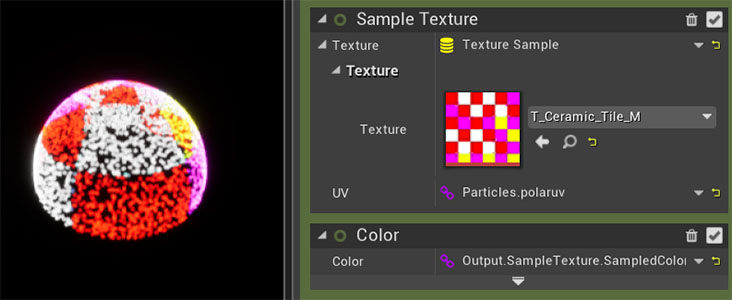
GPU only as of 4.21 preview 4.
Create a Sample Texture module. Use the dropdown next to the uv parameter to select the uv attribute (in my case Particles.polaruv), and select a texture.
Append a Color module, use the dropdown to Link Inputs -> Other -> Output.SampleTexture.SampledColor.
Turn off the background
It's under the window menu, 'preview scene settings'. For some reason my eyes couldn't see it in the menu, its indented with a little QI logo.

Then turn off 'show environment' in the tab that appears on the right:

Turn off blueprint icons and the like
Normally you'd press 'g' to go into game mode, but that doesn't work in the niagara editor. The lovely Mai from Sidefx gave a tip here, press backtick to bring up the console and type
ShowFlag.BillboardSprites 0
Niagara Crowd
A bash at recreating the example in the content gallery of skeletal meshes instanced onto particles with random timing offsets.
Youtube overview of the basics: https://www.youtube.com/watch?v=Ew_jrumAXZE
Short version:
- create new niagara emitter, niagara system, emit particles from grid
- create new blueprint class, 'mySkeletalMesh' that inherits from skeletalMesh
- add float variable for AnimationPlayRate, define function to set it
- on the system add a render component, point it to mySkeletalMesh
- define a rand float attr per particle for animplayrate
- bind it into the anim play rate of your mySkeletalMesh
- link it to your mesh and anim