Appearance
Nomad
Introduction
Ever looked at high poly sculpting work and thought 'I wanna try that?'
But then you looked at Zbrush and were put off by its pricetag/crazy UI/maxon buyout?
Looked at mudbox and realised its abandonware?
Looked at blender and thought 'nah'?
Get Nomad for your mobile device. It's a steal at $15, works pretty well on phones, works incredibly well on an ipad with a stylus, it should be a mandatory purchase for anyone even vaguely interested in 3d.
There's even a web demo, try it right now, will even work with a pencil, in safari, on ipads with iOS 15 and webgl 2 enabled (should be all ipads now) : https://nomadsculpt.com/demo/
Here's a timelapse I recorded, the fluid feel of this even at speed is pretty much how it feels to use the app. Incredible:
Tips
Always curious trying to convey tips in a non-procedural system, as I can't just share an annotated hip. Anyway, here's some stuff that I find handy, you might find the same.
General notes
- Almost all the tools are too extreme at full strength. Turn the intensity slider down until the tool feels controllable. Often thats at 50% or less.
- Some tools like SelMask stop the drag-in-empty-space-to-rotate-the-camera mode. To avoid having to leave the tool, touch with 2 fingers which starts a pan camera mode, then lift a finger, and you'll be in rotate mode. The other option is to drag on the view cube in the corner.
- 3 finger drag horizontally will rotate lights/matcap, handy if you want to check for lumps and bumps
- 2 finger tap will undo
Main tools
- I use 4 tools for 99% of my sculpting: move, clay, crease, smooth
- Move brush for big gestural change of shapes. Almost always go a bigger brush than you think you need, like twice as large, but bring the strength slider down to about half. Much easier to control.
- Clay brush for building up and scraping away of form. Again, use a bigger brush than you think, at a much lower intensity than you think, build up strokes gradually. Click the 'Sub' button on the left toolbar to scrape away material. Eg if sculping a head, use clay in regular mode to build up the brow and cheekbones, go into sub mode, scrape out the eye sockets.
- Crease brush to sketch lines on a surface when starting out for planning, and later for, well, creases. it's sub mode makes a raised crease. I use this a lot for mouths; regular crease mode to define the line between the lips, then sub mode to define the upper lip outy ridge, and lower lip round shape.
- Smooth brush to, well, smooth.
Secondary tools
- Flatten to quickly hammer a shape down. Also good if a shape is going mushy, and you need to refine it, make some choices. Stop being so wishy washy and soft with your sculpt, define some planes! Again, lower intensity until it feels controllable.
- Inflate brush to puff things up. Handy for lips, big jowels. As always, lower that intensity until its controllable.
Mask
- Mask to protect things, handy for if you're posing limbs close to the body, and don't want the body to move, or to create fake cloth layers; mask in a shape, then move tool or inflate tool on the edge to separate it from its surrounds.
- Mask has handy shortcuts by default; single tap in empty space to invert the mask, tap on the masked area to blur, tap on the unmasked area to sharpen.
- SelMask lets you use shapes to create masks. Select the tool, then select the mode on the left.
- Lasso is a quick freehand selection, handy for most quick cases. Can use this as a shortcut to clear the mask by quickly scribbling a lasso in empty space.
- Polygon expects you to tap 3 points to define a triangle, then you can clikc-drag on the triangle sides to add more points. Tap on a point to swap from smooth to sharp. Drag a point into another to 'fuse' them. Click the big green button to apply the mask.
- Mask also lets you copy the masked region into a new shape, eg for making a wig. Mask the region you want, go to the menu, click 'Extract'. Switch to the gizmo, pull it up and away, there's your new extracted piece.
Materials
- Subsurface material is the best. Takes off the harshness from face sculpts, and has a very effective backscatter for ears.
- Most materials are PBRish, controlled from the brush menu. You can control colour, roughness, metalness, click on the shaderball to see some nice presets.
- Subsurface has an extra control on the material for reflectance, I tend to boost this to get more of a sheen on things.
Lighting

- Before going too deep with lights, make sure to go into post processing, turn on tone mapping, and set it to ACES mode. It applies a grade curve which looks more pleasing and correct to my eye, but the balance of your key to env lights is quite different to the default viewport.
- I use a tip from Etienne Marc for lighting; start with just your environment light, treat this as your ambient 'bounce' light. Turn it down just so its making shapes readable, this is what you'd see in shadows. Pick an env map and rotate it so that it gives good shape, helps the forms read. Often this puts the brighest parts of the map towards the back of your sculpt, so you get a good soft rimlight effect, volumes have nice shading.
- Next add a regular light, angled 3/4 top. Boost its intensity above 1 if you need to, helps with that sunlight look through the aces tonemapper.
- Extra love comes from other settings in the post process menu...
Post Process
- Reflection looks great, use it.
- Global Illumination looks great, use it. It's screen space based, so ensure anything you want to bounce light has its front faces visible to camera. It's noisy by default, but thats fine, enable max samples and turn it up to say 50, that looks pretty good in most cases, and only takes a few seconds for a final frame.
- Ambient occlusion can help restore detail to crevices. Play with strength and size so that creases look as they should, just don't go too high with strengtht that it starts to make your render look dirty.
- depth of field, its calculated based on the selected object this assumes you've made up a scene of several objects. Single tap to set the active object to sculpt on, it'll flash purple, its now also the object in focus.
- Bloom, use a little bit to help soften a render
- Curvature, very handy to pull out extra detail. Bump is super intense in its default settings, I drag it right down to .1 or less; just enough to give a satin feel or rounded corners feel, but not so much as to be visually distracting
- Cavity I leave turned up all the way normally; its very similar to AO, but tighter, almost like a toon outline.
- Chromatic Aberration is very flavour of the month, but I love it in small amounts, like 0.25
- Sharpness, yes, small amount
Export image
It's under the main file menu, at the bottom. It'll do the multisample render if you've asked for it, then bring up the image ready to save to your photos, or airdrop to someone.
Export to houdini via GLTF
Nomad stores the point colour/roughness/metalness in gltf in a packed format that other apps understand, but the houdini gltf importer doesn't. Benjamin Lemoine and Jsmack shared a method on the sidefx forums to translate these into Houdini friendly values. The original post is here: https://www.sidefx.com/forum/topic/75110/
To save opening up the hip, here's the steps:
- Ensure @Cd and @COLOR_1 are at the point level (the gltf importer sometimes defaults to putting it on verts)
- Put down an attribute swap, move 'Cd' to 'data'. This is required as Cd is imported as 3 ints, while houdini expects colour to be a 3 float.
- This wrangle to do the bitshifting to extract colour, and bring it down to a 0 to 1 value, and do a similar trick to @COLOR_1 to extract roughness, metalness, mask:
vex
int packed=int(v@data[0]);
int red = packed & 255;
int green = shrz(packed & 65280, 8);
int blue = shrz(packed & 16711680,16);

v@Cd = set(red,green,blue)/255.0;

packed=int(p@COLOR_1[0]);
red = packed & 255;
green = shrz(packed & 65280, 8);
blue = shrz(packed & 16711680,16);

f@rough=red/255.0;
f@metallic=green/255.0;
f@mask=blue/255.0;
int packed=int(v@data[0]);
int red = packed & 255;
int green = shrz(packed & 65280, 8);
int blue = shrz(packed & 16711680,16);
v@Cd = set(red,green,blue)/255.0;
packed=int(p@COLOR_1[0]);
red = packed & 255;
green = shrz(packed & 65280, 8);
blue = shrz(packed & 16711680,16);
f@rough=red/255.0;
f@metallic=green/255.0;
f@mask=blue/255.0;Tidy up so that the only attributes left are Cd, metallic, rough, mask, and you're golden.
Export to Procreate and AR
Overall fairly simple, you'd need to do these prep steps no matter what. Steps are
- Tidy and Decimate
- UV and bake textures
- Export
I've also recorded this whole process and uploaded it to youtube: https://youtu.be/ybXCa6NSMwM
Tidy and Decimate
- Save your sculpt with a new name, this process is pretty destructive, you want to have backups!
- Bake and join all your mirroring, instances, delete lights, so you just have a single object
- Topology menu (where you'd choose subdivisions/voxel remesh), go to the decimation tab
- Set the amount to 50%, turn on wireframe, click decimate. Repeat until you're down to under 20k at least. Wireframe should look game-engine friendly, but model should look relatively smooth when you turn off wireframe.
Uv and bake textures
- Generate uv's with the 'unwrap atlas' button
- Click the 'Bake Vertex Painting' button
- Check the bake by turning off 'uv' on the bottom toolbar, and on the lighting menu turn off 'show painting', to prove that the textures are ok.
- Save at this step if you want
Export
- File menu, scroll down to export
- Select 'OBJ'
- 'export vertex colours' off
- 'export pbr paint' on
- 'export normals' on
- 'export textures' on
- Click 'export obj'
- Choose 'save to files', save it somewhere, i usually put it 'on my ipad', in a new folder nomad/export
- It will save a subfolder named after your project, with an obj, mtl, and a subfolder with textures
Import to Procreate
Ultimately its 'drag a folder into procreate', but that needs some typical ipadOS fiddling.
- Open procreate
- Split your screen to have the files app side by side.
- Find the exports folder in files so you can see the folder nomad created named after your project
- Long press on the folder, drag it over to the procreate gallery
- You're done with the files app, you can make procreate fullscreen again.
- Tap the newly created canvas
- You should now see your model with colour/roughness/metal maps pre-assigned
To verify, open the layers, click the cube icon on the base layer, it will expand to show the colour/roughness/metal maps
If you don't see this, or the viewport is acting strangely, force quit procreate, it should be correct on the second go.
Update maps in Procreate from files
If you need to update the maps again:
- splitscreen procreate and files
- expand out the layers to see the maps in procreate
- select the map you want to update, roughness for example, so its highlighted in blue
- in files, browse to the exported maps folder
- long press on the roughness map in files
- drag it over the highlighted roughness map layer slot in procreate
AR export from procreate and reality composer
Procreate has native AR support, in the gear menu you can choose 'preview in AR', or you can export a USDZ.
The scale is often too big, this can be quickly fixed in reality composer from apple. Download it, do the following:
- In settings, find reality composer, enable 'export USDZ'
- Open reality composer, click the plus to create a new project
- Click the plus, choose 'imported model', find the usdz from procreate
- Select it to add it to the project
- Select, in its properties set its scale to 1%, and its Y transform to 0
- Reframe the view, drag to pop the model onto the ground
- Export a USDZ
- Send to your friends
- Be popular
3d printing
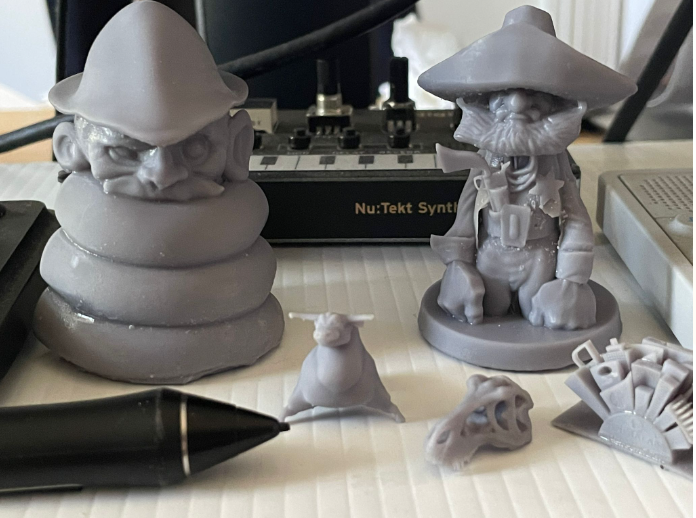 My prints so far, wacom pen in foreground for scale.
I went and got an Elegoo Mars 3 Pro, after a rocky start I think I've got the hang of it, great fun to take my Nomad sculpts and bring them to the real world.
There's a ton of advice to be found on youtube, in discord, on forums, I thought it might be useful to others to do a little summary of my findings.
First, why resin? Printing little figures the size of a walking teapot was always my goal, I don't want to print huge pieces. All the standard extruder printers have that ugly stepping, don't do small stuff well, so resin seemed the better choice.
Dumb tech theory overview
The tech is both very clever and very simple at the same time. The resin used in these printers cures when hit by uv light. Take a tub that has a clear flat bottom, put it on top of a high res projector that shines uv light, fill the tub with resin. If you shine a pattern from the projector, the resin will cure at the base of the tub.
To build that up into a 3d shape, a metal plate on a motor is lowered into the tub. It gets right close to the bottom of the tub, the pattern is projected, the resin cures and sticks to the plate. The plate is lifted a little bit, the next slice of your model is projected, that cures and sticks to the first layer. Repeat that enough, you get a 3d model.
'But wait', you say 'how does the resin stick to the metal plate and to itself, but not to the clear bottom of the tub?'. Very perceptive of you. The clear base is made of a plastic that the resin finds hard to stick to, and is flexible like the skin of a drum. When the metal plate is lifted, the plastic flexes enough to allow the resin to release.
From theory to reality
So what does that mean for you and your 3d printer? You have quite a few variables to play with:
Exposure time, how long the pattern is shone into the resin. Too short and it won't cure. Too long and you're wasting time, or worse, you overcure and start to have bits of the resin near the edge of the pattern also get cured (light gets diffused, the plastic is blurry, the resin also diffuses the uv light etc),
Lift rate/distance, is how fast the metal plate lifts up in between slices to peel the cured resin off the plastic bottom of the tub, and how far it lifts up, and how quickly it lowers to the next correct position. I was told this can be much faster than the default printer settings, which speeds up the whole process.
Initial cure time is how long the first few layers get exposed. It's obviously very important to have a strong bond with the metal plate, otherwise your print will just fall into the resin goop and make a big mess.
Resin properties affect exposure time; some are clear, others aren't, some are flexible, others are rigid, the websites of the manufacturers will tell you suggested exposure times.
All of these setting are handled from the slicing software.
Chitubox, the slicing software
There's a few slicing apps around, Elegoo give you access to Chitubox by default. There's a free and a paid version, I'm using the free one. Chitubox does a few important things:
- Allows you to alter the basic speed/lift/time settings explained above
- Loads a stl/obj file, and lets you do simple scale/rotate/translate manipulations
- Adds support scaffolding if your 3d model can't be printed free-standing
- Can hollow out the model if needed, saving on the amount of resin used
- Add holes, which can be used to drain resin that would otherwise be trapped in the print
- Makes a .ctb file that the printer loads, it contains the slices of your 3d model, and printer settings
The software itself is a little janky, but having used it a few times is starting to make sense. Easiest to explain what happens as workflow steps.
Export a stl from nomad
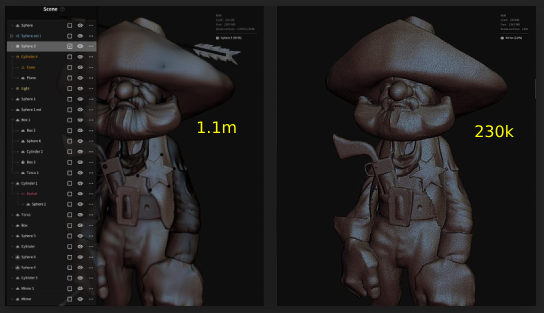
Similar to prepping a model for AR and USDZ, I join all the shapes, remove bits I think might cause issues (like the arrow through the hat), voxel merge as dense as I can to capture all the detail, then decimate as low as I dare to make the final triangle count as low as I can get away with. Go to File -> Export, find the STL section, turn off vertex colours, save.
To get the file to my windows box, I use the dialog that comes up after export to send it to myself via Whatsapp, load the Whatsapp web client on my windows machine, and download. Seems silly, but its the fastest way until we get airdrop on windows. 😃
Load and scale the stl in Chitubox
Start chitubox, use the first icon in the toolbar to import a model, find your stl. By default it'll be tiny; chitubox's default unit is 1mm, nomad will usually treat a model as a unit of 1, therefore your sculpt will be in a rough 1mm bounding box. Chitubox will notice this, and give you a warning at the bottom of the screen saying 'this model is crazy small, do you want to scale it to the build plate?', hit yes, the model is now scaled as big as will fit.
This is where I have a ruler nearby, I work out how tall I want the sculpt to be, and use the scaling tool to reduce it down. So far I've gone for about 6cm high (60mm), as I get more confident I'll go bigger pieces! For reference, a 20mm high model will take about 45 mins to print, a 60mm high model will take about 3 hours.
Hollow and add holes
The buttons across the top control various features, hollowing is the 3rd from the right. As well as setting the wall thickness, it will also put cool strut shapes inside the model for strength. I've just left these settings at the defaults.
Now that you have a hollow core, you need to think about what'll happen when its printed. Because the model will be immersed in a resin bath most of the time, its very likely that when the final slice is exposed and the inside cavity is sealed, you'll have a lot of resin sloshing around inside.
The hole tool lets you define a radius and depth, you click on the model, and a hole is punched in that location. Because the model will be printed upside down, it would make sense to put the drainage hole at the top, so it drains while it prints, but of course thats not always possible. A drainage hole at the bottom is more discreet, just be ready for resin to ooze everywhere when you turn the model the right way up when you first remove it from the printer.
Of course you don't need a hole. I just hacked a hole in the bottom of one of my prints with a sharp tool, but again, this can get messy, and tool a while to work through.
Supports
The thing I had the most trouble with. Imagine you're printing a letter S that is meant to sit upright, not on its back. If you print it just straight up, the base will be fine, the center will be fine, but what happens when it gets to the end of the curve in the top right? When the model is sliced, that tip of the S will print by itself, with no prior slice to bond to. As such it'll be printed, then just stick to the plastic bottom, or to the metal plate, or just float away in the tank.
Chitubox calls these islands (because when you view the individual slices thats what it looks like, an island that isn't connected to anything).
A way to fix this is to make thin supports that go from the build plate to that island, holding it in place until it can connect with the rest of the shape.
There's lots of debate online about how to handle these scaffolds. Do you go lots of small support shapes, or a few big ones? Could you rotate your 3d model so that you get less islands (eg printing the S on its back)? Could you go back to Nomad and tweak the model itself to minimise island and disconnected pieces?
All those options are possible, but for now I just got lots of small supports. Chitubox does a simple visualisation where it looks at the normals of your model, and tints the surface red where things point straight down. The auto-support feature will find those surfaces, and put lots of supports there. You can add supports manually by just clicking on the model, and move supports around if you want.
Slicing
As it sounds, it takes your model and the supports, and generates image slices for the printer to project. When its done you can preview the slices through a slider, and click a little button with an eye on it to have it detect islands, and overlay where there might be issues on the slider bar in red. You click the little arrow heads on the eye icon to jump to the next possible issue.
Usually I'll do a quick skim through the potential islands, looking for largish blobs. It will often mis-identify the struts from the hollowing operation as issues, I ignore those. If there's a genuine issue, I'll go back to the support section, add a few more supports manually, slice, detect islands. Repeat that enough until Chitubox stops complaining, or you run out of patience.
The slicing page will also tell you how long the print will take, and give an estimate of how much the resin will cost, handy.
Export ctb and print
If everything looks cool, export a ctb, put it on a usb drive.
Go over to your 3d printer, calibrate it if needed, full the vat with resin. Turn it on, plug in the usb drive, choose print, find the model, walk away.
Calibration on this device is pretty simple; remove the vat, put a piece of paper over the projector screen, loosen the screws on the metal plate a little. Lower it until it's gripping the paper, tighten the screws, set that as your zero height, done.
After the print is done
3 hours or so later, the print will be suspended from the build plate, covered in supports. You remove the build plate, give it a quick wash, scrape it off the build plate with a metal spatula, blast it with uv light to cure it a little more (for me I just leave it in sunlight for a few minutes). You can then peel the supports off, they tend to bend and break away very easily, snip away any stragglers, more cleaning, then leave it to dry and cure some more. The resin smell is pretty strong, so I tend to leave them in a shady spot outside while it cures.
Meanwhile the metal plate needs to be cleaned up, so likely a mix of water/isopropyl alcohol, maybe methylated spirits, clean and leave it to dry. The resin can be left in the tub if you plan to do another print soon, just give it a stir, otherwise pour it back into the resin bottle through a sieve, scrape out any remaining resin, give it a nice clean, dry it, so its all ready for the next print.
Issues
The above is the ideal workflow. Here's all the stuff that I hit.
The right tools makes it all easier
Elegoo are good about providing the basics, but they're obviously doing it as cheap as they can. They pack a few latex gloves, paper filters, tools etc, but the following have all made printing and cleanup easier:
- Nitrile gloves are a less likely to break than the cheap latex gloves provided.
- Metal or silicon filters are easier to use and less messy than the provided paper filters to pour unused resin back into the resin bottle.
- isopropyl/rubbing alcohol or IPA - I thought this was a mysterious hard to source thing, in Australia I realised it's just Isocol, something most folk would have in their bathrooms. I've also heard people use methylated spirits, but isocol has the advantage of a easily used bottle, and smells nice. 😃
- Paper towels for general cleanup
- A car cleaning chamois is also good for cleaning the metal plate and the bottom of the tank without leaving streaks or lint.
- A coverable bucket of water for general rinsing, should be at least as big as the biggest thing you want to print to dunk stuff in. It'll eventually become a gross mix of resin, water, IPA, you want to cover it to contain the smell, keep it away from kids and animals.
- a better scraping tool than the provided one (which I lost), getting the finished print off the metal plate is like removing residue from a baking tray.
- silicon spatula for helping remove the last remnants from the bottom of the resin tub
- a big tray or silicon mat with a lip on it as a workspace; its likely you'll get a resin disaster at some point, you want to be able to contain it. Youtube suggested this cheap shoe tray from Ikea, it works well.
Water wash resin
I got this thinking it'd be easier to work with, apparently I was wrong. Water just seems to smear it around, it took ages to do cleanup. I tried IPA one day, suddenly cleanup became much easier. I now do a first wash in my bucket which by now is probably 95% water, 2.5% IPA, 2.5% resin sludge. I squirt IPA over the model into the bucket, seems to be ok. Elegoo and others sell dedicated buckets which have a little blender attachment and a timer to swirl the liquid, I'm not at that point yet.
Also I was being super cautious with the cleanup, worried about getting resin sploshed around. It's nasty stuff, don't get me wrong, but now I'm more confident with it, the process goes much faster. It's more like working with house paint now; I'm not terrified if it gets on me, I can wash it off pretty quickly, and I can move faster.
Someone mentioned that the water resins smell a lot worse than the regular ones, I'll try that one day.
Bad prints too far apart in time
Couldn't be helped, I could only play with the printer on weekends, meaning it'd be 7 days between prints. The first test print with a model that ships with the printer worked great, then I had 5 weeks where every print failed, a little demoralising. In hindsight I should've been doing smaller prints more frequently; make more mistakes faster, get used to the process. Download one of the calibration test prints that are floating around, or one of the top prints from places like thingiverse, or the figurines that most people seem to get into 3d printing for to paint. But like learning anything really, shorter, more frequent practice is better than long sessions further apart.
Uv curing
Elegoo and others also sell fancy uv curing stations, another little box with a turntable and a bank of uv lights. One thing we're not short of in australia is uv light, just putting the prints out in the sun for a couple of minutes seems to cure them fine.
Support issues
I read too much stuff talking about printing everything at 45 degrees to minimise overhangs and islands, careful manual management of supports, that other slicing software did better supports, that Houdini could do it etc etc... in the end someone just said 'do the small supports on the auto setting, and lots of them', and so far that's worked. Yes you leave behind little pimples where the supports touch your model, but if you leave them all on the downward facing surfaces, no-one will see them anyway.
Don't let things get too thin
This is obvious, but it caught me out. The cowboy I printed is wearing a vest, at the scale he's printed that's like 0.1mm thick, so parts of it didn't print. Next time I'll know to sculpt it a little thicker.
Handy links
- The Painters Guild has a discord, one channel within it is dedicated to 3d printing. The folk in there were incredibly helpful and friendly.
- Good overview of the basics of resin printing and supports, and where I got the 'just do lots of small supports' tip from.
- Good general tips, including the tip about the ikea shoe shelf.
- This guy has a good attitude of 'be less careful, just move faster, make more mistakes' which helped me be less careful. 😃
- General tips from an Australian point of view, including the tips on using sunlight to cure, and methylated spirits if you can't find IPA.
Summary
Overall I really like the experience, its pretty magical to go from something on your screen to something in your hands. It's definitely not like buying a regular inkjet printer, maybe it'll never be that, but so far, its great fun.