Appearance
Curve Unroll
Intro
Download file: unroll_quaternion_wiki.hip
Update July 2021: Note that 99% of this tutorial is now invalidated with the introduction of kinefx, as it deals with all the tricky stuff of chains of matricies, transforming children relative to parents etc. Still, it's interesting to get a sense of how to do all this manually. If you're in a hurry though, just take your curve, rig doctor, rig wrangle, dance. Example here: HoudiniKinefx#Unroll_curves_with_kinefx
Very early in my career I had to animate a red carpet being unrolled. I used a Maya bend deformer to do this, and if you looked closely you could see it wasn't quite doing the right thing. It always stuck in the back of my mind as something to tackle properly, and now, nearly 16 years later, I think I've cracked it. Part of it was understanding the problem properly, part of it was expressing it cleanly in code.
WARNING
This follows the format of most of my long form tutorials, in that this is definitely NOT a textbook 'how to do an effect' piece. Think of it more as a journey, a narrative of how my mind works when approaching a problem. This means lots of mistakes on the way, rethinking approaches, eliminating the 200 wrong ways to find one possible solution.
If you just want the answer then download the file, skip to the putting it all together section. 😃
Assumed knowledge here is a mild amount of vex, and applying rotations with matricies and quaternions (covered in the later chapters of JoyOfVex). Right? Here we go...
Unrolling manually

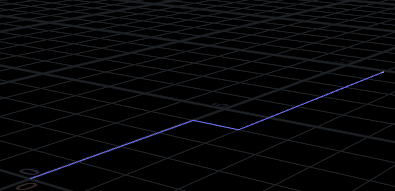
So say you had a windy spiral curve, and you're tasked with making it straight manually. A way to do this is to select all the points, move the pivot to the second point, rotate that section flat. Move the pivot to the next point, flatten that bit, then the next, then the next... Eventually you'd have the entire curve flattened, and will have lost some brain cells in the process.
Expressing that unroll process procedurally
So breaking that down a bit further into pseudocode:
for each segment: select from this segment to the end move the pivot to the start of the segment rotate until it lies flat
Selecting stuff though, that's a very manual user thing. A painful way for a user, but easy for a computer, would be to first set the pivot, work out the rotation required for that segment, then march through each point from that segment until the end of the curve, applying the same rotation to each. Then do the next segment, do the same, and so on until the end of the curve.
for each segment: move the pivot to the start of the segment calculate the rotation to lie that segment flat for each point from this segment to the end of the curve rotate that point
This means the rotation for point 2 gets applied to points 2, 3, 4, 5... until the end, the rotation for point 5 is applied to points 5, 6, 7.. until the end of the curve, as we want.
Finding the rotation fix per segment
To get the rotation for a segment to align it with the previous segment, you treat the current segment as a vector, and the previous segment as a vector. The vex dihedral function will return a quaternion that that will rotate one vector to line up with another.
To calculate those segment vectors we need the current and previous points for the current segment vector, and the previous point and the one before that to get the previous segment vector. With those two you can run the dihedral, and store it as an orient.
vex
vector a, b, prevp, prevpp;

prevp = point(0,'P',@ptnum-1);
prevpp = point(0,'P',@ptnum-2);
a = normalize(@P-prevp);
b = normalize(prevp-prevpp);

@orient =  dihedral(a,b);
vector a, b, prevp, prevpp;
prevp = point(0,'P',@ptnum-1);
prevpp = point(0,'P',@ptnum-2);
a = normalize(@P-prevp);
b = normalize(prevp-prevpp);
@orient = dihedral(a,b);In earlier versions of this setup I've calculated the rotation amounts about a fixed axis, which is ok as long as you only have a 2d curve. This method will work for a curve that twists and turns in any direction.
Apply rotation
My intuition here (after reading through a few odforce posts) was to say 'for each point, get all the orients of all the previous points, and apply them'. This seems simple enough to do with a for loop:
vex
vector4 q;
for (int i = 0; i <= @ptnum; i++) {
    q = point(0,'orient',i);
    matrix3 m = qconvert(q);
    @P *= m;
}
vector4 q;
for (int i = 0; i <= @ptnum; i++) {
q = point(0,'orient',i);
matrix3 m = qconvert(q);
@P *= m;
}That bit of code creates a for loop to run over all the points up to and including the current point. On each loop it read @orient from that point, and applies it to the current point position. It does that by converting the orient quaternion to a matrix, and multiplying the current point position against that matrix.
A neater way would be to avoid the matrix conversion, and directly rotate @P with a quaternion, using the qrotate function:
vex
vector4 q;
for (int i = 0; i <= @ptnum; i++) {
    q = point(0,'orient',i);
    @P = qrotate(q, @P);
}
vector4 q;
for (int i = 0; i <= @ptnum; i++) {
q = point(0,'orient',i);
@P = qrotate(q, @P);
}That should accumulate all the rotations right?
Hmm, not quite. Oh hang on, we're not doing anything about the pivot location! Remember, with the manual rotation process, we set the pivot to be on the previous point.
To do that in vex, you can subtract the pivot from the current position, rotate, then add the pivot back. Lets do that and tidy up the code a bit:
vex
vector4 q;
vector pivot;

for (int i = 1; i <= @ptnum; i++) {
    pivot = point(0,'P',i-1);
    q = point(0,'orient',i);

    @P -= pivot;
    @P = qrotate(q, @P);
    @P += pivot;
}
vector4 q;
vector pivot;
for (int i = 1; i <= @ptnum; i++) {
pivot = point(0,'P',i-1);
q = point(0,'orient',i);
@P -= pivot;
@P = qrotate(q, @P);
@P += pivot;
}
Ugh. First few points work well, then it all goes wrong again. Whyyyyyy?
Because in the manual process each time you do a rotation, you set the pivot from a modified position, not the original position:
Back to pseudocode and gifs...
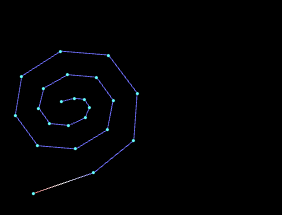
Unroll process visualised
In the manual process we're actually doing several things at once; rotating with a pivot, maintaining offsets, accumulating results.
If we're going to break this apart into steps, we need to be clear about what we're trying to do.
'Rotating with a pivot and maintaining offsets' can be simplified. Qrotate is rotating around the origin, that's why we're moving the point back to the origin first (setting the radius of the rotation), do the rotation, and move back. But really, we don't want to put it back to the original position. We want to put it on the end of the segments that have been unrolled. This gif explains, showing what we want to do if we're rotating the 4th point:
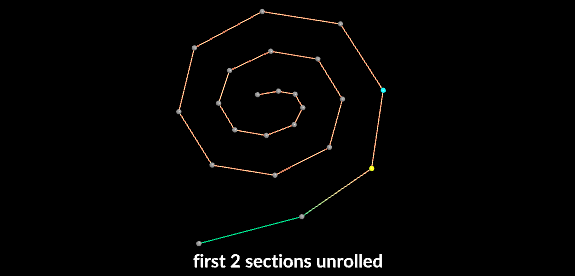
- Get the location of the undeformed 3rd point, this is the pivot.
- Subtract the pivot from the 4th point, this sets the radius for the rotation
- Rotate the segment
- Add the final location of the 3rd point to the 4th point, this sticks the 4th point on the end of our unrolled curve so far
- Store the final location of the 4th point so we can use it on the next loop.
Unroll with correct pivots
Here's some updated code, using pos within the loop, adding prev_pos at the end:
vex
vector4 q;
vector pivot, prev_pos, pos;
prev_pos = {0,0,0};
q = {0,0,0,1};

for (int i = 0; i <= @ptnum; i++) {
    pos   = point(0,'P',i);
    pivot = point(0,'P',i-1);
    q = point(0,'orient',i);

    pos -= pivot;
    pos = qrotate(q, pos);
    pos += prev_pos;

    prev_pos = pos;
}

@P = pos;
vector4 q;
vector pivot, prev_pos, pos;
prev_pos = {0,0,0};
q = {0,0,0,1};
for (int i = 0; i <= @ptnum; i++) {
pos = point(0,'P',i);
pivot = point(0,'P',i-1);
q = point(0,'orient',i);
pos -= pivot;
pos = qrotate(q, pos);
pos += prev_pos;
prev_pos = pos;
}
@P = pos;Another mistake in the previous attempt is using @P inside the loop. What we want is the original position of each point within the loop, rotate that, add those rotated positions as we go, and when the loop is finished set that to @P. To make it clearer I've introduced a new variable, pos.
So, here's what's going on in that code:
- get pos (@P from the current point in the loop)
- get the pivot (@P from the previous point in the loop)
- get the rotation
- move pos back by the pivot, setting the radius of the rotation
- apply the rotation
- add prev_pos to pos, which is the accumulated position. Where did prev_pos come from?
- It's on the next line! Setting as the last thing in the loop, means it will be ready for the next loop iteration.
Have we fixed it?
Not quite. Now we can see that we're definitely accumulating the right translations, as the entire curve gets translated as the each segment moves, but the rotations aren't right. Ahh, do we have to accumulate the rotations too?
Unroll with correct pivots and rotations
Yes, we have to accumulate the rotations. To do this we'll add the orient q to itself each time the loop runs. To do this with pure rotation angles you'd add them, with matricies you multiply them, and with quaternions you also multiply them, but using the qmultiply function. Here we go (also make sure we initialise q to no rotation, ie {0,0,01} before we start) :
vex
vector4 q;
vector pivot, prev_pos, pos;
prev_pos = {0,0,0};
q = {0,0,0,1};

for (int i = 0; i <= @ptnum; i++) {
    pos   = point(0,'P',i);
    pivot = point(0,'P',i-1);
    q = qmultiply(q,point(0,'orient',i));

    pos -= pivot;
    pos = qrotate(q,pos);
    pos += prev_pos;

    prev_pos = pos;
}

@P = pos;
vector4 q;
vector pivot, prev_pos, pos;
prev_pos = {0,0,0};
q = {0,0,0,1};
for (int i = 0; i <= @ptnum; i++) {
pos = point(0,'P',i);
pivot = point(0,'P',i-1);
q = qmultiply(q,point(0,'orient',i));
pos -= pivot;
pos = qrotate(q,pos);
pos += prev_pos;
prev_pos = pos;
}
@P = pos;
Hooray!
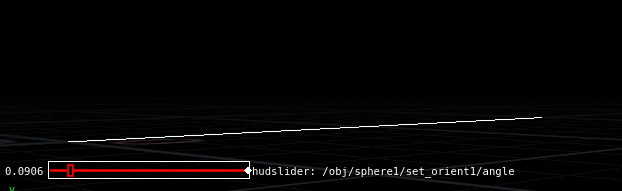
Stagger timing
If this was just run as-is, the entire line would unfurl instantly, pretty boring. Now that we have the tricky stuff done, we can just play around with the orient values, and set them to blend from no rotation to their required rotation, staggered from each other in time. Could use ramps and curve uv's and stuff, here I just use @ptnum, add time to it, and clamp it to adjust the stagger timing.
vex
float i, t;
t = @Time*ch('speed');
t += ch('start');
i = clamp(t-@ptnum*ch('offset'),0,1);

vector dir = point(0, "P", 0) - point(0, "P", 1);
dir = normalize(dir);
vector4 start_quat = quaternion(dir);
@orient = slerp( {0,0,0,1}, @orient, i);
float i, t;
t = @Time*ch('speed');
t += ch('start');
i = clamp(t-@ptnum*ch('offset'),0,1);
vector dir = point(0, "P", 0) - point(0, "P", 1);
dir = normalize(dir);
vector4 start_quat = quaternion(dir);
@orient = slerp( {0,0,0,1}, @orient, i);A slerp is a lerp for orients, (and lerp is short for 'interpolate', ie a blend), so I blend from {0,0,0,1} (no rotation), to the target rotation, based on the value of i.
Putting it all together
While I could put it all together in a single wrangle, I've broken this out into separate wrangles for each major operation.
First, it moves the curve so that the first point sits on the origin, and stores that offset so we can restore it later.
vex
v@originoffset = point(0,'P',0);
@P -= @originoffset;
v@originoffset = point(0,'P',0);
@P -= @originoffset;The orient calculation is done next. The code at the top of this page works fine and unrolls the curve, but it annoyed me that it unrolled in some random direction. Sexyman Jake Rice pointed out what I was doing wrong; I was calculating the angles by comparing the current point and the previous, and the one before that. But the first 2 points of course don't have a previous point or the one before that, so this breaks down. Instead, I do a special case for the first point which will use the current point and the next point, flips it, and tries to lie that vector onto the x-axis.
vex
vector prevp, prevpp, a, b;

if(@ptnum >= 1){
    prevp = point(0,'P',@ptnum-1);
    prevpp = point(0,'P',@ptnum-2);

    a = normalize(@P-prevp);
    b = normalize(prevp-prevpp);

} else {
    prevp = point(0,'P',@ptnum+1);

    a = -normalize(@P-prevp);
    b = normalize({1,0,0});
}

@orient =  dihedral(a,b);
vector prevp, prevpp, a, b;
if(@ptnum >= 1){
prevp = point(0,'P',@ptnum-1);
prevpp = point(0,'P',@ptnum-2);
a = normalize(@P-prevp);
b = normalize(prevp-prevpp);
} else {
prevp = point(0,'P',@ptnum+1);
a = -normalize(@P-prevp);
b = normalize({1,0,0});
}
@orient = dihedral(a,b);The staggering of the timing has an addition of a channel ramp, allowing for an ease-in and ease-out to the timing. I don't need to store the 'i' variable here as @i, but its handy to see values in the geo spreadsheet, and more handily, if you bring up the mmb info window and click the 'i' attribute in there, you get a nice colour coded visualiser, which is how I capture the red-white-blue in the gifs above.
vex
float i, t;
t = @Time*ch('speed');
t += ch('start');
i = clamp(t-@ptnum*ch('offset'),0,1);
i = chramp('ease',i);
vector dir = point(0, "P", 0) - point(0, "P", 1);
dir = normalize(dir);
@i = i;
vector4 start_quat = quaternion(dir);
@orient = slerp( {0,0,0,1}, @orient, i);
float i, t;
t = @Time*ch('speed');
t += ch('start');
i = clamp(t-@ptnum*ch('offset'),0,1);
i = chramp('ease',i);
vector dir = point(0, "P", 0) - point(0, "P", 1);
dir = normalize(dir);
@i = i;
vector4 start_quat = quaternion(dir);
@orient = slerp( {0,0,0,1}, @orient, i);Then the unroll process:
vex
vector4 q;
vector pivot, prev_pos, pos;
prev_pos = {0,0,0};
q = {0,0,0,1};

for (int i = 0; i < @ptnum; i++) {
    pos   = point(0,'P',i);
    pivot = point(0,'P',i-1);
    q = qmultiply(q,point(0,'orient',i));

    pos -= pivot;
    pos = qrotate(q, pos);
    pos += prev_pos;
    prev_pos = pos;
}

@P = pos;
vector4 q;
vector pivot, prev_pos, pos;
prev_pos = {0,0,0};
q = {0,0,0,1};
for (int i = 0; i < @ptnum; i++) {
pos = point(0,'P',i);
pivot = point(0,'P',i-1);
q = qmultiply(q,point(0,'orient',i));
pos -= pivot;
pos = qrotate(q, pos);
pos += prev_pos;
prev_pos = pos;
}
@P = pos;And finally restore the position:
vex
@P += v@originoffset;@P += v@originoffset;Here's the scene again if you can't be bothered to scroll to the top. 😃
Download file: unroll_quaternion_wiki.hip
Roll Into Spirals
Download scene: Download file: spiral_rollup.hip
The stuff so far has been about taking a messy curve and making it straight. The base algorithm of accumulating translations and rotations should be pretty versatile, so if we come up with a different way to calculate the orient values per point, it should do interesting things.
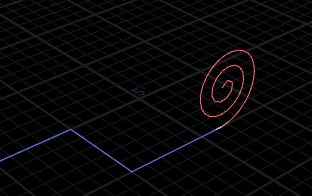
First thing I wanted to do was roll lines up into spirals, approximating the reverse of the original carpet roll-up effect that got me into this problem.
To start with I had a straight line with @curveu pointing down Z, set @N to be along X, and gave all points the same small rotation angle.
vex
vector a;

a = @N * ch('angle');
@orient = quaternion(a);
vector a;
a = @N * ch('angle');
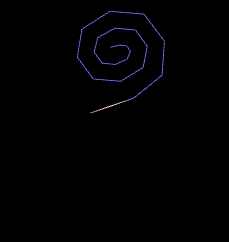
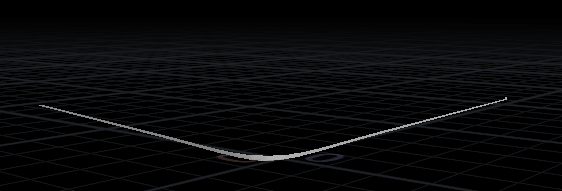
@orient = quaternion(a);This does as I expected, and rolled the curve into a perfect circle, where changing the angle changes the radius:
To go from circles to spirals, the angle has to change over the length of the curve. The spirals near the center of the finished shape will be turning more quickly than those near the outside of the shape. We have @curveu, it's 0 at the start, 1 at the end, so lets multiply the angle with a scaled @curveu, see what we get:
vex
vector a;

a = @N * ch('angle') * ch('spiral') *@curveu;
@orient = quaternion(a);
vector a;
a = @N * ch('angle') * ch('spiral') *@curveu;
@orient = quaternion(a);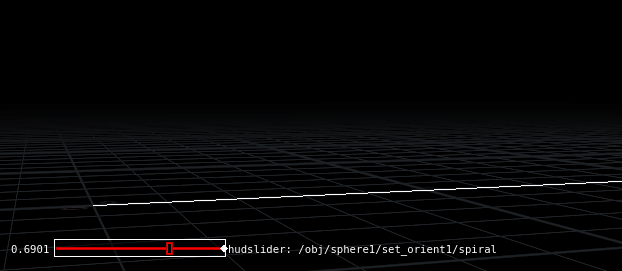
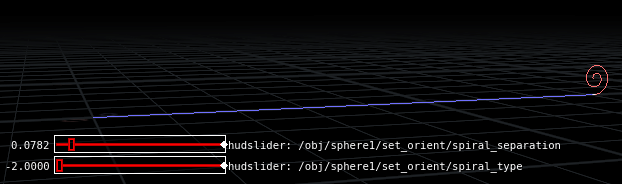
Mmm, spiral. As the multiplication factor increases the spiral changes its tightness, which is good, but its non linear; the outer spirals are loose, the inner ones get very tight. I wanted evenly spaced spirals, so figured rather than just multiplying against a evenly scaled @curveu, I'd need to have it non-linearly scale to counteract the spiral behavior. I tried raising @curveu with a power function, adding offsets, started writing expressions like Russel Crowe in A Beautiful Mind. Some came close, but either the inside or outside of the spiral would compress in a way I didn't like.
I turned to my neighbor Ben Skinner for a chat, he started to have a play too. Simultaneously we twigged to the same idea; a vinyl record has this spiral pattern, surely someone on the internet has written up the maths behind that?
Well yes they did, and yes they had. That spiral is an Archimedean spiral, but most of the internet expressed the equation in terms of polar coordinates, rather than in easy-to-steal javascript or pre-made vex for an idiot like me. Luckily Ben is a whizz with the maths, and worked out how to convert it, and better, found a more general equation that would let you dial in different spiral types:
vex
vector a;

a = @N * (ch('spiral_separation') * pow(1-@curveu, 1.0/ch('spiral_type')));
@orient = quaternion(a);
vector a;
a = @N * (ch('spiral_separation') * pow(1-@curveu, 1.0/ch('spiral_type')));
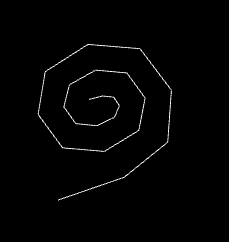
@orient = quaternion(a);Setting spiral_type to -2, hey presto, evenly spaced spirals:
So that worked for straight lines, what about lines with bends in them?
Spiral around bends
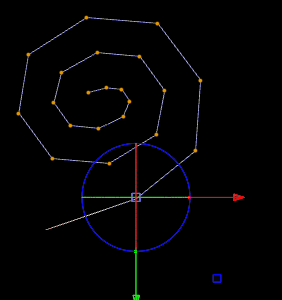
Take the straight line, put a bend in it, use a polyframe sop with bitangent output as @N:
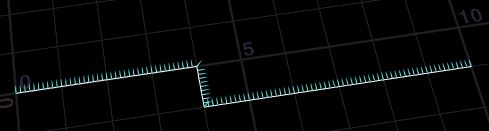
Running it through the above setup kinda does the right thing, but not really:
Each point is doing its correct local rotation, but there's nothing to tell the overall system to align itself along the curve path. How to fix?
I wondered what would happen if I manually twisted the orient value on the corner. To test this I manually selected a corner point after the spiral vex code had run, inserted a transform sop, and rotated it 90 degrees. Even though rotating a single point around itself shouldn't do anything, if you visualise the orients, you can see its being affected:

The result is a little janky, but indicated the idea was working:
How to replicate this effect in code? Remembering the earlier work in untangling, I guessed I could compare each segment to its neighbor and calculate the dihedral. If the two segments are parallel the dihedral won't do anything, but if they're different (like on a corner), it will give you the quaternion to rotate one onto the other.
Then remembering the other trick I got from Raph Gadot about quaternions, I realised I had 2 rotations here; the spiral one, and the course-correction one. To make them both work together, qmultiply them together.
vex
vector a,b, p1, p2, p3;

// spiral
a = @N * (ch('spiral_separation') * pow(1-@curveu, 1.0/ch('spiral_type')));
@orient = quaternion(a);

// course correct
p1 = @P;
p2 = point(0,'P',@ptnum-1);
p3 = point(0,'P',@ptnum-2);

a = normalize(p1-p2);
b = normalize(p2-p3);
vector4 q = dihedral(a,b);

// apply both rotations wtih qmultiply
@orient = qmultiply(q,@orient);
vector a,b, p1, p2, p3;
// spiral
a = @N * (ch('spiral_separation') * pow(1-@curveu, 1.0/ch('spiral_type')));
@orient = quaternion(a);
// course correct
p1 = @P;
p2 = point(0,'P',@ptnum-1);
p3 = point(0,'P',@ptnum-2);
a = normalize(p1-p2);
b = normalize(p2-p3);
vector4 q = dihedral(a,b);
// apply both rotations wtih qmultiply
@orient = qmultiply(q,@orient);For a while this was almost working, then I remebered that quaternion multiplication isn't like regular multiplication; a * b isn't the same as b * a. As a wild stab I swapped a and b, and the rotation fix worked. Hooray!
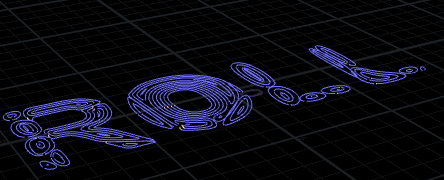
Trying this on some curves generated from text does groovy things:
There's still some broken things (the last segment needs a rotation fix so it doesn't flip, I need to compensate for each curve length so the spirals are of the same radius, getting some weird uneven spiral growth in certain cases), but its good enough to share for now. If you come up with any improvements, get in touch!
Here's the download link again: Download file: spiral_rollup.hip
Next steps
Stuff I'd like to work out:
- Rather than unrolling from one end, do it like a string being pulled
- Other things