Appearance
Copy Stamps, Rotation, Hscript, Vex
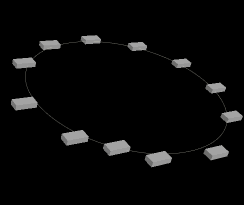
Gary Jaeger on the sidefx mailing list posted a nice video of tumbling ring shapes that grow from nothing, asking if there was a better way to control the effect. I created this example scene, but seemed a good idea to put some notes down about it, cover some ground that can be a bit confusing for new users.
The challenge
Download scene: circles_final.hipnc
Here's my solution to Gary's initial question:
 When I saw Gary's video, I broke it down into a few steps:
- take a circle, copy sop to make several copies
- rotate each copy separately
- another copy sop to put the boxes on the circles
Easy enough. But 2 extra things required a little more thought:
- Start in a random state, and finish aligned
- Start with one box per circle, and grow them smoothly so that they're all in place when the rotation is resolved
I figured I'd start the basic setup first, then concentrate on the other 2 points later. The setup was easy enough, which lead to the first major problem; controlling rotation of the copied boxes.
Controlling Rotation
Here's what happens with just a circle that's rotated, then has boxes copied onto it:
 The boxes are doing interesting rotations, but its not controllable, and not the effect we're after.
The reason for this strange behaviour is simple; the copy sop looks for certain point attributes to orient the copies. None of those attributes exist on the circle.
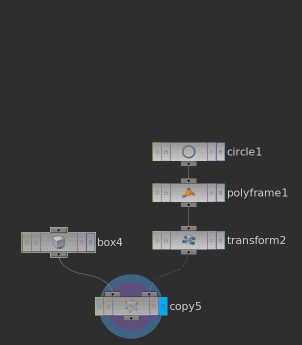
Time to add some attributes! If we create an N attribute (Houdini's standard name for a normal), the copy sop will orient the boxes along the normal. A normal sop in point mode seems like the most obvious choice, appended immediately after the circle:
 Hmm, nothing. Look at the geometry spreadsheet, you can see @N is being created, but all 3 components are 0. Looks like the normal sop doesn't work well with curves. Ok, there's always other options in Houdini.
A facet sop with 'post compute normals' enabled will makes valid normals on the circle, but they're all set to {0,-1,0}, which is no good. We want the boxes to be facing out, not down.
A polyframe sop can generate normals and tangents (and bitangets) on curves, lets try that:
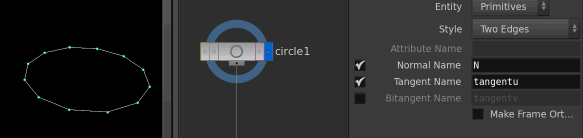 Cool, we have something. The default gave us normals on {0,-1,0} which we don't want. I tried the tangent and cheated by forcing its name to be N, thus making it become the normal instead. But this is also no good. Doing the same steps with the bi-tangent is correct, normals that spike out from the circle. Does that fix our rotation problems?
 Sort of. While they all start out correct (I've added a few more boxes here for clarity), as soon as the circle starts to rotate, some boxes start spinning on their pivot,others stay pinned upright. What gives?
This is the same as the aim+up problem you get with maya orient constraints. A single direction isn't enough to define a stable orientation. You can point your hand straight up, but you could be on a spinning chair, facing in any possible direction. Your hand is always pointing up but your body direction is undefined.
With a copy sop, if you're using @N, you need to use another attribute, @up, to give you stable orientation. To make it nice and clear, we'll make this perpendicular to our normal. The polyframe node seemed to give us this, so we'll use it, rename its 'N' to 'up', and see what we get:
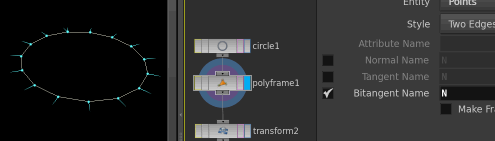 Success! The boxes are now stable, and stay locked to the circle.
Start with random rotation and finished aligned
The brute force answer to this is to just keyframe it; using the transform node I've been testing with earlier, set keys at frame 0 with some large rotation values, and at frame 24 set them all to 0. Perfectly fine approach, but one thing you start to become obsessed with in Houdini is making clean, multipurpose, reusable, dare I say elegant solutions.
As such, we'll dive into some expressions. I'll say up front that I try to avoid hscript expressions, but I'll use it in the short term, and explain a better way shortly.
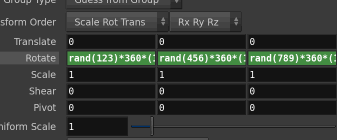
First, lets generate a random x rotation. In the rotx field of the transform sop, we could use something like
rand(2342)
This gives us a random number between 0 and 1, using 2342 as the seed to generate that number. Normally rand() is used to generate a random number every frame, or by some other varying thing, but here, we just want a random number that won't change. (There's nothing special about '2342', we could use 0, or 1, or $PI, or any other number).
Because we're talking rotation, it'd be more useful to have a random number between 0 and 360, so lets multiply this by 360:
rand(2342) * 360
Ok, now how to animate it? Well, if we take this value and multiply it by 1, the result will be unchanged. If we multiplied it by 0, the result is 0. So, if we can multiply the above by something that smoothly goes from 1 to 0 over the framerange we want, that'll give us the rotation we need.
rand(2342) * 360 * <ramp from 1 to 0 over framerange>
Say we want this effect to last 30 frames. We could divide the current frame by 30, that'd give us a 0 to 1 fraction;
- frame 0 would be 0/30 = 0
- frame 15 would be 15/30 = 0.5
- frame 30 would be 30/30 = 1
Should work. ( $F is the hscript variable for current frame) :
rand(2342) * 360 * ( $F / 30 )
Sort of works; we get rotation, but it starts at 0 rather than ends at 0, and never stops. First, lets make sure the ramp value never gets below 0 or above 1 by using clamp:
rand(2342) * 360 * clamp( $F / 30, 0, 1 )
Better, but still its ending on the random value, not starting with it. Now that we have a stable 0-1 ramp, the easiest way to make it a 1-0 ramp is to take it away from 1 (called the compliment):
rand(2342) * 360 * ( 1 - clamp( $F / 30, 0, 1 ) )
Success! If we wanted a different random rotation, you can just change 2342 to some other number, and to make the effect longer or shorter, change 30 to something else.
Stop using hscript
This all seems fine, why not keep using it? Well, assuming you want to use a random y and random z rotation at the same time, you copy and paste that expression in the yrot and zrot fields, ending up with this:
 This irritates me (and hopefully you) for several reasons:
- At a glance, the expressions are all crammed together, you can't see what they're doing
- You can't edit them all at once, you have to edit them individually
- Houdini, especially with a wacom stylus, makes it hard to do an instant click-edit on expressions, often it'll accidentally bring up the value slider or swap between the expression and the result of the expression instead
- Editing the first expression and hitting tab to move to the others often misfires too, and expands the field to the full width of the parameter editor, so you sometimes aren't sure which field you're editing
- Hscript tend to be single line expressions, which get hard to read (they can be broken over multiple lines, but people rarely use this)
- Its not much better than maya expressions, both for readability and general clunkiness
The first time I used Houdini and Hscript, I was puzzled. This didn't seem like the slick procedural workflow I was promised, it's almost worse than maya expressions in certain ways. It was only years later when I returned to Houdini that I learned the Right Way; thinking in points, and using Vex.
Thinking in points
Houdini is happiest when you're just manipulating points (hence Houdini artists are also happiest when manipulating points). I've seen Houdini artists do seemingly roundabout ways to do setups at a point level, when to a maya person just manipulating transforms and higher level objects seems the most obvious choice. This is about to be one of those times!
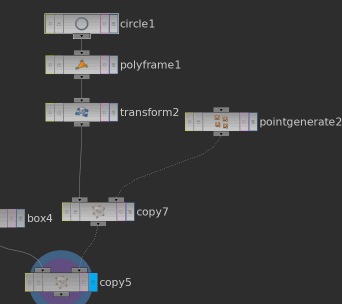
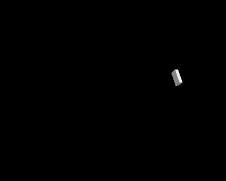
Our existing setup has a circle, and then copies boxes onto each point of the circle. It makes sense that if you deleted half the points from the circle, you'd get half as many boxes copied. If you go all the way and delete all but a single point, you get a single box:
 So, one point, and one box, fed into a copy sop, will generate one copy of the box.
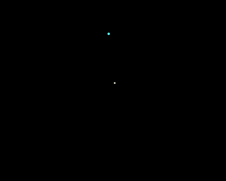
Now a leap of logic, we'll do the same thing for the circle. Ie:
One point, and one circle, fed to a new copy sop, will generate one copy of the circle.
We'll insert this above the box copy sop, as shown below (I use a 'point generate' sop to create the point):
 Note that the point generate sop in its default state creates 5000 points, we only need 1 for now.
Why go to all this trouble? Because now we have a point that can control the circle. As we add attributes to the point, we'll have fast and powerful control over the final result.
Vex and the point wrangle sop
Insert a point wrangle between the point generate and the copy:
 If you look at its parameter window, its a nice big area for entering text. Already this is one step ahead of hscript purely from a visual standpoint; you can see what you're doing.
Let's do something simple to start with; move the circle up. (Delete the transform node we were using for the hscript rotations, we won't need it anymore):
@P.y = 0.5;
Once you either click outside the text field, or hit ctrl-enter (cmd-enter on mac), the circle will jump up. I talk about vex syntax over on the HoudiniVex page, but briefly, @ is shorthand for 'attribute', @P is the point's position attribute (you can see this in the geometry spreadsheet). Because @P is a vector with x y z components, we can set the y component directly with @P.y.
Ok, replace that simple line with this:
vex
float end;
float ramp;
vector rot;

end = chi('end');

ramp = @Frame/end;
ramp = 1 - ramp;
ramp = smooth(0,1,ramp);

rot = vector(rand(@ptnum))*2*$PI;
@orient = eulertoquaternion(rot*ramp,0);

@pscale = (@ptnum+1)/float(@numpt);
float end;
float ramp;
vector rot;
end = chi('end');
ramp = @Frame/end;
ramp = 1 - ramp;
ramp = smooth(0,1,ramp);
rot = vector(rand(@ptnum))*2*$PI;
@orient = eulertoquaternion(rot*ramp,0);
@pscale = (@ptnum+1)/float(@numpt);Press the little button to the right of the text field, that will create a slider named 'end'. Set it to 30, and scrub the timeline. You should see the ring rotate around, and reset at frame 30. Lets go through this bit by bit:
vex
float end;
float ramp;
vector rot;
float end;
float ramp;
vector rot;Create floating point variables named 'end' and 'ramp', and a vector called 'rot'.
vex
end = chi('end');end = chi('end');Set 'end' to the value of the channel slider named 'end' (when you press that little button, houdini scans the vex code looking for ch() calls, checks if those sliders exist, and if not, creates them for you. chi() makes an integer slider, ch() makes a float slider).
vex
ramp = @Frame/end;
ramp = 1 - ramp;
ramp = smooth(0,1,ramp);
ramp = @Frame/end;
ramp = 1 - ramp;
ramp = smooth(0,1,ramp);Similar to the hscript expression earlier, we take the current frame (vex uses @Frame rather than $F), normalises it, compliments it, and rather than use a clamp to limit the value, uses a simlar function smooth(). This gives a nice ease in and ease out.
Something to note here is that by splitting the command over several lines, it's much easier to read. There's nothing to stop you putting it all on a single line like the hscript one, but why would you?
vex
rot = vector(rand(@ptnum))*2*$PI;
rot *= ramp;rot = vector(rand(@ptnum))*2*$PI;
rot *= ramp;A few things to pick apart here, working from the inside out:
@ptnum is the id of the current point. Because we only have one point, this will be 0.
rand(@ptnum) generates a random number, like hscript, between 0 and 1.
vector( rand(@ptnum)) generates a random vector between {0,0,0} and {1,1,1}, rather than a random single number. Because we're after a random rotation on x y and z, this is more useful for us.
vector(rand(@ptnum))*2*$PI takes that 0-1 vector, and multiplies it so its in the range 0-2Pi. Why on earth would we use 2*Pi? Because most rotation functions in vex use radians. 2*Pi radians = 360 degrees, so we're ensuring the random vector can be anywhere within a full rotation.
This random vector is assigned to 'rot', and then scaled by 'ramp' so that it starts at its full rotation, and scales to 0 over time.
vex
@orient = eulertoquaternion(rot,0);@orient = eulertoquaternion(rot,0);I mentioned earlier that the copy sop looks for several attributes to control orientation. @N and @up is one way, but my preference is to use @orient. @orient is a quaternion, a 4 value vector, which you might've heard of in terms of rotations. Its key advantage over other rotation methods is that it's standalone; just @orient by itself will give you stable orientation.
Its key disadvantage is that quaternions are hard to understand for humans. Luckily, we don't need to understand it, vex has several ways to create quaternions from other values. One way is the eulertoquaternion() function. Give it an euler vector, and the order the rotations are in (0 here means the order is x y z), it will create a quaternion for you.
vex
@pscale = (@ptnum+1)/float(@numpt);@pscale = (@ptnum+1)/float(@numpt);Take the point id, divide by the total number of points ( @ptnum ), and assign it to @pscale. To make sure we don't get a value that could be 0, add 1 to @ptnum first. Because @numpt is an integer, and division by an integer gives an integer, we have to convert it to a float by using float(@ptnum).
Why @pscale? Why all this extra work? Here's why. Go to the point generate sop, let the scene play, and start increasing the number of points:
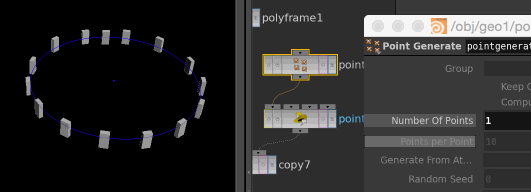 @pscale is another attribute recognised by the copy sop, it controls scale. As we add more points, each points gets a @pscale which is an even division between 0 and 1. So 10 points will have pscale of 0.1, 0.2, 0.3 .... 0.8, 0.9, 1.0. This means we get 10 circles that are evenly scaled within each other.
Because the rotation is driven by rand(@ptnum), each point gets its own random rotation, meaning each circle gets its own random rotation.
When this nest of circles is then passed to the 2nd copy sop, it just does what its told; finds each point, and copies a box onto it, using @N and @up to orient it.
Resample sop to generate evenly spaced boxes
A resample sop takes a curve, and adds more points along it. In its default mode it adds extra points every 0.1 units. Insert a resample sop between the 2 copy sops as shown below. Because this is being done after the circles have been copied, the result is that the circles are evenly divided; the outer circles have lots of points, the inner circles only get a few:
 As it happens our box is exactly 0.1 wide. Wouldn't you know it, perfectly sized and copied boxes on rings!
Deleting points
Armed with what we've just done, deleting the points should be pretty easy. We'll be able to reuse the ramp timer from before, and this time do something that involves comparing it to some attribute that goes around the circles.
If you think of a curve, it's safe to say that the first point's id will be 0, and the last point will be (total number of points -1). To get this as a nice 0-to-1 value, again we do a similar trick to before; divide the current @ptnum by the total number of points, which will give us essentially a uv coordinate (well, a u-coordinate) along the curve. @ptnum and @numpt are both integers, so you have to convert at least one of them to a float to get a floating point value:
float u = @ptnum/float(@numpt);
(Just a reminder, @numpt is the vex attribute for the total number of points)
So we have the curve points with a 0-1 value, and a timer with a 0-1 value. All we need to do is test if u is smaller than the timer, and if it is, remove the point:
vex
float end;
float ramp;
end = chi('end');
ramp = @Frame/end;
ramp = 1 - ramp;
ramp = smooth(0,1,ramp);
float u = @ptnum/float(@numpt);
if (u < ramp) {
removepoint(0, @ptnum);
}float end;
float ramp;
end = chi('end');
ramp = @Frame/end;
ramp = 1 - ramp;
ramp = smooth(0,1,ramp);
float u = @ptnum/float(@numpt);
if (u < ramp) {
removepoint(0, @ptnum);
}That last function just takes 2 arguments, which geometry to work on, and which point to remove. In this case we're using whatever geometry is wired to the first input of the wrangle sop, which is the 0th input. This new wrangle is inserted after the resample, to make sure its deleting the final dense count of boxes individually:
 Hmm, sort of working, but not quite right. Lets temporarily turn off the rotation and see whats going on:
 The circles are undeleteing sequentially, rather than in parallel. This is because we're generating the @u attribute naively; its the current point in relation to the total number of points in all the circles, not just its own circle.
To fix this, there's several ways to solve it:
- We could use something like a connectivity sop, which would recognise each curve as a separate island of geometry, and give the points of each circle their own common @class attribute, then take that into consideration when generating our @u attribute.
- There are vex functions to give you information about a point relative to the polygon/curve it belongs to, look that up instead of the the total number of points etc.
- We could generate @u on the original circle, and that will be copied onto each circle, and the resample will correctly interpolate it onto however many points the final circle has
- A uvtexture sop in 'rows and columns' mode will just try and create uv's along contiguous curves. Make sure its in point mode, then copy the first value of its @uv attribute to the @u we need (ie, @u = @uv[0]; )
Of all these, the 3rd is probably the cleanest quickest way. Create a new wrangle, put it immediately after the circle sop, with just this code:
@u = @ptnum/float(@numpt);
Because this is an attribute, it will flow down through the geometry to where we need it, in our delete wrangle. That will need minor modification to use @u, rather than calculating its own 'float u' that lives only within the wrangle:
vex
float end;
float ramp;

end = chi('end');

ramp = @Frame/end;
ramp = 1 - ramp;
ramp = smooth(0,1,ramp);

if (@u < ramp) {
  removepoint(0, @ptnum);
}
float end;
float ramp;
end = chi('end');
ramp = @Frame/end;
ramp = 1 - ramp;
ramp = smooth(0,1,ramp);
if (@u < ramp) {
removepoint(0, @ptnum);
}How does that look?
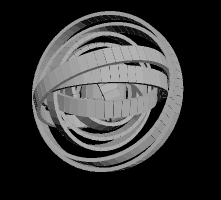
 Much better! Lets turn the rotation back on, and see the finished result:
Copy sop and stamps, don't do it
It's possible to achieve everything we've done so far purely with hscript expressions. The trick to it is the stamp() function. Going back to the first chapter where we had a circle, a transform, and a copy sop, say we had the copy sop make multiple circles, they'd all rotate in exactly the same way, because the transform happens before the copy.
A stamp expression lets you drive houdini in reverse. You could have the copy sop create a random rotation for each copy named $RANDROTX, and on the rotx parameter you'd use an expression like
stamp('../copy1','$RANDROTX',0)
What that expression means is 'ask copy1 for the variable $RANDROTX, if you can't get a value, use 0'. The copy sop knows which copy its currently processing, so knows the correct value to set on the transform for each circle.
I hope this makes you feel as uncomfortable as it makes me feel uncomfortable. Houdini compared to maya has such a clean data flow that goes from top to bottom, that this idea of cheating and going backwards up the chain doesn't feel right.
More worryingly, stamps can rapidly bog down a houdini scene when you start to get into heavy point counts, which no-one ever wants. A stamp version of the setup is included in the hip, but really, avoid it as much as you can. They have their place, but whenever you can create an effect in a cleaner top-down approach, its better.
Further work, final notes
- We recalculate the timer ramp variable in 2 locations, it'd be better to pass it as a point attribute (hint; to make attribute from the right input of a copy sop flow into the output geometry, enable the 'use template point attributes' toggle on the attributes tab)
- The rotation looks a little clunky and dull, could that be replaced with a nicer function, or even replace that with a hand keyed ramp value?
- The un-delete is a little too perfect, they should have a staggered start time
- The ending position of the undelete is also too perfect, they should finish at different points around the circles
- Maybe some undelete faster than others?
- When debugging, its handy to quickly throw an internal variable of a wrangle (say float ramp) to a point attribute so you can observe it in the geometry spreadsheet. You can do this easily by just adding the line '@r = ramp;'. You can remove it when you're done. Houdini happily lets you put as many attribute as you want on points (I've seen production scenes where each point has 30 or more attributes), but its good to get in the habit of trying to keep clean geo, and only use geometry attributes when you really need them. Don't be stingy, but don't go crazy either. 😃