Appearance
Smoke and Pyro
The pyro solver isn't too scary once you understand it, and gets amazing results. I found I got a better understanding by building a simple smoke sim first, and gradually adding complexity. There's a few things to do before getting into dops, the first of which is to create a volume.
I should point out that this is all relatively old, back in the H13 or H14 days. The current methods are still pretty similar (or at least until H18 with its new fangled pyro-in-sops stuff), but you should still be able to follow along with these to get the basic principles. If you jump over to the HoudiniDops page there's some more up to date stuff with H17.5.
Create a volume
There's many ways to do this, the simplest is to start with a polygon shape, append a 'vdb from polygons' sop, and set the mode to 'density'.
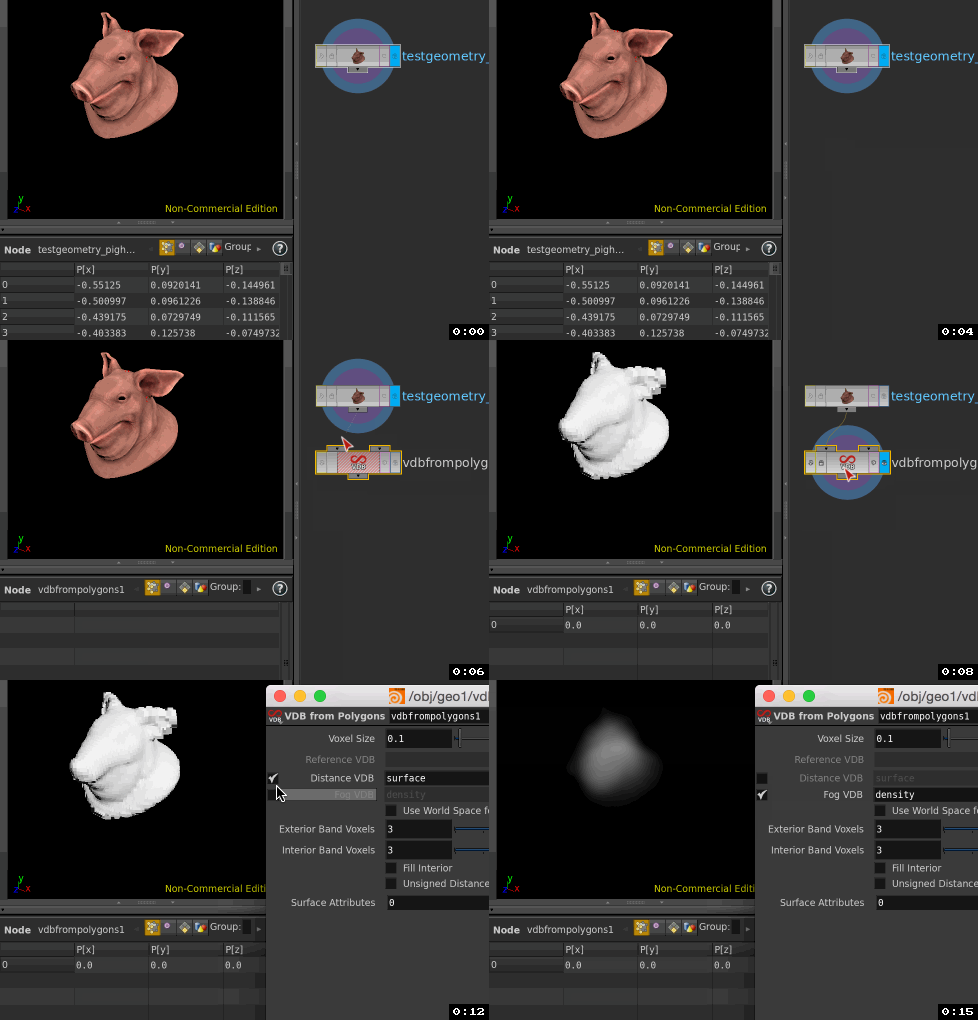
The geometry spreadsheet now shows a single 'point', the vdb volume. If you've been using sops for a while, you might expect to see all the voxels individually listed, in the way you see all the points for a polygon object. Don't be alarmed, this is normal.
To increase quality, lower the voxel size parameter. Lower values means smaller voxels, which means more detail.
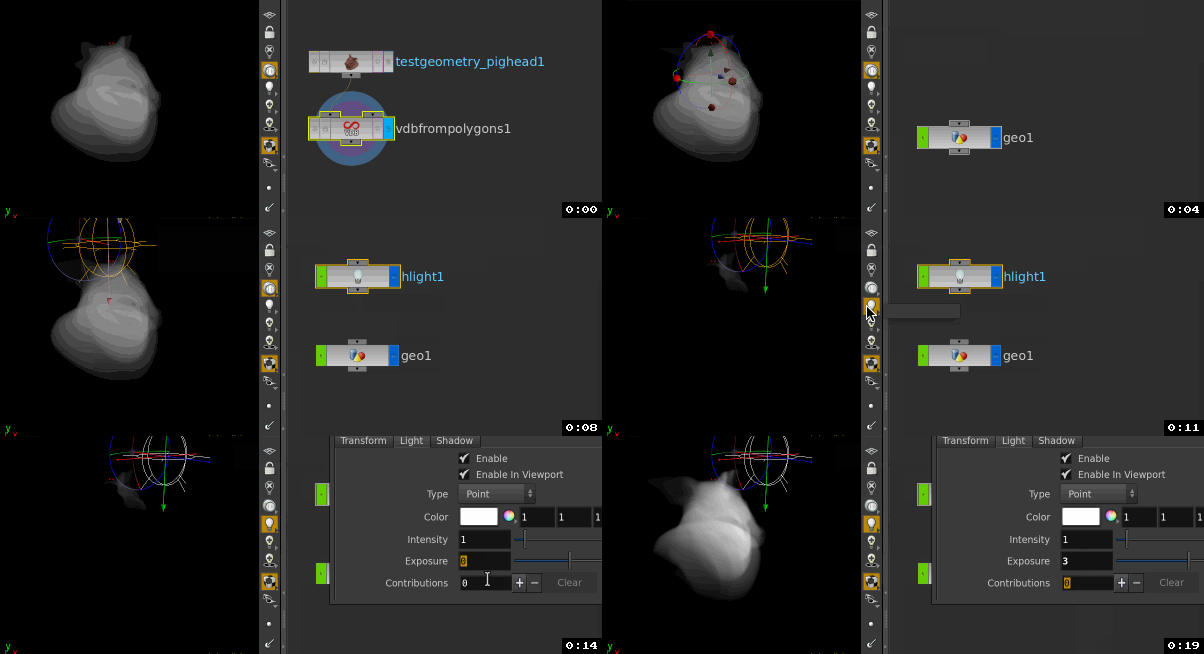
The viewport will render shadows within the volume if you go into a lit mode, and add simple lights. This can help with reading the shape of a volume, at the expense of performance. Keep in mind that houdini lights default to physically correct falloff now, so often you need to boost their exposure by a few stops when you translate the light away from the volume.
Create velocity field
For a smoke solver to do anything interesting, we need to tell it how to move. Again, many ways to do this, for now we'll re-use the 'vdb from polygons' sop.
First, insert a point wrangle after the pig, and give it velocity (@v) that moves straight up:
@v = {0,1,0};
Now move to the 'vdb from polygons'. There's a surface attributes multi-parm. Click the plus button, and it creates a new set of parameters. This allows you to read other point attributes from your shape, and create a new vdb volume from it. Use the combo box to choose point.v, make the name 'vel', and the vector type 'displacement/velocity/acceleration'. ('vel' is the default name Houdini uses for volume velocity)

The only change you'll see is that an extra row appeared in the geometry spreadsheet. This means we now have 2 vdb volumes, density and vel. Density is a float, ie, each voxel stores a single value to say how dense it is, while vel is a vector, where each voxel stores an x,y,z component.
By default Houdini will only display the density field. To view the vel field, you can append a volume visualisation sop, and set the diffuse field to vel (you might have to adjust the density sliders to see it properly)

Smoke solver
We now have the basic ingredients to do a smoke simulation.
Create a dopnet, connect the vdb sop to the first input, dive inside.
The most obvious thing we'll need is a smoke object. This will store data during the simulation. To run the simulation itself, we'll use a smoke solver. Connect the smoke object to the first input of the solver, and the solver to the output dop.

This is now a working smoke sim, but not a very interesting one; if you play the timeline, nothing happens. What we need now is to import the vdb volumes into this sim. Unlike pop networks, this isn't done automatically, so lets do that now.
Create a 'source volume' dop, and connect it to the last input of the solver (named 'sourcing' if you hover over it). Set the 'volume path' parameter to
`opinputpath('..',0)`
Note the backticks, and let the autocomplete help you type the function name, its hard to type quickly! If you middle click on the volume path label, you'll see that it toggles to the path of the vdb. Let the scene play, you should get smoke. Hooray!
Why use opinputpath()? Lazyness. You're supposed to give it the full path to your volume manually, meaning if you want to use a different sop as the input, you need to keep updating the source volume dop. I also like to see a connection between the source volume and the dopnet, vague 'magic' connections bother me.
opinputpath() is an hscript function that given a node and input reference, returns a path to the node conneced to that input. Here, the node looks at the parent of the current node (that's the '..' bit, like in unix), then reads its first input (the '0'), and returns the path of whats connected to it, which is our vdb node.
Resize the sim and sim voxels
You'll have noticed the sim is limited to a small cube. The size of the sim is determined by the smoke object, lets make this bigger.
Select the smoke object and hit 'enter'. You should get controls in the viewport to resize the sim, or you can use the parameter pane to set its width/height/depth/center. Make it big enough to fit the pig, and twice as tall (roughly 2.5 2.5 2.5 for size, and 0 0.5 0 for center). Rewind and let the sim play again.
You'll also notice that the detail doesn't match the quality of the vdb object. That's because the voxel res of the sim is independent of the res of the source volume. Again on the smoke object, there's a division size set to 0.2. Try setting it to 0.1, or 0.05, and notice that more detail is kept (at the cost of longer sim times)

A closer look at Source Volume
So how is 'source volume' bringing in the vdbs? Select it, and notice it has parameters to scale the input density/temperature/velocity, and drop-downs to set if each field will copy/add/clamp sub/multiply etc.
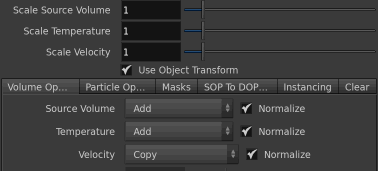
The default behaviour for density (which is confusingly labelled 'source volume') is 'add'. That is, every step of the simulation, the density values from the vdb are added to the existing sim density, making it thicker over time. If you want density to build more slowly, use the 'scale source volume' slider to turn it down.
Try changing the density mode from 'add' to 'copy', and resim. The sim now appears frozen. That's because 'copy' forces every step of the sim to be exactly the same as the vdb. No density can build up or be pushed around, therefore no motion will occur.
Notice that velocity is set to 'copy' by default. Density can be pushed through this static field, and will do so at a constant rate. Try changing its mode to 'add' (don't forget to set density back to 'add' too), see what happens. The smoke accelerates. Each simulation step, the velocity is added to that of the previous step, so it gets faster and faster.
But how does the node know which field from the vdb should drive which field in the sim? Go to the 'SOP to DOP...' tab. There you'll see the default mappings used; density maps to density, vel to vel, and temperature to temperature (which we're not using for now). If you had named the vdb field 'v' for example, you could map v to vel here.
Dissipate and gas microsolvers
The smoke now rises, but it never fades away, which doesn't look very natural. To fix this, create a gas dissipate node, and connect it to the 2nd input of the smoke solver (labeled 'pre-solve'). Set the evaporation rate to 0.9 and play the sim, you should now see the smoke rise a little bit from the pig, then fade away.
The gas dissipate node is one of many microsolvers in houdini. These are little self-contained vop networks, each of which do a specific effect. If you look inside the dissipate dop, you'll see it does a fairly simple process of taking density, and removing it every time step by a certain amount. As is the norm for Houdini, the high-level idea is that by joining lots of small simple nodes together, you can create complex yet easily controlled behaviour.

Adding turbulence
The sim is still pretty boring. We need some turbulence to distort the vel field, which will in turn affect the smoke. Create a gas turbulence node, and connect it to the middle input of the solver (labelled 'velocity update'), and set the turbulence scale parm to 1, and resim. Now it's starting to look interesting...

Resize fluid dynamic
So far we've kept the smoke sim quite small, but what if you had a sim that changed size substantially over time, starting small and ending huge? It would be a waste to have a giant smoke object, having most of it empty for most of the shot, only to fill it towards the end of the simulation.
Houdini offers another microsolver that can dynamically resize the smoke object for you, called the gas resize fluid dynamic dop. To see it in action, lets adjust the settings to make sure the smoke grows larger than our existing object.
On the source volume dop, set scale velocity to 4 to really push the smoke up and away. To really overcrank this, make sure the velocity mode is set to 'add', so it accelerates over time.
On the gas dissipate dop, set the evaporation rate to 0.2, so more smoke hangs around. Sim this, see that it rapidly fills the object.
Now create a gas resize fluid dynamic dop. Normally this also goes into the pre-solve input, where you currently have the dissipate node connected. Not a problem; when you want to connect multiple gas nodes into a single input, put down a merge node, connect the gas solvers to the merge, and the merge to the input.
By default it'll resize until it hits the size set in the smoke object, lets turn that off here. Go to the max bounds tab, and turn off 'Clamp to maximum'.
Sim, and now we get a more interesting result.
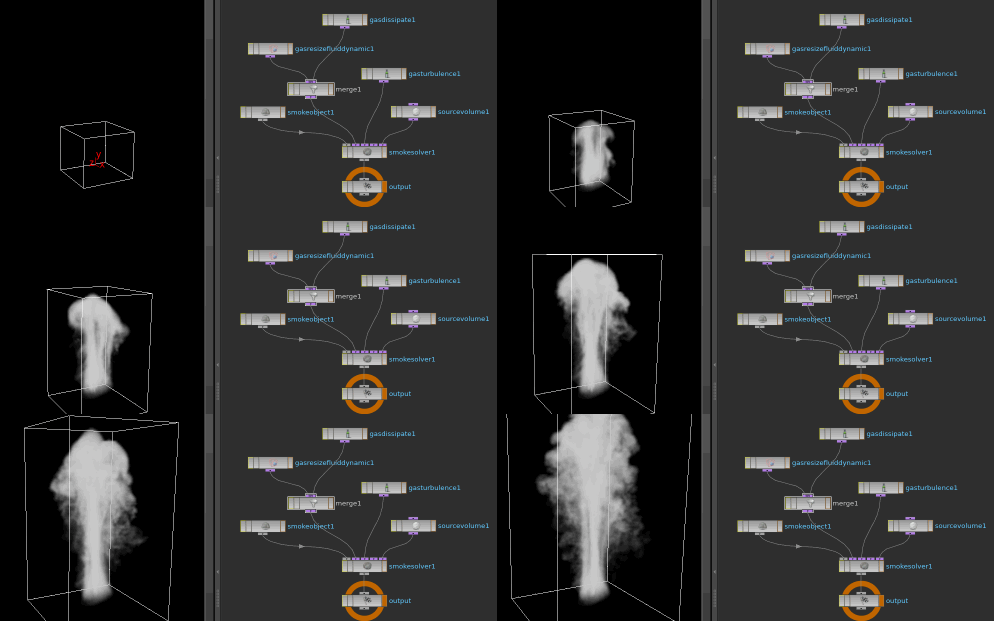
How do you know which connection goes to what on the smoke solver?
Nodes that have just 1 or 2 inputs are easy enough to work out, but the smoke solver has 5, how are you to know what goes where? Well, the connection between the smoke object and smoke solver is hinted at visually; the matching gray connectors mean they go together. This is the convention for dops, sim objects usually go to the first input of a solver.
For other connections, I've cheated and looked at the setups created by the shelf tools. They have a certain logic that makes sense over time; velocity modifying nodes go to the advect input, nodes that inject density and velocity go to the last input, and resize nodes and stuff that doesn't directly affect the sim goes to the pre-solve input.
In practice I've been surprised that you can connect most things to most things, and it works fine. I expected the docs for the microsolvers to be more explicit, but having looked just now at the page for dissipate, resize, gasadvect, even the source volume, they don't really say much apart from 'they can be connected pre or post main solver step', which isn't much help.
For now I just loosely follow what the shelf tools do, your mileage may vary. 😃
Adding density and velocity noise to the source vdb
Often the best way to add interest and realism is to take your sop inputs to the simulation, and vary them over time. The vdb that drives this sim doesn't do much, lets go back up to the sop context and fix this.
Lets use the point wrangle to start with. Right now @v is the same for all voxels (0,1,0), time to add some animated curl noise:
@v = {0,1,0};@v += curlnoise(@P+@Time);
After tweaking a few other values (gas turbulence scale down to 0.1, source volume scale velocity down to 0.2, gas dissipation evaporate up to 0.9), we get this:
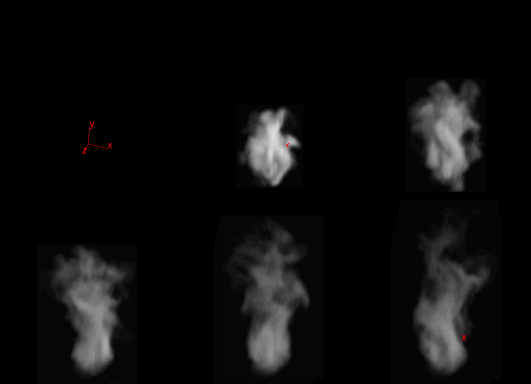
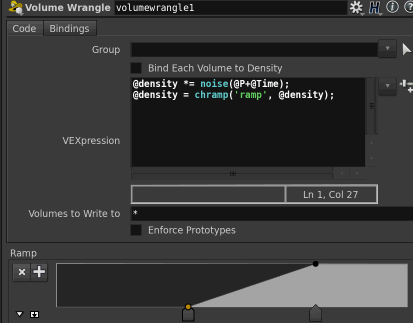
Looking good. We should add some density variation as well. This time we'll add a volume wrangle after the 'vdb from polygons' node, multiply density with animated noise, and use a ramp to boost contrast (click the plug icon to the right of the text editor, and tweak the ramp to look like the image below):
@density *= noise(@P+@Time);@density = chramp('ramp', @density);
Now we get wisps that fade in and out, looking even more interesting:

Here's the setup so far: smoke_solver_basic.hipnc
Smoke solver vs Pyro solver
You might argue that while having gas microsolvers is useful, there's already a few that you'd be adding every time you create a smoke sim. If you were keen you could wrap this up into an HDA, and have a one click, reasonably good smoke setup ready to go. Well, sidefx have already done that for you, and it's the pyro solver.
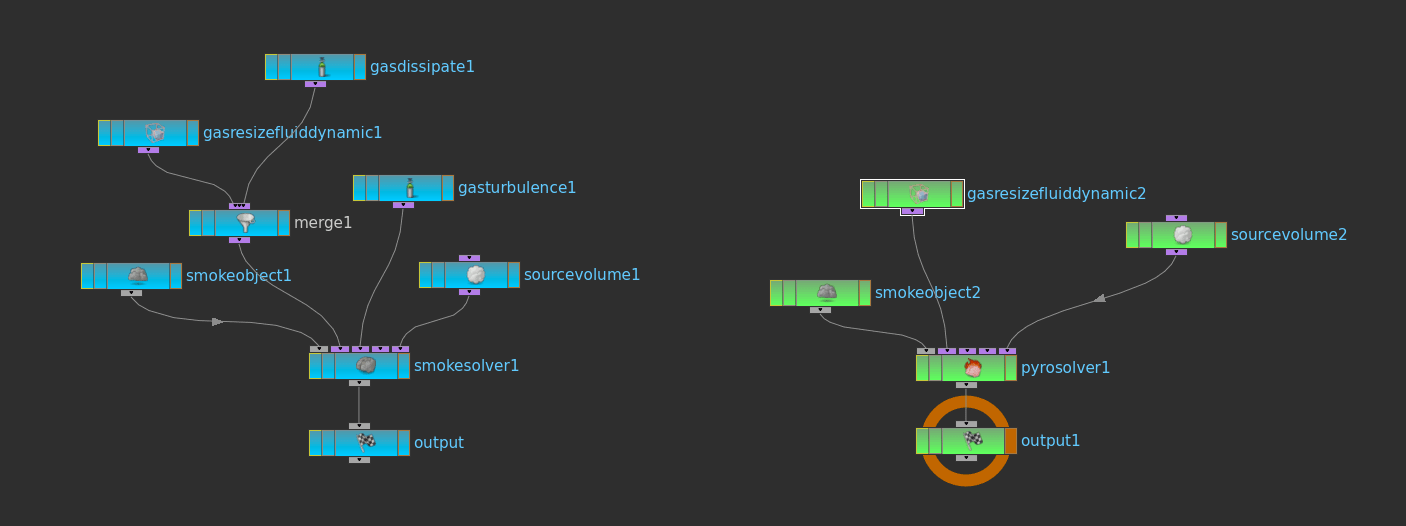
Create a pyro solver and have a look at its parameters. It has the same basic inputs and controls as the smoke solver, but it has extra tabs to deal with the usual things you'd want to tweak like turbulence and dissipation, as well as several others. If you dive inside, you'll see that it is in fact a regular smoke solver, but with a bunch of gas microsolvers already setup and merged together.
As such, we can swap the smoke solver for a pyro solver, and remove the dissipate and turbulence nodes. The smoke solver setup is on the left, the equivalent pyro setup is on the right:
There's not much of a performance difference between pyro and smoke, so I tend to use pyro due to the larger feature set (also the pyro solver is preconfigured to also handle fire and explosions, which we'll get to later). That said, I find it handy to know how to replicate the basics of a pyro setup by hand. A useful by product is when pyro stops working for whatever reason; a few times I've enabled turbulence on the pyro solver, and it just stubbornly refuses to work. Rather than try and debug it, I'll just add a gas turbulence node, and move on.
Volume velocity sop
While we used a wrangle to create a more interesting vel field, Houdini's 'volume velocity' sop can do this too. It offers presets for creating velocity based on noise, or a spinning vortex, or from points/objects. We'll try using it to create a vortex velocity field, which will bring up some interesting items on the way.
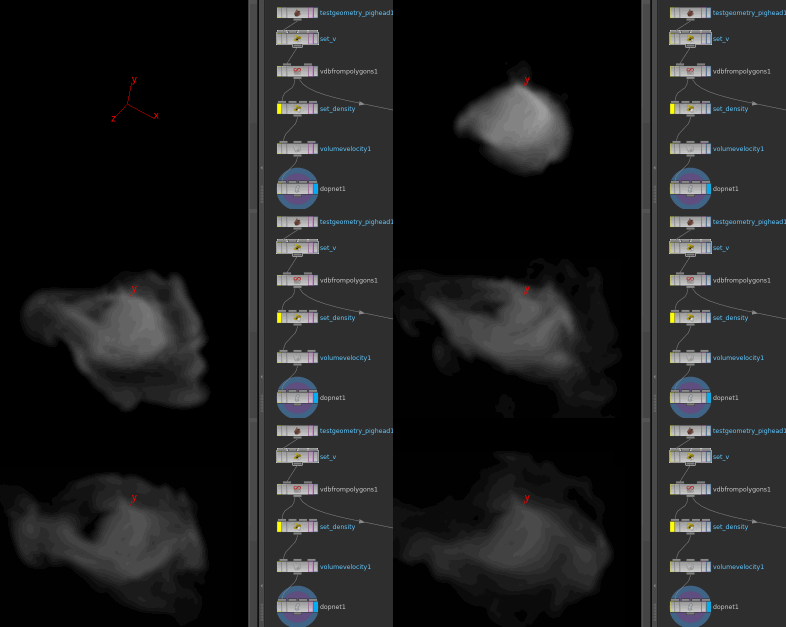
Load the example scene from above, get to the sop context, create a volume velocity sop, and enable 'add vortex'. The node will be in an error'd state; this is because it doesn't create a vel field, it modifies an existing one. Insert it between the set_density vol wrangle and the dopnet, let it play. It might be working, but the noise we've added is making it hard to see. Lets disable those for now to see what's going on.
On the set_v point wrangle, disable the curlnoise line with //, and set @v to {0,0,0}:
@v = {0,0,0};//@v += curlnoise(@P+@Time);
Bypass the set_density volume wrangle, play the sim. Now we can see the vortex is working:
Running the sim takes time though. Looking at vel as a coloured volume with a volume visualisation sop can be hard to read for patterns like this vortex. Two alternative ways to help preview velocity are the volume slice sop and the volume trails sop.
Volume slice and volume trails
Volume slice is the more straight forward one. Create it, branch it from the volume velocity sop. In it's default mode its created a slice on the XY plane, so change it to XZ. Now its showing you density, so use the group dropdown to swap to '@name=vel'. Now you're viewing a slice of the velocity, you can slide through it using the offset parameter.
This is still showing colours though, really it would be nice to see little vector markers to indicate the vortex. Create a volume trail, connect the volume slice to the first input, the velocity to the second, and set the 'velocity volumes' dropdown to 'vel'. You can now see the vector swirl. Well, actually you see a splodge of colour the trails are too long and mixing with each other. Slide 'trail length' down until you can see the vortex.
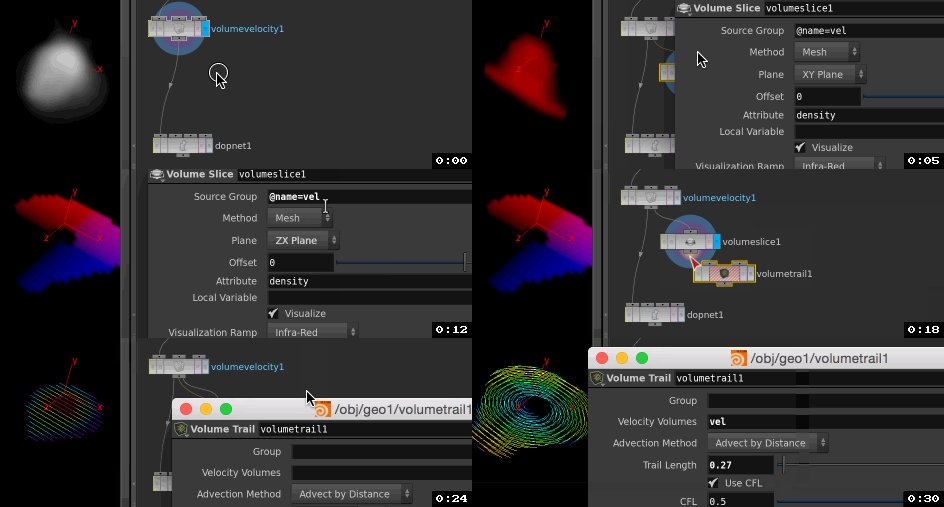
The volume trail sop doesn't require the slice to work, all it does is use the points on the first input to create trails. If you want to get a sense of the full 3d shape of the vel field, scatter points from the volume, and use that for trails instead.
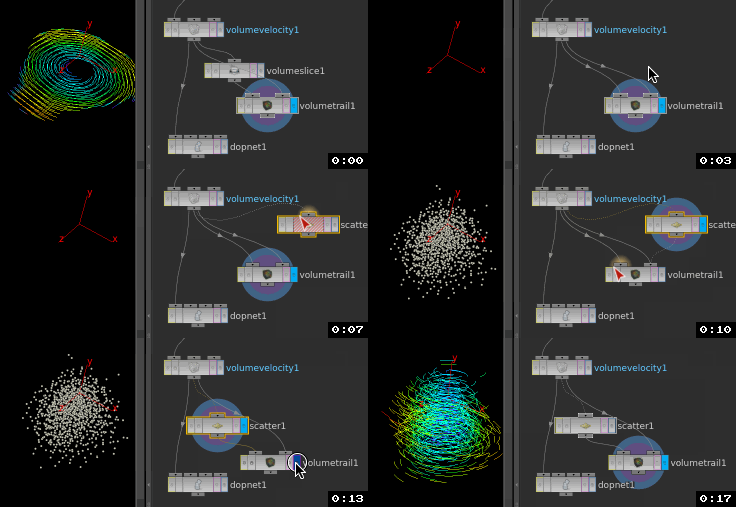
Volume wrangles and volume vops
At the very start I mentioned that each vdb appears as a point in the geometry spreadsheet; it's a primitive in the way a primitive sphere or disc or tube is a primitive.
If that's the case, then how do wrangles and vops work? Surely they'd just process a single point, and do nothing useful?
Well lucky for us, they do the right thing. Volume wrangles and vops can manipulate voxels in a similar way to regular geometry wrangles and vops manipulate points. The main difference comes in how the data is stored (and indirectly how you mentally visualize it), but in practice it's much the same.
For regular geometry, a point would have position (@P), and might have colour (@Cd) and a scalar (@foo). Ie, it's one point that has multiple attributes.
For volumes, each vdb can only store a single attribute. Here we have a vdb for density (name @density), and one for velocity (@vel). The voxels within each vdb can be referred to by position (@P).
So when we do something like '@density = noise(@P);', Houdini is running over each voxel in the @density vdb, running noise() using each voxel's @P position, and applying it to @density.
To try and state that more clearly, data for points vs data for volumes are the inverse of each other. Say you had a point with P, Cd and v, and a volume setup with density, Cd, vel
A single point can have many attributes, (P, Cd, v)A volume can only contain a single attribute, so you have 3 volumes here, a volume named density, a volume named Cd, a volume named vel
If you look in a volume vop, you can see that you get a different set of global attributes to use, and can only write to @density by default. If you want to write to @vel in a volume vop, use a 'bind export' as you would in a point vop.
Note that volume vops and volume wrangles have their own set of special functions to call, like volume gradients and whatnot. Worth exploring.
Read data out of the dopnet
You might have noticed that you can only view the simulation when inside the dopnet. That's because we haven't told the dopnet what fields we want exposed back to sops.
Select the dopnet and view its parameters. On the object merge tab, the object parameter is set to '*', meaning it will export all objects (in our case there's only one sim object, the smoke object). The data field is empty however, which is where you tell it what volume name to export. In our case we want the density field, so type 'density' into that parameter, and you should see your sim.
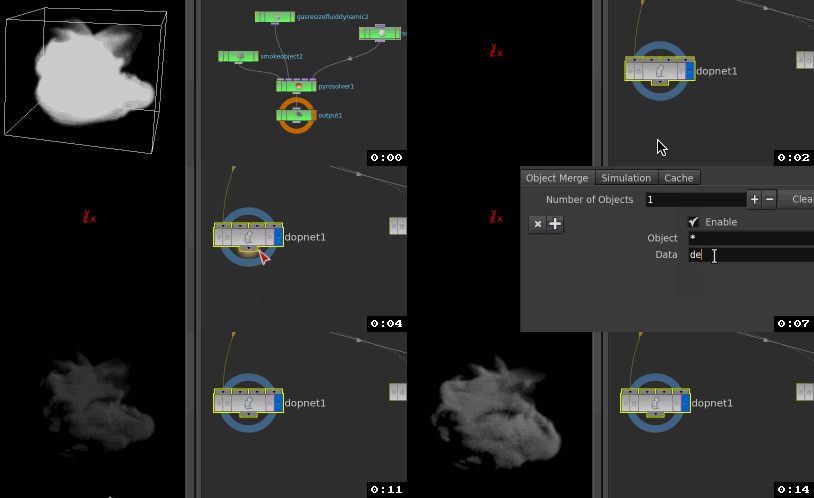
If you wanted to export vel as well, use the + button above to add another instance, and set that data field to 'vel'.
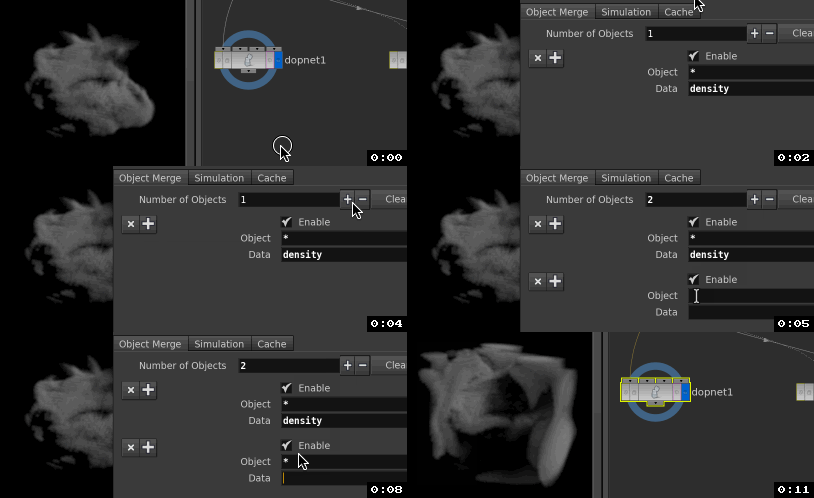
You can see that it just overlays the vel field on the density, which isn't ideal. If you don't care about the display (ie you expect to process it further before rendering), then this is the quick-n-dirty way. The 'official' way is to use a DOP I/O sop. More fiddly, but the idea is the same; it pulls fields out of a dopnet, and makes them available to sops. A useful feature is it has presets for various sim types, so will automatically try and find the relevant fields for a smoke sim, and display them appropriately.
The minor hassle comes from having to provide it the path to the dopnet and the sim object inside (the smoke object in this case). For a smoke sim it's probably overkill, but can be useful for more complex sim types with more fields, like a full fire pyro solve.

Vdb vs houdini volumes
So far we've used VDB for the inputs to the sim, but look at the output of the sim; it's no longer VDB, it's Houdini native volume primitives. What's more, before we had 2 VDB's (density and vel), now we have 4 ( density, and vel.x, vel.y, vel.z):

So what's the difference? In terms of functionality they're about the same, these days most of the Houdini volume sops can process VDB's too. A strong win for VDB is that they're a sparse format; that is they only store information where there's actual data, while Houdini volumes have to store the full cube that surrounds the data. By trimming away needless empty voxels, VDB can be substantially smaller in memory and on disk.
Another advantage is that they present vector fields as a single field, while Houdini volumes don't support vector natively, and require 3 scalar fields (hence vel.x, vel.y, vel.z).
While most of the volume nodes in houdini now support both, occasionally you'll find some that only use volumes, or assume vector fields are really 3 scalar fields. The volume visualisation sop is an example of this; if you create one, and put 'vel' into the diffuse parameter so you can preview vel as colour, it won't work. If you use the dropdown, you'll see that it expects 'vel.*', ie, 3 scalars. If you change it to this it'll work. Nothing earth shattering, but something to be aware of.
Personally I like to keep volumes as vdb as much as possible. A VDB convert sop in vdb mode will do what you expect, and it also lets you go back to houdini volumes if you require, the operation is pretty fast.
VDB sparseness, active vs inactive
Here's the pig again, converted into a density fog with 'vdb from polygons' as per usual. I've got wireframe overlay so you can see the bounding box. If I append a volume wrangle and set '@density=1', you'd expect the entire box to be filled with fog right?

Nope! It boosts the density that is there, but the rest of the vdb stays empty.
When a vdb is created, it notes which voxels are active (ie, they have data), vs the rest. The rest are 'deactivated', and won't be enabled unless you ask it to.
There's several ways to do this. A dumb way is to use the Convert VDB sop to swap to a houdini volume and back again.

A better way is to use the VDB Activate sop. This lets you activate voxels by manually entering coordinates of of a bounding box (position tab), or growing from the edge of an existing volume (expand tab), or by the bound of another object (reference tab). If you use the reference option, and put the same VDB into the left and right inputs, it basically does the same as the convert vdb trick:
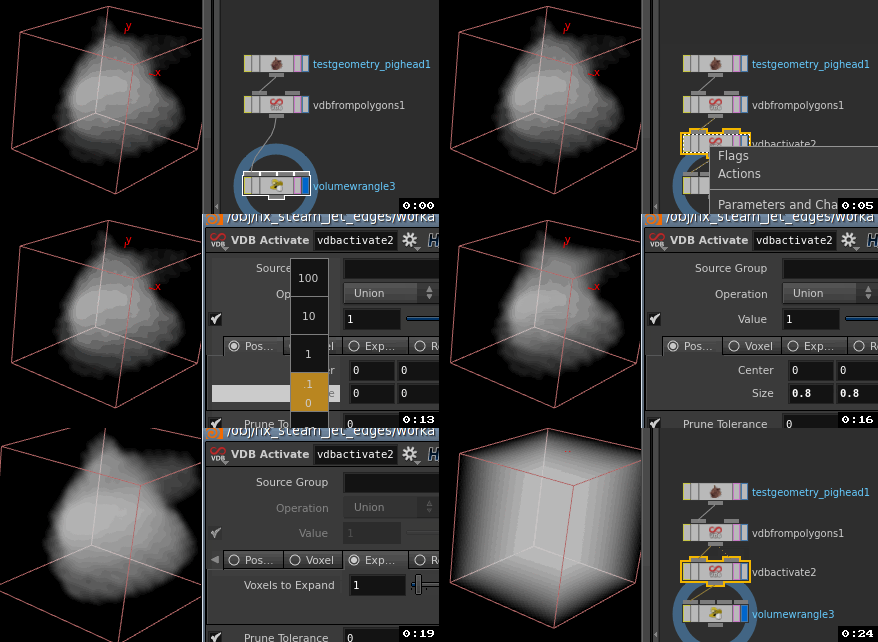
This can be useful to know if, say, you're creating a vel field that's designed to push smoke around on a large scale, like a vel field of noise. If you use the vel field as created by vdb from polygons, you'll only get the noise near the surface of your emitter. Activate the entire VDB space, and you'll get what you expect.
Smoke object features
Get back inside the dopnet, and we'll have a closer look at the smoke object node.
As mentioned earlier, you can set the initial size of your sim volume here, but there's a few other things it can do. You can set the initial state of the volume with the 'initial data' tab. As with the source volume dop, you can use the path selector to choose a sop, or use the `opinputpath('..',0)` expression to default to the 0th input (ie the 1st input) to the dopnet.
Two minor irritations with this though; it won't automatically resize the sim to match your input, and if your input has multiple vdbs (like our input does), you can't split them out easily. Really you can only use it for density, the others will be ignored, unless you go to the effort of isolating each one using blast sops, then reading them in. A cleaner way is to use another source volume sop, in copy mode, with its active parameter set to only be on the first frame (a quick hscript expression for this is $F==1). You need to enable 'solve on creation frame' on the creation tab of the smoke object for this to work though.
The other thing it manages is how the volume is displayed. Go to guides->visualsations tab, and you can see it lets you see all sorts of fields (assuming they exist in your sim!), in various ways. For example, you can enable the velocity checkbox, go to the velocity tab, and in its default state will have a 2d overlay of streamers, which you can offset through the volume, or change its orientation, very handy.
The multi-field tab is very handy, as it lets you combine a scalar and vector field together. Set the scalar to density, and the diffuse field to vel, and you get a pleasing false colour preview of the volume.
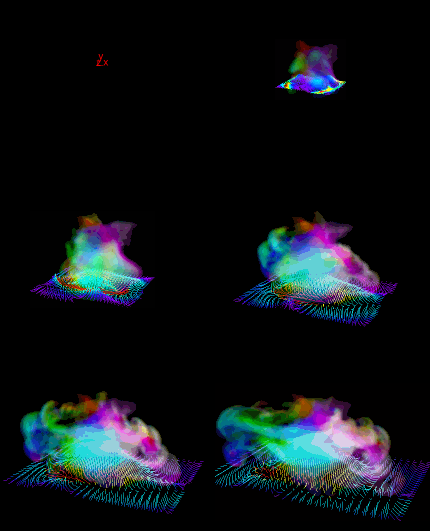 Multifield for diffuse and vel, and velocity as trails on XZ plane. Scene: smoke_solver_vis_multifield_vel.hipnc
This is more useful when you add a colour (Cd) field to a sim, which we'll get to later.
Collision

You might assume that to make smoke collide with geometry will require more microsolvers or other specialised nodes, in fact all it needs is another 'source volume' dop. Think about it; when smoke gets near a moving object it just has to do 2 things; inherit its velocity if its close enough, and if it smoke happens to get inside the object, set its density to 0.
Create another source volume sop, at the top of its parameter window is an 'initialize' parameter. The default is 'source smoke', change it to 'collision'. Sure enough, it sets the density and velocity to use different modes. Have a quick play with the other defaults, see if you can guess why they're set as they are.
So this seems simple enough. We'll create a box and get it ready to collide:
- Make box
- Transform it, set keyframes so it passes through the volume
- Trail sop, change the mode to 'compute velocity' so you get a @v attribute
- Vdb from polygons, this time leave it in surface (ie, SDF) mode, and add a vel field that reads from point.v
- Connect it to the 2nd input of the dopnet, and set the new source volume node to use `opinputpath('..',1)` to read from that input
- Create a merge node, merge the 2 source volume nodes together, and wire that to the last input of the pyro solver
In this case, we don't want a density field; that would imply we're colliding with a soft amorphous shape. A SDF gives us a distinct boundary, better for colliding.
If you run the sim, nothing will happen. A closer look at the source volume dop explains why, if you go to the 'sop to dop bindings' tab:

Ah; setting the collision preset changed the volume names its looking for; it doesn't want 'surface' and 'vel', it wants 'collision' and 'collisionvel'. There's 2 ways to fix this; either change it here, or change the names created by the vdb from polygons sop. I prefer the latter; it's best to stick with the naming conventions Houdini expects, just in case some microsolver or complex HDA later on assumes it'll find those names.
So, you go and change those names on the vdb node, run the sim again and... still not quite right. There's some sort of collision going on, but it's not perfect.
This is because the source volume sop in collision mode expects houdini volume primitives, not VDB. A quirk of how VDB SDF's work vs Houdini Volume SDFs is that the sign is reversed; -1 for a VDB means inside the shape, whereas for a Houdini volume it means outside.
Luckily this is easily fixed. On the source volume, set 'Scale Source Volume' to -1, which will invert it. Play the sim again, you should get working collisions now.
In the example scene, I've done a few extra things to make it easier to read. I've removed the volume velocity sop, turned off dissipation on the pyro solver, and I just inject density on the first frame (using the $F==1 trick explained in the previous section).
Download scene: smoke_solver_collision.hipnc
If you're wondering how you'd know to use SDF, names of the volumes etc, it's because the smoke solver assumes you'd create your collision geo using the Collision Source sop. Try creating one of these, you'll see the various pieces of geo and attributes it sets up (although interestingly it still doesn't exactly match what's expected by the source volume collision preset... hmmm)
Smoke from moving objects
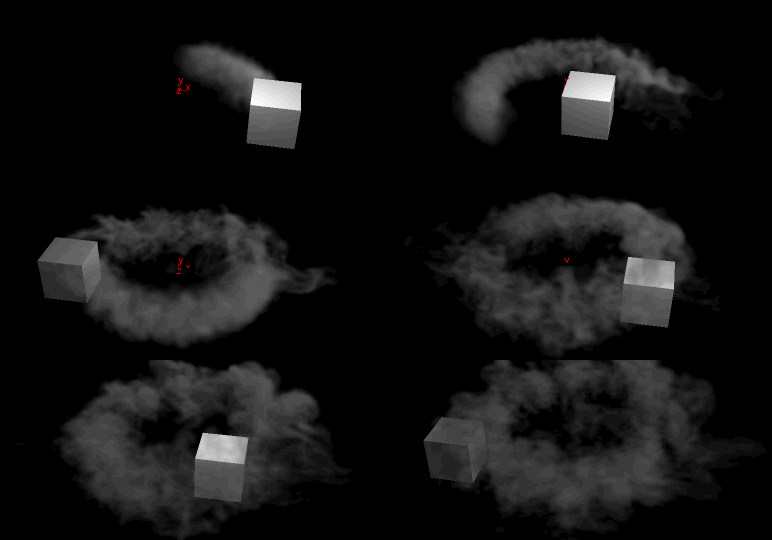
Armed with what we know so far, this is pretty simple. Keyframe an object, trail it to get velocity, vdb from polygons to create @density and @vel, use that as an emitter.
Here I've done some tweaks; with the pig moving this fast it felt like the smoke shouldn't be emitted with the pigs velocity, but instead be pushed backwards like a rocket trail. In a wrangle I used @v *= -1; to reverse the velocity, then scaled it down substantially on the source velocity dop. Has too much turbulence, small dissipation, but it gets the point across. 😃
Download scene: smoke_solver_moving_pig_emitter.hipnc
Smoke from moving particles

HoudiniDops#Advect_smoke_with_particles explains this in more detail.
Same idea, slightly different approach. Particles (or points) can be converted into volume with the vdb from particles sop. If they're moving at high speed though, they can look unnatural as a density source, creating pulses in the smoke solve.
This can be fixed by using a trail sop to create a string of points, which is an easier emission shape for pyro to use, or use a point replicate/particle replicate to create a solid 'dart' of particles that can be made into a nice vdb emitting shape.
Color and Cd

Most pyro sims I've seen in production don't have colour as part of the simulation; instead an existing property like density or temperature is used to drive a ramp to drive shading.
That said, its possible to have coloured smoke, but it needs a bit of work to setup.
First, the source volume needs to have a colour field. This is easy with a vdb from polygons sop. As long as your points have colour, you can create a new field from point.Cd, and name it 'Cd'.
On the simulation side, the smoke object natively supports a lot of fields, but not Cd. As such, this has to be added manually. Inserting a vector field node between the smoke object and smoke solver will do this, set the last parameter, 'Data Name', to Cd, and at the top set the resolution and dimensions.*
To import the Cd data from our vdb, we'll hijack a source volume dop. Create one, point it to the vdb, and move over to the 'sop to dop bindings' tab. While these fields are labelled density/temperature/velocity, we can use it to copy any field from sops to dops. Change the velocity entry so it copies Cd to Cd.
To visualise this, go to the smoke object tab, change the mode to multi-field, and on the multi-field tab, set density to density, and diffuse to Cd. Assuming your volume dimensions are correct, you should see colour when you play the sim.
The only thing left is to make sure the colour moves as velocity moves. Create a gas advect field dop, link it to the advection input of the pyro solver, and set field to Cd, and velocity field to Vel.
In the example scene I've also used a gas dissipate microsolver to blur the colour over time, and another source volume, this time copying Cd to vel. This directly maps rgb from the colour to xyz velocity, so red moves along x, green on y, blue on z, which creates an interesting effect.
Download scene: smoke_cd_advect.hipnc
*if you look inside the smoke object, then the smoke configure object, you'll see that this is similar to how each of the standard smoke fields are setup, but just conveniently channel referenced together.
2d solver
On the smoke object (and vector/scaler field dops), there's a toggle to enable 2d. As it says, this pops you into a 2d mode, which runs very fast and can be used for interesting effects. Fun to play with.