Appearance
User Interface
HDA tricks
opdef paths
All relevant info here: http://www.sidefx.com/docs/houdini/ref/windows/optype#access_contents
Referring to extra images in help markup syntax
Use this:
[Image:opdef:.?myimage.gif]
http://www.sidefx.com/docs/houdini/assets/opdef.html#opdef
Embedded videos
:video: #src:opdef:.?myvideo.mp4
Embed examples
http://www.sidefx.com/docs/houdini/help/createexamples.html#loaders
Helpcard wiki syntax
http://www.sidefx.com/docs/houdini/help/format.html
Selection
I never remember the hotkeys, the UI doesn't give any clues, writing it down here in the hope it'll stick in my brain this time...
The sidefx docs cover it here:
https://www.sidefx.com/docs/houdini/basics/select.html#loops
The summary to save a clickthrough into the docs:
- edge loop - double click an edge to select the loop. shift and ctrl will let you add and remove other loops from your selection
- face loop - hold A, then mmb click the next face, it will select a loop in that direction
- face loop partial - hold A, then hover over a face where you want to end the partial selecton, you'll see a preview. LMB click to confirm.
- face loop walking - ie you want to define a ring of faces on a grid. click the first face, hold down shift-A, then click each corner of the ring of faces you want.
- flood fill faces - to select the faces within the ring you just defined, hold h, tap a face in the center of the ring selection to flood fill the selection (but lose the ring selection). if you want the ring too, use shift-h.
- pattern selection - its possible, but I've not used it. see https://www.sidefx.com/docs/houdini/basics/select.html#pattern
- procedural selection - the group expand sop is great for expanding stuff out, use it. it can also output a @step attribute to indicate how far away the new faces are from the original selection, handy for all sorts of things.
the 9 group list hotkey (aka the joy of se(le)ct(ion))
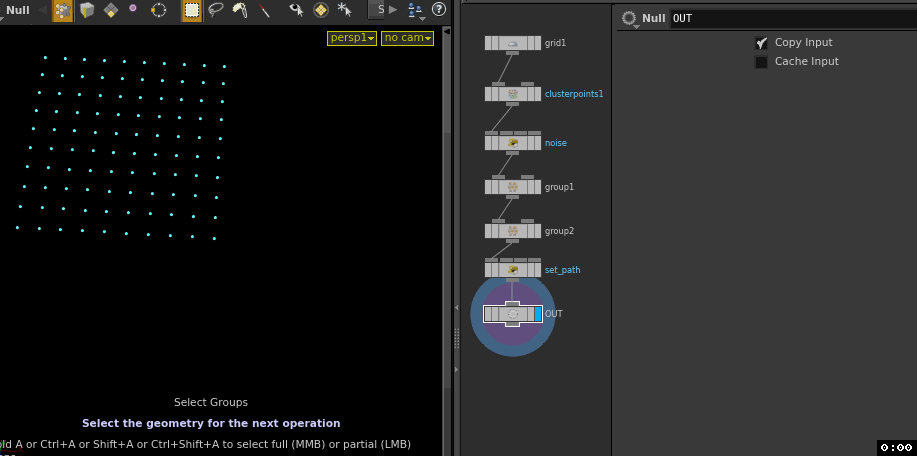 That grid of points has a @cluster attribute, a random attrib called @noise, and some @path string attributes.
- Hit the 9 hotkey, you see a list of groups (make sure you're in the appropriate selection mode, so 2 hotkey for points, 3 for edges, 4 for prims)
- Select an entry in the list
- While your mouse is in the viewport, tab in a blast node. It will be created, and the group field will be filled out
- remove the blast, back to the viewport, this time go down to attributes. Here I select the cluster attrib which I made earlier
- can see the cluster listed and colour coded. You can hover over the list to see them highlighted, or hover over a point, and all points with the same cluster attrib will highlight
- put down a blast node, this time the group field will be pre filled out with the attrib syntax; @cluster=3
- remove blast again, this time shift select nodes in the viewport, blast node, it'll be filled out with the multiple cluster attribs
- remove blast, switch to displaying the path attrib
- blast again, there it is. super handy for material assignments!
understanding viewport selection and point display
I remember this really frustrated me when I first used Houdini, doesn't bother me at all now. When you're in sops, its the maya equivalent of being in component mode all the time (ie, like you've hit F8). Thing is Houdini doesn't shout at you the way maya does, and you can be in sops and have selection disabled, which can be more confusing. So here's what to look for:
- s hotkey in viewport enables selection mode
- esc hotkey quits this mode and normally puts you into view mode. so if I consciously want to get out of select and back again, i'll be going s, esc, s, esc
- in select mode, 1 2 3 4 choose obj, point, edge, face respectively. 1 will kick you up a level into /obj context which is annoying, but just hitting 2 or 3 or 4 will drop you back down again
- in view mode, 1 2 3 4 choose the persp/top/front/right view. As before, normally I don't want or expect this, so I'll swear, hit 1 to go back to the persp camera, hit s, then 2 to choose points
- the toolbar at the top of the viewport tells you what mode your in. in view mode, its blank. in select mode, you see icons for point/edge/face, with one of them highlighted for the current mode.
- if you can see blue points, you're either in point mode, OR you've enabled 'display points' with the toolbar on the right of the viewport.
- most of the time i want to stay in select mode, but not clutter my view with points. i've found the simplest way is to hit '4' to get into face mode, the viewport looks clean, but i can jump back to points whenever I want
- another shortcut to swap to persp/top/front/right is to hold down spacebar and press 1/2/3/4.
the frustration of seeing blue points when you don't want them, or not seeing them when you do, drove me crazy for the first week or so. Keep an eye on the toolbar, all makes more sense.
Misc
Arrow keys and looping
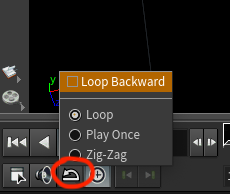 The left and right arrow keys on your keyboard will move forward/back by 1 frame. If you're at the last frame it'll loop to the first, but it won't go the other way.
If you want this, click on the looping behavior button in the lower right, and toggle 'loop backwards'.
If you don't want the looping at all, disable that toggle, and set the loop mode to 'play once'.
mplay for comparing sequences
I must admit I don't use mplay much these days, we have RV at work, and if I need robust playback elsewhere I'd probably use DJV, nice open source tool. Still, its handy to know that mplay can do more playback tricks than people expect. I vaguely recalled it could compare sequences, but before I could work it out, JeffLMnT from the discord chat explained it all, here's a summary:
- After you load your first flipbook, go to view>layout and choose any number of columns or rows. In the same spot uncheck "hide blank viewports"
- Click the blank viewport that pops up, you'll see a green highlight move to the new viewport
- Click the New Sequence button (or menu render>new sequence) and do another flipbook, you should have two flipbooks side by side
- You can do this for up to 17 renders, perfect when wedging sims and comparing them
Wiping between them is quite easy, every flipbook names the caches with ip_<timestamp>, all you need to do is click the new sequence button and render a new flipbook. If you look in the image menu you can see the flipbook being listed with the time stamps. In the same menu there is a compare images tickbox, that should activate the compare dialog. The little tool left of the slider lets you switch between different wipes, and even ask mplay to highlight differences.
Thanks Jeff!
customise right click menus
 Houdini's right click menus can be customised through xml files dropped in your houdini preferences folder. Matt Ebb a while ago shared this rather neat trick to auto create channels in wrangles, which after he wrote it up became a feature sidefx added as standard.
Someone mentioned it'd be handy to have the create-channels button also set default values. Armed with Matt's example and the handy menurefresh texport command, I got a rough proof of concept going.
The functionality itself is done using houdini's python module, which means its pretty easy to pull apart and learn if you know a bit of python already. Here's me copying Matt's PARMmenu.xml file locally, and replacing his code with this:
import re
parm = kwargs['parms'][0]

n = parm.node()
snippet = parm.unexpandedString()

for l in snippet.split('\n'):
    r = re.findall('chf.+$',l)
    if r:
        r = r[0]
        p,default = r.split('//')
        p = re.findall("chf\(\"(\w+)\"", l)[0]
        default = float(default.strip())
        t = hou.FloatParmTemplate(p, p.title(), 1,default_value=([default]))
        n.addSpareParmTuple(t)
import re
parm = kwargs['parms'][0]
n = parm.node()
snippet = parm.unexpandedString()
for l in snippet.split('\n'):
r = re.findall('chf.+$',l)
if r:
r = r[0]
p,default = r.split('//')
p = re.findall("chf\(\"(\w+)\"", l)[0]
default = float(default.strip())
t = hou.FloatParmTemplate(p, p.title(), 1,default_value=([default]))
n.addSpareParmTuple(t)What's going on? Glad you asked:
- import the regex module
- get the reference to the parameter that was right clicked
- derive the node name from the parm
- get the vex wrangle code from the parm
- for each line in the vex wrangle code:
- find 'chf(' in the line, copy from there until the end of the line
- if that text search worked:
- get the first element (re.findall always returns a list of results rather than a single string)
- split that result on the // bit, so we get the chf call stored as 'p', and the stuff after the // as 'default'
- take the chf bit, find the word inside the double quotes, so chf("foo") becomes 'foo'
- take the comment, strip out any whitespace, and convert to a float
- make a new parameter template using the name we extracted and default value we extracted (note that the default value has to be an array in a tuple, weird)
- add that parameter to the node
This is a super rough proof of concept (it only works with chf, only support double quotes), but its interesting. Go do more things with this!
d hotkey is context sensitive
'd' over the viewport brings up display options, while over the network view it brings up different options. Easy to miss.
use d viewport menu to change point display size
default is 3 pixels, but you can make them super tiny if they get in the way, or giant. d in the viewport, geometry tab, 'point size' slider in the lower left.
d hotkey will hide the display options too
all the time i was closing the window manually like a chump. just hit 'd' again, it'll go away.
tab menu auto completes on initials
Trying to put down a point wrangle sop? You don't have to type '<tab>p o i n t w' to find it; just type the first letter of each word, ie, '<tab> p w'. The tab auto complete is very optimistic in its matching, so you can even type the first few characters of the first word, then the first letter of the second, and it'll find it, eg '<tab>p o i w' will also directly find the point wrangle.
tab menu shift-enter will auto drop and append to current selection
<s>In theory this is awesome, but it also moves the network view, which I hate. You might love it though!</s>
This now works as expected in H16, it's pretty sweet.
viewport got doubled up geo? try making a new scene view
The houdini viewport is generally pretty good, but sometimes (especially when you're first learning it for some reason), some geo will be duplicated in the view, and won't go away. Its easy to think its something you've done wrong, but if you catch yourself in time, just make a new scene view (little plus button in the tabs above the viewport, scene view), see if the view is ok again
w hotkey
- shift-w in the viewport to toggle wireframe overlay
- w in the viewport to toggle solid/wire
- shift-w in network view to open outliner
p hotkey
- p in the network view toggles the parameters in the corner
- p in the viewport toggles a floating parameter pane (but its behavior is strange; eg when inside a dopnet, pops up paraters for the dopnet itself)
- alt-p toggles the timeline to swap between panes
- alt-shift-p pops open a python prompt
- ctrl-p in the viewport creates a sticky note
visually adjust pivot of transform sop
The pivot for a transform is normally at the origin; you can tap the insert key to move the pivot (its the same as keying in values for the pivot channels, but all visual n stuff)
R and E to update display and template flags
I use this all the time, I think a hangover from using nuke too much. With the current node selected, hit R to set its display flag to here, E to set its template flag. This is often much faster than trying to hit that tiny blue rectangle.
<s>Hitting 1 repeatedly cycles between the selected node and the last created node, handy for doing a quick comparisons (analogous to nuke and setting 1 to a node, 2 to another, and tapping 1 2 1 2 to compare them) </s>
This no longer works in H16+. Sad face.
Toggle display between 2 nodes in H16 and newer
But there's hope!
Thomas Slancik pointed out that you can select 2 nodes, tapping 'r' will toggle between them. Hooray!
colour correction toolbar in viewport
 Mentioned elsewhere on the wiki, very handy. Viewport top-right menus (where it usually says persp1 or cam1), 'correction toolbar'.
geometry spreadsheet
Always have this open. ALWAYS. It should be a force of habit to see what attributes are on your geometry, otherwise you're flying blind.
The view dropdown menu on the geo spreadsheet is handy; put it into 'only show selected', then choose some points, its much easier to inspect data, get their point numbers and so forth.
If you have lots of point attributes, use the view menu, 'hide all attributes', then just enable the ones you want.
You can also use the attributes filter (the text entro to the right of the view menu. Eg, make it *id to only show attribs ending in 'id'. If you have lots of groups, you can hide them in the geo spreadsheet by using ^group* in the attributes filter.
You can sort by any column by clicking its title.
precise editing of keyframes in the animation editor
 Say you want to move a lot of keys 10 frames later. Select them all in the animation editor, and in the 'frame' field at the bottom, type +10. This also works for the value field too. Explained in more detail here:
http://www.sidefx.com/docs/houdini/ref/panes/changraph#edit-fields
Houdini on a laptop, middle mouse button
It's nearly impossible to use Houdini without a middle mouse button. If you're a lazy slob like me who likes to mess around with houdini on a laptop while on the couch, this presents a problem.
My solution has been to map a key I rarely use to be a middle mouse button. On a Mac I use the right clover-key, on Windows I map the context menu key (the one between alt and ctrl on the right of the spacebar).
- Karabiner lets you do this on OSX: https://pqrs.org/osx/karabiner/ (once its running, search for 'command middle', and enable 'Command_R to MiddleClick'. On a macbook running mojave (10.14.3), its under 'simple modifications', set target device to the internal keyboard, add a new item at the bottom. The mapping is from 'right_command', to 'button3'.
- Autohotkey lets you do this on windows: https://autohotkey.com/ I have a .ahk file in my startup folder with the mapping "AppsKey::MButton", or on my G73 its "RAlt::MButton"
- Noah Witherspook got in touch with this handy trick buried deep in the docs: "set HOUDINI_MMB_PAN = 0 in your houdini.env and it'll interpret a right-click-drag as a middle-click-drag." Thanks Noah!
Making master controllers via drag and drop
Some folk (not me) like to have a null in their scene which they use as a master controller, like making an HDA without making an HDA. They make a null, create a bunch of parameters on it, and channel link other nodes to be driven by those parameters.
There's a cool trick when making HDAs where you can drag and drop any parameters of the nodes inside the HDA onto the outside parameter list, and they're instantly created, named, and linked. Try the same trick elsewhere, you get an error.
CiranM pointed out a workaround! It's a safety feature, but you can disable it. Under the gear menu of the edit parameter interface, you can turn off 'forbid linking parameters outside this subnet'.
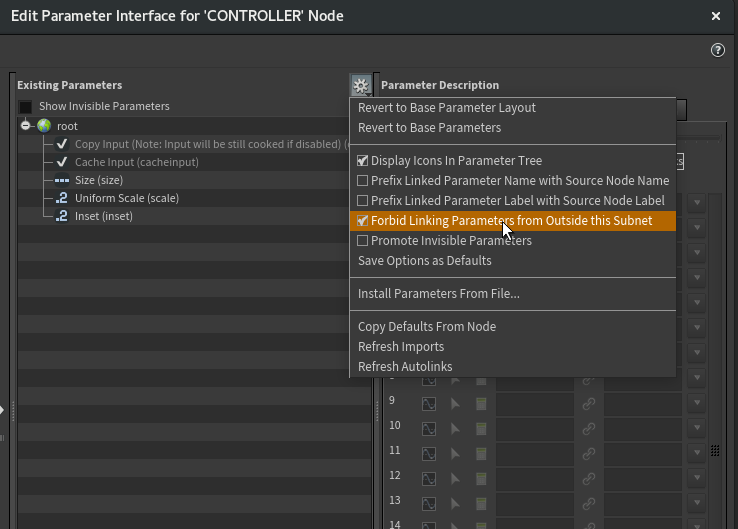 Now you can drag and drop as you please. This even includes buttons eg the 'reset simulation' button on dopnets/popnets. Here's a capture:
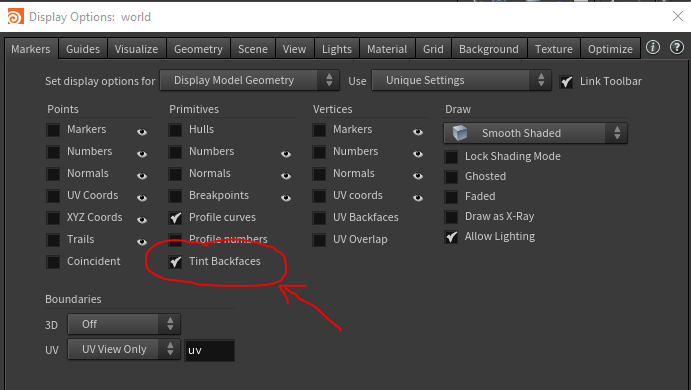
Backfaces
By default Houdini makes backfaces visible and tints them light blue. Often when doing realtime related work both these things get in the way.
To turn off tinting, its in display options, markers (first tab), second column, 'tint backfaces' is the last option.
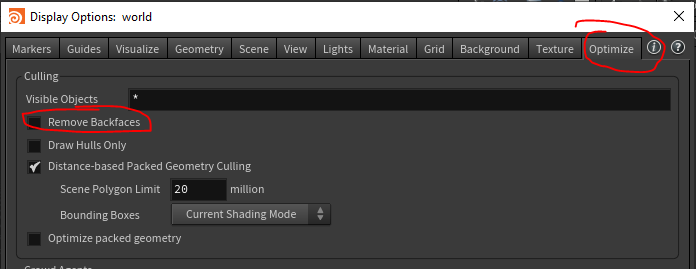
 To turn off backfaces, its the last tab of the display options, 'Optimize', remove backfaces at the top:
OSX
Houdini on Mac can be frustrating for several reasons, but 2 core ones for me are the inability to easily run it from a terminal, and the odd behaviour with external monitors. Here's a fix for both, add this to your bashrc:
bash
cd '/Applications/Houdini/Current/Frameworks/Houdini.framework/Versions/Current/Resources'; source ./houdini_setup; cd -

alias fx='export HOUDINI_ENABLE_RETINA=0;export HOUDINI_UISCALE=100;houdinifx'
alias fxr='export HOUDINI_ENABLE_RETINA=1;export HOUDINI_UISCALE=50;houdinifx'
cd '/Applications/Houdini/Current/Frameworks/Houdini.framework/Versions/Current/Resources'; source ./houdini_setup; cd -
alias fx='export HOUDINI_ENABLE_RETINA=0;export HOUDINI_UISCALE=100;houdinifx'
alias fxr='export HOUDINI_ENABLE_RETINA=1;export HOUDINI_UISCALE=50;houdinifx'The first line there runs the same command that is in 'Applications/Houdini/Utilities/Houdini Terminal'.
The aliases are ways to sidestep the retina screen behaviour. By default Houdini looks great on the retina display of a Macbook, but if you drag it over to a standard non-4k non-retina external monitor Houdini will appear double sized, icons the size of Duplo blocks.
The two envvars in that 'fx' alias will stop that behaviour, so it looks more sane. Unexpectedly it allows you to move between both screens, and it still looks ok, which is nice (if a little blurry).
If you want the standard retina behaviour, say you're in pure laptop mode, use the 'fxr' alias.
Reference images in camera
Rich Lord asked a question I've simmered on for ages. Thanks to Rau and Sepu from Discord, finally have a sensible answer.
Say you want to load an image over the camera view, there's several sucky ways you'll probably try:
- 'background image' slot in the camera. Works, and you can set the brightness via the 'd' display options in the viewport, background tab, which fakes transparency. But it's always behind the geo.
- 'foreground image' slot in the camera. You enable this in the 'd' display options too, camera tab, 'display foreground image', but there's no way to control the alpha.
- use the above with a cops path and an op:/path/to/cops. You can set alpha this way, but its not live, you need to keep runnin 'glcache -c' in a texport to make it update which is dumb, and will likely eventually crash houdini.
- make a grid, set @Alpha, parent to camera. Works, but its fiddly to setup. Worse, when you lock the camera to the viwport and move it, it only updates the grid on mouse-up, very annoying.
- reference image in /obj. Rau pointed this out, has a built in slider for alpha, but suffers the same delay lag when you parent it to a camera.
After all that, here's the one true answer via the second key tip from Sepu:
Reference image in object, parent to camera, in the viewport camera menu enable 'Export View Continuously'.
Easy to control, updates with the camera, happy days. Well, mostly happy; you still get a tiny bit of lag, but its way better than the default.