Appearance
Lops and Solaris
Introduction
Choose your weapon
Lops and USD covers a LOT of stuff. As such, I present to you 4 weapons to start your Lops attack:
- Are you just interested in the lighting and rendering side, want to get going quickly? Then head to the LopsLightingQuickstart page.
- Are you interested in USD, understand Vex fairly well, and want to get a more tech focused overview similar to the Joy of Vex Guide? Then head to the UsdGuide page.
- Do you want a video intro? Ben Skinner and I made one, its 24 mins, and is a good overview of USD and LOPS: https://youtu.be/ulkJEPflgvk
- Are you interested in my unsorted tips and tricks, opinions, hacks to make Lops do what I want it to do? Stay on this page then.
The simplest take on Lops is that it's a procedural hierarchy editor. At the university where I taught we used Lops for doing layout, creating sets, all that stuff, so this quickstart is heavily focused on that. From that perspective there'll likely be a lot of 'ahhhh, is that all there is to this?' moments, as this side of Lops is relatively straightforward. Lops and USD are capable of lots of other things, will cover those when I get to them!
Background context
In broad strokes of Houdini vs USD vs hierarchies, you could say:
Houdini:
- PRO: Great node editor, great procedural workflows
- CON: Bad at editing hierarchies, scene manipulation
USD:
- PRO: Great at editing hierarchies, scene manipulation
- CON: Needs high level python coding skills to use effectively
Lops/Solaris attempts to combine the positive aspects of both these things:
- PRO: USD's ability to manipulate hierarchies and scenes
- PRO: Houdini's great node editor and procedural workflows
An unfortunate extra con of USD is terminology, read the official docs and you're rapidly drowning in tech jargon. Once you get familiar with Lops and USD it's not too scary. I've written these notes for people who are familiar with Houdini and have never touched USD, and only introduce the jargon as needed.
To get started, make sure to set your desktop to 'Solaris', so you can look at the scene graph tree and see what's going on with your object hierarchy. This should drop you to a new context, so in addition to obj, shop, mat etc, you have a new one, stage.
Thanks
Credit where it's due, Ben Skinner did most of the work here, I just wrote it down. Ben developed a lot of the USD stuff for our pipeline at UTSALA in 2018, then was first to dive in and play with Lops and PDG in 2019, so many thanks to him. He has his own website of more coder focused tips at http://vochsel.com/wiki/ .
Mark Tucker has also been very patient with my idiot questions, has offered valuable advice and edits, thanks Mark.
Also Lewis Taylor has been a great sounding board though all this offering great feedback and advice. Huzzah.
Right, lets go!
Lops basics
Define a top level folder
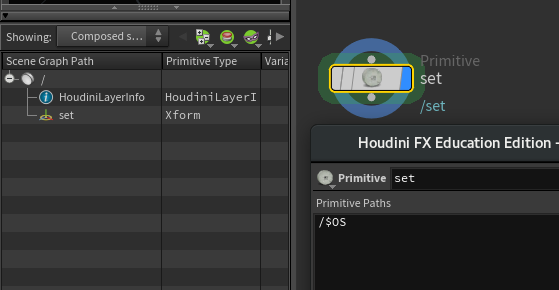 Create a primitive lop. Look in the scene graph tree (SGT), you can see you have a tree with 2 things, HoudiniLayerInfo and primitive1. The parameters for the primitive lop set its primitive path as /$OS. In other words its at the top of the hierarchy, and $OS means its named after the node itself. Rename the node itself from 'primitive1' to 'set', and you'll see in the SGT its been renamed to /set.
For anyone familiar with Maya, this is the equivalent of making an empty group, naming it, and putting it at the top of your Outliner.
Worth pointing out early on what 'primitive' means in USD vs in regular Houdini. In sops a primitive is a renderable thing, like a polygon, a curve, a volume. In USD a primitive means a thing in the Scene Graph Tree. So in that outliner style way of thinking, a folder is a primitive, a shape is a primitive, a transform is a primitive. Pretty much any element you see in the Scene Graph Tree is a primitive. Remember, hierarchy editor, we're thinking in those terms....
Add a sphere to the scene
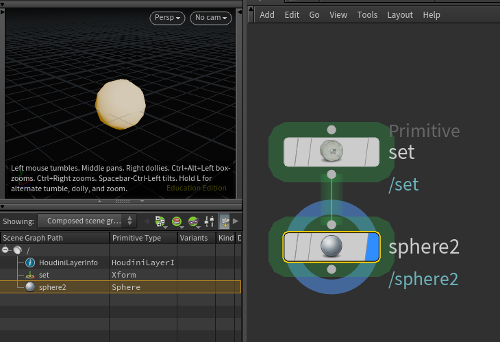
Create a sphere lop. View it, you can see its made you a sphere, and its location in the SGT is /sphere1.
Merge the sphere and set
You can do the houdini thing, put down a merge node, and connect the set lop and the sphere1 lop to it. Look in the SGT, they're now both in the hierarchy.
Merge the sphere and the set, Lops style
 Merging is fine, but you can also connect nodes inline, like Katana. Delete the merge, wire the sphere after the primitive. Look in the SGT, you've done the same as the merge but with 1 less node.
Remember, lops aren't sops! Sops is about manipulating geometry, lops are about manipulating hierarchies. Lops nodes can carry through what's in the previous node, and add their own stuff. Takes some getting used to, but you quickly get the hang of it.
Merge the sphere and make it a child of the set
 The set primitive and the sphere are sitting side-by-side in the SGT, we probably want the sphere to be a child of the set. A manual way for the moment is just to set the path for sphere1 to where we want it to go. Select the sphere lop, change its primitive path from /$OS to /set/$OS. Look in the SGT, its now a child of /set.
Bring in a pig from sops
It's unlikely you'll just have a scene full of spheres and nulls. Jump over to sops and make a pig, and append a null named OUT_PIG so you can find it easily. Get back to the /stage network. Append a sop import, set the sop path to find your pig. Look at the SGT, ugh, ugly name, its called it sopimport1 over there. Rename your lop to 'pig'. Now it has a nice name, but a bad location, it should be under /set. Change the Import Path Prefix to /set/$OS.
Move the pig
Can't just have the pig at origin, that's silly. Select the pig in the SGT, and choose the translate tool from the viewport left-hand options. Drag it away so it's no longer blocked by the sphere. Now look in the node view, see that its created an edit node for you. This works like an edit node in sops, so you can select the sphere, move that, back to the pig, move that, etc, all these general changes are stored on the single node. Works, but sometimes you'll want more explicit control. I wonder if lops has something like the transform sop?
Move the pig with a transform lop
Of course it does. Append a transform lop, and at the top where you'd expect to find a group, there's a field expecting you to give it a name of a SGT location. Clear the expression and start typing /set/pig, you'll see it has tab completion like usual groups. You can now move stuff more explicitly. That's nice. Also note you can move /set, and the children move as expected. That's a trick you can't easily do in vanilla houdini.
Lops are not sops part 1: transform lop
If you load a usd file on disk using a file lop, and immediately try and transform it, the transform lop doesn't appear to do anything.
The reason is the default expression you can see up in the 'group' field, or rather, the thing where the group field would be in lops. It's set to identify the last modified 'thing' in the previous node, so the transform lop will only move that. But with a file lop nothing has really been modified, so it doesn't find anything.
To fix you can either drag and drop something from the scene graph tree into the field (called the primitive path field), or put in an asterisk to choose everything, or use viewport style preselection, ie, select something in the viewport first, hit tab while your mouse is in the viewport, choose transform, the prim path will be pre-filled out for you.
Also note that if the prim path is empty, NOTHING will move, which is the exact opposite from sops where generally when nothing is selected, EVERYTHING will be affected. This comes back to USD's core behaviors; all operations should be linked to a name of a thing in the scene, and it will try to be as conservative as possible to minimise edits.
Edit lots of things with a stage manager
Say you have lots of usd files on disk, and you need to do lots of making folders, parenting stuff, getting initial layouts correct. This is easy in Maya with its Outliner cos you can just directly grab groups, rename, do things, but the SGT is view only. You don't wanna go use Maya do you?
No you don't. Append a stage manager instead. The parameter pane now looks like a simple version of the SGT, but this is fully editable. R.click, make folders, double click stuff to rename things, shift click and drag and drop stuff, go craaaaazy. Further, click the little folder icon, it brings up a file browser, so you can find all those usd files on disk, drag them into the graph view, or even into the viewport. Click the little transform icon next to things to move them directly from this one node. It's amazing.
Fancier combining with graft and reference
Say you had a castle set, and had gone through with the stage manager and defined locations for moat, drawbridge, castle, courtyard etc. Meanwhile you had another chain of lops nodes to make a bedroom. Once you have that whole chain, how would you insert that bedroom scene graph into the correct location of the bigger castle scene graph?
A graft is the simple way. It takes 2 inputs, and reparents the right input to a SGT location in the left input. By default it has an expression to find the last defined primitive from the left input, and parents all the stuff from the right input under that primitive. You can override that and put it wherever you want, but that's base idea.
A reference is a fancy graft. As well as 'parent all the right inputs to somewhere on the left' input, it can also directly load usd files from disk, and parent them to a location (this is its default behavior).
(Mark Tucker points out flaws in my simplification here, and rightly so, but we'll get to those later)
Reference vs payload
The reference lop has a few modes, with alternate between 'reference' and 'payload'. What's the difference?
When something is referenced, it HAS to be loaded.
When something is a payload, it CAN be loaded, or not.
You can imagine this being handy for big heavy scenes; eg say you're merging a huge forest full of detailed tree models. Lighters will require the full forest for final lighting, but if an animator loads the shot, they can 'unload' the forest payload, it's never brought into memory, the animator gets a nice fast load time, and doesn't affect the needs of lighting downstream.
Wherever possible (and wherever it makes sense), use payload.
Lops level 2
Materials
In regular rendering setups you need to create a material, name it, assign it. It's the same with USD, with the extra step of saying where the material will live in the scene hierarchy.
A material library node does all this work. Append one, by default it looks for materials inside itself. Dive inside, you're now in a mat context.
- Create a few principled materials, name them nice, jump up again.
- Click the 'auto-fill materials' button, look at what it's done; it's made a /materials folder in the SGT, and put all the materials under it. From the parameters pane it will have made a multilister for each material, each has a 'geometry path' parameter.
- You can drag geometry from the SGT into this parameter, or use the tab completion stuff, or use wildcards.
The material assignment will appear in the viewport if the viewport understands your material. The binding of a material to geometry is tagged on the primitve. Select a primitive in the SGT that has a material assigned, and look in the scene graph details pane. There's been an attribute for a material binding, linking to the chosen material.
Variants
For our current project we'll be in a forest fire. Some trees will be on fire, others won't. I remembered a siggraph talk by MPC on The Jungle Book fire sequence, where layout had fire assets and props they could put in the set, seemed like a good thing to try in Lops.
To be specific, I would like a tree asset, and have an option to have the tree on fire or not. Variants are the USD mechanism for this.
The Lops skin on top of variants is kind of a fancy merge, kind of a fancy switch.
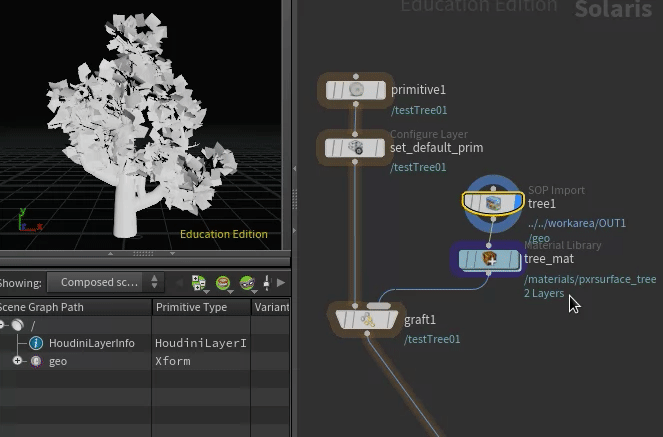
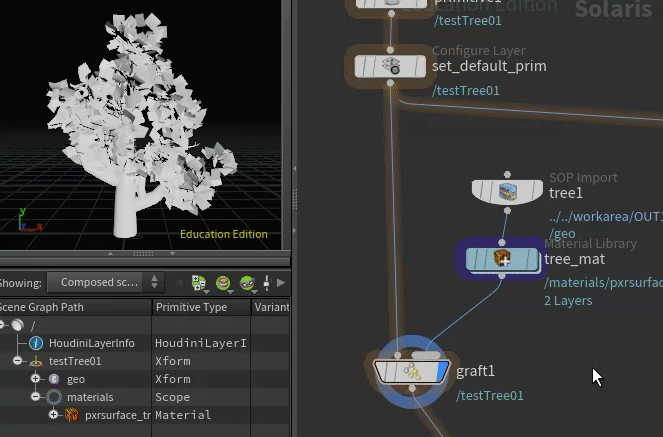
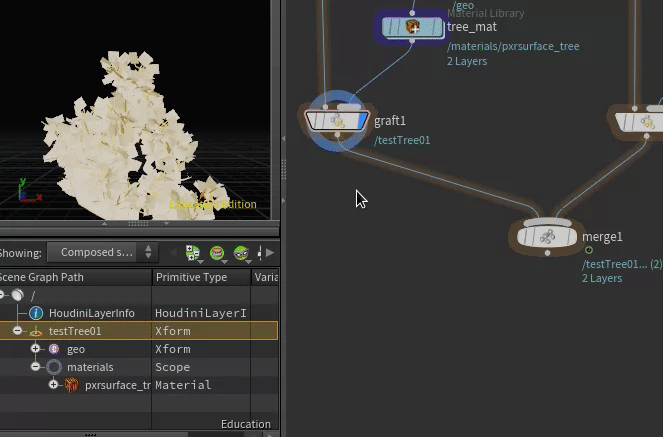
First get your geo ready. I've sop imported a tree, assigned a material, and used a graft to put it all under a nice top level SGT transform '/testTree01':
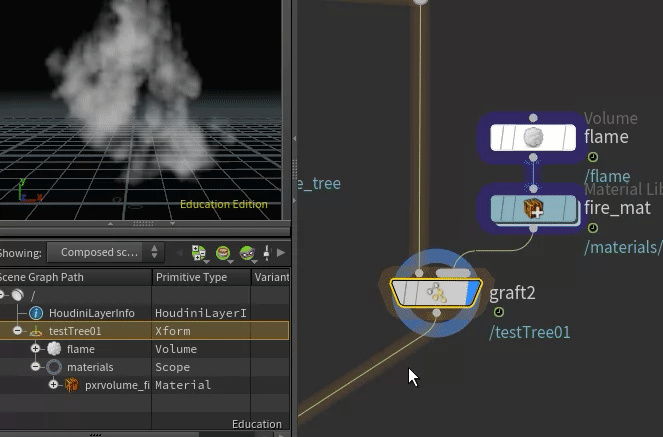
 I did a quick pyro sim in sops, made it loop (the sidefx labs loop sop is awesome), wrote a vdb sequence on disk. I imported that with a volume lop, assigned a material, grafted that under /treeTest01 as well:
 But we don't want to choose between tree or flame, we want to choose between tree, and tree+flame. No big deal, lets just merge the tree and the flame to create our tree+flame, ready to feed to our variant setup:
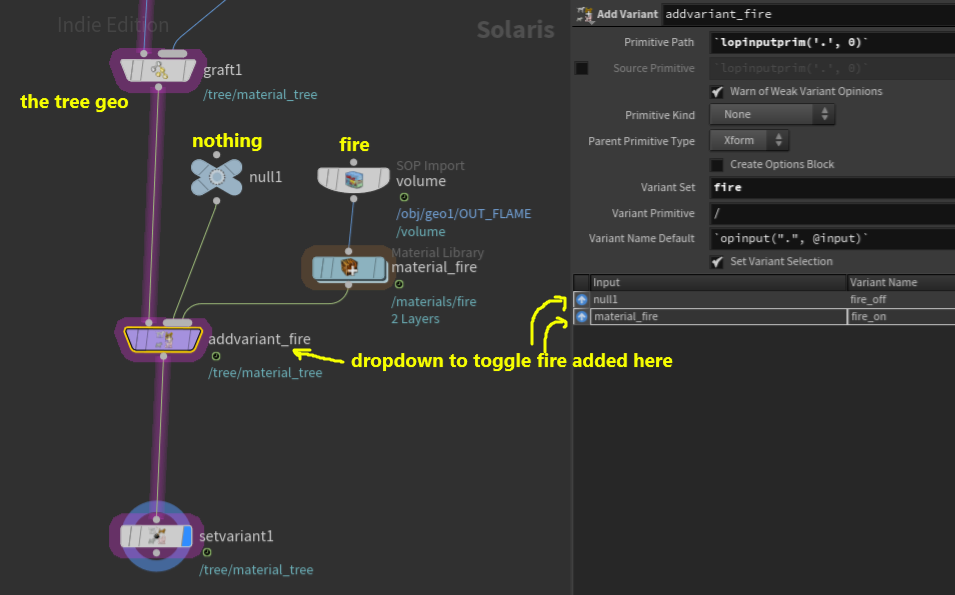
 Now the variant magic. We have a tree, a tree+flame, and connect them to a variant lop. I create a 'add variants to new primitive' lop, and connect the tree and tree+fire to the second input.
When this is all done, variants are presented as a drop down selection, so we need to define a name for the drop-down option, names for each of the drop downs, and what thing in the SGT this is all applying to. Here I'm telling the variant thing (the primitive) is /testTree01, the name of the drop-down will be 'fire_toggle'. To name the options within the drop down, double click and rename in the second column of the multilister:
 Now we can select which one to use with a 'set variant' lop. Append, choose the variant option ('fire_toggle'), choose a variant, see the SGT and the viewport update to flip between fire and no fire. Neat!
 Oh wait, the thing is called something silly (or was when I set it up), the variant node uses /$OS as the name for the new variant. Silly node. Change that to /testTree01, and it all works as expected.
This can now be duplicated (try a duplicate lop the equivalent of a copy and transform), and set variants on a subset of the trees. It's pretty cool.
Why do all this when we could've just used a switch? Remember, when we save this USD asset out to disk, all that variant magic is now inside it. So we could choose variants here in Houdini, or in USDview, or in Maya, or in Katana, or in any package that supports USD. If we get to final lighting and the lighter realises they need to have more or trees on fire, they can do it, it won't involve a kickback to fx or layout.
A cleaner way to prepare those variants
Ben Skinner pointed out the merge isn't necessary, I could just chain 2 grafts. He's right of course.

An even cleaner variant setup
Download hip: lop_variant_fire.hiplc
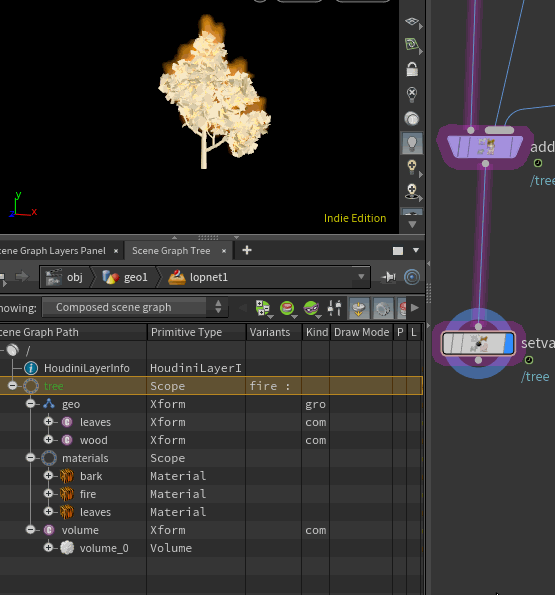
Mark Tucker pointed out it's wasteful to include the tree in both variants, when the only thing that's changing is the fire. He suggests it's better to just add a variant that only choose between the fire and a null, makes sense. This doesn't have the VDB nodes I should be using if this is to work outside of Houdini, but it's nice and clean.
Check that scene graph! So clean!
Instancer for trees on a groundplane
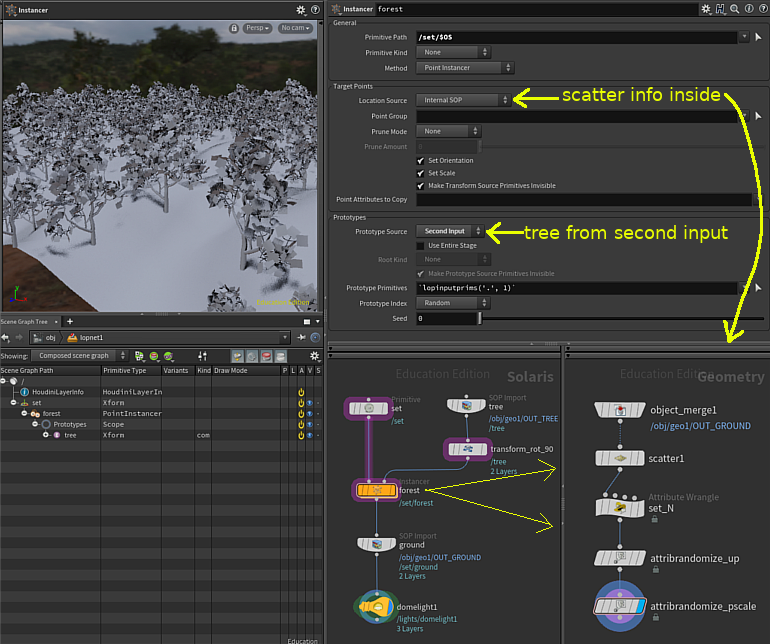 Download hip: lops_forest.hipnc
The core idea is very copy-to-points, but with some extra stuff to deal with USD requirements.
An instancer will need at least 2 things, points for the locations, and shapes to copy onto those points.
A 3rd requirement is what we touched on earlier. We covered how lops nodes can be connected one after the other, and the new node appends whatever it's doing onto the existing stream. So this system has to be able to take in an existing scene, and add the copied stuff onto that.
3 inputs. A variety of ways to expose this to the user. Who will win?
The answer is 'yes'. Lops exposes several different methods for this, I'm going with the one that's most intuitive for me, you can play with the other methods when you're more comfortable.
The instancer lop has 2 inputs. I've set it up so the existing scene flows through the left, and the shapes we'll copy are on the right.
Where do the points go then? You can double click to dive inside, and this is a sops network. Define any geo in here, those points will be used as the instance locations.
So:
- sop import a tree, connect that to the right input
- on instancer, 'prototypes' is the shape to be instanced. So set prototype source to 'second input'
- on instancer, 'target points' is the point locations. Default mode is 'internal sop', we'll use that
- dive inside, create a groundplane (or object merge in something), append a scatter
- done!
There's some tidying up to do here though, names and stuff should be better. The USD convention is for the objects you're instancing to go in a prototypes folder, which the instancer does for you. Generally name things as nice as possible. Starting this from scratch I've made a primitive lop named set, to get a /set at the top of my heirarchy. I've named the instancer 'forest', and put it under /set/$OS. The tree via the sop import is named 'tree' and its primpath is /$OS. When the instancer grabs it, it gets moved underneath to be at /set/forest/prototypes/tree.
As I said this is one of many ways to set it up, start typing 'instanc' in the tab menu, you'll see a few different options, but most are just the same instancer lop in different configurations. You can use the inputs for different things, refer to external geo for the locations, it's pretty flexible.
Instancing and variants
 Download hip: lops_point_instance_variants.hiplc
So having learned about variants, and having learned about instancing, it seems obvious that we should be able to combine the two right?
If you think about what's being requested, it doesn't really work like that. Instancing is about taking one primitive and linking it to lots of transforms, so they all share the one primitive. A variant is a change to a primitive. If you want each instance to be able to use a different variant, then fundamentally you can't; you change one, you change them all.
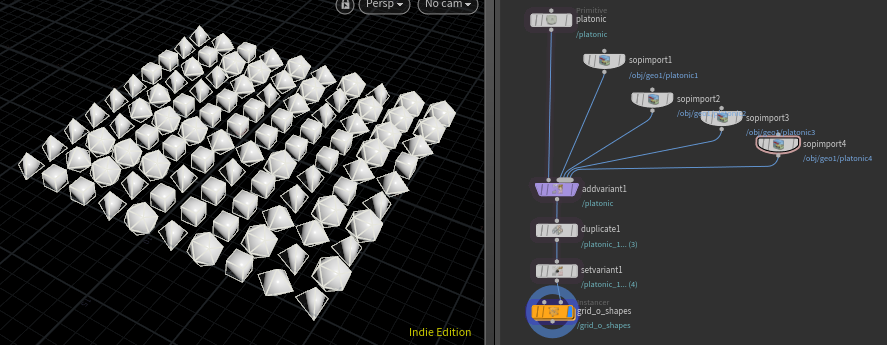
A possible fix is to take your primitive, duplicate it as many times as you have variants, set each duplicate to a different variant, then instance those.
This setup provided by Mark Tucker does exactly that. Here's the core of what's going on:
- A duplicate lop is like a copy-and-transform sop, so we duplicate the shape 4 times, because we have 4 variants.
- A set variant lop comes next, which uses the @prim lops attribute so that each prim gets a variant matching to its prim number ie, 0, 1, 2, 3.
- Now that we have 4 prims which each have the variants we need, these can be fed to an instancer in 'random' mode, giving us our shape variations.
Lops level 3
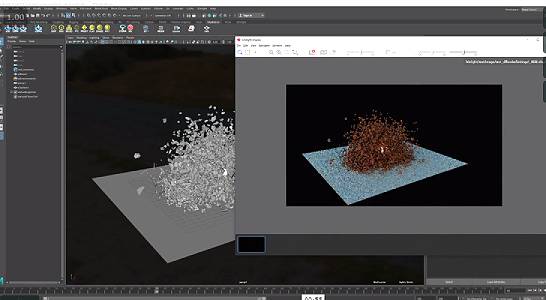
RBD to lops as a point instancer
rbd export version 1
(skip down to v2 for the 'correct' answer, I'm leaving this here as reference as to why v2 is better!)

I chatted with Lewis Taylor aka tinyhawkus about USD and RBD. He had a workflow pre-lops that involved writing out one huge static USD file containing the heavy RBD geometry, and a super light animated USD file that would contain only animated points and a point instancer referencing the big file.
Here's an attempt to recreate that workflow in lops.
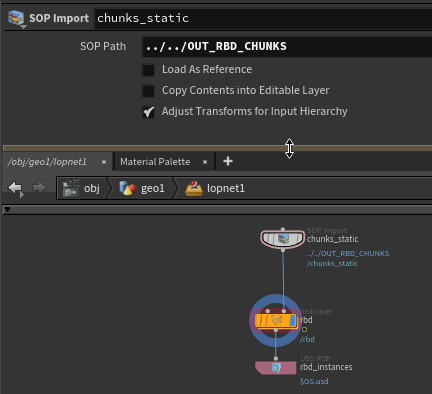
The sops network is a simple RBD setup. The static rbd pieces go to a null called OUT_CHUNKS. The RBD solver in sops has multiple outputs, handily one of them is the points that represent the sim, they're connected to a null called OUT_POINTS.
In the lop network, the chunks are brought into lops with a sopimport and run to a point instancer. The source of the points internally is just an object merge to the points mentioned above. To get the correct chunk put onto the correct point requires 2 things, to set the list of shapes to copy, and how to match shapes to points. That's done by setting the following parameters on the point instancer:
- prototype primitives: /chunks/Prototypes/*
- prototype index : name attribute
With that done, we can just write out the usd file.
This setup creates a single usd file, which isn't quite what I want. I've set the Layer Save Path parameter on the sopimport, which from what I understand should then be implicitly written to disk when the final rop is run, but it's not. I got stuck here, but Mark Tucker provided a solution:
rbd export version 2
Mark Tucker read the above, and offered the following handy improvements:
To write the chunks to a separate file from the animation, you just need to turn on the "Load As Reference" option at the top of the chunks node.
 Because each chunk is unique, he suggests changing the chunks node's Primitive Definition -> Packed Primitives option to "Create Xforms".
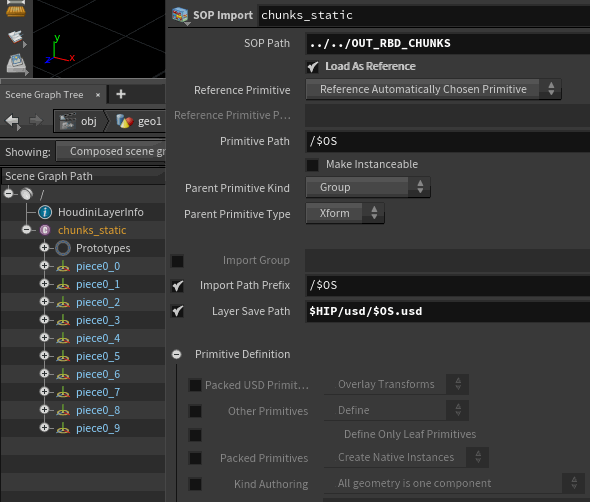 Watch the SGT in the above gif, before the change there's a prototypes folder and all the pieces are blue, implying they can be instanced, after the change the prototype folder is removed, and the pieces are no longer blue, ie they're regular geometry.
Why make this change? Cleanliness. We're not really instancing each chunk to hundreds of locations. Each chunk can only ever be moved to its corresponding single rbd location. Having these pieces be ready for instancing is needless overhead.
Because we removed that unnecessary 'prototype' location, the instancer will need its prototype primitive path updated; change the instancer1 LOP's Prototype Primitives to "/chunks/*.
Here's the old scene graph tree vs the new:
 Lewis recorded a cool demo showing it working in Maya and Houdini with 3delight and a non-trivial data set:
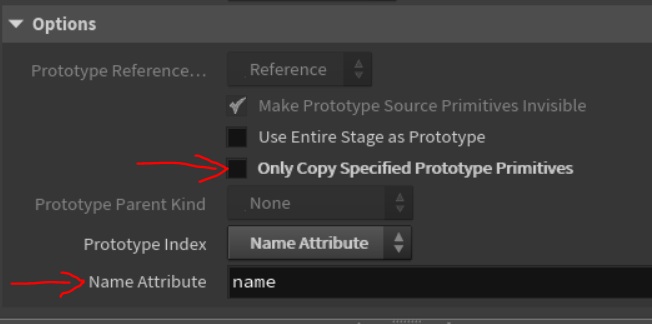
Note for v19+ users
Seems the defaults have changed on the point instancer, so if you're following along at home with a fresh scene, make sure that 'only copy specified prototype primitives' is disabled, and the prototype index is 'name attribute', with the attribute being 'name':
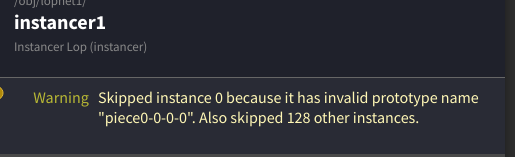
 Also, if you use the default rbd material fracture, you'll get the instancer complaining. As nicely summarised by Ben Skinner, "the only valid usd characters are lowercase, uppercase, underscores, numbers after first character". The rbd material fracture sop uses a hyphen as the default separator, so you run in this error:
 Easily fixed though, jump back to the rbd material fracture sop, and change the hyphen to an underscore:
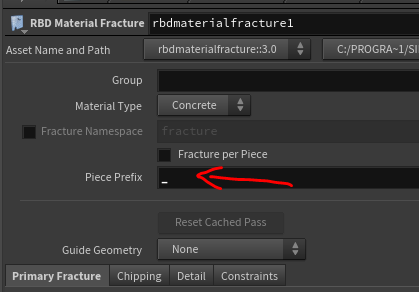 You might need to toggle the bypass flag on the instancer to see it fix, but should fix.
Also note that the prototype primitives on the instancer is set to /sopcreate1/* in the hip. This wildcard will strip the /sopcreate1/ part from their names, so that the instancer can properly match them to the @name attribute of the points.
Layers and references and save paths
Why did enabling 'load as reference' in the above section fix the file save stuff? How does the final ROP know to save that file? What are layers? What magic is this?
There's a few bits here that tie together, I'll explain as 3 high level axioms, and explain more afterwards:
- Layers are containers.
- References always exist in their own layer.
- Layers define their own location to save or load a USD file on disk.
Layers are a core idea in USD, so far I've managed to avoid them. Layers are like groups in Photoshop; its a container for stuff to live in, and layers can be composed and combined.
Layers also define how things will be saved. Generally each layer will be saved to its own file, which can be handy when you're trying to save your USD scene in a modular way.
References implicitly live in their own layer, meaning they need their own location on disk.
When reading USD with a reference that's self evident, obviously you're reading from that unique file location.
When writing USD with a reference, and that reference is generated within houdini from a sopimport, its implied that you've made a new layer, and that you'll want that reference saved in its own location. In the previous example by swapping the sopimport to a reference, and setting the layer save path, we've explicitly said we want the chunks saved in their own file.
Cleverly the USD ROP is aware of this. So even though you only define the path for the 'final' USD file on the rop, it will detect if you have other layers defined, look at their save path, and write those layers to those locations.
If you don't specify a save path, you'll get a warning that Lops will just vomit whatever incoming geo to the output usd file. Sometimes you want this, eg when delivering standalone fx, its likely that your output USD is your delivery, you don't benefit from modularizing that.
Eariler I mentioned a fundamental difference between grafts and references which I glossed over, this is the key difference. a graft merges geometry into a single layer, a reference implicitly creates a new layer, and expects that you'll define a save location.
The Scene Graph Layers panel can be useful here, you can see the layers being made, references sitting within them, and the implied save type and save location per layer.
 Incidentally, this is what the glowing coloured borders in the node network represent, a different random colour is chosen for each layer.
 Thanks to Ben and Mark for helping me understand all this, and offering handy analogies!
Here's the end result:
Looping clips and vdb sequences
 Download hip: lops_vdb_loop_valueclip.hip
This can't be right. And yet, it works so... ?
- Write out a 'myvolume.usd' to disk which is the length of your loop, say 42 frames.
- Read it back in with a file lop (which is really a sublayer lop)
- Append a value clip lop, create 2 clips, point both clips to the same 'myvolume.usd'
- Make the first clip be 'length-1' frames (so 41 frames in this case), the second clip be 1 frame
- Set 'loop end time' to the the total length you want the loop to run for, say 2000 frames.
Bullet point notes about that process:
- Volumes are just wrappers around vdb files on disk.
- The contents of that wrapper is very lowbrow, internally its just a list of strings, one for each frame of the vdb sequence
- Because its ultimately just a list of files, Mark Tucker suggested an expression to loop over the files you have.
- I'm stubborn, that seemed too simple, i had heard usd had clever support for clips and looping and stuff.
- The way to do this is a value clip in lops.
- You define clip files, which point to usd files on disk. No, it can't do timewarp style tricks of existing upstream stuff, it has to be on disk (I'm guessing for performance)
- You set the global 'loop end time', give it clips, tell it how long each clip runs for, and it'll loop them until it hits the loop end time.
- If you inspect the written out usd its basically an even longer list of frames on disk, in the loop order you specified. Basically the same as Mark's suggestion to just use an expression on the filename. 😃
- The base behavior doesn't make sense. I have a 42 frame vdb sequence on disk:
- If I use single clip, I don't get any animation.
- If I used 2 of the same clip, both marked as 42 frames long, the animation would play forwards for 42 frames, backwards for 42 frames, forward again.. weird!
- If I used 2 of the same clip, the first marked as 41 frames long, the second as 1 frame long, it works.
- The valueclip requires an input, which must EXACTLY match the hierarchy of the value clips. Any variation, like names don't match or node types mismatch, the valueclip can't overlay itself properly, no animation. I found the easiest way to ensure it all matches up is to just load the usd first with a file lop, then valueclip after that.

Value clips and variants
 Download hip: clips_and_variants.hip
Combining clips and variants? Don't use sublayers, use references.
The next logical step in our setup was to setup looping fire on a tree, then put it under a variant so that layout folk could place trees and choose 'fire/no fire'. When I tried this however the loops stopped looping.
Ben Skinner found the problem; rather than load in the original clip with a sublayer, use a reference.
Mark Tucker suspects its something to do with the order-of-precedence of overrides (the LVRPS acronym, so layers will override variants which override references etc). Stil not entirely clear on why, but the fix is straightforward.
More explaination in this sidefx forum thread: https://www.sidefx.com/forum/topic/75302/
Sublayer vs reference
Both a reference and a sublayer let you import a usd file, what's the difference?
A sublayer brings in everything from the usd you choose, with the hierarchy exactly as its specified in that file.
A reference gives you more control, with two important key features:
- You specify where the file will be inserted in the scene graph hierarchy (mandatory)
- You can specify to only load some parts of the usd file (optional)
So references are more flexible, sublayers are simple. If you're just bringing in simple stuff, why not use sublayers? From my experiments I've been burned a few times where sublayers break things, like the variant example above. I've also been told by smart people that references have a more complete API under the hood and appear to be better supported than sublayers. As such, I'm trying to wean myself off sublayers, and go the slightly more complex references. It's not that much more effort, and seems to cause less headaches in the long run.
To make a reference function like a sublayer, set the primitive path to be the same top primitive as the sublayer. In the example below, the top primitive is /volume1, so I type '/volume1' into the primitive path parameter.
 I thought there was an automatic way to do this, but it errors for me. Hmm.
USD and big files
Skip down to Geometry clip sequence for the latest way to do this in May 2024
Download hip: stitching.hip
 'USD is amazing!' you're no doubt saying by now, 'is it good at everything?'
Well, it's very good at making big files. Really good. So good it's actually bad. USD is like alembic in that it prefers a single file as output. If you have a 100 frame animation, USD expects you to write out a single 'animation.usd' file. Fine in most cases, but it'll happily let you cache out a 500mb per frame hair cache for a 1000 frame shot until you run out of disk space or crash your machine, or both.
We faced exactly this issue on the UTSALA short film a few years ago. Our main character had 2.5 million hairs, about 170mb per frame. Most shots were about 4 seconds long and our fur caches were ok, but a couple of 15 second shots would consume all the memory we had and crash Houdini. Yuck.
File per frame
One way to fix this is to simply write out a usd file per frame. On the USD rop, enable the separate file per frame option, easy.
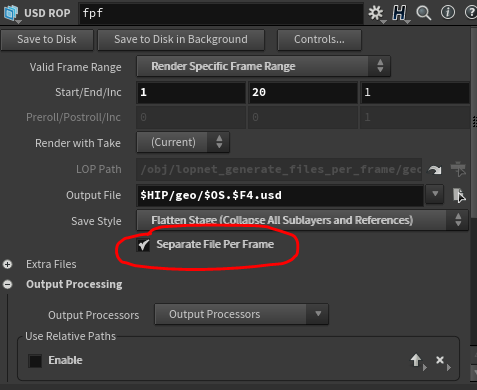 But now you have 100 usd files on disk. If you're wanting to pass this downstream to other departments, they'll need to know how to read that sequence. Maybe they will, maybe they won't. And what about motion blur which expects to be able to read previous and next frames? It's a mess. What to do?
Usd Stitch
There's a USD command line tool that can take a sequence of usd files, and stitch them back into one megafile, so you've avoided the export issues with memory, and you can pass a single file downstream. Solaris has a wrapper for this, the usdstitch rop. Create one, point it at your USD sequence using $F4 in place of the frame number, give it a output file location, you now have a single file again. Great!
Oh hang on, but that file is huge! Man this problem is tricky.
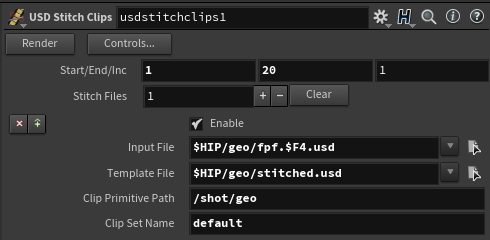
Usd Stitch Clips
Ideally we want the best of both; a single file that lighters and other departments can point at, but also a single file-per-frame so that we don't have a monolithic single file. Can we achieve this impossible dream?
YES WE CAN.
That's what the usdstitchclips rop is for. Similar to how USD volumes are really a thin wrapper around a VDB sequence, you can make a thin wrapper around a USD sequence.
Create a usdstitchclips rop, point it at a USD sequence, give it an output name, and do some fiddly work with the extra parameters, and you get a USD wrapper around your USD sequence. The fiddly bits are the same as the value clips in the previous tip, it needs a primpath and a name for the stitched clip. The problem with this being in a ropnet is that it can't inspect the file to give you a name, so make sure you get the names exactly right!
 Note that I've heard issues with this and motion blur, if that'll be an issue for you, you better do some testing!
Geometry clip sequence
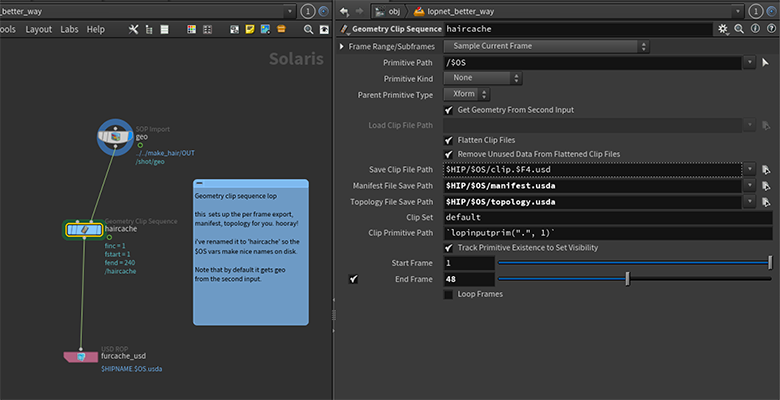
Download hip: stitching.hip
All that above stuff is such a pain, sidefx improved this workflow. The Geometry Clip Sequence Lop will quietly setup all the intermediate usd files so you don't have to, and even set itself up so that it runs inline, no pre processing or staged rops required.
By default you connect the geometry to process to the second input, and rename the node itself to represent what the contents are, eg 'furcache'. When this is written out via a usd lop, it will create a per frame cache, instructions for how to load the cache (the manifest), instructions for values that remain constant (the topology), and the per frame cache usd files themselves. Lovely timesaver.
Thanks to Mike Lyndon for pointing this out to me, and indirectly to Ben Jones for pointing this out to Lyndon.
Inline USD lop and channels
 You can directly create and manipulate USD with the inline USD lop. Eg, drop this code in, you get a primitive sphere:
vex
# Simple ball
def Xform "geo"
{
    def Sphere "Sphere"
    {
        double radius = 1;
    }
}
# Simple ball
def Xform "geo"
{
def Sphere "Sphere"
{
double radius = 1;
}
}What's fun is to exploit Houdini's behavior to evaluate hscript expressions in a UI first before sending result to the rest of the system. So here we could create a slider to set the radius. Change the code to look like this, so we have a ch call in a backtick expression:
vex
# Simple ball
def Xform "geo"
{
    def Sphere "Sphere"
    {
        double radius = `ch('radius')`;
    }
}
# Simple ball
def Xform "geo"
{
def Sphere "Sphere"
{
double radius = `ch('radius')`;
}
}There's no button to create the channel slider yet, so make that manually via the gear menu, and add a float slider called radius. Finally toggle the bypass flag, and now the radius is controlled by the channel.
Use attributes to change render properties
Every second pig has cast shadows disabled, controlled via sops point attributes.
Download hip: lops_set_shadow_casting_in_sops.hip
A key selling point of lops for Houdini folk is being able to treat high level render things (lights, objects, cameras) as if they were just prims in sops. Because of the sops <-> lops interaction, its possible to setup attributes in sops on geometry, and be able to use that to do interesting things when you import to lops.
Talented one man army Nick Deboar asked if it was possible to set shadow casting as an attribute, and have a renderer understand that. You can't do that in regular houdini rendering, but its possible in lops.
Here I use a copytopoints to create some packed pigs, and set every second pig to have @noshadow = 1. That is pulled into lops with a sopimport, where the packed geo become seperate usd prims, where each prim has that @noshadow attribute.
Most lop nodes have a 'primitive' parameter at the top, which functions very much like the groups parameter in sops. As well as letting you specify paths to primitives and wildcards, you can filter using expressions, similar to how you'd do it in sops.
Here, we can isolate to the relevant prims by using the expression
{ @noshadow == 1}
By using that on a Render Geometry Settings sop, shadows can be disabled without manually selecting anything.
Note that attributes on packed prims come in slightly strange by default; the attribute name is @primvars:noshadow, and the value is stored in an array. The USD configure sop is used to format the attribute and its data in a more friendly way.
More info on primitive selection tricks: https://www.sidefx.com/docs/houdini/solaris/pattern.html
Retime Instances
 Download hip: lops_retime_instances.hip
Haven't checked all the use cases, but this seems to work well enough:
- Write out an animated something to disk
- Read it back in with a sublayer
- Use it as a prototype source for a instancer, leave it in point instance mode
- Inside create a grid, and setup a @frameoffset attribute on the points, eg i@frameoffset = -@ptnum;
- Append a retime instancer
- To make it see all the instances, use this lop expression: /instancer1[*]
Usdz and iOS
 A friend (hi Ian!) got a 3dscan with a texture, asked if I could help him reduce it. I figured this would be a interesting challenge, and a chance to follow in the path of Ben Skinner who had done some fun AR tests with USD and iOS.
Basic import convert and export
First step was to import the obj. It was 900mb, more than Houdini could handle, but I could load it into Blender and immediately export as alembic. Obj is a super old format, Houdini's Obj importer is also super old and grumpy. Alembic is more recent and designed to handle high polycounts, once converted Houdini could load that happily.
Once that was in Houdini, I could run a polyreduce and bring it down to about 20,000 polys.
I used a sopimport to bring it into Solaris, and a usd rop to export a usd. Once that was on disk I used the command line tool 'usdzip' which is part of the USD package to convert it to a usdz file.
Upload that to google drive, download from google drive to my phone, click it, and it opens automatically in AR view and.... its enormous. Like Ian's head is the size of Mount Everest. And it's got an ugly pink and purple preview material. But it works!
Export with USDZ rop
Note that there's a usdzip rop now too, but I didn't know that when I first wrote this tutorial. Annoyingly it's not native to Lops, but sits in Rops. If you hate this as much as I hate it, please send your RFE to sidefx.
Create a ropnet, put down a USD Zip rop. This functions as a on-disk file converter, so you give it the input path (your usd on disk you presumably just made in lops), and the output path (something.usdz).
Cos I hate typing, and I hate that this node feels like needless busy work, I usually copy the output path from my solaris output node, channel reference it into both slots, and append a 'z' on the end of the second paramter. If I put this in a ropnet inside lops, then its at least a single click away. Still, this should be tider. Grumble.
Quick gif runthrough:
Fix scale and material
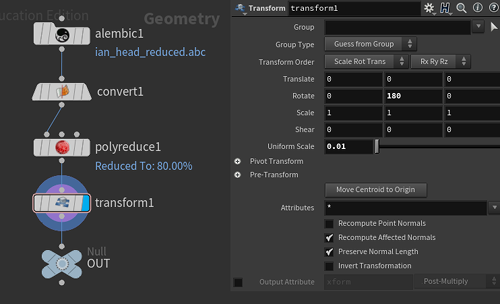 Back in sops I appended a transform sop after the polyreduce, and set uniform scale to 0.01.
To fix the pink+purple look Ben told me I have to add a usd preview material. In Lops I put a material library lop after the import, dove inside. I created a usdpreviewsurface material, set the basic parameters, jumped up a level, assigned it to the head, export. Run the usdzip -> gdrive -> phone process, its now the right size and a uniform gray material, but facing the wrong way. Rotating the transform sop 180 degrees fixed.
Add a texture
 The head scan came with a diffuse texture, time to add that too. It was massive (16k x 16k), so I used cops to reduce it to 2k, and save as a PNG, as Apple only supports PNG textures.
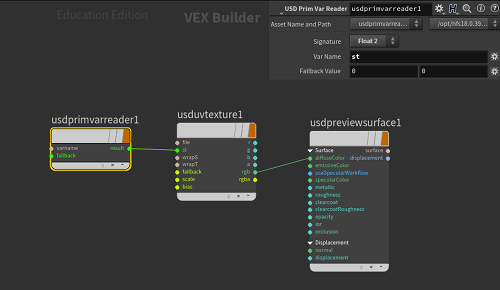
In the material library subnet I added a usduvtexture and filled in the path to the PNG. I thought I'd see the texture in the viewport, but nothing. Ben pointed out the network needs to bind the @uv attributes, in Lops that is done with a usdprimvarreader. Create it, set signature to float2, var name 'st', connect result to the st input of the usduvtexture node. Again, no result.
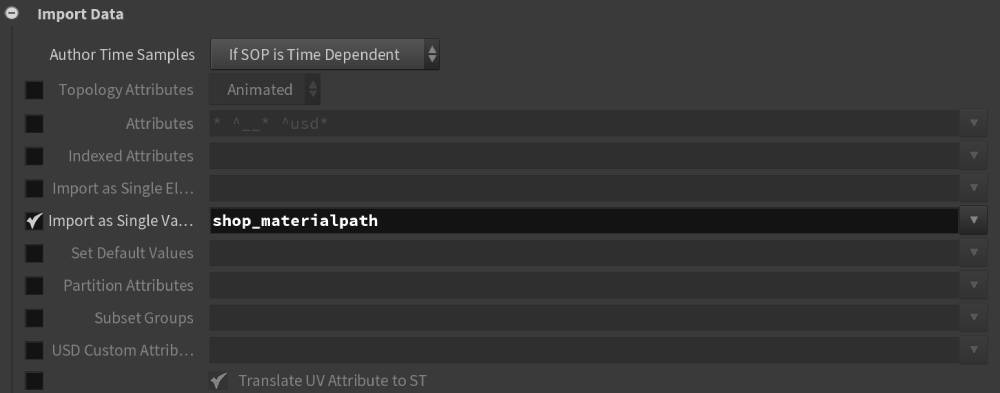
Last thing to do is to tell the sopimport to convert @uv to @st. Jump up, Select the sopimport node, expand the 'import data' section, scroll to the bottom, enable 'translate UV attribute to ST'. The texture now appeared in the realtime viewport! (This checkbox is now enabled by default, it wasn't when I wrote this little guide)
Export that USD, and convert to usdz again. Send that to gdrive, that to the phone, hey presto, textured usd model on iOS!
Bonus fun trick that I used for a twitter post was again thanks to Ben. He pointed out that Apple have a free app called Reality Composer, which lets you quickly prototype AR setups and bind USDZ assets. Loading up the face tracking template, pulled in Ian's head and moved it off to the side, job done.
Vex
Starting to collect enough lops vex bits to justify a named section. I've also put the start of a lops+vex intro page on the UsdGuide docs over at UsdGuide19.
Assign material Lop with shop_materialpath
Cunning trick from Michael Abrahams, and the first time I've seen vex used within lops, nice.
By default lops will import the materialpath as an array attribute, saving the value for each polygon. But assign material only gives you a one-line vexpression so it will choke on an array attribute.
If you set up your paths so that each lop primitive has a unique material and set this on your SOP import then you can use a normal vexpression in the assignmaterial lop without errors.
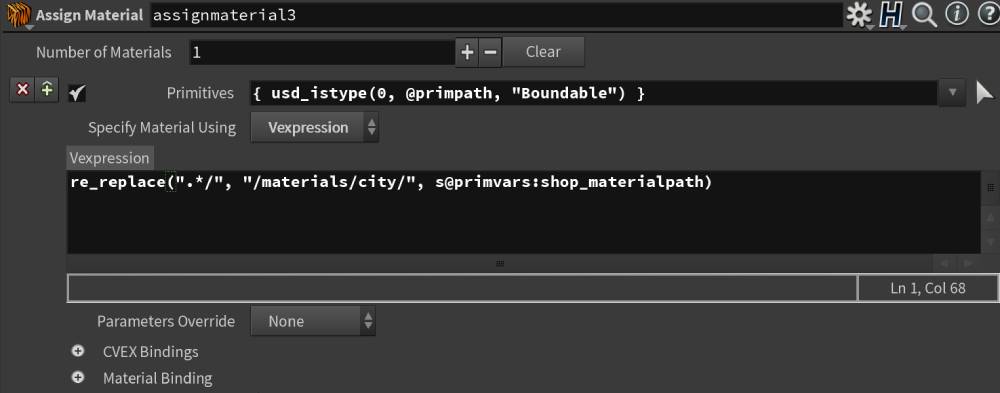
For the copypasta kids:
Primpath:
vex
{ usd_istype(0,@primpath,"Boundable") }{ usd_istype(0,@primpath,"Boundable") }Vexpression:
js
re_replace(".*", "/materials/city", s@primvars:shop_materialpath)re_replace(".*", "/materials/city", s@primvars:shop_materialpath)Assign material lop vex basics
In sops you can do material assignment and edits by just editing the string attribute @shop_materialpath. The good side of this is that its easy to edit with a wrangle. The bad side is if material names change, your assignments will break.
Lops and USD don't use simple strings, but tracks relationships between primitives and materials. That means as you reparent and rename either materials or objects, Lops will usually be able to maintain material assignments. The downside is you can't directly do simple string modifications like you would in Sops.
There's nodes like the material linker to display and modify assignments, but if you wanna do clever code based things with vex, <s>the only way</s> one way is via the assign material node using its vexpression mode.
In the vexpression mode it uses the prim you specify in the top selector, and assumes the vexpression will be a string which is a path to a material, eg
vex
'/pig/mtl/Pig';'/pig/mtl/Pig';If you want to be tidy, put return before it so you can pretend you're a real coder:
vex
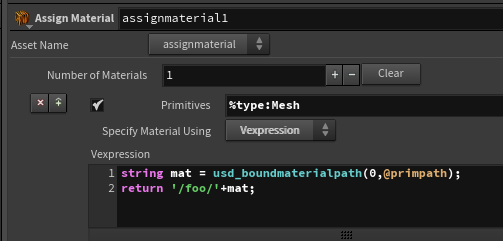
return '/pig/mtl/Pig';return '/pig/mtl/Pig';If you're operating over many prims, you'll likely want the name of each prim, and also the current material assigned to the prim. The current prim can be accessed with @primpath, and the material with the usd_boundmaterialpath function. So say you wanted to grab the current path, and stick /foo in front of it for some reason:
vex
string mat = usd_boundmaterialpath(0,@primpath);
return '/foo/'+mat;
string mat = usd_boundmaterialpath(0,@primpath);
return '/foo/'+mat;Note that it won't let you make invalid material links; if the material doesn't exist at that path, it won't update the material binding.
Assign material with vex part 2
Chris Rydalch points out that you CAN set materials in a lops wrangle using the function usd_setrelationshiptargets. He agrees that the assign material method is probably better, lucky for me. 😃
usd_setrelationshiptargets(0, @primpath, "material:binding", {"/materials/plastic"} );
https://www.sidefx.com/docs/houdini/vex/functions/usd_setrelationshiptargets.html
Get USD attributes in Vex
There's a suite of usd functions in vex, one that looks handy is usd_attrib(). Say I have a cube defined in my lops graph, and I want to read its size attribute in sops. The help docs say the function format is
usd_attrib("stage", "primpath", "attrib");
Where 'stage' corresponds to a node in your lop graph. So you'd probably try this:
@size = usd_attrib("/stage/OUT_set", "/cube1", "size");
...and then swear for hours while it stubbonly returns nothing. Eventually I found a forum post that gave the answer; the stage path needs an op prefix, like in cops:
@size = usd_attrib("op:/stage/OUT_set", "/cube1", "size");
You might also be caught out when pulling in string values, note that a lot of usd string attributes tend to be in arrays, so make sure to set your vex attributes as arrays too:
s[]@font = usd_attrib("op:/stage/OUT_set", "/my/prim/that/has/a/string/array/mesh", "mystringarray");
Hopefully that all saves you hours of heartache!
Set random displayColor with vex
vector col = rand(@elemnum,@Frame);
v[]@primvars:displayColor = array((col));
If you set your primpaths appropriately (eg in my case /duplicate1*/* ), you should get random colours on every prim on every frame.
I worked this out with my usual trick of stealing stuff from others and brute force. The lop wrangle has an example of setting a constant displayColor:
v[]@primvars:displayColor = 0;
I tried creating a random colour, and putting it inside the brackets, but got a syntax error:
vector col = rand(@elemnum);
v[]@primvars:displayColor = {col};
Then I remembered you can't use variables inside vectors if you define them with curly braces, so tried a set call:
vector col = rand(@elemnum);
v[]@primvars:displayColor = set(col);
Worked, but the colours were all monochrome. I then remembered that this is an array, set is for vectors and matricies. Swapping to the 'array' function worked. Woo!
vector col = rand(@elemnum);
v[]@primvars:displayColor = array(col);
Then I noticed one of the other wrangle examples also does random colours. Doh.
Update texture paths for usdz assets
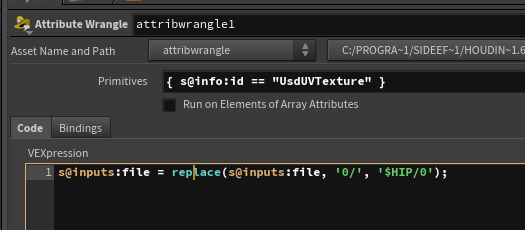
When USDZ files are created, it will gather textures into a numbered folder (usually 0), and point usduvtexture nodes to '0/thetexture.png'. If you happen to unpack a USDZ and put textures elsewhere, it can be a pain to update.
But not anymore!
Ben Skinner and Dave Brown both came up with this cunning fix. Like the group parameter in sops, the primitives parameter can make selections based on critera, in this case the info attribute of a prim. If you set the primitive parameter to be
{ s@info:id == "UsdUVTexture" }
That will target only UsdUvTexture nodes. Next, to swap the 0/ prefix for, say $HIP/0, can do usual vex string tricks:
vex
s@inputs:file = replace(s@inputs:file, '0/', '$HIP/0'); s@inputs:file = replace(s@inputs:file, '0/', '$HIP/0');Bam. Neato.
Randomise point instancer rotations
Have a peek inside a point instancer and the scene graph details, you'll see there's a orientations primvar, and it's an array.
I don't know if this is the Right Way to do this, but I figured I'd bring my limited vex+lops knowledge to bear, amazingly it worked. Set the primpath on the wrangle to the instancer, obviously:
vex
for (int i=0; i < len(p[]@orientations); i++)
{
    p[]@orientations[i] =quaternion({0,1,0}*rand(i)*10);
}
for (int i=0; i < len(p[]@orientations); i++)
{
p[]@orientations[i] =quaternion({0,1,0}*rand(i)*10);
}Ie, for loop through the array for the length of the array, create a random quaternion, stuff it into each element of the array.
Randomise point instancer rotations 2
See the toggle 'run on elements of array attributes'? It does as it says, and lets you skip the for loop, just set directly like you were running in a point wrangle:
vex
p@orientations = quaternion({0,1,0}*rand(@elemnum)*10);p@orientations = quaternion({0,1,0}*rand(@elemnum)*10);or if you wanted it randomised by position:
vex
p@orientations = quaternion({0,1,0}*rand(v@position)*10);p@orientations = quaternion({0,1,0}*rand(v@position)*10);Add random rotations to duplicates
Thanks to Christopher Rutledge for this. In my case all the duplicates were named component1_something, so the primpath on the wrangle was
/componentoutput1*
You could probably get away with not using the include just to get access to USD_AXIS_Y, but I'm quietly hoping it does the right thing for y-up or z-up systems. Or something.
vex
#include <usd.h>
usd_addrotate(0, s@primpath,"", USD_AXIS_Y, rand(@elemnum)*400);
#include <usd.h>
usd_addrotate(0, s@primpath,"", USD_AXIS_Y, rand(@elemnum)*400);Set colour and exposure on instanced lights
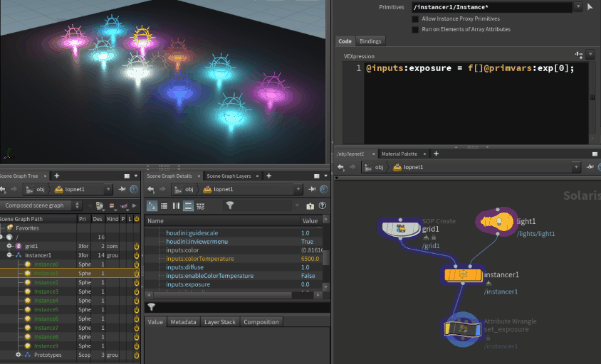 Download hip: lops_light_instancer.hip
TLDR: Use reference mode, colour will be applied automatically, exposure can be set in a wrangle with
@inputs:exposure = f[]@primvars:exp[0];
Setting arbitrary properties on arbitrary prims isn't too hard, but takes squinting at the scene graph details panel a few times to understand when its not working.
Say you want to instance a bunch of lights, and want them to have different colour and exposure.
First you need to ensure you have the instancer method in 'reference' mode, point instance and other modes won't work in Karma.
Inside the node create a grid, and use 2 attribute randomise nodes, one for @Cd, the other to set a float attribute called @exp, of a range between -3 and 1.
When you jump up and instance a light to it, you should see the randomized colour. Lucky for us, Lops and Karma will automatically translate Cd from the points to 'inputs:color' on the lights.
For the exposure, append a lops wrangle, set the primpattern to '/instancer1/Instance*', select a light in the Scene Graph, and look in the Scene Graph Details panel.
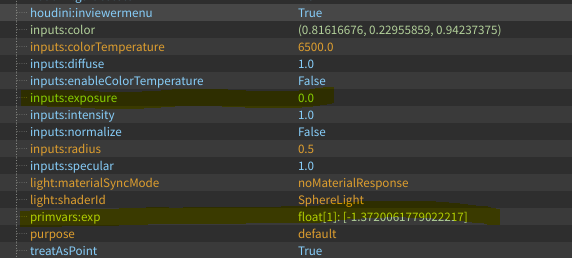 You can see that the light exposure is called 'inputs:exposure', and the randomised attribute created inside the instancer is called 'primvars:exp'.
Based on the previous examples, we should be able to just link them up:
@inputs:exposure = @primvars:exp;
But you'll get an error. The clue is to look closer; primvars:exp isn't a float, it's an array. The value has square brackets around it, and even the prefix gives a clue that its a float array with 1 element, 'float[1]'. That means you need to use vex float array prefix f[], and a suffix of [0] to get the zero-th element:
@inputs:exposure = f[]@primvars:exp[0];
A lot of Sops attributes will default to array types in Lops, easy to miss.
Modify positions with vex
Two-parter depending on if you want to modify transforms, or modify point positions.
As mentioned earlier, the cheaters way to get results is to look at the code examples provided with the wrangle under the presets menu, and to look in the scene graph details panel. Once you have an idea of an approach, you can go into the usd related vex functions and poke around.
Modifying transforms with vex
There's an example provided named 'primitive translation'. Create a lops pig, append a wrangle, load that preset. You'll need to set the primpath to /pig to get to the parent xform, and you should see the pig jump forward 1 unit. Peek at the code, you can see its doing something with sin and cos, presumably to move the pig in circles.
You wanna animate this right? You'll be surprised like I was to find setting
float revolution = @Time;
won't work. @Frame works, but not at first glance; as it happens this is controlling the amount of turns, so it'll do exactly one turn per frame. Try a lower number:
float revolution = @Frame*0.05;
Bam, spinny pig. We can use this to make an even simpler example of adjusting the position:
v@xformOp:translate = set(0,sin(@Frame),0);s[]@xformOpOrder = {"xformOp:translate"};
There, simple up and downy motion. To make this work on multiple things, say a line of pigs, you can use @elemnum like you're meant to in normal sop wrangles (but never do) like ptnum.
Use a duplicate lop to make 10, spread them out, adjust the primpattern on the wrangle to /pig*, and modify the code to do shifted uppy-downy motions per pig:
float y = sin(@Frame*0.2+@elemnum*0.2);v@xformOp:translate.y = y;s[]@xformOpOrder = {"xformOp:translate"};
Hmm, ok they're offset, but they also lost their original positions. How to fix?
Select the duplicate node, select a pig, look at the scene graph details. You can see the xformOpOrder attribute, which is an array pointing to 'xformOp:tranform'. Now look at the wrangle. You can see its been replaced by 'xformOp:translate'. Knowing that a huge amount of usd magic is based around layering of attributes, maybe we shouldn't be replacing that element in the array. Maybe append?
float y = sin(@Frame*0.2+@elemnum*0.2);v@xformOp:translate.y = y;append(s[]@xformOpOrder,'xformOp:translate');
Eyyy, pigwave!
This gives clues as to how you can nicely decompose motion on xforms in lops; make multiple attributes, append them to the xformOpOrder array.
Modifying point positions with vex
Go back to the single pig, append another wrangle. Expand the scene graph tree and find the shape node under the pig. Look at the scene graph details.
You can see there that the points are stored in an attribute called 'points', and it's a point3f array.
The lops wrangle has a nice feature where you can treat arrays like you would @P or @Cd in sops; enable 'run on elements of array attributes'. Now you just have to refer to @points instead of @points[the_vertex].
Lets see if the same tricks work here. Set the primpattern to /pig/geo/shape, and try this code:
v@points.y += sin(@Frame*0.2);
Eyyy, that was easy! You can do similar things to modify the points driving an instancer. Or even procedurally wiggle the uv's (st's, yeah yeah) if you choose.
u@primvars:st[0] += sin(@Frame*0.2)*0.1;
You don't need the primvars: prefix here, but in other places I've found you do, and I'm trying to be more clear in my vex code anyway.
Misc
Stage manager UI toggle
 I think Mark Tucker mentioned this in passing in a forum post, its a game changer. The stage manager lop lets you bring in lots of stuff and lay it out, but it felt a little hands-off in that you couldn't see explicit transforms or names of objects.
Turns out its there, just hidden. Click the little slider thing in the top right, you swap to a tab view where each operation you've done is displayed like the paint sop; you see explicit paths to usd files you're importing, transforms you've done, renames, super handy.
Enable realtime subdiv
 The viewport can handle realtime subdiv very nicely, but needs a bit of a kick to make it work sometimes.
- Hover over the viewport
- Hit d
- Go to the geometry tab
- Set Level of Detail to 2
- Swap to the Karma renderer
- Swap back, mmmm, smooth,
Enable subdiv on poly meshes
- Append a mesh edit lop
- Set the prim path to your mesh
- Enable 'set or create' on subdivision scheme
Inspect usd source
At any time you can right click on a lops node and choose Lop Actions -> Inspect active layer. You'll now see the usd code under the hood, a great way to get context on what's being constructed by Solaris.
usdview
A nice bonus of lops is that it comes with a lot of the pixar usd utilities. They should be implicitly available on linux and osx, while on windows its easiest to access from a bash prompt.
I use git bash, as long as you source the bash script to import the houdini environment, you can run usdview and all the others. At some point I'll incorporate this into my bash profile, but for now I:
- find my houdini bin directory in windows explorer
- right click on that bin folder, 'open git bash here'
- source houdini_setup_bash
That's it! Now you can open a usd file with
usdview myfile.usd
Well, sort of. Usdview is called via a python wrapper, it seems windows git bash gets confused and needs the first wrapper to exit before usdview can run. Lazy fix is to just run it in background mode with
usdview myfile.usd &
Primitive selector click vs control click
The parameter field that looks like the group field in sops is to let you enter primitive names. If you click the arrow selector button you can select in the viewport, or select from the Scene Graph Tree. There's a few cases though where neither of those are right, and you'd prefer something like the pop up node lister you get with say an object merge sop.
If you control-click, you get a mini pop up scene graph selector as you want, neat.
Tidy caches
If you're used to writing out bgeo.sc caches, it can be tempting to just append a usd rop to your sop chain, walk away.
But if you want to be a good USD citizen, you should tidy up your caches so that they're as lean as possible. The first is basic cleanliness; put an attrib delete in, get rid of anything you don't need. Ideally your sop stuff should be just @P and @uv, material assignments and whatnot will be done in lops.
The next step is telling USD what will change per frame, and what only needs to be defined once up front. Ben Skinner has drilled into my brain the art of looking in the details panel in lops. Blue values are static, green values update every frame. Check this out, I'm using a sopimport lop to directly view what I'd eventually save from my sop usd rop:
Oh my gosh. Too much green!
The green values show that the vertex count, vertex indicies, points (ie @P) and st (@uv) are being saved every frame. In my case the mesh doesn't change topology, neither do the uv's, so this is needless extra stuff.
You can fix this in sops with a UsdConfigure sop. Put that in before your USD rop in sops, and you can give hints to what the usd rop should do:
 At the bottom of the Usd configure sop I've set topology attributes to 'static'. This will mark the vertex count and vertex indicies as static, and they'll turn blue. 'But wait, won't that stop the animation exporting too?' I hear you cry. I thought that too, but give it a try, you'll see the position values remain green and therefore are recorded per frame. If you put a timeshift before the usdconfigure and remove time dependency, you'll see position go blue as well.
Then below that I enable 'set default values', and enter 'uv'. This then tells the usd rop that these values don't change during the animation, so they too will go blue. Here's the ideal end target:
Mmmm, blue
The wins can be surprising, a cloth cache went from 170mb to 30mb, and loads much faster. Tidy those caches!
Ben also points out that you can take advantage of the layering abilities of USD. You could write out a static 1 frame of the model that has only position (@P) and st (@uv). Then for simulation write out only the position data, strip off everything else. In lops (or any usd pipeline) you could reference one over the other, and they'll be composed together to get both the static uv's, and the animated cache. This is less about disk space, but department demarcation; the people doing modelling and surfacing can tweak the uv's as much as they want, the cloth team don't know nor care whats going on there, they just provide sweet animated caches. When it comes to lighting, both the animation and the uvs arrive as expected. Sweet.
Live text preview of USD
 You don't want this turned on for huge scenes, but for certain types of debugging, and definitely when playing with smaller scenes and really wanting to see how USD and Lops work under the hood, its incredibly useful.
Open a scene graph layers panel, and click the little stack of squares in the top left. I'll pop out a text panel. Expand the root layer, select a node in your lops network, select the new layer in the panel, you'll see the live ascii representation of the USD scene.
Note that it sometimes requires you to select, deselect, reselect nodes to force an update, but thats a minor price to pay to save you having to keep exporting usda's and opening them in a text editor. You could combine this with the inline USD node for peak nerd.
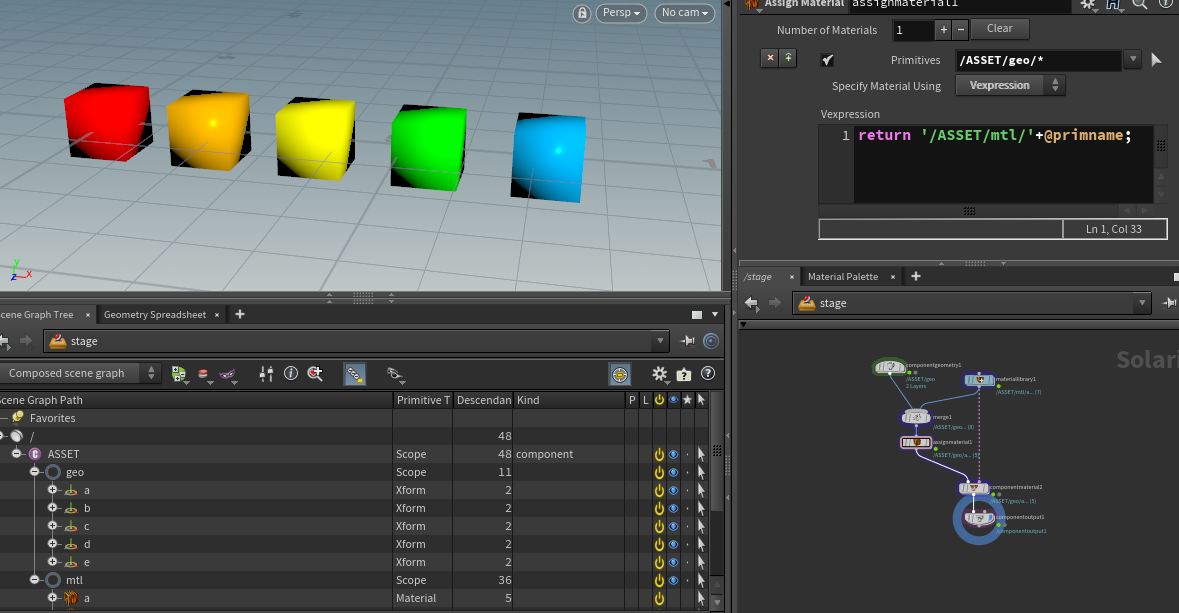
Component builder match materials to prims by name
 Download hip: lops_mat_from_name.hip
Smug and hacky like a good houdini network should be.
The component builder assumes for manual assignment, but thats for chumps. If you have a bunch of prims named 'a b c d e', and a bunch of materials also named 'a b c d e', you should be able to automatically assign them right?
If you sneak an assign material node into the component builder network, you can use a vexpression to do this. Pretty straightforward really, just
return '/ASSET/mtl/'+@primname;
The component builder output is picky, and expects its upstream connection to be one of the other component builder nodes. No big deal, just shuffle the standard component material node down there, and clear out its parameters so it doesn't do any assignment.
MaterialX test scene
 Download hip: lops_materialx_example.hip
Roger Dass made a nice little test scene for materialx and put it on github:
https://github.com/RogerDass/Usd-Mtlx-Example
I pulled it into Lops and was able to get it going without too much effort. The changes I made in lops were pretty minor:
- The scene didn't have a root prim, so I grafted it under /stage
- The scene was rotated on its side, so I used a transform lop to rotate /stage -90 on x
- The meshes had their uv's named 'UVMap'. I used a sop modify to rename them to 'st'
- The textures weren't being found, I used a lops wrangle to replace 'materials' with '$HIP/materials'
- The procedural marble material doesn't work, I assume thats a materialx library conflict? *shrug*
The texture fix uses the Dave Brown/Ben Skinner trick in the vex section earlier, but using the handy primpath
%shadertype(*tiledimage_*)
To find all the materialx file texture nodes automatically. The vex code is just
s@inputs:file = replace(s@inputs:file, 'materials', '$HIP/materials');
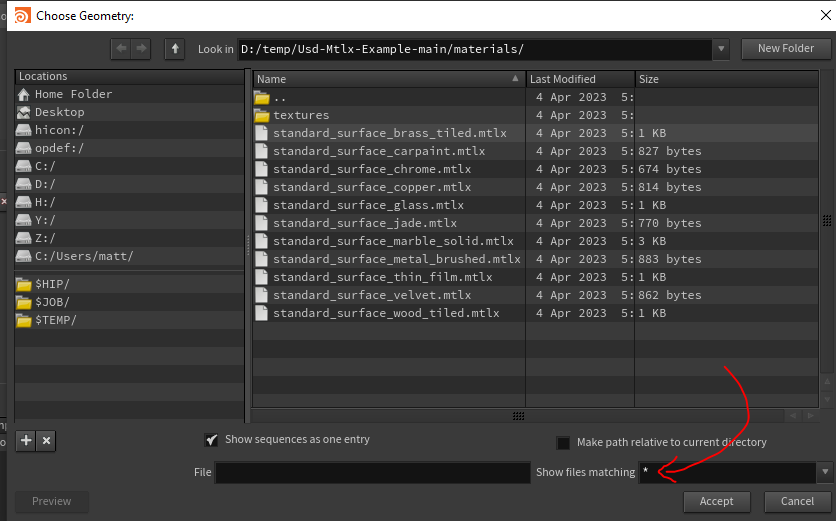
Load mtlx files individually
Just use a file lop in sublayer mode. Annoyingly it's file dialog will look like it can't load mtlx files, but don't be fooled. Change the file filter to show all files, choose a mtlx file, and it'll be pulled into your scene graph ready to be assigned.
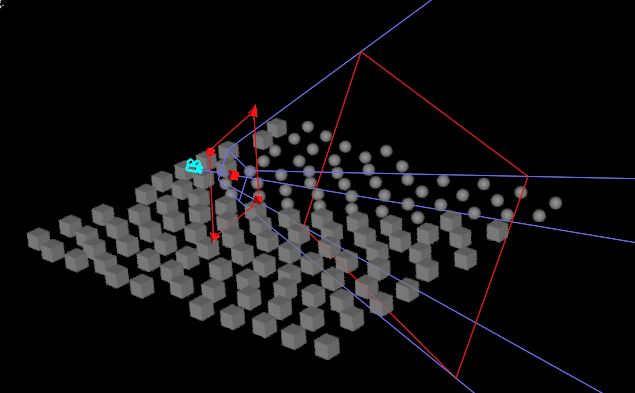
Collection based camera frustum subdiv
 Download hip: lops_frustum_subdiv.hip
On discord someone asked "How would you subdivide objects only within the camera view?".
USD has collections, their term for for groups/selection sets/bundles, basically a named selection of prims.
Collections can be defined manually, or there's auto-collections for rule based setups, which are explained here:
https://www.sidefx.com/docs/houdini/solaris/pattern.html#auto-collections
One of those is to get all prims within the frustum of a camera. Paste this text where you'd normally use a primpath:
%bound:/cameras/camera1
To test this I deinstanced a copytopoints, then used that auto-collection on an edit mesh sop to set the subdiv type.
Note that this only worked for me in Karma, the HoudiniGL delegate wouldn't see the change. Maybe if I did the subdiv kickstart trick mentioned elsewhere here? Also if the frustum happened to include the world origin, ALL the shapes would become subdivided! I'm guessing it's something to do with a prototype source being at the origin and I'm not filtering enough things. If you have a fix please get in touch!
Sample cops into a lops variable
Over here: HoudiniCops#Sample_cops_into_lops
Texture baking with Karma
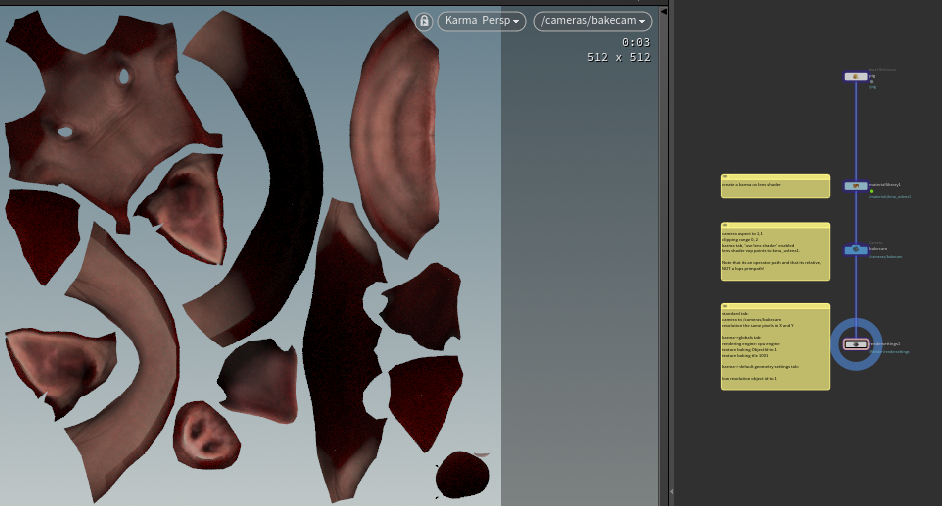 Download hip: lops_baking.hip
In 19.5 it's a bit technical and limited, but the base tech is there. You'll really want to crack open the hip and look at the settings, but the overview for the impatient:
- create a karma uv lens shader
- on a camera enable lens shaders, link it to the lens shader (use a relative op path, not primpath!)
- on the render settings tab set parameters to tell Karma which object you want to bake to, which object to bake from (both the same in this setup) and in which uv space, denoted as UDIM values.
CPU only too for the moment, but it's pretty fast.
Python script lop to read, create, duplicate materials
As always, Ben Skinner saves the day. We had a need to read usdpreviewsurface materials, and do a simple port to another renderer. At first I attempted this via hom and vops as I'd done in the past to convert mantra materials to 3delight materials, but quickly realised issues. In the earlier case all the materials existed as houdini nodes, in a matnet. Here, the materials are in the lops scene graph, so houdini isn't really aware of them. I could use the edit material lop to create nodes, but its a bit slow and clunky, wouldn't work at scale.
The openusd docs show how to create materials in native usd python and UsdShade. The idea is that the container is a material, and inside will be a shader (the usdpreviewsurface), texture node, primvar reader. That's all explained here:
https://openusd.org/release/tut_simple_shading.html
What wasn't explained clearly anywhere was how to read values from an existing material, and get its connections. That's what Ben helped me with, using UsdShade.ConnectableAPI. This is remarkably undocumented! Ben mentioned there's likely a better cleaner method floating around, but this worked for my little example.
Note that to make this work for other renderers, lops doesn't even have to know nor care about it. Just give things the right id, name the inputs and outputs properly, that'll all be passed onto the renderer, which will know what to do with it. Eg here you could replace
pbrShader.CreateIdAttr("UsdPreviewSurface")
with
pbrShader.CreateIdAttr("ND_surface")
and if that's what a materialx compatible renderer recognises, it'll use it.
Note that the shader creation stuff is hastily copied from the openusd docs, it probably needs some love. Really, this is just a dumb example, for this to be useful in terms of porting shader values to another renderer, you'd be using different node id's and attributes anyway.
You can use the scene graph tree and scene graph details panel here too; make a dummy material for your target renderer, inspect it in the scene graph details, you can copy the id's and attribute names:

python
node = hou.pwd()
stage = node.editableStage()

from pxr import UsdShade
from pxr import Sdf
from pxr import Gf

meshpaths = [
'/geo/obj0',
'/geo/obj1',
'/geo/obj2']

for mesh in meshpaths:
    name = mesh.split('/')[-1]
    print('mesh: ', name)
    # Find the mesh, its material, the material's shader
    mesh = stage.GetPrimAtPath(mesh)
    mat = mesh.GetRelationship('material:binding').GetTargets()[0]
    mat = UsdShade.Material(stage.GetPrimAtPath(mat))
    usdPreviewShader = mat.ComputeSurfaceSource()[0]

    # From the shader read the roughness, speccolor, texture path
    shaderAPI = UsdShade.ConnectableAPI(usdPreviewShader)
    roughness = usdPreviewShader.GetInput('roughness').Get()
    specularColor = usdPreviewShader.GetInput('specularColor').Get()

    texfile = ''
    for i in shaderAPI.GetInputs():
        if(i.HasConnectedSource()):
            connectedNode = i.GetConnectedSources()[0][0].source
            texfile = connectedNode.GetPrim().GetAttribute("inputs:file").Get()

    # fix texture path, strip the leading and trailing '@'
    texfile = str(texfile)[:-2][1:]
    print('rough: ', roughness)
    print('spec: ', specularColor)
    print('tex: ', texfile)

    ### Create material
    # copypasta'd from https://openusd.org/release/tut_simple_shading.html

    # set path, make material container
    matpath = '/materials/'+name
    # setup shader, attributes
    pbrShader = UsdShade.Material.Define(stage, matpath)
    pbrShader = UsdShade.Shader.Define(stage, '/TexModel/boardMat/PBRShader')
    pbrShader.CreateIdAttr("UsdPreviewSurface")
    pbrShader.CreateInput("roughness", Sdf.ValueTypeNames.Float).Set(roughness)
    pbrShader.CreateInput("specular", Sdf.ValueTypeNames.Float).Set(specularColor)

    # setup texture node, attributes
    diffuseTextureSampler = UsdShade.Shader.Define(stage,'/TexModel/boardMat/diffuseTexture')
    diffuseTextureSampler.CreateIdAttr('UsdUVTexture')
    diffuseTextureSampler.CreateInput('file', Sdf.ValueTypeNames.Asset).Set("USDLogoLrg.png")
    diffuseTextureSampler.CreateInput("st", Sdf.ValueTypeNames.Float2).ConnectToSource(stReader.ConnectableAPI(), 'result')
    diffuseTextureSampler.CreateOutput('rgb', Sdf.ValueTypeNames.Float3)

    # setup uv node, attributes
    stReader = UsdShade.Shader.Define(stage, '/TexModel/boardMat/stReader')
    stReader.CreateIdAttr('UsdPrimvarReader_float2')
    stInput = material.CreateInput('frame:stPrimvarName', Sdf.ValueTypeNames.Token)
    stInput.Set('st')

    stReader.CreateInput('varname',Sdf.ValueTypeNames.Token).ConnectToSource(stInput)
    # connect all the nodes together, assign to mesh
    material.CreateSurfaceOutput().ConnectToSource(pbrShader.ConnectableAPI(), "surface")
pbrShader.CreateInput("diffuseColor", Sdf.ValueTypeNames.Color3f).ConnectToSource(diffuseTextureSampler.ConnectableAPI(), 'rgb')
    stInput = material.CreateInput('frame:stPrimvarName', Sdf.ValueTypeNames.Token)
stInput.Set('st')
    stReader.CreateInput('varname',Sdf.ValueTypeNames.Token).ConnectToSource(stInput)
node = hou.pwd()
stage = node.editableStage()
from pxr import UsdShade
from pxr import Sdf
from pxr import Gf
meshpaths = [
'/geo/obj0',
'/geo/obj1',
'/geo/obj2']
for mesh in meshpaths:
name = mesh.split('/')[-1]
print('mesh: ', name)
# Find the mesh, its material, the material's shader
mesh = stage.GetPrimAtPath(mesh)
mat = mesh.GetRelationship('material:binding').GetTargets()[0]
mat = UsdShade.Material(stage.GetPrimAtPath(mat))
usdPreviewShader = mat.ComputeSurfaceSource()[0]
# From the shader read the roughness, speccolor, texture path
shaderAPI = UsdShade.ConnectableAPI(usdPreviewShader)
roughness = usdPreviewShader.GetInput('roughness').Get()
specularColor = usdPreviewShader.GetInput('specularColor').Get()
texfile = ''
for i in shaderAPI.GetInputs():
if(i.HasConnectedSource()):
connectedNode = i.GetConnectedSources()[0][0].source
texfile = connectedNode.GetPrim().GetAttribute("inputs:file").Get()
# fix texture path, strip the leading and trailing '@'
texfile = str(texfile)[:-2][1:]
print('rough: ', roughness)
print('spec: ', specularColor)
print('tex: ', texfile)
### Create material
# copypasta'd from https://openusd.org/release/tut_simple_shading.html
# set path, make material container
matpath = '/materials/'+name
# setup shader, attributes
pbrShader = UsdShade.Material.Define(stage, matpath)
pbrShader = UsdShade.Shader.Define(stage, '/TexModel/boardMat/PBRShader')
pbrShader.CreateIdAttr("UsdPreviewSurface")
pbrShader.CreateInput("roughness", Sdf.ValueTypeNames.Float).Set(roughness)
pbrShader.CreateInput("specular", Sdf.ValueTypeNames.Float).Set(specularColor)
# setup texture node, attributes
diffuseTextureSampler = UsdShade.Shader.Define(stage,'/TexModel/boardMat/diffuseTexture')
diffuseTextureSampler.CreateIdAttr('UsdUVTexture')
diffuseTextureSampler.CreateInput('file', Sdf.ValueTypeNames.Asset).Set("USDLogoLrg.png")
diffuseTextureSampler.CreateInput("st", Sdf.ValueTypeNames.Float2).ConnectToSource(stReader.ConnectableAPI(), 'result')
diffuseTextureSampler.CreateOutput('rgb', Sdf.ValueTypeNames.Float3)
# setup uv node, attributes
stReader = UsdShade.Shader.Define(stage, '/TexModel/boardMat/stReader')
stReader.CreateIdAttr('UsdPrimvarReader_float2')
stInput = material.CreateInput('frame:stPrimvarName', Sdf.ValueTypeNames.Token)
stInput.Set('st')
stReader.CreateInput('varname',Sdf.ValueTypeNames.Token).ConnectToSource(stInput)
# connect all the nodes together, assign to mesh
material.CreateSurfaceOutput().ConnectToSource(pbrShader.ConnectableAPI(), "surface")
pbrShader.CreateInput("diffuseColor", Sdf.ValueTypeNames.Color3f).ConnectToSource(diffuseTextureSampler.ConnectableAPI(), 'rgb')
stInput = material.CreateInput('frame:stPrimvarName', Sdf.ValueTypeNames.Token)
stInput.Set('st')
stReader.CreateInput('varname',Sdf.ValueTypeNames.Token).ConnectToSource(stInput)Todo
- load shotgun metadata? shot start/end? handles?
- lops and the farm/tractor/pdg
<s>what vex wrangle tricks can we do in lops?</s>- scene import, pitfalls
- cameras and lights
- controlling render settings
- usdskel stuff for crowds
- usdshade, loading shader networks that exist in usd files, make overrides
Musings
Why is USD interesting if I'm not a big studio?
I'll link to this in a few places, you can read this wall of text, or watch this 24 minute summary, has practical examples and stuff, probably better:
A rant I did on discord, in the pub, to my family, copied here and tidied up for your benefit. Nice images, practical examples etc will come later.
Short version: It lets small studios punch well above their weight.
Long version:
Big studios have lots of big things. Big farm, big teams of artists, big IT and infrastructure. All of those things are important to get big shows done, but a key factor is allowing people to solve systemic problems that aren't purely tech and aren't purely art. Pipeline TDs, department TDs, RnD, there's enough people hired and they're given enough space and time to allow a big studio to function more efficiently. Small studios generally can't afford this.
6 years ago
Take a film I worked on about 6 years ago, wall to wall photoreal cg, crowds, environments, the works. In the start of a show like that it feels like a small studio, a small team of people who each have a specialty, just experimenting and sorting things out. As the show progresses more artists are hired, the work expands.
At a certain point the scale of the project starts to have an effect. The quantifiable stuff is fine; number of shots, number of assets in shot, get a metric of how long it takes an artist to make a certain asset or finish a shot, multiply that out to get x thousand days for a single artist, look at how much time you have left, divide one by the other, thats the number of artists you need. Oversimplifying, but that's the idea.
What happened as more assets were completed, more stuff got shoved into shots, was the tools got slower and slower. So slow that it began to affect artist productivity. In a smaller studio you shrug, maybe panic, but you can't do much more than that, everyone is busy doing the 'arty' work assigned to them.
In a big studio, the TDs and RnD folk kick in. They can analyse the tools, identify bottlenecks, rewrite slow things, adjust stuff to get time-to-first-pixel more quickly, time to final comps faster. One of the things that really slowed us down was assembling big shots; tools 6 years ago could handle 1 asset fine, probably 10, maybe 100. But 1000, 10000, things get slow, and thats when you want an army of TDs with you to solve stuff.
Now
Jump to now, whats changed? Machines are faster, renderers are better, cloud computing is a thing. Some tools are better, some have made things incredibly efficient. Megascans, Substance, Houdini improvements, means making individual assets and fx is much faster.
Big assembly still sucks. Maya is still miserable at handling lots of transforms, Houdini when working in /obj is clunky and lame. I just finished watching The Lion King, and was blown away by how good the completely digital environments were. Looking at them critically, you could probably make a single element of those environments easily enough (a tuft of grass, a rock, a tree), but to assemble thousands of them into a set, ugh, a nightmare.
A big sequence in a small studio without USD
Say you were crazy enough to do that with a team of 7: 2 modellers, 2 surfacers, a layout artist, a lighter, a comper. You have 30 shots in a Savannah to do. Run a quick breakdown, thats 7 grass models, 8 rocks, 4 trees, ground, 4 mountains, twigs, pebbles, 5 bushes. Each has 3 surfacing variations. Modellers and surfacers work away on that as fast as they can, save it all on disk. Layout artist gets started, pulls all these models into maya via references, lays them out, animates a camera. Lighter gets started, uh-oh, there's a non manifold edge somewhere that causes the render to crash.
The lighter flags it, can't tell exactly which model it is, but its in the lower right corner of the shot. Layout artist tries to identify the asset, its rock07v01. Modeller fixes it, saves as v02. Now what? The layout artist has to find every instance of rock07, and update it from v01 to v02. Meanwhile the lighter finds the texture used for grass03 is too high res, while tree04 roughnessmap is too low res. They get kicked back to surfacing, version up, again layout person has to find those materials and update in the layout file. Then director notes, more changes. Also in shot 30 the tree needs to be moved for a nicer composition. Oh, and this all now has to be moved to katana, cos maya just can't handle this anymore.
All of those things are distressingly common, and are maybe 10% of the daily churn of shots and assets. All those changes need to be updated, rolled into shots. If you're working across multiple DCCs, how do you handle this? Alembic is ok for geo, but doesn't store material definitions. It still requires a hard bake at some point, if assets get updated, someone has to open the maya scene, update, republish. Maybe you can write a python script to automate it, or a batch job on the farm. But then how do you ensure lighters are using the right file? And now the alembic is blowing out into bigger and bigger filesizes, so big maya and katana are having problems loading it....
And so it goes. At this point you'd be wondering why you ever bothered, and surely if we're suffering through all this, others are too, and why are we all solving it alone?
Enter USD
Well its not just you, and not just the small studios, big places have the same issues. Even Pixar. Luckily Pixar have lots of smart people, and are keen on open source, so have shared their solution, and its USD. USD solves lots of things, lets run through how it handles the issues outlined above:
- A usd file can point to other usd files, which can point to other usd files, which can point to other usd files. Like maya references this means you could have a file, say shot050.usd, which is actually only 5 lines of text, as internally it points to camera.usd, fx.usd, props.usd, char.usd, set.usd. If you went and looked at set.usd, it might refer to hundreds of usd files within it, so grass01.usd, tree03.usd etc, with their transforms defined for the set. Dive into grass01.usd, that'll have the polygons that define the model, but it can also have a shader graph defined in it. So usd at this point can be thought of as fancy alembic, which can reference other alembics.
- Those references to other usd files, they can be hard paths on disk, so /assets/setpieces/grass/grass01_v002.usd, but it can also be an abstracted path. In our case at UTSALA we use an abstraction that points to shotgun queries, so the path looks like type='setpiece'&name='grass01'&version='latest'. When the file is loaded, the usd libraries know 'ah, I better ask shotgun what this means so I can get a path on disk', gets that path, loads the thing. THIS IS HUGELY POWERFUL. No more relying on the poor layout artist to update versions of things. No double checking lighting renders to ensure assets are correct. No writing of code in your DCC to compare disk paths to what shotgun says should be in your scene. This awareness of version and disk path abstraction is built into the usd file format itself.
- usd works cross platform. originally for maya, then katana, then houdini, and now rapidly spreading into most dcc's. This means a lot of the difficult interop and translation between dcc's is gone.
But also...
- usd comes with a standalone viewing tool, usdview. Think of it as mplay or rv, but for 3d scenes. Want to check whats in a shot? Load it in usdview, its blazingly fast, plays buttery smooth, it's a great QC tool
- referencing lots of usd files that in turn reference more usd files isn't just appending files together like maya referencing; you can be really clever and have 'stronger' usd files selectively update, tweak, modify 'weaker' usd files. So you could have char.usd for base character anim caches, but a later charfx.usd file could insert fur, hair, cloth caches into the hierarchy of the character setup, so lighting don't even have to know they're coming from another department.
- usd has its own fast method to talk to render engines. Almost all the major players have announced support for this (called 'hydra delegates'), meaning you don't even need a DCC app to send usd files to a renderer; they can function like .rib, .ass, .ifd, and be rendered directly.
- USD has built in support for lots of things you need but don't realise you need until you think about it. High performance instancing, LOD, variations, volumes, lights, geo attributes, curves, particles, crowds, motion blur, cameras, it's all in there. Pixar have been using USD for their films for a good 5 years, and USD's predecessor for many years before that, they've thought of and solved most of the use cases!
Enter Lops
This was all amazing, but still required knowledge of USD's python api to tie it all together. What didn't exist was an artist friendly interface to all this incredible power. That's what Lops/Solaris is. Sidefx have made a new network type that represents USD primitives as nodes, USD operations as nodes, and lets you do all the stuff you'd want to do.
We've been using USD and Lops for a couple of years now at UTSALA, recently we made a video covering a lot of the points above, have a look:
Compare to Clarisse and Katana
One could question how does this compare with the two apps known for solving big shots, big numbers of lighters, namely Katana and Clarisse.
Katana set out to solve the question of big shots and lots of them many years ago, and does it broadly by letting lighters import huge amounts of geometry from multiple locations, merge them together, create and modify lights, material assignments, object properties etc, then send all that to a render engine. By design it won't actually try and load geo unless you explicitly ask it, meaning lighters can work in katana quite quickly. It has good high level support for switching chunks of a network based on rules, so you might turn on a bunch of lights for shots facing characterA, vs a bunch of different lights for shots facing charB.
Katana's pro is also it's con; it can feel very hands off, you're generally operating on your scene in a kind of abstracted state, making rube goldberg machines trying to catch names of objects in your shot, do things if found, hope that it all falls out the bottom as you'd expect. It's also a little beyond the reach of small studios, both being quite expensive, and needing substantial TD work before it can even run effectively.
Clarisse tries to solve similar problems to Katana, but by being tightly coupled to its renderer is much more direct and hands on. It's faster to get going with less technical expertise, and was quickly adopted by matte painters as a way to generate massive shots with thousands of trees, buildings, stuff.
It's cons are that it's developed a reputation for being unstable, and that it isn't really designed to talk to existing renderers, you're buying into a unified lighting tool+renderer. (This has changed as of Clarisse 5, see below)
Both Katana and Clarisse work on the core idea that they're the final stop; 3d assets are brought into them, images come out. Also the ability to edit the scene is limited to what lighters require, and in Clarisses case what matte painters want; you can create lights, cameras, modify materails, some object attribtes, but thats's it. You can't really model geometry, or do fx, or do uvs, or animate characters, anything that you'd traditionally do in maya, you do in Maya.
Compare to Lops.
Lops by itself should cover most of what Clarisse and Katana do. Import big shots, create and modify lights, material assignments, object properties, send to a renderer. But being built around USD, you get all the I-can-see-all-the-geo from Clarisse, combined with the I-can-render-to-whatever-renderer from Katana.
But Lops isn't by itself, it's in Houdini! There's nodes to allow you to send stuff from Lops to other contexts in Houdini, and to go back the other way. So select a building in lops, take it over to be destroyed by and RBD solver, bring it back in. Create a standalone volume, pull that into your shot. Realise this certain model needs better uv's, fine, bring it into sops, uv away, bring it back.
PLUS, it's not just to and from Houdini. Save your final setup as USD, send it to katana if you need to. Or back to animation. This is the U in usd, its universal, you can bounce this back to any usd compliant dcc, it should be able to use it.
Update May 2021
Cool to see that Clarisse 5 now has pretty good USD export, so it now plays nicer with others:
Proceduralism for scenes
A final sell for existing Houdini folk is the difference between sops and /obj. Once you've used sops for a bit, you get comfortable with the idea of copy-to-points a ton of pig heads to points, or creating volumes from scratch, or selectively deleting faces who's normal faces directly along +Y. Yet we jump up to /obj and its same old manual cameras, manual lights, manual visibility states, manually dragging and dropping objects into rop object lists.
USD and Lops brings that concept of sops proceduralism to /obj contexts. Bringing in caches from disk can be rule based. Make lights based on procedural things. Scatter and layout stuff as manually or as automatic as you want. Have all that stuff change instantly based on the shot name. Save an entire lightrig to a cache on disk, bring it back later via a HDA menu, or through shotgun. Proceduralise all the things!
State of USD and Lops late 2019
The above is the sell. What's the reality? What should you be aware of? Bullet points for me to fill in later:
- USD is rapidly evolving. Base geometry, layering of geometry is solid. Storing shading networks in USD is relatively new, as are volumes. USD crowd support is bleeding edge. USD for realtime and mobile is very bleeding edge and changing all the time.
- Lops as a node UI on USD is very very new. So some parts are a new thing sitting on a new thing, expect some stuff to not be fully working. Some things don't update when you expect, need a bit of a kick to work.
- USD terminology can be confusing. To me it feels like synonym bingo, lots of stuff to avoid maya specific or katana specific things, takes a little getting used to.
- Hydra render delegate support is very new. PRman has probably the best support (its a pixar product, go figure), the rest are all at v1 or even v0.99 support for hydra. Karma is still in beta, other stuff is in a state of flux. That said, everyone seems to agree that USD is the obvious choice moving forward, and are investing heavily in supporting it.
- USD to generate final frames is pretty new. Up until recently USD was sort of used like alembic++, in that it ultimately was brought into Maya or Katana as a file format, but then to be sent to the render it would use Maya or Katana native behavior for that. This idea of pushing USD right through to the render engine itself is pretty recent, even stuff as seemingly fundamental as defining AOVs or render quality options is very new and still being actively discussed, expect changes.
- Lops as a katana replacement is still WIP. To be explicit about the last 2 points, if 'proper' support for renderers via Hydra is new, and support for generating final frames is new, then using Lops as a Katana replacement, who's entire reason for being is to talk to renderers and generate final frames, is pretty bleeding edge. Ironically USD and Lops is probably more foreign to Houdini users than it is to Katana users. Katana folk will find a lot of the concepts and workflows familiar, even a lot of the terminology is kind of the same, while Houdini folk will have some head scratching, questions raised as to why this is more complicated than Rops. My take on it all is that H18 is v1, they've done the heavy lifting of getting most of the USD concepts translated to nodes, the framework is in place. Next steps from both Sidefx and the community is to wrap up these nodes into HDAs, streamline the workflow, so that its easy for both veterans and new users.
- Lops as a tool for layout artists and pipeline folk is awesome. All the stuff that used to require loads of python, asset wrangling, runtime procedurals, effort and pain, bah, its all gone. Just go slap some nodes down, do a happy dance.
- USD support in realtime engines is super new. Unity got support in the last 6 months, UE4 got proper support in the last 6 days. Expect changes.
- USD is largely cache based, not rendertime procedural based. Requires some changes of thinking; if you're used to render-time procedurals to grow fur, generate crowds, do things, change your thinking. A core principle of USD is speed, render time procedurals screw that. USD now supports render procedurals, but Pixar are strongly advising folk to be careful if going down that path.
- No version control out of the box. When you specify a path to a file in USD, it isn't loaded directly, but gets handled by a module called the asset resolver. This is a plugin architecture to allow you to specify file paths in different ways. USD ships with a single asset resolver, which is basically just a pass-through for files on disk; if it recognises a path your give USD is a 'real' path on disk, it will load it. But what you really want is an asset resolver that talks to your asset management system, like shotgun. This gives you the ability mentioned earlier, to just use shotgun queries like asset name and version number, and the asset resolver will ask shotgun for the path on disk. As mentioned before this is really powerful, giving version control at the filesystem level rather than in the DCC. Unfortunately, you don't get any of this from the USD distribution or Pixar, you have to write this yourself. But hey, are you using Shotgun? Well you're in luck! The clever folk I work with at UTSALA wrote an asset resolver for shotgun, it's called Turret, its open source, go get it! https://github.com/UTS-AnimalLogicAcademy/turret
Which renderers have Hydra delegates
Hydra is the USD module that handles sending the scene description to a renderer. The end goal is that render developers don't have to write separate translators and importers for Maya, Katana, Houdini, Mac, Windows, Linux etc, they just write a single Hydra plugin, and it will work everywhere. Similarly for any new fangled geometry formats that USD hasn't covered yet, as long as they write the plugin for that correctly, render engines should support it directly.
When renderers develop support for Hydra, that's called a Hydra delegate. Delegates can be offline renderers or realtime, GPU or CPU, support some features or all features of USD. It's handy that when you have it all running, you can swap between different renderers as easily as swapping between wireframe and solid shaded mode in Houdini. Here's a quick list of names, what they are, what they support:
- Storm - Pixar's "fast interactive viewport-style renderer" in their words. Think of this as the realtime preview, it's the default in usdview, and good for checking animation, fur, camera layouts. Doesn't support volumes, doesn't support complex shading. Storm used to be called Hydra, which caused confusion with the Hydra module itself, hence the rename.
- HoudiniGL - Sidefx's realtime viewport delegate, used by Lops by default. Supports volumes (as I understand it, it's the default Houdini viewport renderer ported to Hydra), most of what you're used to in houdini viewports.
- Karma - Sidefx's offline renderer, in beta, early days. More or less an update to mantra, so think of it in those terms (vex based shading, principled materials, volumes fur etc, but ingests usd rather than ifd). Good breakdown of where Karma is relative to Mantra: https://www.sidefx.com/faq/karma/
- Embree - Example fast raytracer from Intel. It's basically an ambient occlusion renderer with basic surface colour support, motion blur, not much else. Lops doesn't support it internally as its more of an example implementation, doesn't do volumes, but can be handy in usdview in a pinch. https://www.embree.org/
- OSPRay - Intel interactive (but not realtime) CPU raytracer. The followup to embree, support more things, bigger, better, new, but they state clearly its not competing with Arnold and Renderman and the like, its an intermediate quality renderer. https://www.ospray.org/
- Renderman - Pixars CPU renderer, supports all the things, full materials, motion blur, volumes, several different integrators. Really handy in USDview to see things exactly in context, the debug integrators to let you see wireframes on objects, or shader complexity, or a ton of other things, really useful. Amusignly there's not much info or screenshots about the renderman usd hydra delegate in action, even though we use it daily at UTSALA. Will fix this...
- Redshift - GPU offline renderer, early days, but already pretty fully featured: https://redshiftrender.cgrecord.net/2019/11/houdini-18-redshift-hydra-delegate.html
- 3delight - CPU offline renderer, early days, again remarkably fully featured, incredible time to first pixel, remarkable ability to load massive datasets quickly: https://gitlab.com/3Delight/HydraNSI/-/wikis/Videos
- Arnold - CPU offline renderer, early days, but seems to be supporting most of what you'd want already: https://github.com/Autodesk/arnold-usd
- Prorender - AMD's GPU offline renderer, early days: https://twitter.com/bhsavery/status/1028318614003232768
- Octane - GPU offline renderer, beta: https://twitter.com/otoy/status/1123053790024716288?lang=en
- Vray - CPU offline renderer, rumoured Hydra delegate, but no proof online that I could find.
What next and useful links
You made it this far? Wow. Try reading the sidefx intro to lops, it'll probably make more sense after reading this page:
https://www.sidefx.com/docs/houdini/solaris/about_lops.html
Again, Ben has a nice collection of more coder focused usd tips: