Appearance
Houdini Chops
Chops are weird. Its the scary corner of Houdini no-one talks about, the documentation is sparse, and artists who understand it walk around in a smug world of their own. Bastards.
Every 6 months or so I'll have a stab at it, and while I could follow along with tutorials, it never clicked in the way sops clicked or even dops, and dops are weird.
Well, with the advent of the channel wrangle and some help from discord (especially Henry Dean, who in one video did more to advance chops knowledge than 10 years of prior work), I think I've had that click moment, so I'm hastily writing it down before it fades away.
So what the hell is chops?
The standard analogy is 'audio processing', but there's a few other things chops does, handy to be aware of them all.
- Chops is a digital audio processor. Load in wav files, midi files, filter them, generate triggers to spawn particles or drive animation, all that is well covered.
- Chops is a rigging toolkit. Feels like this will get more attention going forward, but already a lot of the rigging and constraint tools are done via chops. Dynamic parenting, Euler rotation filtering and cleaning, aim at constraints, IK handles, all that sort of stuff is chops.
- Chops is a way to model and sculpt animation independent of time. If you could convert all your channel curves into real polylines in a 3d viewport, mush them around, distort, combine etc, then send them back as animation data, that's what chops lets you do. Here's a laboured gif analogy:
Here's a bouncing ball:
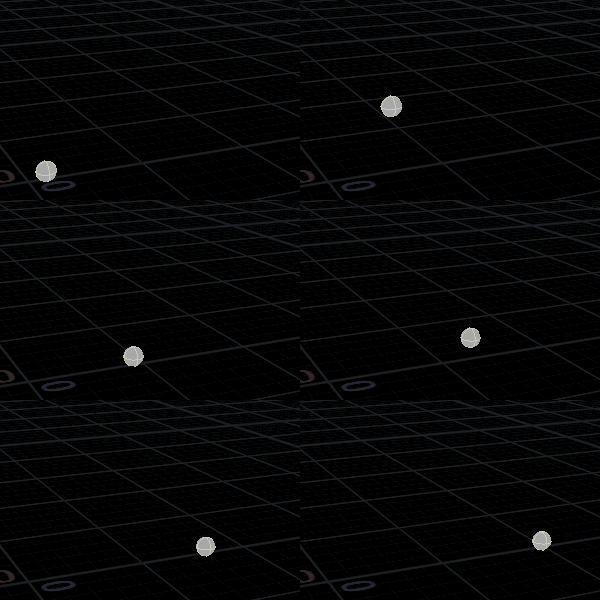 In other 3d packages you can display the motion path (here I've faked it in Houdini):
 Now imagine that motion path was a regular curve in sops. Ideally you would be able to model and distort the curve, and have the animation update. You wouldn't be limited to whatever tools the keyframe editor allows, you'd bring the whole sops toolkit to your animation workflow. What you've also done is stop looking at time through the timeline, you can now manipulate all moments of the animation at once. All the animation is splayed out in a human readable format.
This is what chops does, not just for translation like the sphere above, but for all animatable parameters, and not just for a single position, but for all the point animation on a complex shape, or all the joints in a rig, or all the things that are changing over time (within reason!).
How to setup a chopnet for sops
I hope you agree that all the fun stuff happens in sops. So its surprising that you have to jump several hoops to get sops to talk to chops. The steps are:
- Define a node where you want chops to read from, usually a null with an obvious name
- Append a channel node to read the data back from chops, set its method to 'animated'. This will be in an error state until you give it a chopnet and a chop out node to read from.
- Create the chopnet, dive inside
- Create a geo node to read from the null from earlier, set its method to 'animated' too
- Append a null to be the export location, name it nicely
- Go up a level, select the channel sop, set the path to the chop null (eg '../chopnet1/OUT') set its mode to animation
- Have a drink
Here's my best speed run. Ready.... GO:
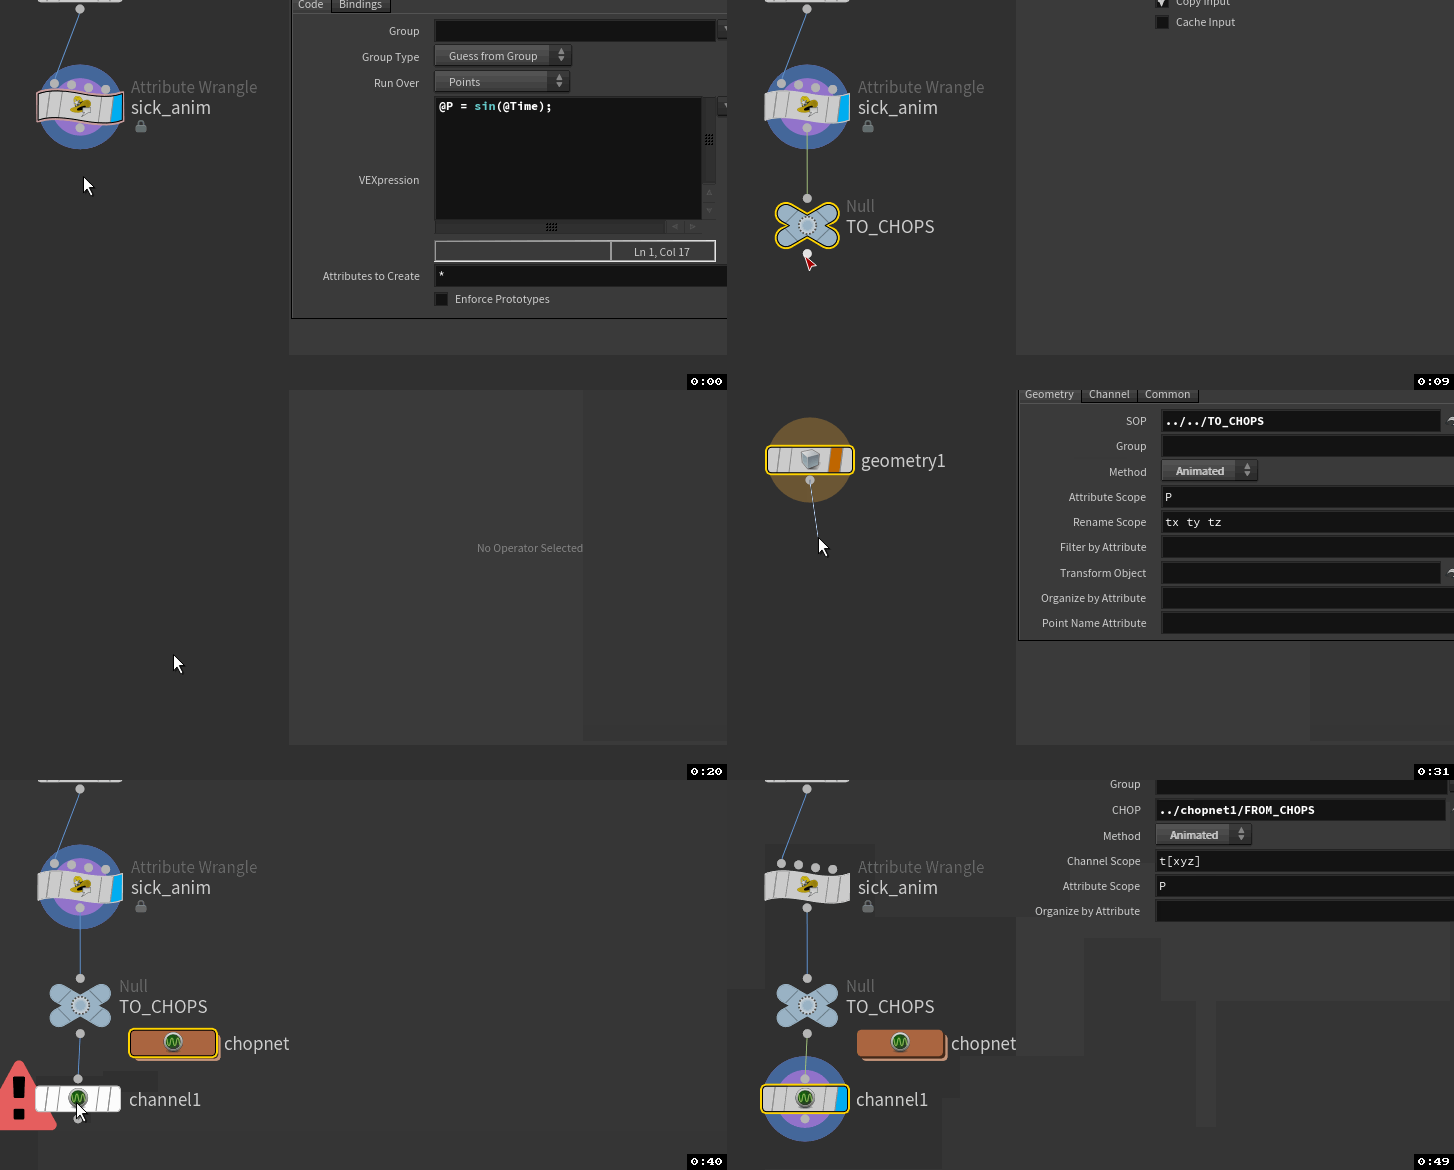 See? Simple!
Deciphering the motionfx graph
So... what have we done? A geo chop reads @P by default from sops, but by default only on the current frame. Switching the method to animated will read the full timeline animation. If you create a motion fx pane, you'll see all the animation data graphed out, much like an animation view. It'll probably look super busy too, if you hover over the pane and tap L on your keyboard, it'll hide the labels and make things run a little faster.
I've taken a line with 10 points, and in a wrangle set it to wave back and forth along x with a simple @P.x = sin(@Time);
Here's how that looks next it its motion fx graph:
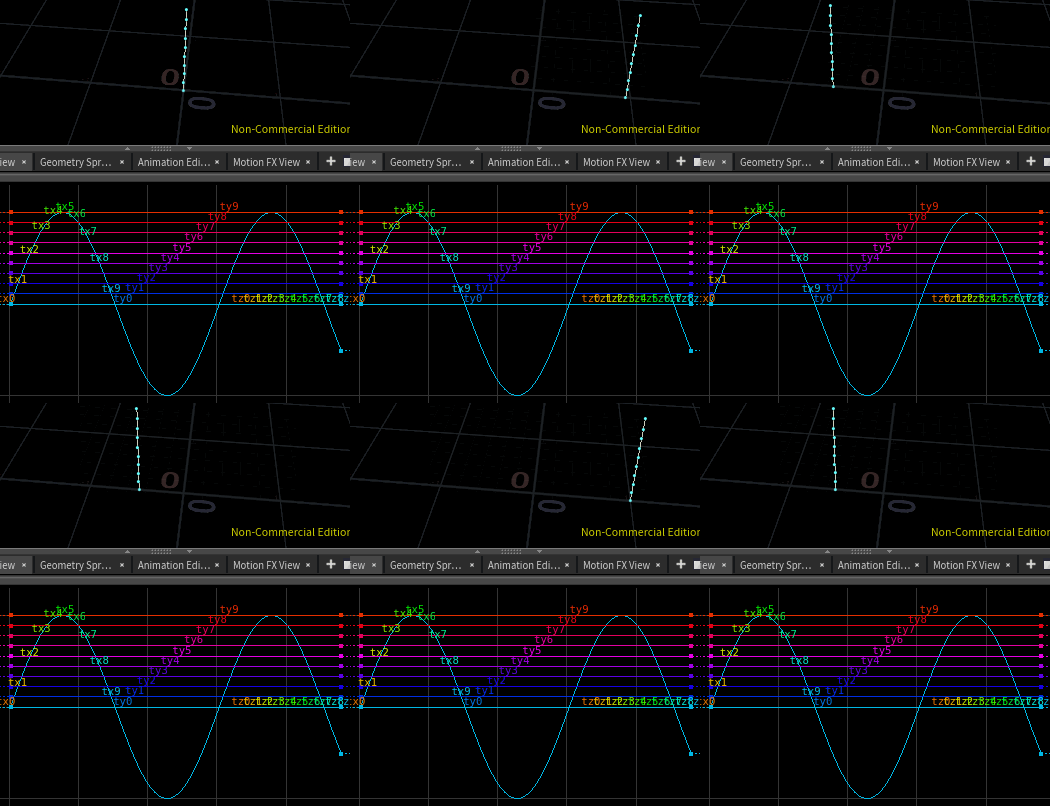 I've left the labels on here, you can see the sine wave motion on the blue, well, sine wave. The 1980s pink+purple lines are the y positions of each point; they don't change, so they all stay as flat lines. What you can't see is tz; all the points share the same tz value, 0, so they're all hidden at the 0 point.
What's all this tx/ty/tz stuff? Look at the geometry chop, you can see it has an attribute scope, P, and a rename scope, tx ty tz. Unsurprisingly, this takes each component of @P, and renames them as tx ty tz. I suspect this stems from a few things; chops is old and does its own thing compared to the rest of Houdini. Also I think its original purpose was to deal with object level transforms, where those keyframeable parameters are called tx ty tz, rx ry rz, sx sy sz.
Note that on the channel sop, it does the reverse, reads in tx ty tz, and converts them back into P.
The spring chop
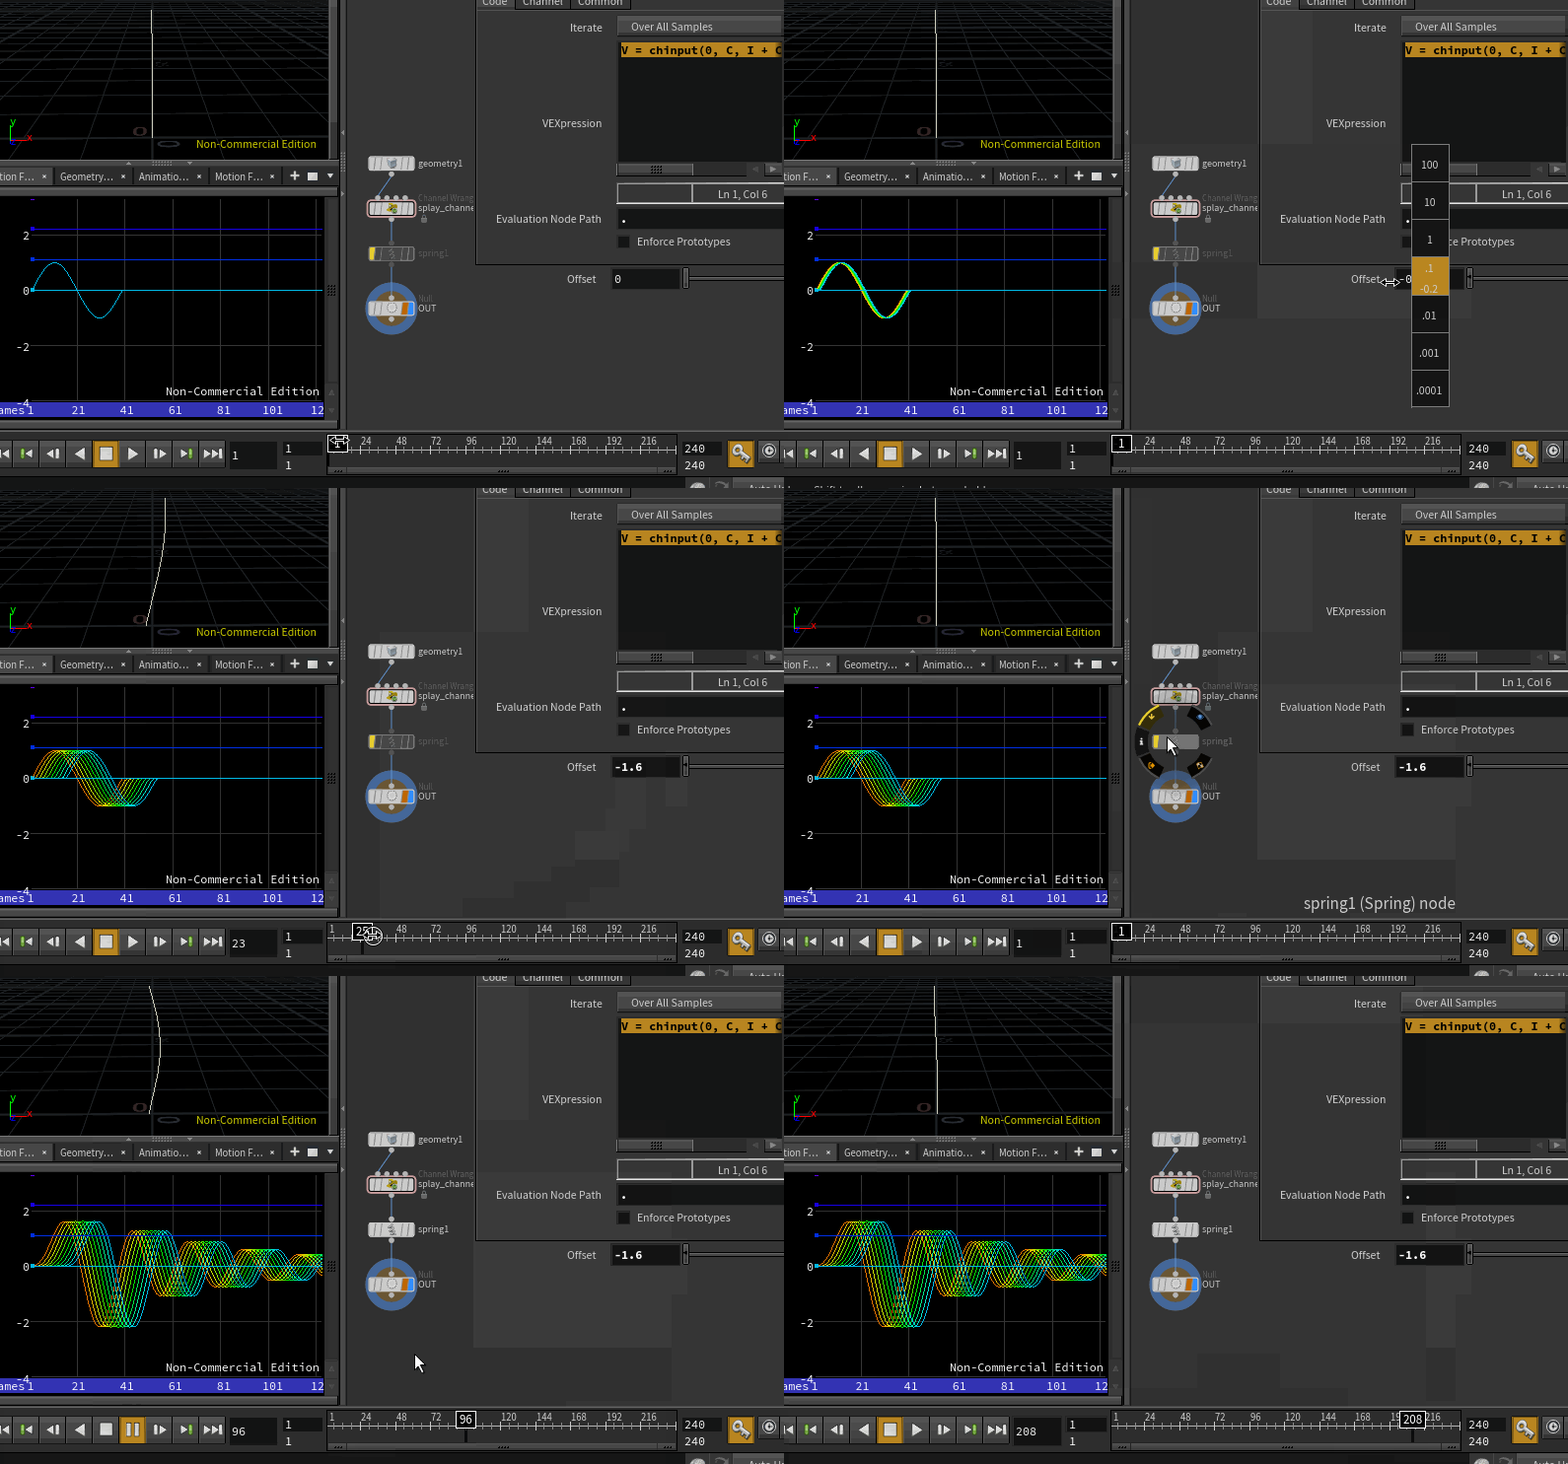
So say we limited the sine motion to a single pulse by clamping time (and speeding it up so its more interesting) : @P.x = sin(clamp(@Time,0,1.57)*4);
Inside the chopnet we can add a spring chop, and get some cool stuff (excuse the size of this gif, but its handy to see all the things):
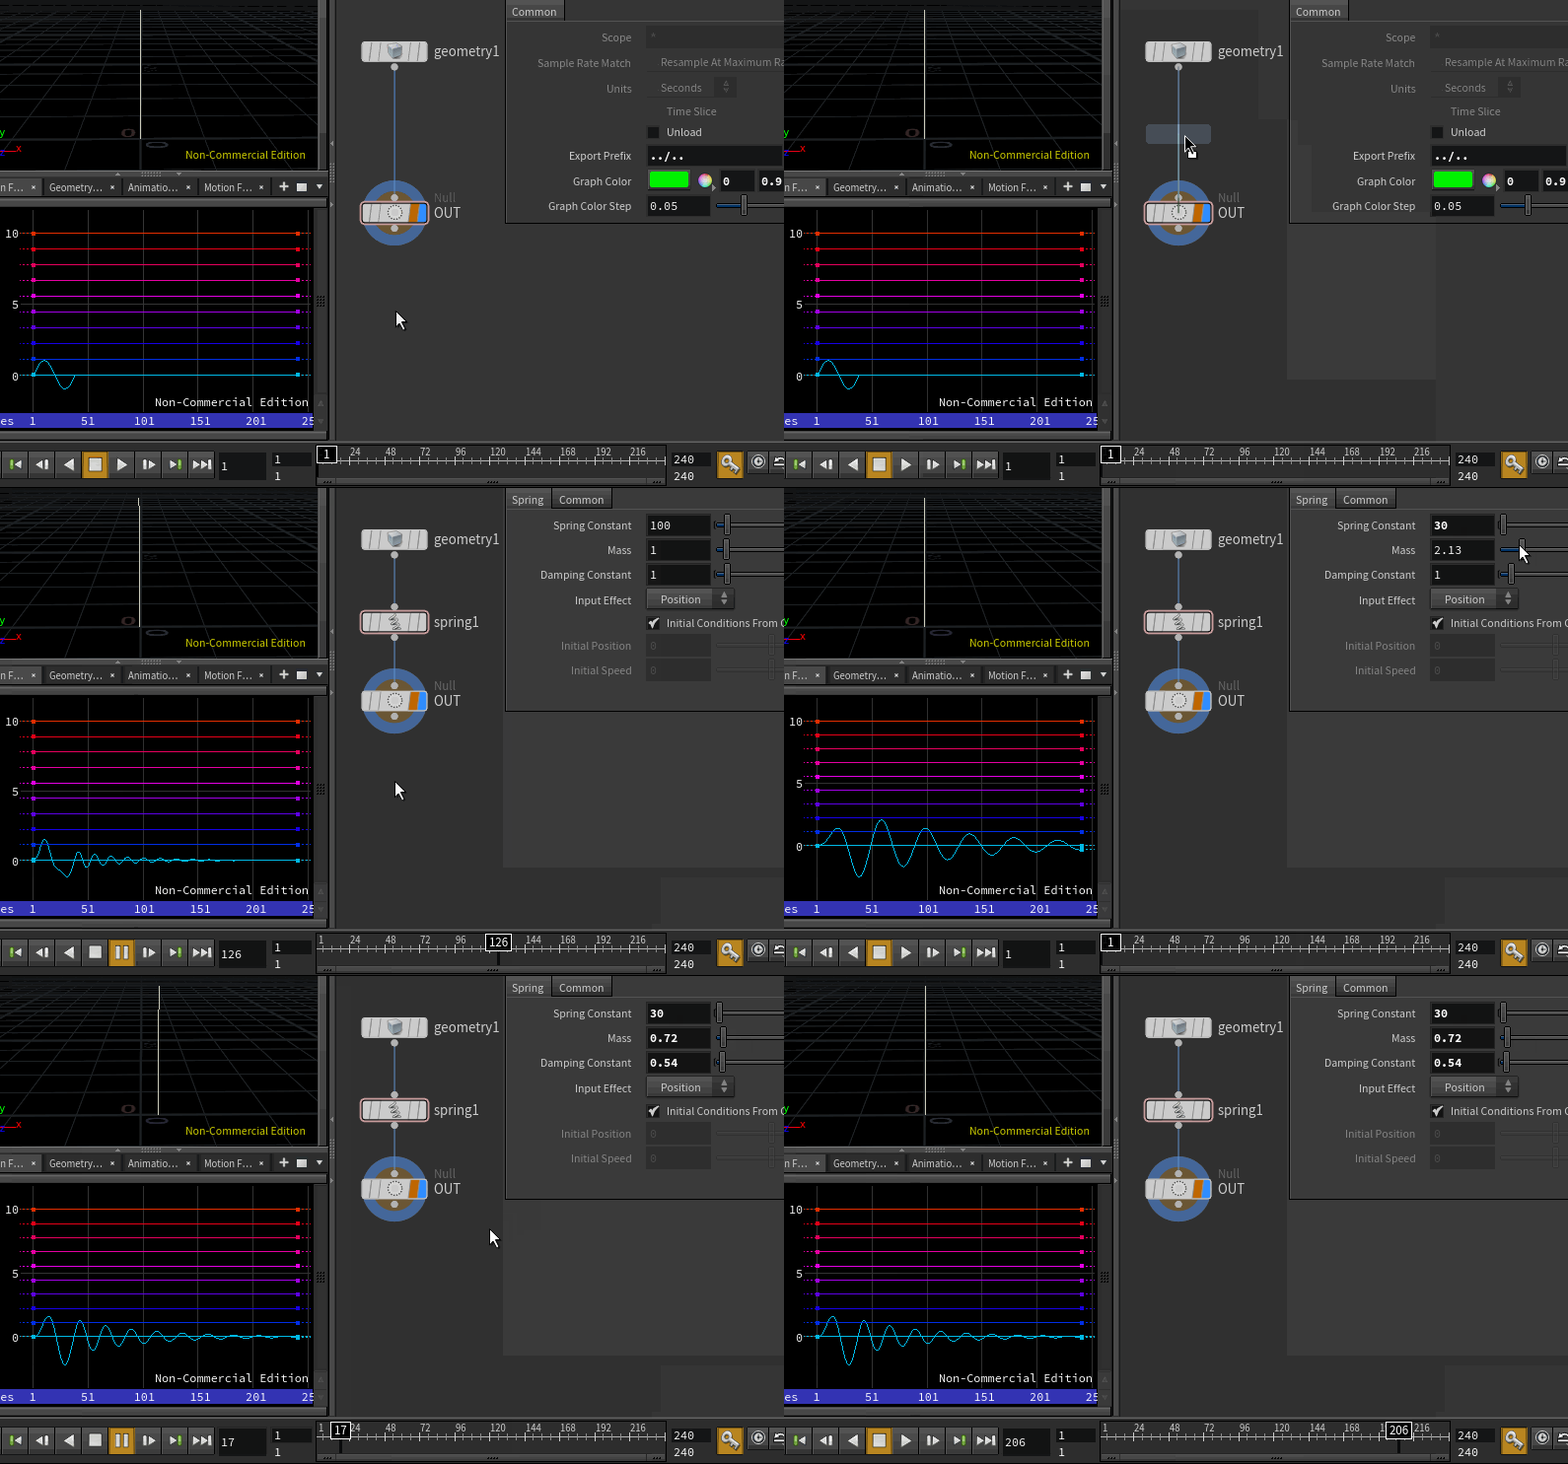 It's important to remember that that isn't a simulation; it's better to think of it as a deformer, for motion. Note that I can change the properties like mass, decay etc, and the graph updates in realtime. There's no run up, no recaching, no sim. That's kind of cool. What else can we do?
Stagger channels with a wrangle
 Download scene: chops_example.hipnc
Now that we have the channel wrangle in H16, we can do some fun stuff.
Each line of animated data is called a channel, within chops they're kind of like a packed prim for animation; they're an atomic unit, they have attributes, and have sub-data (kinda like unpacking a packed prim, don't think about this analogy too much).
In a wrangle context, the important attribute names are V for a value at a given time, C for the channel number, and a few other helpers like CN for the channel name, They're all listed here: http://www.sidefx.com/docs/houdini/nodes/chop/channelwrangle#globals
There's not a lot of chops specific vex functions, but the ones they have are useful. A handy one pointed out by Heny Dean is chinput(), which is sort of like a point() call, it lets you access other channels and other values of those channels.
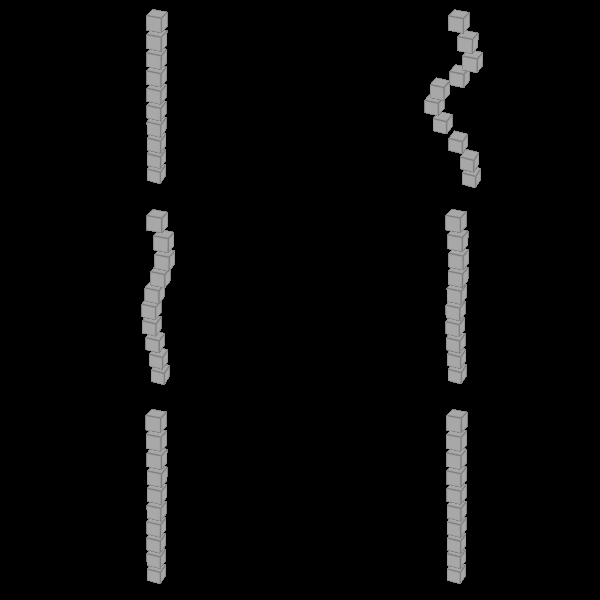
So here, lets take this boring back and forth motion, and do something cool; stagger each point based on its channel id. Insert a channel wrangle after the geometry chop with this code:
V = chinput(0, C, I + C*ch('offset'));
Click the button to make a slider, slide it while watching the motion fx window (and the viewport):
 Cool!
Cool!
I remember doing lots of keyframe anim like this in maya, keying many objects to move in lockstep, then in a dopesheet window offsetting each object by a few frames to get a sexy staggered motion. And here's houdini doing it procedurally. Oh the time I've wasted....
More anim stagger
 Download scene: chops_repeat_and_splay.hipnc
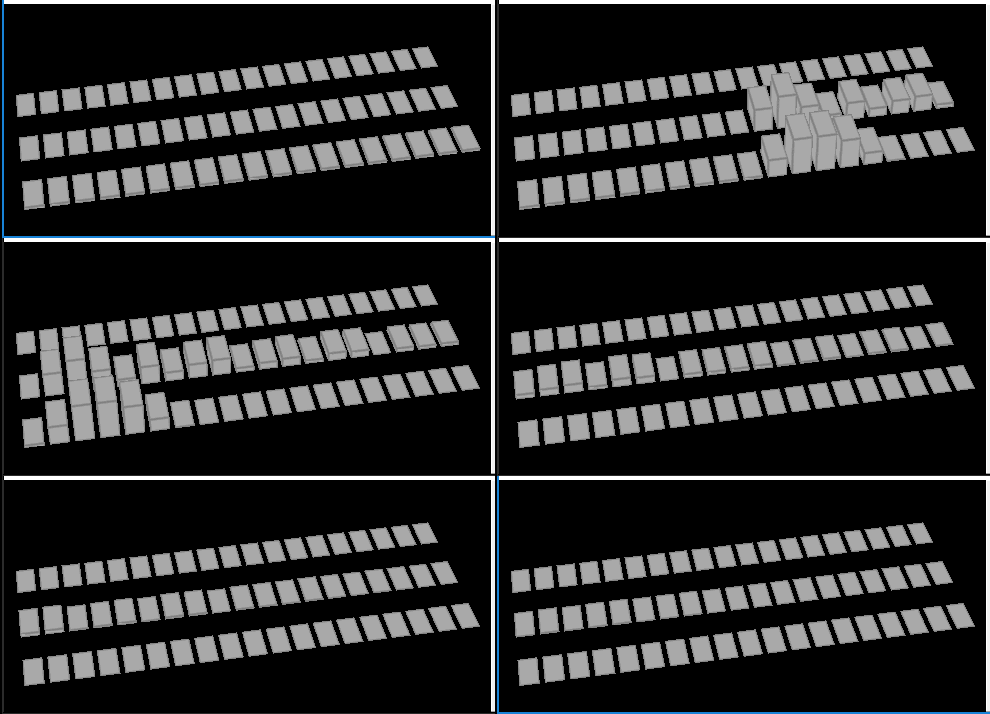
The top row is a polyextrude being driven by a @zscale attribute. In a wrangle I've keyframed that attribute, because its the same for all prims, they all extrude with the same animation.
The middle row is the same, but processed through chops before going to the polyextrude. Similar to the previous example, I stagger the animation using a wrangle, and apply an echo to repeat the animation with a delay and decay.
The bottom row is also the same, but showing how to generate a new animation within chops, then copy+stagger to all the prims. A trigger chop is used to define a new waveform, then 2 maths nodes are used to copy that waveform to the incoming channels. The first just multiplies all the incoming channels by zero, effectively resetting them. The second math chop just adds the newly reset channels to the trigger channel, so each channel is now a copy of the trigger. There's probably more elegant ways to do this, but the advantage with this method is that it'll work no matter how many incoming pieces of geometry there are. I use the same chop wrangle trick to splay/stagger the animation.
Stagger and offset bones
 Download scene: bones_chops.hip
Same idea as above, but the end result is more fun, and covers how to bring object level parameters into chops, plus a few nice H16 UI tricks.
First, drawing a chain of bones. Make sure you're in /obj, hit tab in the viewport, choose 'bones' (not bone). Click the start position, move to the end position, but before you click, scroll the mousewheel up. Hey hey, instant bone chain. Click to set the end, hit enter to finish the tool.
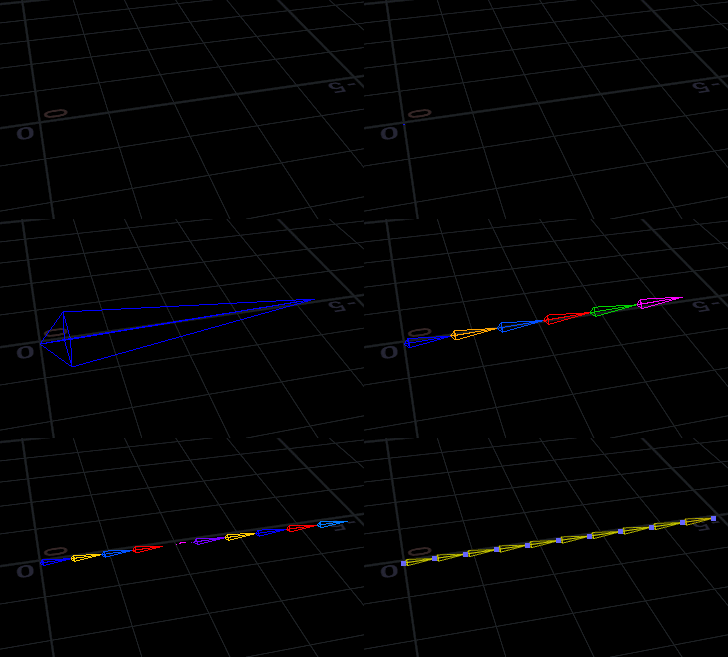 Now to create a chops network for these bones. Initially we'll just affect the rotate-y channel of these bones, so select them all in the network editor, bring up the parameter pane, right-click on the rotate-y channel, and choose 'motionfx -> wave'. This will create a chopnet, pull all the rotate-y channels in, apply a wave channel effect, and link the result back to these channels. Pretty slick.
 Houdini will have also spawned a floating parameter pane for the wave chop, close that for now, and look inside the chopnet. It's pretty simple; the channel chop pulls in the animated channel names, the wave chop generates a wave, the math chop adds them together, and because it has the export flag set, sends the result back to our joints. Set the amplitude on the wave chop to 16, admire your nice wavey motion.
Having a closer look at the channel chop though, you can see its a multiparm that references each channel by name. It's a bit unwieldy, and doesn't support wildcards. We can do better than this. Drop down a fetch chop, set the path to a wildcard that'll get all our joints: '/obj/chain_bone*', and set the channel name to ry. Swap the fetch for the channel chop and... an error?
The fetch chop can be temperamental for reasons we'll cover soon, to fix this click the light-orange export flag on the math chop to disable it, then enable again, should now work.
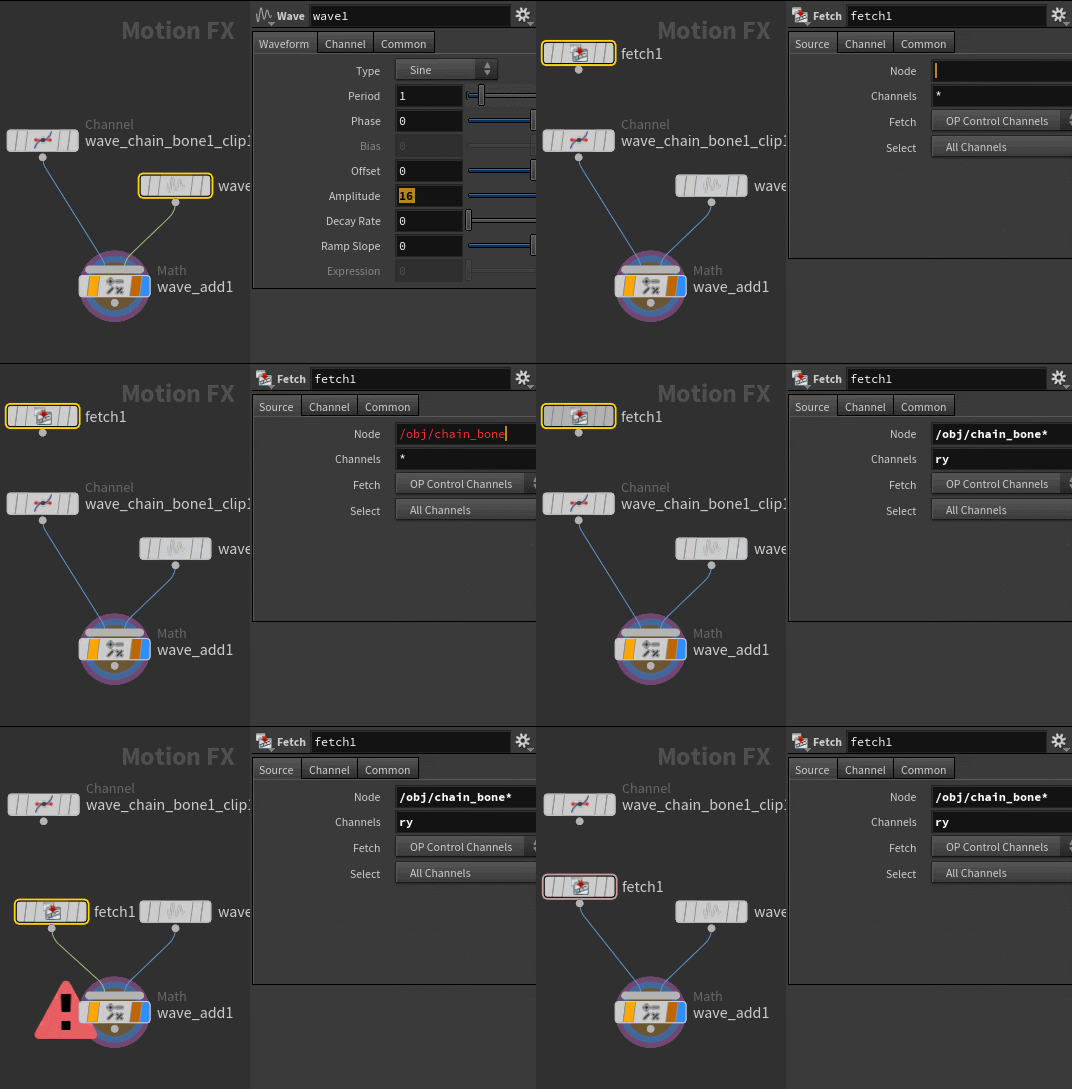 Mmm, much more procedural, sweet. Now like the previous example, lets create a chop wrangle to stagger the timing per joint, and drive that from a slider. Append a wrangle, move the export flag to it, enter the following code, click the 'create sliders' button.
vex
V = chinput(0, C, I + C*ch('offset'));V = chinput(0, C, I + C*ch('offset')); Notice though that each time I move the slider, I have to do the same disable/enable export flag? That's pretty annoying. Luckily Henry Dean found a great workaround for this. He explains here that its due to a cyclic dependency bug in the fetch rop, but you can bypass this by putting down a constant chop after the fetch, hit the 'snapshot input' button on the snap tab, then disconnect the fetch chop. If you look at the 0 tab, you can see that it copies the incoming channels, but now they're just static names, removing the dependency issues.
Now you can let the playbar run, and slider the sliders to see the lag run in realtime, which is great fun.
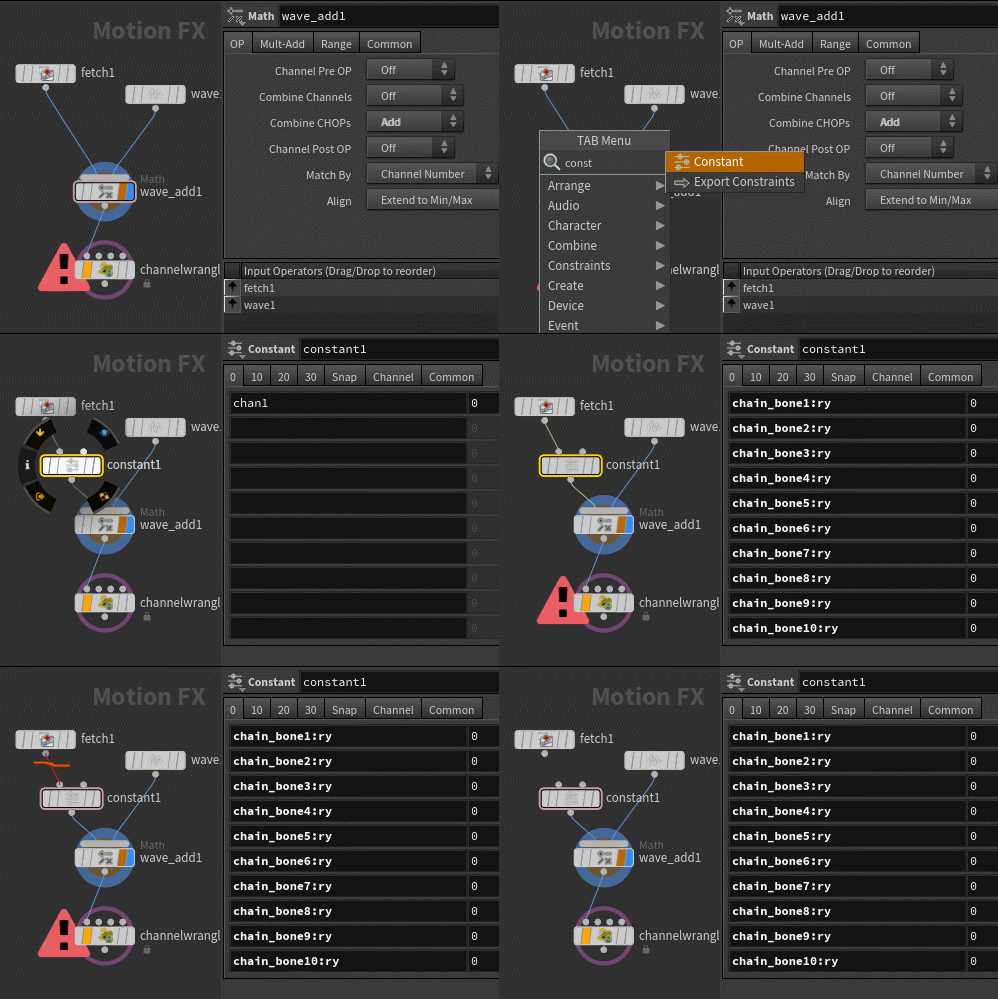 With this setup, its easy to make silly changes. Eg, say we wanted to animate the rotate-x channels too, and have them use a different offset and amplitude. First we have to import those channels, so reconnect the fetch chop, and change the channel name from 'ry' to 'r[xy]'. Snapshot the new names and disconnect the fetch rop again. Now the rx channels are available to chops.
To update the wrangle, I add an if statement that looks at the channel name; if it ends in 'x' (ie, its an rx channel), then use a different chinput call using different sliders:
vex
float oy, ox, ay, ax;
oy = ch('offset_y');
ox = ch('offset_x');
ay = ch('amp_y');
ax = ch('amp_x');

V = chinput(0,C,I-C*oy)*ay;
if (CN[-1]=='x') {
   V = chinput(0,C,I-C*ox)*ax;
}
float oy, ox, ay, ax;
oy = ch('offset_y');
ox = ch('offset_x');
ay = ch('amp_y');
ax = ch('amp_x');
V = chinput(0,C,I-C*oy)*ay;
if (CN[-1]=='x') {
V = chinput(0,C,I-C*ox)*ax;
}The gif at the start of this section shows playing around with those sliders, pretty cool.
Should point out that I still don't really know how to skin geo to these bones, nor do I have much of an interest in learning right now. Maybe one day...
Dynamics driven by chops
 Download scene: chops_drive_dops.hipnc
Download mp3: beat.mp3
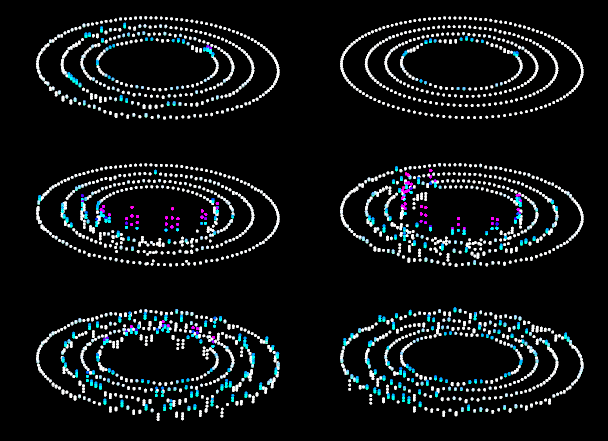
A more stereotypical example of what people think of for chops. A mp3 beat is driving the vertical motion of a ball. The ball has its motion transferred to a grid, which then drives a ripple solve. The ripple solve is in turn used to drive a particle sim. To make the gif make sense, I also drive a line using the same mp3 like an oscilloscope, but unlike an example elsewhere on this site, this is using a channel wrangle.
Nothing overly complex here, but when getting into this sort of stuff it can be hard to know where to start, hopefully this give some clues.
Using the beat chop
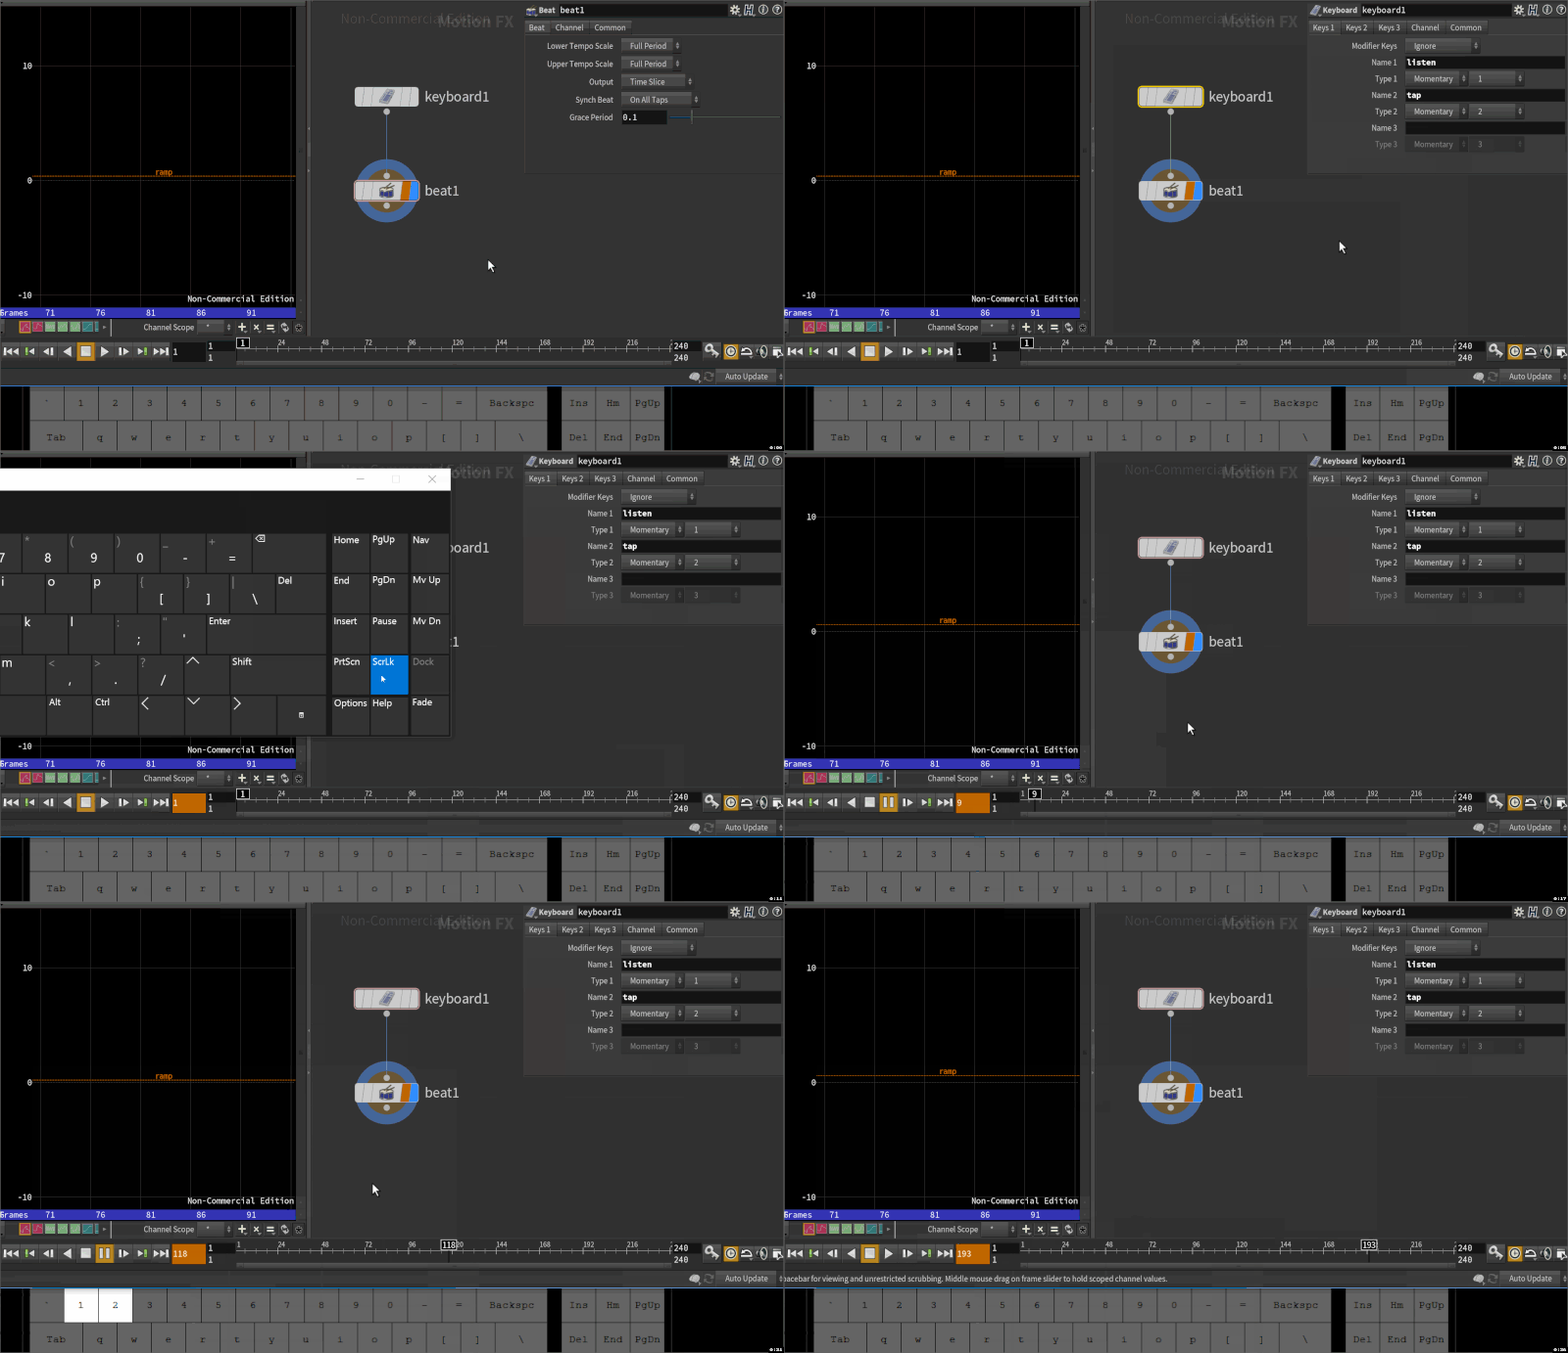 The beat chop works like a metronome, and like most audio editors you can tap a beat and it'll then guess what beats-per-minute you've tapped. It expects 2 input channels, 'listen' and 'tap'. If listen is non-zero, it tries to work out the bpm from pulses in the tap channel.
You can generate those channels with a keyboard chop, holding down a key to enable listen mode, and tapping another key to set the beat. To allow the keyboard chop (and other input chops) to detect keyboard presses, you press the scroll-lock key. The time indicator will turn orange to show that chops is now in detect-inputs mode. So:
- keyboard chop, name first channel 'listen', second 'tap', leave the keys as 1 and 2 if you want
- connect that to a beat chop
- hit scroll lock, see the frame indicator turn orange (I had to use a virtual keyboard, no scrolllock on my mini laptop keyboard)
- hold down 1 to enable listen, tap 2 to set the beat
I'm using an on-screen keyboard tool partially so you can see what I'm doing, but mainly because the little surface pro 4 I'm using doesn't have a scroll-lock key. 😃
Set chops to listen to keyboard input on machines without a scroll lock key
Surface pro's and most mac laptops don't have a scroll lock button, in that case you can enable the mode from houdini's main menus, 'Edit -> Intercept mode'. The current frame indicator won't turn orange, but chops will now pickup keyboard events. Thanks to someone at Sidefx for pointing out that very obscure workaround!
Glitch effects
 Download scene: chop_glitch.hip
Super cool tip from the incredibly helpful and friendly Henry Foster aka Toadstorm. He mentioned the cool banner on his website was done with Chops, dropped a few hints in a discord chat, was enough to get me to work this out.
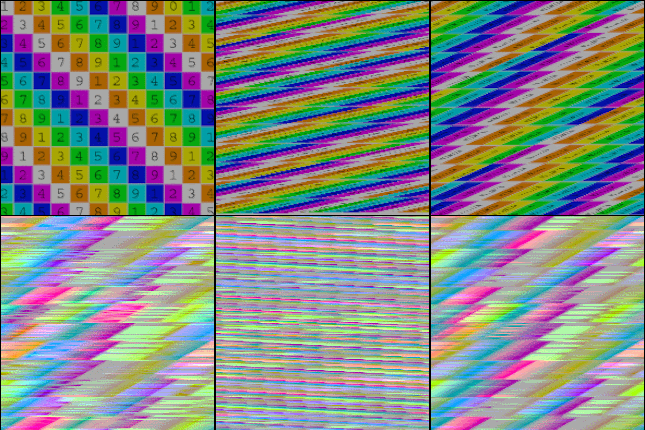
The core idea is simple; images probably shouldn't have audio filters applied to them, so if you go and do that, fun glitch stuff happens. A resample starts to offset the alignment of the colours from where they should be, leading to interesting Amiga style loading screens, and a lag chop really breaks things, leading to more interesting effects. There's a wealth of things you could do here, lots to explore.
The actual mechanics of getting the colour info in and out of chops is fairly simple. This is a grid where I've set Cd with an 'attribute from map' sop, then I read Cd into chops, and pull it back out again with a channel sop like the geometry examples above.
The only tricky trick is to make sure its working on Cd, not P. To do this I tell it what the attribute is (Cd, obviously), and what 3 channels to map that to in chops, I've gone with cdr, cdg, cdb. Set the same names on the channel sop, and you're good to go.
RBD filter high frequency noise
 Download scene: rbd_post_filter.hip
Download scene for 16.5: rbd_post_filter_16_5.hipnc
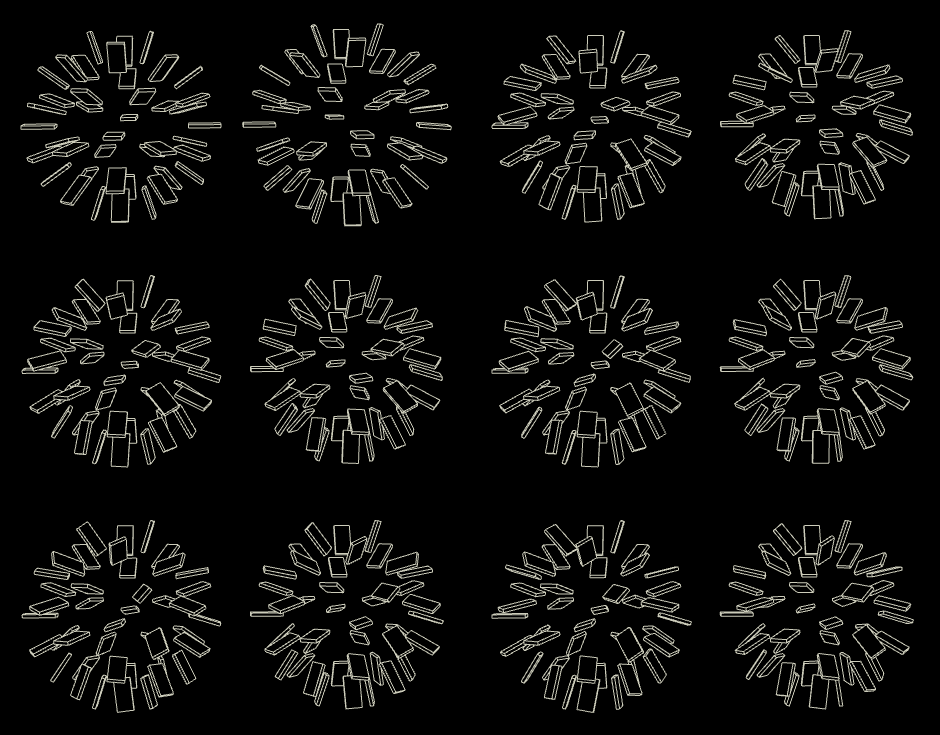
Short version: cracktransform -> chops -> foreach chop -> construct t* r* s* channels -> transform chop -> filter-> eulertoquaternion(radians( filtered_rotations ) )
Often RBD sims will have high frequency pops and jitters that can be a pain to remove. I knew chops should be capable of filtering that noise out, and its relatively easy to do for position, but rotation, specifically @orient, took a bit of effort.
My first attempt was dumb, read in @orient as a vector4 (so I set the geo chop to read @orient, and create channels rx ry rz rw), filter, then reapply. It fixed the most jittery RBD objects, but others that had been calm would flip erratically. On closer inspection it looked like euler flipping.
I knew chops should be able to fix euler flipping, so I started investigating that. From reading around, it seemed to be as simple as applying a transform chop. I did that and... nothing. Further reading said that it expected euler values, which makes sense.
So I used vex cracktransform() to convert @orient to euler, store it in @r as a vector attribute, read that into chops, and.... still nothing. Yet more reading, head scratching, it seems that the transform sop is designed to work with /obj level transforms, not arbitrary rotations on points. As such, it expects a full set of translate/rotate/scale channels, so tx ty tz, rx ry rz, sx sy sz.
I made some dummy channels for translate and scale, merged and... STILL NOTHING. Hmm. Yet more head scratching, suddenly realised that it expects literally those names. The geometry chop appends a number suffix to each channel that corresponds to each point, that confused the transform chop.
Even more head scratching, and I found the for-each chop. I could process each point by stripping the name suffix, create the extra required channels, feed that to the transform chop. Finally it would now apply the euler filter, and I could see clean channels without discontinuities. Hooray!
Except... it went crazy when applied back to the points. It took Nick Taylor and Henry Foster to point out my stupidity; I was using the eulertoquaternion function to convert back to orient, it expects radians, I was using degrees. Idiot. A quick cast to radians, and finally convert @orient back to the intrinsic transform of the packed geo, and it all works. Fiddly, but should be very useful!
Henry Dean pointed out that 16.5 has a euler filter chop that works on just rotations. Hooray! Will test that when I get a chance...
A wave in chops via touch designer
 Download scene: chops_wave.hip
This is the kind of chops network I tried to understand when I first tried Houdini 10 years ago, made my head hurt, gave up. I can now almost understand it, but mainly I'm impressed at the crazy mind who would think to design a 3d module like this. Greg Hermanovic, you're insane, I salute you, never change.
Working through the great Touch Designer Operator Snippets, hundreds of little examples of what Touch can do, with a massive section on chops. One of the examples is a wave like this, which I recreated in Houdini to make sure I understood it.
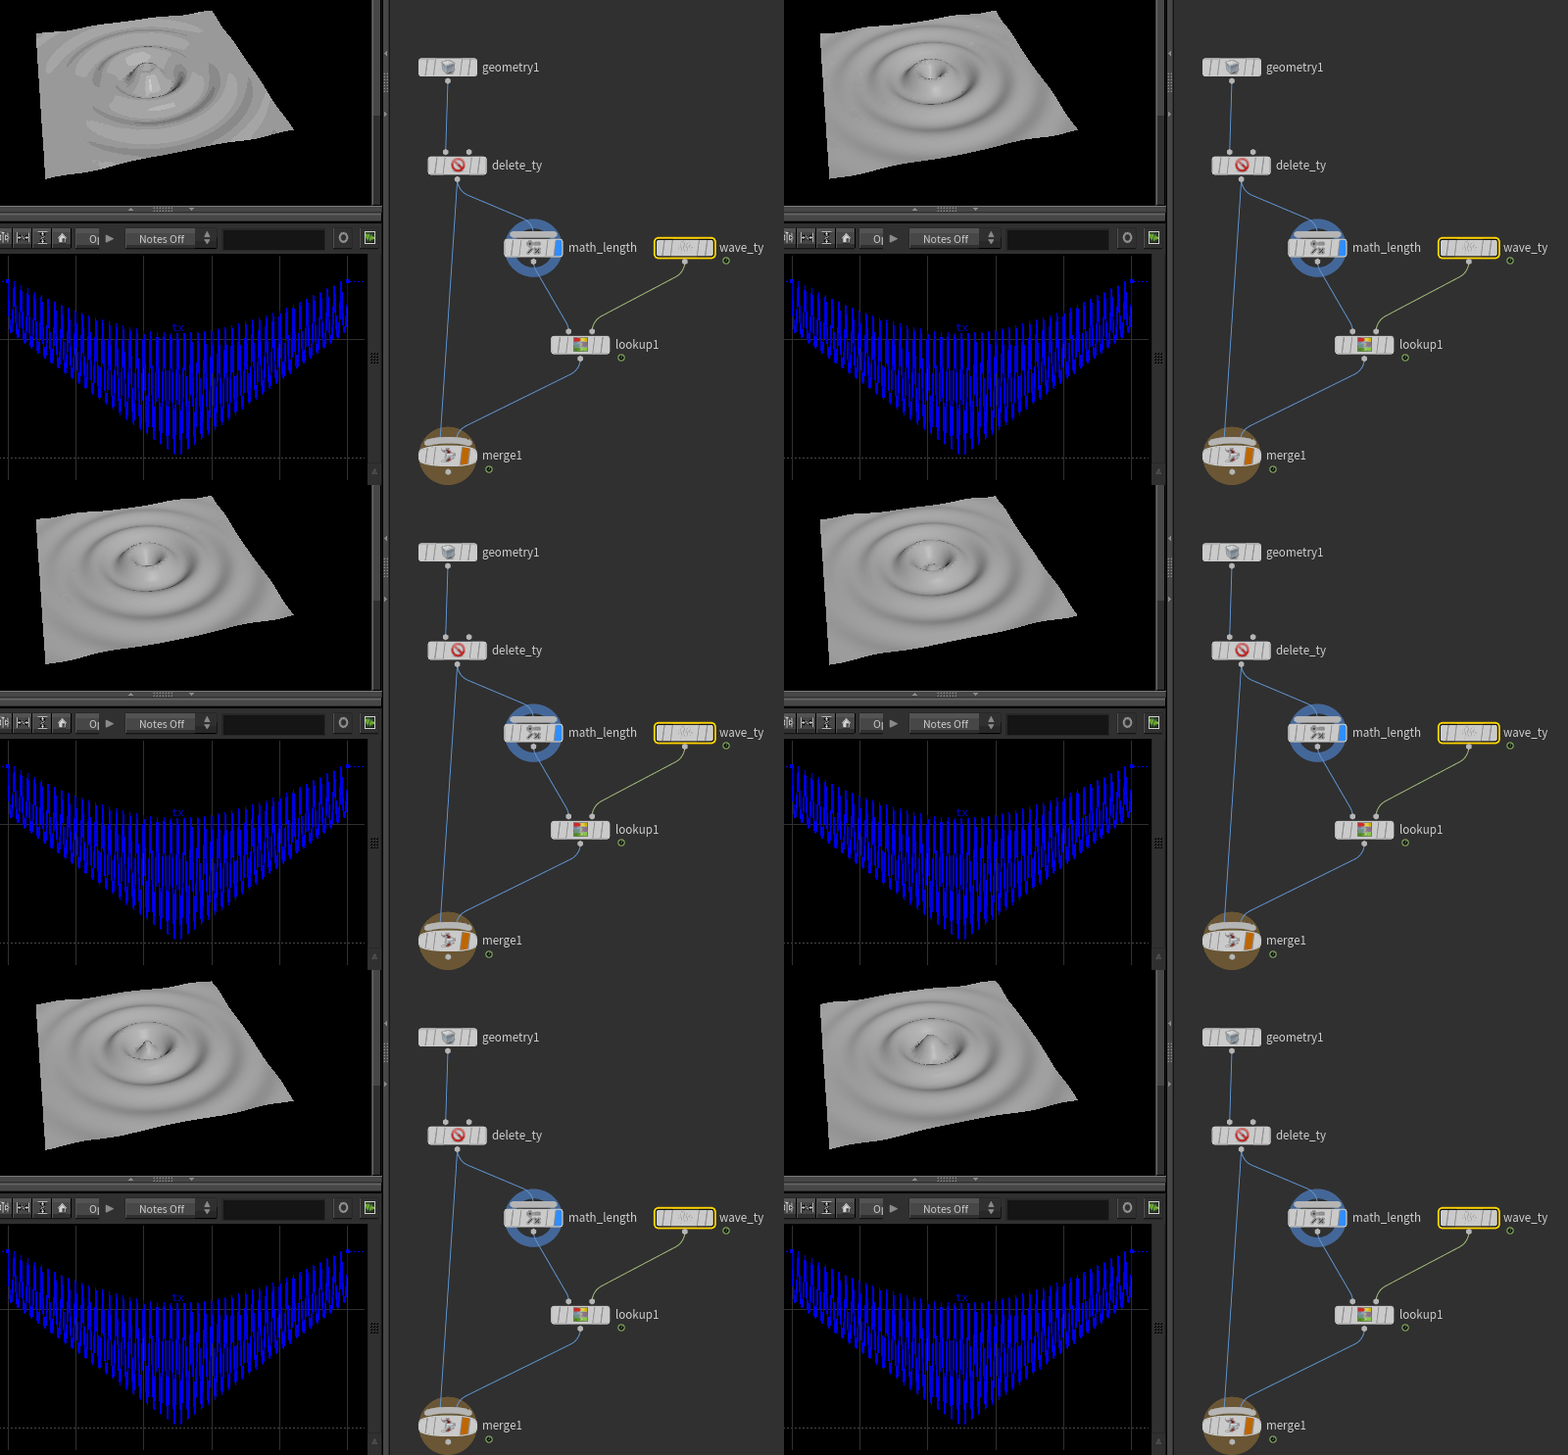
The points of the grid are brought into chops with a geo chop, like the previous examples. The ty channel is deleted, as we'll create and merge in our own ty channel later. The remaining tx and tz channels are fed to a math chop, which lets you do maths operations in a strangely hands off, menu based way. The operation here is length, which from reading the docs says it treats the incoming channels as a single vector, and measures its length. In this case that will run per point, so points near the origin will be 0, points at the edge of the grid will have maximum length. This is a single value, chops will store it on the first channel it finds (tx), the rest are deleted.
Meanwhile, we use a wave chop to draw the cross section of our wave. This is done in a very musical, audio synth way, so you choose the base waveform (sine, sawtooth, square), amplitude, decay, phase etc. I use $T to animate the phase over time. I name this channel ty, as this will become our height channel soon.
The length and this wave are fed to a lookup chop. Similar to a ramp in a wrangle, it uses the first channel to lookup values in the second. Here, we use the length to lookup what part of the sine wave to become. The result is named after the second input, so its called ty.
Finally we merge this new ty with the original tx and tz, and export this back to the grid.
Would I ever use this? I hope not, but its fun in a perverse way, and it makes me want to learn even more chops by playing more with Touch. It's great fun, I highly recommend it!
Chops for crowds and fbx cycles
There's a few extra bits on chops on the crowds page, especially towards the bottom with regards to making locomotion clips, make sure to have a read: HoudiniCrowd
Reading audio waveforms into sops
 Download hip: chops_waveforms_revised.hipnc
One of the first things I tried to do in chops many years ago was read audio waveforms into geometry. The various examples I found seemed a bit complex, but that seemed to be expected.
Had a look again today, maybe its new vex calls, maybe I looked in the wrong places, but it seems MUCH easier now.
Bring in a 44100 Khz mp3 to chops, and you can push it onto geometry with a pretty simple point wrangle:
vex
float t, s;
string path;

t = @Time * 44100; // 44khz, the sample rate of the audio
path = chs('path');

s = chop(path, 'chan0', t);

@P.y += s * ch('amp');
float t, s;
string path;
t = @Time * 44100; // 44khz, the sample rate of the audio
path = chs('path');
s = chop(path, 'chan0', t);
@P.y += s * ch('amp');Create the sliders, set the path to the chops file (using the op: prefix,eg op:../chopnet1/OUT ), and your geo will start bouncing to the audio.
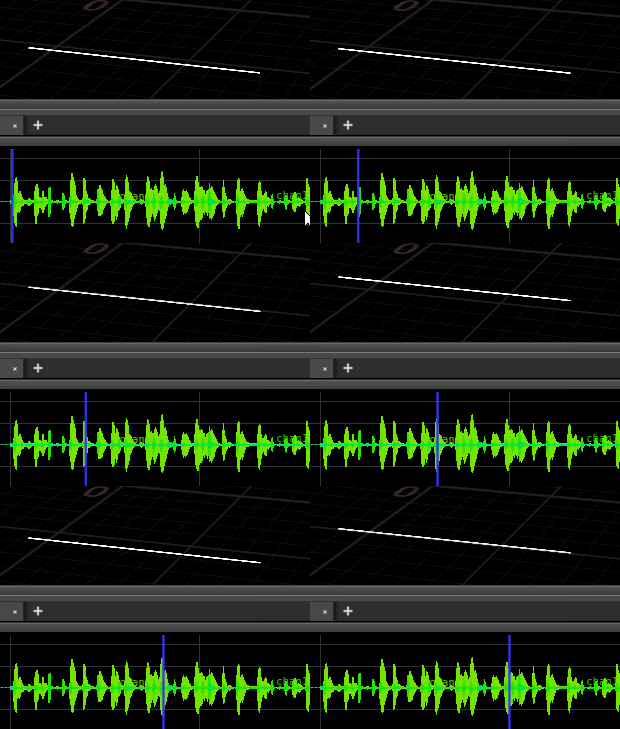 The chop vex function in there is pretty simple; find a chop node, look at chan0, and read the value at sample t. Because the sample is at 44khz, we need to multiply time by 44100 to get to the resolution of the individual sample slices.
To see waveforms rather than a uniform bounce, we need to make points at the end of our shape be reading samples from a slightly different time. If we use the uv's of a shape for example, imagine zooming in to a little sliding window over the sample, and mapping one side to @uv.x = 0, and the other size to @uv.x = 1.
By multiply @uv.x by some value, this will set the width of our window, and adding @Time to those values will animate the window along the waveform:

vex
float t, s;
string path;

t = @Time;
t += @uv.x * ch('offset'); // offset in seconds along uv.x;
t *= 44100; // 44khz, the sample rate of the audio

path = chs('path');

s = chop(path, 'chan0', t);

@P.y += s * ch('amp');
float t, s;
string path;
t = @Time;
t += @uv.x * ch('offset'); // offset in seconds along uv.x;
t *= 44100; // 44khz, the sample rate of the audio
path = chs('path');
s = chop(path, 'chan0', t);
@P.y += s * ch('amp');Can get all sorts of fancy with this. Eg, rather than 'chan0', that string could be constructed so that each prim could refer to its own channel. Applying envelopes, lags, eq etc in chops helps get unique looks. I've unlocked all my inner winamp visualiation demons now..,
Audio spectrum analysis
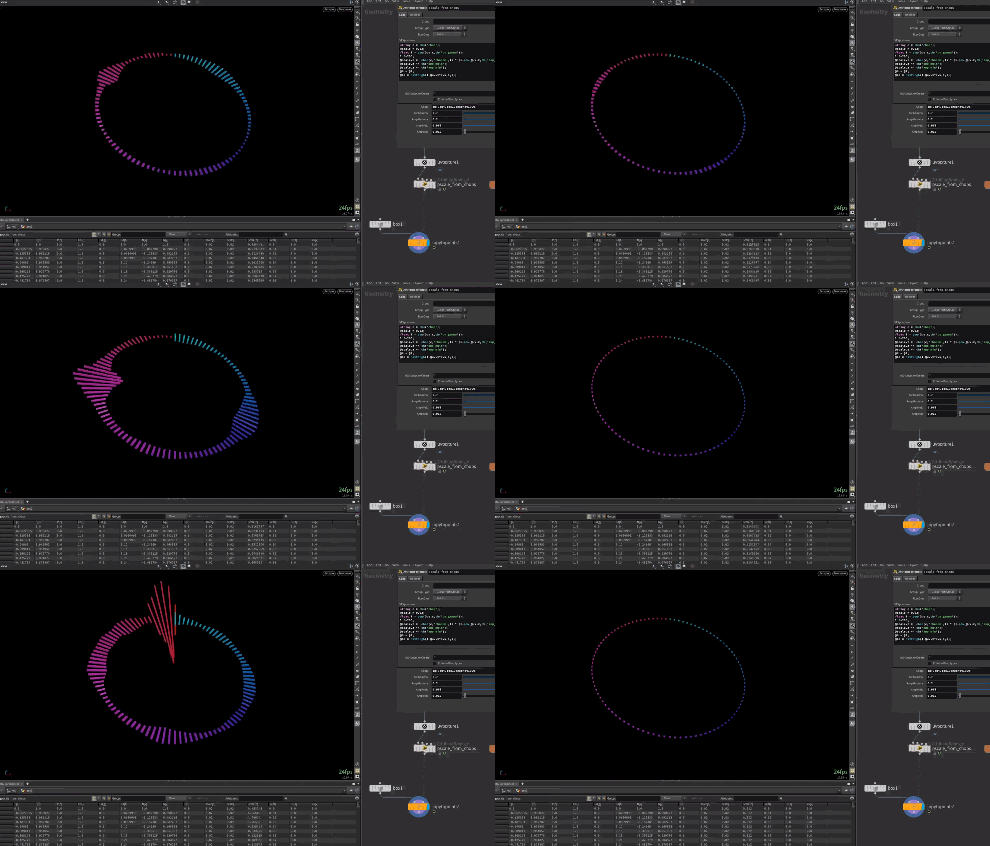 Download hip: chops_spectrum.hip
This setup is the kind of thing that gives chops a bad name. 2 minutes to setup, then an hour trying to understand why it wasn't behaving. The spectrum chop does a frequency analysis, but will put the values it generates starting at the current frame, sliding along the timeline as you playback. Not great if you expect it to start from 0 when doing a lookup from sops.
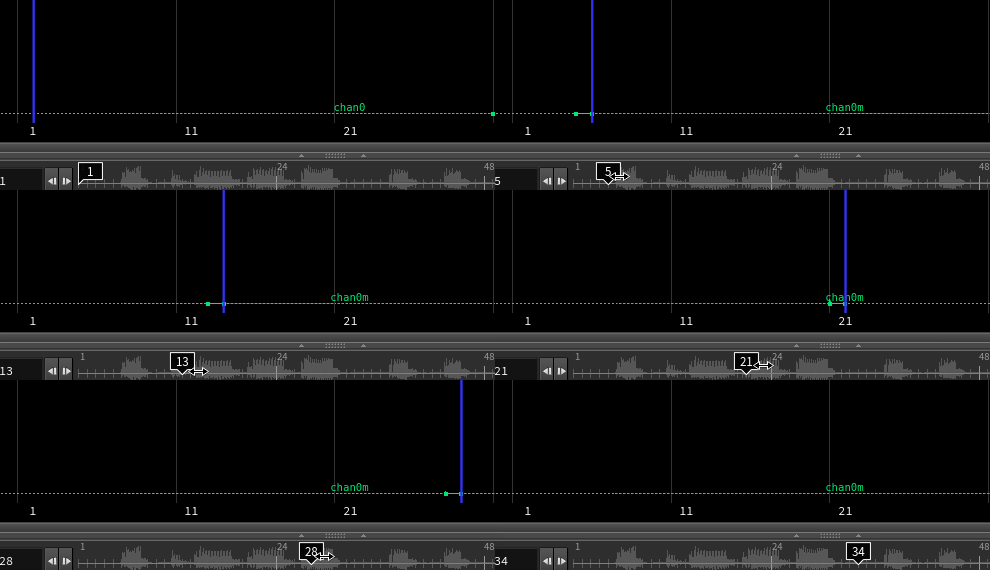 Stranger still, at first it looked fine, I'd move to sops, then back to chops, and the results looked like it was just returning a single value. Tracked down that the spectrum chop doesn't work well with scrubbing backwards or randomly seeking on the timeline.
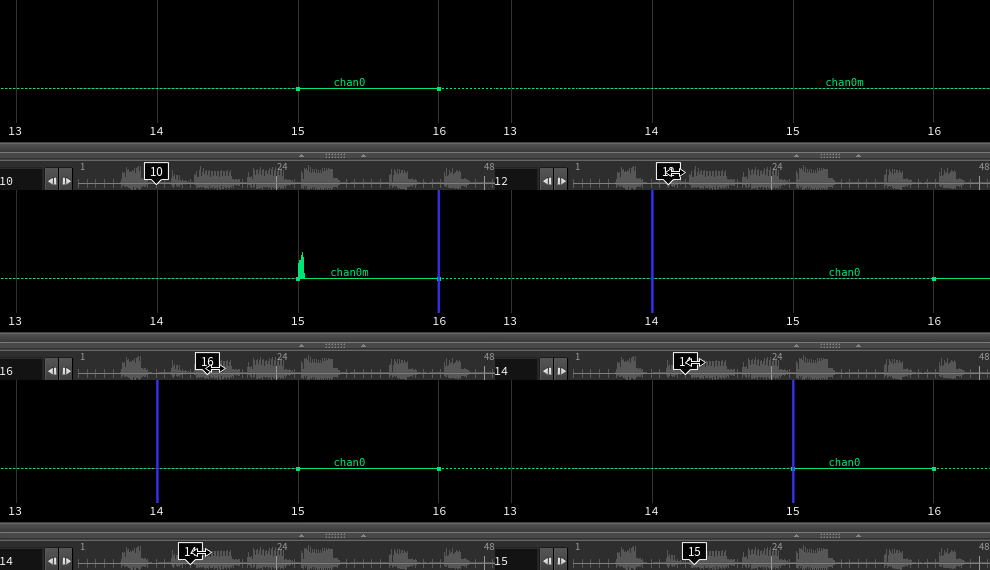 Once I understood that, I could massage the data into something usable. It seemed to be a really coarse result in its default range, and most of the values were between 0 and 0.01 on the horizontal axis. Resampling and multiplying it out by 100 seemed to help, as well as running it through a square root operation on the maths chop to even out the range. I also fixed the start-at-current-frame behaviour by subtracting the current frame with a shift chop. I also found I had to force most of the chop nodes to work in 'frames' mode on thier last tab, if I had a mix of the samples, seconds, frames, things started to break again.
 Anyway with all that out of the way, I could read it into sops using the same chops vex trick posted above, with more power functions and multiplications/offsets on the incoming uv's to get a nice range of values to drive the pscale of my points.
Despite all that, I'm still really chuffed with the end result. Damn you chops, you temptress...
Retime a camera
 Download hip: chops_camera_retime.hip
A thing I loved in Maya is that time is represent by a node, Time, and everything is implicitly connected to it. If you drive the time node's inTime connection, or any animation curve inTime with another curve, you can easily retime whatever you want; a single bone, a camera, an entire scene.
In Houdini its easy enough to retime sops using a timeshift node, but what if you have a camera or other /obj level things? Here you need to use chops, and I was surprised that I've avoided learning how to do this for so long, as retiming cameras was something I'd do all the time in Maya.
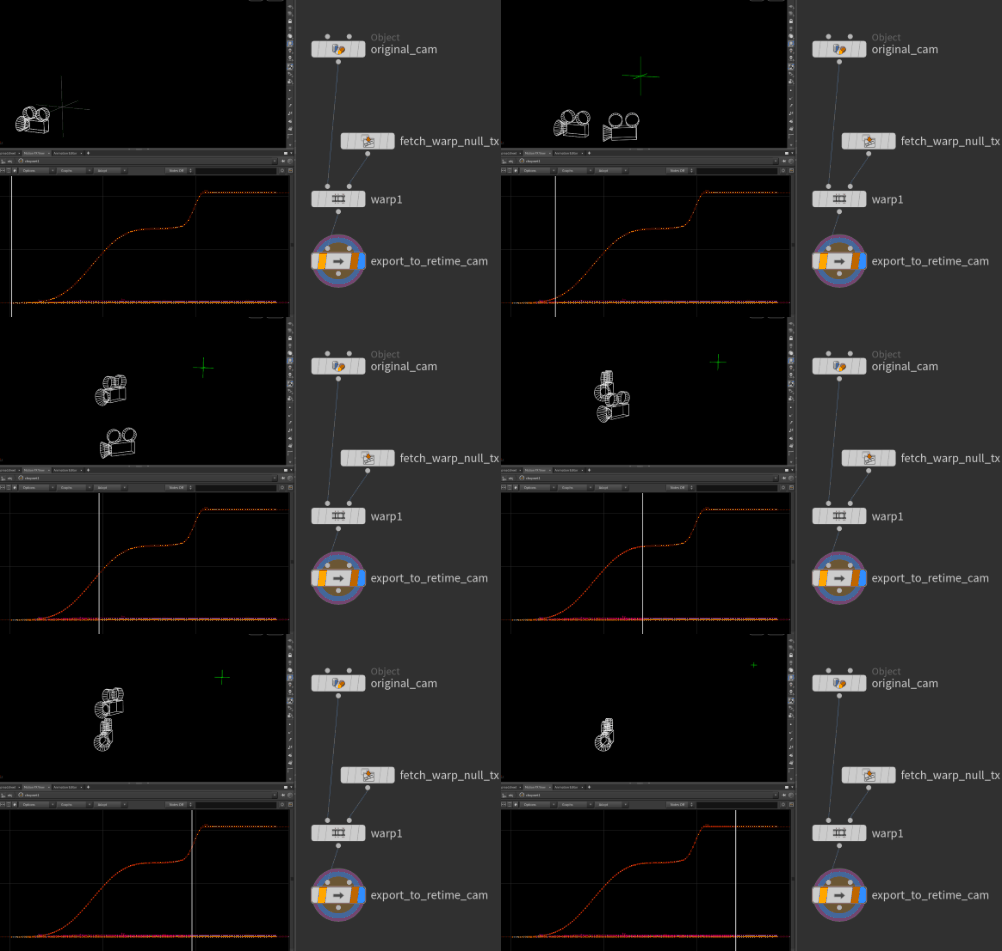
Anyway, here's an example. 'original_cam' has some keyframed animation, we want to retime that and apply it to a duplicate camera, 'retime_cam'.
The retime curve has been done by keyframing a null, using its translateX to represent the new animation values. So its keyframed 1 at frame 1, 100 at frame 100, and if this were used for the retime, nothing would change. But now if you insert extra keyframes, change the first and last values, you'll be warping time.
In chops the workflow is:
- Object chop to pull in the original_cam, set the mode to 'position and rotation'
- Fetch chop to pull in the null, set to only load tx
- Warp chop, camera to first, null to second. By default this uses seconds and accelleration, I'm used to working in frames and absolute frames. Set the method to 'Index Control', and on the common tab set units to 'Frames'.
- View this node in the motionfx view, compare to the object chop, you should see the retimed values
- Append an export chop, set node to the retimed cam, and path to 'tx ty tz rx ry rz'. Most importantly, cos I always forget, click the second flag on the node, it'll be orange. This will make chops 'push' the values onto the specified node, rather than relying on you to create parameter expressions on the new camera to 'pull' the data.
I assumed there'd be an easy way to generate an animation curve within chops, but it doesn't appear so. You'll see some bypassed nodes in the chopnet based on a hint from Will at Blackginger, but its not quite what I wanted; you can define a linear section of channel samples, edit them directly in the motionfx window (thus freezing the node), but there's no bezier handles, no sparse data, its a bit convoluted. Amazingly using a null's translatex is less convoluted somehow! Ah chops, once again conforming to the stereotype of making the hard things easy and the easy thing hard.
Still, its highly likely I'm missing something obvious, if you know a better way, get in touch!
Well, guess what I just learned... see below...
Generating retime curve within chops
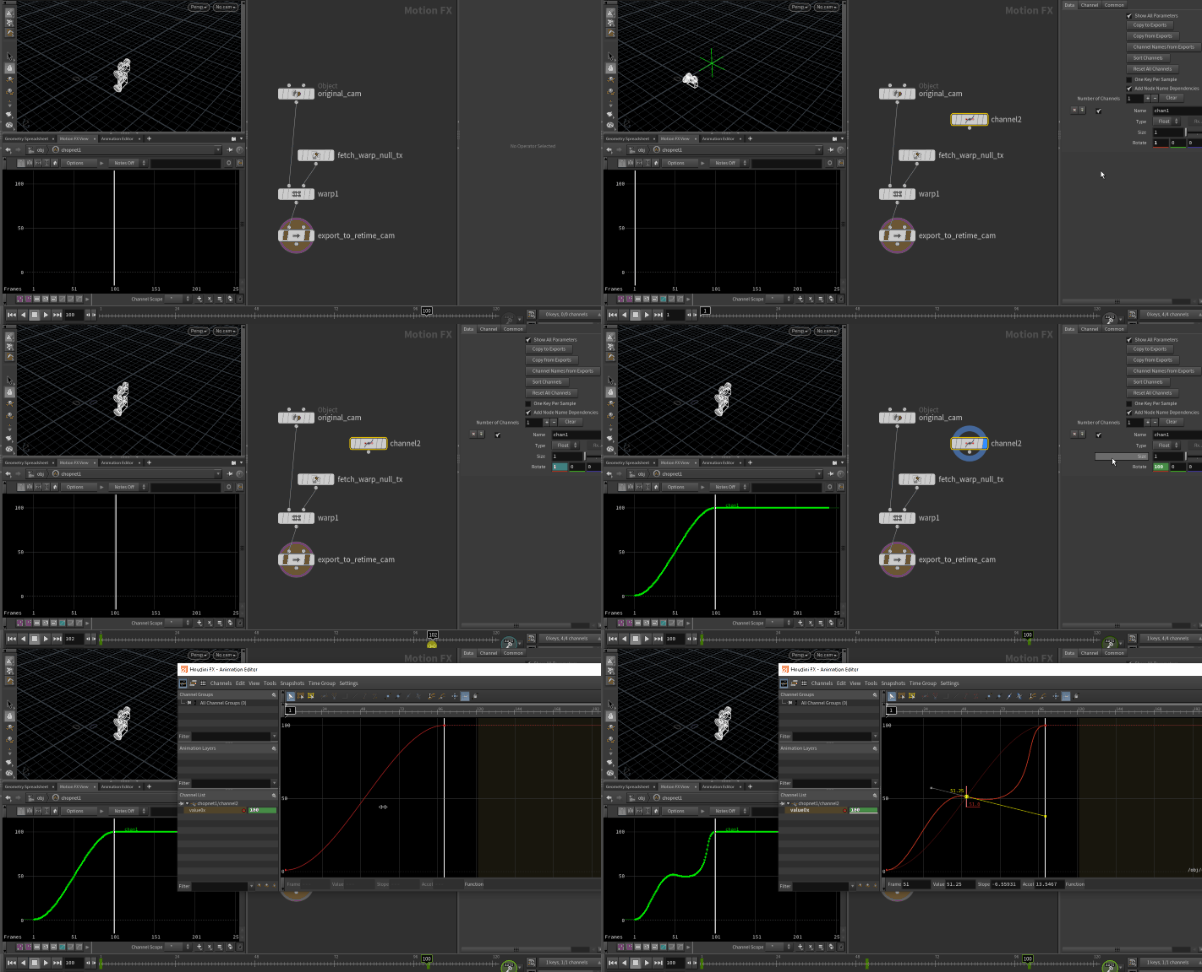 Will Harley pointed out a simple fix. I'm an idiot.
- Create a channel chop
- On the Data tab, alt-click the (poorly named) first rotate channel to be 1 at frame 1
- Move to frame 100, set the value to 100
- You should see the now sampled as one-sample-per-frame in the motionfx view. But how to get nice bezier handles?
- shift-click the channel, and/or bring up your own graph editor. Tada. Animate in there, see it directly update in chops
- Feed this channel directly to the second input of the warp chop.
Easy fix! Thanks Will!
Random intertia looking rotation
Download hip: chops_random_object_rotation.hip
Will Harley came up with yet another great setup that got me interested in chops again. Hopefully this mania won't last, but its tricks like this that make me think there's life in chops yet.
His original post is here if you wanna go straight to the source:
https://www.sidefx.com/forum/topic/87202/#post-376651
I pulled it apart, then rebuilt it trying not to look at his hip to see if i understood the concepts.
There's a few clever things going on here:
- Using chops native support for 3x3 matricies. Has that always been there? Maybe for obj stuff, but this was the first I'd seen it used in sops.
- Linking this to a 'transform by attribute' sop to actually manipulate geometry
- A handful of cunning hscript expressions to make chops parameters do the right thing.
Quick text walkthrough:
- Generate a bunch of packed shapes
- Initialise their 3@transform
- Pull this into chops with a geometry chop, using 'transform' in the matrix parameter, and unpacking the channels with t[xyz] r[xyz] s[xyz]
- We just want to work with the ry for now, so use a delete chop with ry* as the channel name wildcard, and delete non-scoped.
- Generate a noise waveform for each ry channel. Can do this by setting the channel name parm to `chopnames("/obj/geo1/chopnet1/just_ry")` which grabs the ry* channel names from the delete chop
- Each channel needs to be different, so use $C (a hscript variable that returns each channel's unique index) in the seed parameter
- A trigger chop is appended, which generates a synth ADSR pulse whenever the noise lifts above a threshold. It can be easier to see this if you reduce the number of input shapes to just 1 or 2. Tweak so it has a fast attack and slow decay.
- An area chop adds values over time, so the individual ADSR triggers become channels that can either stay flat, or increase in value, but never decrease, which is used to get the simulation-ish looking rotation.
- A maths chop multiplies up these values into something more like regular rotation values
- A comp chop inserts these ry* channels back into the matrix channels
- This is pulled back into sops with a channel chop, and the matrix animation applied with a transform by attribute sop.
Step through the chop nodes while watching the motionfx view (you'll need to space-h to zoom the window appropriately), and play with the values to see it update in near realtime. I tried to extend the setup to make the pigs turn either left or right randomly, but I couldn't get it to look smooth, and its getting late.
I hope this isn't a sign of another trip down the chops hole....
Careful now
Before you go and chop all the things:
- Geometry chops don't scale well. Makes sense really; if you have a 50x50 grid over 240 frames, then that's 50 * 50 * 3 channels it has to generate ( 7500 ), times 240 frames = 1,800,000 bits of data. Remember if you want to access the entire timeline of animation at once and manipulate it, then all that has to be available, then all of that has to be modified as you slide values on the spring chop. Made worse because...
- Chops are single threaded, or were last I checked.
- Chops can lock Houdini super easy. All those channels, all that data, put down some fancy chop, you'll pay for it.
- Chops are disliked and feared by most Houdini artists. Remember I said chops savvy folk get all smug? Part of that is knowing if they have to share their scenes with others, there'll be tears. Don't be a dick, keep the chops stuff to only when you really need it.
Additional resources
- https://www.youtube.com/watch?v=VTJmzoDlmfw Jason Harmon has put together a really clean tutorial explaining how to record keyboard input, and quickly link those recordings to other parameters in Houdini. It's a must watch!
- https://vimeo.com/209784546 - brilliant clean simple tutorial from Henry Dean, covers the rigging side of chops better than anything else I've seen.
- http://www.technical-artist.net/?tag=tutorial - japanese, google translate does a pretty good job. Covers using chops as cheap mocap source among other things.
- http://www.andrew-lowell-productions.com/andrew-lowell-productions/resources.html - quite old, but still a great resources for the audio and midi side of chops.
- http://www.hossamfx.org/chops-in-houdinifx/ - The trailer for this training video looks pretty good (I haven't watched it though)
- http://www.derivative.ca/ - The guy responsible for chops split from Sidefx several years ago, and spun chops into a realtime gfx toolkit called Touch Designer. Chops is the gateway drug to Touch Designer (or maybe Touch is the gateway drug to Houdini?), either way if you like chops, you'll love Touch. 😃