Appearance
Katana
Katana overview
Sort of Houdini, sort of Nuke, sort of neither. You collect bits of stuff like a katamari damacy ball, so you'll have some geometry, a mini graph of lights, a camera, some materials, you then merge them all together like a nuke 3d graph.
Beyond that point, its sort of like stylesheet overrides in houdini (assuming I understood those, which I dont). The tree of merged stuff (Katana assumes you're making heirarchies of things, and assembling them into a tree) is available on every node, like sops. You then filter and manipulate that tree with each node, adding properties, modifying stuff until you have a complete tree of things and properties ready to make pretty pictures.
The idea is you then have a katana procedural that talks directly to the renderer, doing all the filtering and magic required per frame. Amazing.
The Scene Graph is the outliner, but works like the geometry spreadsheet in that its a live view of the graph based on where you specify. Its just nodes and their heirarchy, not their attributes.
The Attributes tab shows you the things you need, so you select a node in the scene graph, the attributes tab displays all the properties on that thing at that point in time.
Loading a vdb sequence
The loader (a pxrvolume node in this case) can use a python expression, and a string replacement to swap out the frame we want with the built in 'frame' variable:
python
'/path/to/volume.%04d.vdb' % frame'/path/to/volume.%04d.vdb' % frameCan do loops with modulo and stuff, which gets annoying because the symbol for module (%) is the same as the one for string replacement (%):
python
'/path/to/volume.%04d.vdb' % (1+(frame%499))'/path/to/volume.%04d.vdb' % (1+(frame%499))Basic prman setup
 Here's a usd file, a camera, a material.
- MaterialAssign is what binds the material to the USD object.
- RenderSettings determines the camera to use, and the resolution.
- PrmanGlobalStatements drives the prman specific render settings (sampling, integrator etc)
- Render determines the output path(s).
MaterialAssign and CEL
This node assigns materials to objects. If you've merged your materials and objects before this node, you can use a built in selection tool to fill in the relevant information.
Easiest way is to select the object in the scene graph, click the 'add statement' dropdown, and choose 'append scene graph selection'.
Similarly, find the material you want to assign in the scene graph, use the dropdown next to the materialAssign parameter, choose 'adopt scene graph selection'.
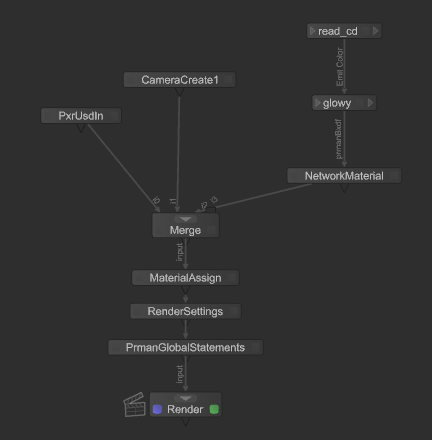
Reading point Cd to feed emission colour
In the above image, can see the slightly more fiddly material network used.
- The read_cd node is a PrmanShadingNode, with nodetype set to PxrPrimvar. The variable name is set to displayColour, which is what the USD rop in houdini renames Cd.
- The glowy node is also a PrmanShadingNode, nodetype PxrDisney. The emit colour of the shader is connected to the pxrprimvar.
- The NetworkMaterial has a new terminal added of type bxdf. This now exposes an input port you can connect the material to.
Connecting shading nodes together
Seems to prefer going backwards, from destination to source. Say you have an alembic which has @Cd on the points, and you want to use that in a material in katana.
- Create a PrmanShadingNode, set it to PxrDisney
- Create a PrmanShadingNode, set it to PxrPrimVar, put it above the PxrDisney node
- Set the PxrPrimvar to look for Cd, type color
- Click the triangle on the left side of the PxrDisney node. This brings up a list of inputs, find colour.
- You now drag an arrow away from the triangle, click on the right triangle of the PxrPrimvar, this brings up a list of outputs, choose color.