Appearance
Lops Lighting Quickstart
Overview
You have a scene that you're just about to start rendering in Redshift/Mantra/Arnold, but you're keen to give Karma a try? Don't wanna learn all that prim/reference/sublayer/delegate stuff all the USD nerds talk about?
Hopefully this will get you started. USD jargon is unavoidable at some point, but I think its possible to dive in without getting too caught in the weeds. The aim here is to take a /obj, /mat, /rop setup, and port it to Lops as painlessly as possible, while picking up some basic USD concepts on the way.
This whole thing should be 20 mins at the max. Lets gooooo!
Basics
What you know vs the end target
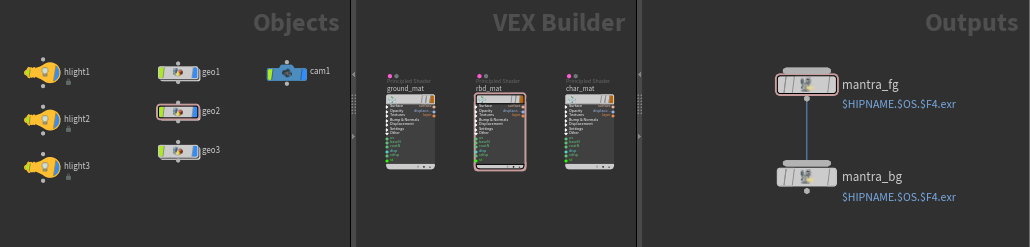
If you've rendered anything in Houdini before, you're probably used to a setup like this:
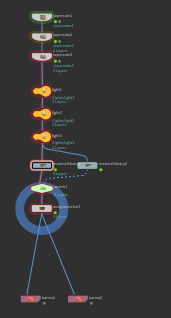
 Familiar sure, but if you think about it, doesn't really play to any of the strengths of houdini's node network way of thinking. One of the goals of Lops is to unify this, so that you can combine everything into a single network:
 Neat right? "Whatever," you say, "It's the same nodes in a different skin, big deal". But think about the sops tricks you're used to, and how you can reapply them in this context. Eg being able to have multiple cameras, and easily change between them with a switch node:
 Or create a copy of your materials, change all their properties, and swap them out instantly:
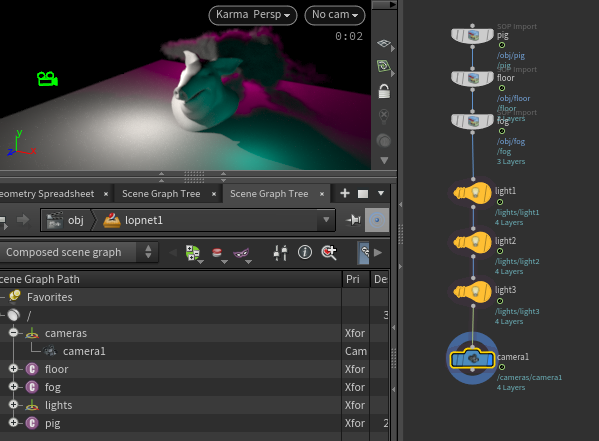
 Or add extra lights that will only be used by 2 'rops', and ignored by the other:
 While it's possible to do those things in /obj /mat /rop, its much easier to understand and edit in a network view. Katana folk will look at this and say 'dur, of course'.
Example file
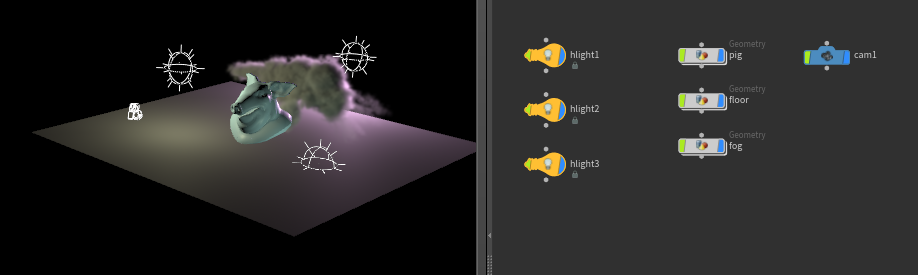
Here's a hip with some rbd, ground, volume, lights camera, we'll port this to lops.
The plan
Here's what we'll do, playing to the strengths of Lops to start with, and talk about other options later:
- Import geo from sops
- Create lops lights
- Create and assign lops materials
- Create camera
- Create a render node
Import geo
You can either jump to the /stage context, or do what I and the other sensible people do, create a lopnet (people who use the top level contexts are savages).
A sopimport node is like an object merge, it grabs geo from sops, and pulls it over to lops.
Create one, and set the path to the pig. Tada, your pig is in lops.
The scene graph tree
The one bit of Lops jargon you HAVE to understand is the Scene Graph Tree. Super quick mini tutoral follows, sorry if this is dry, we'll get back to our foggy pig in a sec. Katana folk, this the same as the Scene Graph, you can just skip this chapter. 😃
Jump back to /obj, and hit shift-w in the network view to display the vanilla tree view. You can collapse it down to look like this:
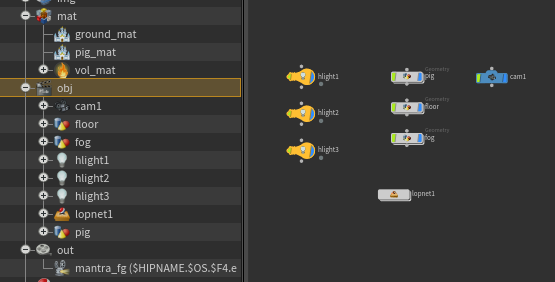 You can see that each node in /obj, /mat, /rop has a matching single entry in the tree view. One node = one tree location.
Houdini gives no tools out of the box to procedurally create or modify nodes at this level. You can't copy-to-points a bunch of cameras. You can't pack a bunch of lights down into a single node. You can't procedurally create and destroy materials. (Ok yes TD's can with python, but thats another story).
In other words, the shift-w tree view is just a different way to display your nodes, and it's a 1:1 match.
Now look at this, I've got a single file lop, and I'm viewing the Lops Scene Graph Tree:
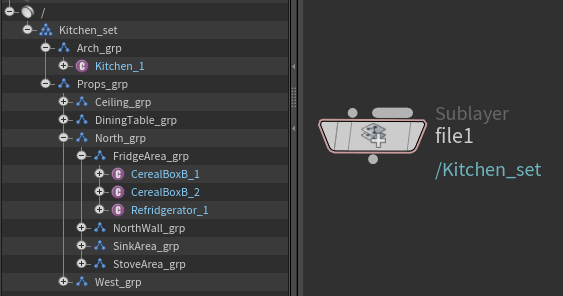 A single lops node has created an entire structure of objects and materials!
But that's not all. A lops node could remove one thing, or many things from the scene graph. Or rename one or many things. Or reparent one or many things, or transform one or many things.
Unlike /obj and the shift-w tree, Lop nodes do NOT have a 1:1 correspondance to the Scene Graph Tree.
This seems unintuitive, but don't stress; you already have a similar analogy in your brain with sops. You know that 1 sop node doesn't mean 1 piece of geometry, but each sop node could create a single point, OR hundreds of polys, OR modify polygons OR delete them.
Sop nodes modify geometry, you keep an eye on the geometry spreadsheet to see what the 'state' of your geometry is, the viewport shows you what it looks like.
Lops nodes modify hierachy and objects, you keep an eye on the scene graph tree to see the 'state' of your objects, the viewport shows you what it looks like.
As such, you need to see your Scene Graph Tree at all times, so lets do that. Jump back into your lopnet, and change to the 'Solaris' desktop. You should see the Scene Graph Tree in the lower left. You're gonna get very friendly with this panel.

Sopimport edits
See how the node appears in the scene graph tree as 'sopimport1'? It's called this beacuse in the sopimport parameters, it uses $OS to define its own name. Lets be lazy here and rename the sopimport node in the node network to 'pig', so that the scene graph is correct.
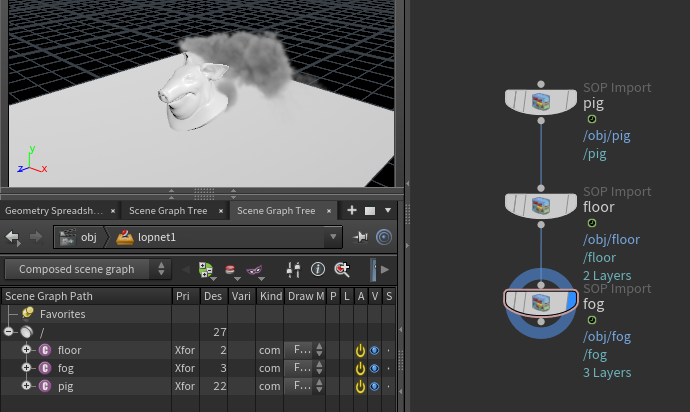
Append another sopimport, and use its parameters to bring in the ground object. Note that when you attach the two nodes together and display the second, you see both the grid and the pig? Connecting sopimport nodes appends their results, as opposed to sops which does chains of geometry modification, or connecting /obj nodes which does parenting operations.
Repeat the operation for the fog, you should now have all your geometry in lops and a nicely named scene graph:
Create lights

- Append a light lop
- Use the transform parameters to move the light to the top left.
- Select the 'base properties' tab, set colour and exposure (I set exposure up +4)
- Can also hit enter to get its interactive handle to move in the viewport
- Append 2 more lights, do the same
- To hide the transform gizmo for the selected light, hit escape
Like sopcreate, light lop nodes will append themselves to the overall hierarchy.
Karma preview
- In the viewport menu where it says 'persp', select Karma. You're now viewing the full quality renderer in the viewport. You can move stuff, change lights, it will keep up.
- If the light icons are distracting, toggle the 'display light guides' toggle on the right stowbar of the viewport.
- You can swap back and forth between HoudiniGL and Karma whenever you need.
Create camera
- Append a camera lop
- Look through it via the viewport menu ( where it says 'no cam', select and change to '/cameras/camera1')
- Click the padlock icon on the right of the viewport, this locks the camera to match the view. Select the pig in the scene graph tree, hit space-f to frame, then the usual space or alt controls to rotate and pan the camera
Did you notice that in the scene graph tree the lights are put under a lights folder, and the camera under a camera folder? Why?
Tidyness and convenience! You can see in the camera parameters it's primitive path is set to /cameras/$OS, lights do a similar thing. You can have them be created wherever you want in the hierarchy, these paths are just handy SideFX defaults.
If you didn't want the camera in a folder for example, you could change the path to /$OS.
Create materials
- Append a material library
- Dive inside, it's a /mat context. Create materials, or be lazy and copy them from /mat, paste here.
- Jump up, look at the scene graph tree. There's now a materials folder (same idea as before, this is nice for tidyness), inside are the materials.
Assign materials
- Append a assign materials lop
- Ensure the /materials folder is expanded in the scene graph tree
- To assign the pig material to the pig geometry, drag the pig geo from the scene graph tree into the 'primitives' parm, and drag pig_mat from the materials folder into the 'material path' parm.
- click the plus icon at the top of the parameters multilister twice, assign the ground material to the ground, fog material to the fog.
Note that if you select items in the scene graph tree, they'll be highlighted yellow in the viewport. If this bothers you, click the 'display selection' button on the right of the viewport to turn it off.
Karma XPU

- Ensure you have karma enabled in the viewport (click the first menu where it says 'persp', choose 'Karma')
- Hit d in the viewport to bring up display properties, swap from CPU to XPU
- After a short delay (data has to be buffered to the GPU), XPU will kick in, offering even faster interactive performance
- Not all features are supported, but its being actively worked on
- If the viewport feels like its lagging too much after 30 seconds, try restarting Karma (viewport persp menu, 'restart render')
Enjoy procedural scene building
 As mentioned earlier, there's a strong analogy between sops creating geometry, and lops creating hierarchy. This extends to how you can 'walk the nodes' in both networks. In sops you can walk down the nodes to understand the construction process, you can do this in Lops as well.
- Select the first pig sopimport. The Scene Graph just shows a single pig node, but the viewport will show the results of the node with the display flag. This is the same as sops, where the geometry spreadsheet follows selection, the viewport follows the display flag.
- Display the first pig sopimport, the viewport reverts to just the pig.
- Select each node down the network, see how the scene graph changes with each node
- Display each node down the network, see how the viewport changes with each node
- Try bypassing some of the nodes, see how the graph and the viewport react.
Handy right?
Setup karma rendering to disk

- Append a karma lop
- This acts like a render rop, and should be intuitive to understand; framerange, camera, resolution etc
- Set the framerange 1-24
- Change the output suffix from exr to png
- Change the rendering engine to XPU
- Change pixel samples down to 4
- In the lower section choose the 'Image output' tab, then the 'filters' subtab'. From here you can enable denoising, try optix to start with.
- Set the display flag on this node. The changes you've made will be sent to the viewport, so you can see the denoising working, the sample settings etc.
- Also note that the render settings themselves are also saved to the scene graph tree, under a top level /Render folder. Render nodes are just treated like all the other nodes we've made so far, it all appears in the scene graph.
- Click 'render to disk', your machine will render those frames. Render times will be maybe 10 seconds per frame, and Houdini will be locked up while rendering. Lets fix this. Cancel the render and move to the next step.
Setup karma background rendering with Tops
 Ok you probably don't know tops either, think of this as a crash course within a quickstart. 😃
- Append a USD rop (NOT a USD Render rop, thats a different thing)
- Set the framerange to 1-24, write to disk, it should be very quick
- This USD file has everything required to render, like a .ifd, .rib, or .ass for other renderers. We can use tops to render this in a background process.
- Jump up to /obj, create a topnet, dive in
- Create a file pattern top, point it to the usd file you just generated.
- Append a USD Render rop
- Set 'evaluate using' to 'frame range', set the range to 1-24, and enable 'all frames in one batch'.
- Select the rop, press shift-v to start tops processing. The frames will be written to disk, more efficently and in the background rather than locking up your session.
Finished hip
Here's my hip with all the above stuff setup if you wanna take a look:
Download hip: lops_lighting_quickstart_finished.hip
Next steps
Ok, that's the basics covered. Where to from here?
Scene import
Now is the time to tell you about the 'scene import' Lop. It's a magical single node that will try and import all your obj nodes, cameras, lights, material assignments, and reconstruct it in Lops, which could be argued makes the 20 mins you just spent a waste of time. 😃
If you really want to learn Lops though, it's best to get familiar with making your own Lops setups. Also the scene import lop can confused by non-standard obj setups, you'll likely have more luck porting your crazy setups over manually.
Karma Rop
You might've also spotted the karma rop lurking in the out tab menu. It's an HDA, dive inside and you'll see it's a lopnet using a scene import lop, and all the karma lop parameters promoted to the top of its UI. So the same caveats apply; fine for simple things, will probably break if you push complex old scenes through it, and really, you're not learning.
Sopcreate vs Sopimport
There's no need to create your work in /obj and then sopimport it over. A sopcreate acts like a geometry node in /obj. Dive inside and its just sops, create away.
Can Lops do <insert feature>?
Probably. Here's some other things I like about Lops that you can investigate:
- Instancing - Can work like the copytopoints sop, and works on any object. Copytopoints a bunch of lights! A bunch of cameras!
- Modularity - You can save a section of a scene to USD on disk, and load it back in to combine with other nodes. Create a bunch of lighting presets! A material library! A set of one click render backdrops!
- Context aware - You can have lights be enabled if the camera is named 'shot030'. Have materials be assigned when a certain object is detected. Have karma samples modified in some cases and not others. Bring your smug sops powers to scene building.
- Smart Sops import - If you have packed geometry in sops, or things with different @name or @path attributes, and you wished you could make those be seperate objects, you can.
- Modify Lops with Sops - Lops isn't the end of a one-way street. You can use a sopmodify to push objects back to over Sops, do what you want, and return them to Lops. You can animate Lops transforms with points. You can extract a handfull of polys from a huge shape and define them as their own new object, or run them to a sim and reimport, or use them to define a new light location, etc etc
- Talk to other systems - USD can open in quicklook on OSX and iOS, in other DCCs, more renderers are getting direct USD support, there's even an early native web player now.
The rest
There's lots to cover, this quickstart was the bare minimum to get renders out, intentionally avoiding USD specific stuff.
Fair warning though; unlike most people who are interested in Lops for Karma and rendering, most of my work with Lops over the past few years has been for everything except karma and rendering; scene assembly, processing of caches, more nuts and bolts stuff.
The main lops page on this site is tips for working within the pipeline we had at UTS ALA, so doing procedural enhancement of assets to feed back into the pipe, procedural assignment of stuff, how to read caches from anim, modify them, save them again, that sort of thing:
https://www.tokeru.com/cgwiki/index.php?title=HoudiniLops
A still work-in-progress USD guide is focused at building up USD core concepts similar to the Joy of Vex guide:
https://www.tokeru.com/cgwiki/index.php?title=UsdGuide
As always, if you found this useful, support me via Patreon or Paypal. If you have questions about this guide or have suggestions, you can contact me on the cgwiki discord... which you get access to when you support me via Patreon or Paypal. 😃