Appearance
Houdini
If you've landed here and you're totally new to Houdini, maybe head to HoudiniGettingStarted first, has a quick overview of how to use this site, and how to get comfy with Houdini as quickly as possible.
The intro tips are a little old, but still give a pretty good overview of what Houdini's about. One of these days I'll do a sweep to update it all for H18.
Basics
Soup/Sop basics
November 2023 - Had to remind myself why this intro section is written in this way. I started out learning SOuP, an implementation of Sop style logic in Maya by Peter Shipkov. I wrote down what I learned on the Soup page, then later figured a good way to learn Houdini would be to port those Soup examples over. Talk about convoluted! Anyway here they are, they're still a good way to get into a Houdini mindset, cover the basics.
Attribute transfer and position
![]()
Houdini scene: Download file: attribute_transfer_position.hip
Transfer the position of sphere to the points of a grid, with a smooth falloff.
- Create grid
- Create sphere
- Create attribute transfer node
- Wire grid into first input, sphere into second
- Enable 'Match P Attribute'
- On second tab set the distance low (say 0.1) and blend width up (say 2.0) to get a blendy warp like the soup version.
A few things to take note of here (or come back to later after you've tried a few more examples) :
- P is the standard attribute for position, usually point position. In maya you'd say this are the vertex positions. While in maya you rarely modify these directly (usually you stay one level higher and manipulate object transforms). In houdini, all the fun stuff is down here, getting messy, pushing points around.
- This setup reads the position of the sphere, and transfers it to each point on the grid, with falloff. If you had no falloff, the entire grid would disappear to a single point at the center of the sphere. (In fact you see this happen before you modify the distance and blend with parameters).
- 'But hang on, you said we're basically manipulating verticies, how come this setup magically reads the transform of the sphere? And shouldn't the grid verts be warping to all the verts on the sphere surface?' Good questions. The answers are that a default houdini sphere (called a primitive sphere) isn't like a maya nurbs or poly sphere. It's more like a single maya particle rendered in sphere mode; ie it has position and scale, but no verts that make up the surface. Knowing that, this setup makes a little more sense. In maya-speak, we're reading a single particle (that we visualise as a sphere), read its position, compare to each vertex in a grid, and warp those verts towards the particle if they're too close.
- Yes houdini has regular poly and nurbs spheres too, look in the 'primitive type' dropdown of the sphere SOP.
- The 'match P attribute' is required because usually people don't want this; they'll be transferring colour, or some other attribute, but they don't want the points to actually move.
Attribute transfer and colour
![]()
Houdini scene: Download file: attribute_transfer_color_and_position.hip
Same as before, just type 'Cd' in the list of transferred attributes. If you want more than one attribute transferred, separate them with a space. Eg, you want to transfer colour, normal, and pscale, you'd type "Cd N pscale".
I added a colour node to the grid to make it red, another to make the sphere green, so you can see what's going on.
Why 'Cd'? Houdini uses a lot of naming conventions derived from prman. Cd is 'colour diffuse'. 'P' is position, 'N' is normal, and so on.
List of recognised houdini attributes (the amount surprised me, I use maybe 10% of these): http://www.sidefx.com/docs/houdini14.0/model/attributes#idm140573562786112
List of renderman SL variables for comparison: http://renderman.pixar.com/view/shader-global-variables-tables
Point Sop
Don't use point sops. Older tutorials use point sops, you're better off getting comfortable with vops or vex. Keep moving...
Point Vop
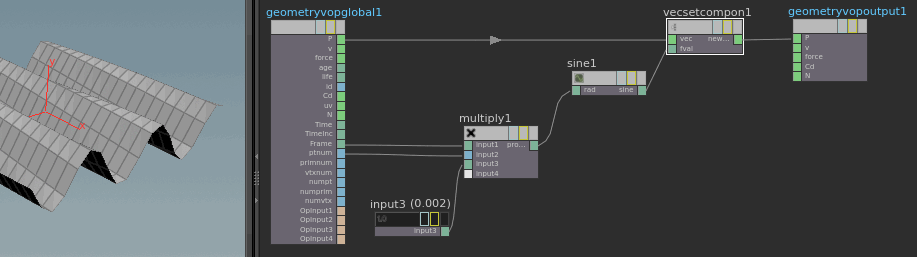
Vops are node based programing, sort of like hypershade/the node editor in Maya, but way more powerful. I explain vops a little more in Houdini Vops, but you can think of vops as a way to make your own deformers, using nodes.
It helps to think of the vop network like a flowchart, reading left to right. First, the setup:
- Create a point vop
- Hit enter, or double click, to go into its sub network.
Here you find a new type of node graph, one that is also used for houdini shaders (SHOPS). They flow left to right rather than top to bottom. In a vops network, the houdini chant that 'everything is points' becomes very important. Anything you do in this graph is run on all the points of your geometry simultaneously, or at least as simultaneously as your computer will allow.
The leftmost node represents a single point, and all its standard built-in attributes; position, colour, normal, id etc. The rightmost node represents the final output of a point. With no other nodes in the graph, attributes are implicitly passed through, so input P goes to output P, input N to output N etc; ie, the geometry is unchanged. Once you start to wire in extra nodes, you change the state of the point. Because this graph runs not on one point, but ALL the points at once, the geometry too will be changed.
To make a simple sine wave deformer we'll do the following high level steps:
- Take the point id, current frame, and a constant of 0.002, and multiply them together
- Feed that result to a sine
- Get the point position, replace the Y component with the sine result
- Finally sets that as the new position of the point
Here's the workflow to set that up in vops. It's probably easier to just look at the image as a guide; tab complete the node names, drop them down, wire them together. Easy.
- Create a multiply node
- Create a constant node, float mode, set its value to 0.002
- Connect the global frame attribute to first input of the multiply node
- Connect the global ptnum (the point id) to the second input of the multiply node
- Connect the constant to the third input of the multiply node
- Create a sine node, connect the multiply to the sine
- Create a set vector component node
- Connect the global P attribute to the set vector component node
- Connect the sine to the value input of the set vector component node
- Set the vector component to 'component 2', ie of the XYZ of the point, we're setting Y, the second component
- Connect the set vector component to the global output P
Point Wrangle and Vex

Vops nodes generate Vex under the hood, Houdini's native multithreaded language. You can write stuff directly in Vex if you want, and avoid Vops entirely. The syntax is pretty simple:
vex
@P.y = sin( @ptnum * @Frame * 0.002 );@P.y = sin( @ptnum * @Frame * 0.002 );That multiplies each point id ( @ptnum) by the current frame (@Frame) and 0.002, and assigns it to each point's y-position ( @P.y ).
Hscript, Vops, Vex (and python), which to use?
Unlike the mel/python/pymel debate, this isn't so clear, each have pros and cons.
Hscript maps closest to mel. It's the original scripting language of Houdini, and pops up in a lot of places, largely due to legacy. Old tutorials tend to use it a lot, and I find its syntax hard to follow. Because it often appears where you might write a maya expression (ie, on an animatable channel), editing tends to feel a little cramped, and the end expressions feels like an odd combination of mel and tcsh scripts. Also, the older houdini nodes that only let you procedurally drive them with hscript tend to be single threaded, so don't scale well.
Hscript is still used a lot up at the transform level; setting properties on cameras, lights, objects, rops etc, so its useful there, but any time you see it used to modify points (eg, with a point sop), alarm bells should be going off, and its probably better to replace it with vops or vex.
Vop and vex (wrangles) are two views of the same thing; vex is the core language, vops is a node UI to generate vex code without you knowing it. Vex is designed to be multi-threaded and incredibly fast, so is ideal for manipulating geometry, or writing shaders, or making image filters... any time you need to run the same code on lots of things simultaneously. Can't stress enough how much vex is NOT mel or python; the only way you'd get close to what vex does in maya is to write your own shaders and deformers in C++.
Vops is great for starting out, and even as you get familiar with houdini, offer a drag-n-drop playground to experiment with. Bigger vop networks can get hard to follow though, and conditional operations (if/for/while) feel a little inelegant (though this was made easier after H15).
Vex is quick to type and quick to run, but of course you need to know how to write vex, to write vex. Being able to right click on a vop network and choose 'view vex code' is a good way to learn, as are the docs, eventually you start peppering your hip files with nice little 1 or 2 liner wrangle nodes.
If you're comfortable in another 3d package then Vex should be pretty easy to pick up. I wrote a little guide of 20 short lessons, each lesson about 20 minutes, have read: JoyOfVex
You can always combine them too; make a vop network, then inside create an 'inline code' vop, and write little custom bits of vex inside. Best of both worlds!
Python in houdini is interesting. Generally speaking it's used as pipeline glue, or for manipulating the UI. If you want to create/destroy nodes, read from a central asset database, parsing text files or curious data in interesting ways... typically pythony stuff. The base mapping is pretty good, and you can drive most things from python, but occasionally (like with pymel), you have to drop back to hscript to get some things done. Also remember that python in houdini suffers the same problem of python elsewhere; it's designed for readability and general purposeness, not for performance.
That said, these days I do very little python, way less than I used to in maya. I think the primary reason is that I'd use python in maya to work around a UI issue, or to repeat a workflow, or automate a process. In houdini, because the base methodology forces you to think in a procedural, generally reusable manner, there's way less scripting required.
So I'd say vops first, then hscript, then vex, then python.
Point Sop with if statement

Houdini file: Download file: point_sop_if.hipnc
DEPRECIATED
Keep moving kids, nothing to see here.
The houdini expression is a little more succinct than the soup one:
vex
if ($PT % $F == 0, 1 , 0)if ($PT % $F == 0, 1 , 0)the syntax is 'if ( test_condition, value_if_true, value_if_false)', similar to nuke's TCL if statement.
Point Vop with if statement
The point vop version is a little less succinct, but again, performs better with more geometry. It's also in the scene file above.
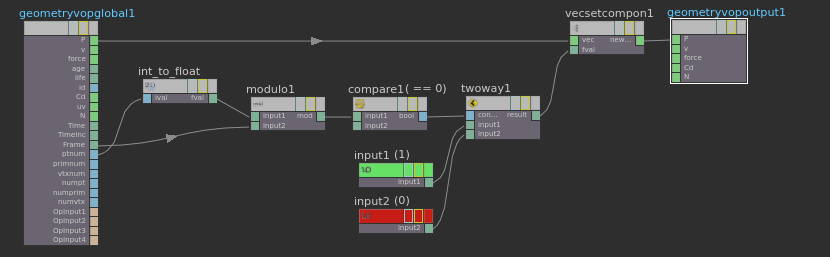
Reading left to right:
- convert the point id to a float
- modulo it against the frame number
- see if it equals 0, get a true/false value
- pass this to a 2 way switch, where true sends the first value (a constant of 1), and false the second value (a constant of 0)
- set this as the Y value of the point position
"Wait, where's the 'if' vop?" You ask? There's a vop for that, all the control-flow vops (if/for/while), are subnets (like a group in nuke or a container in hypershade). If the incoming condition is true, the nodes inside are executed. This is fine, but if you're doing something simple like setting a value, its cleaner to keep the vop network flat. The compare vop and the 2-way vop function as an 'if' statement here, no subnets required, slightly faster workflow.
Point Wrangle with if statement
Put down a point wrangle node, and use this code:
vex
if (@ptnum % @Frame == 0) {
 @P.y=1;
}
if (@ptnum % @Frame == 0) {
@P.y=1;
}I'll explain more of that on the HoudiniVex page.
Point rays, promote parameters
Houdini scene: Download file: point_sop_rays.hipnc
Again, both point sop and point vop examples are provided.
Generally speaking compiled languages are faster than interpreted languages. C++ and vex are compiled, python and mel are interpreted. The penalty for the speed of compiled code is the time it takes to compile; if you've ever suffered through watching UE4 compile from source or other tools, you'll know how long this can take.
Vops is a node interface on vex as previously mentioned. Each time you change a vop node, you're changing the code, therefore the code needs to be recompiled. Houdini does this automatically on demand, and is actually pretty quick as far as compilers go; change a single node, you usually see the result update in a fraction of a second.
That said, it can add up. And if you're using complex nodes, then the compliation time can blow out to a 0.5 to 1 second. Doesn't seem like much, but if all you're doing is moving a slider, that can get annoying quickly.
But think about this; most programs you use day to day are compiled, but can handle changing inputs without needing to be recompiled. A program like photoshop will have inputs to the code predefined for things like the a brush size slidder, the program is compiled, now you can change the brush size in realtime via said slider.
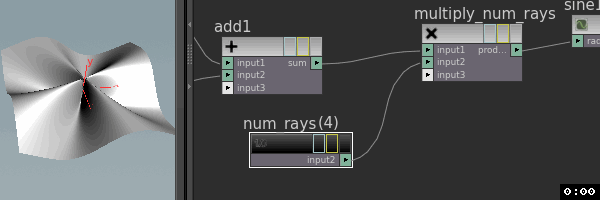
You can do a similar thing with vops. You can define certain parameters to be inputs to your 'compiled' code. In houdini this process is called promoting parameters. Once this is done, that slider or value doesn't live 'inside' the vop code, but outside on the top of the vop parameters. Now when you change that value, the code doesn't recompile, you get much faster performance.
In the animated gif above, you can see the lag as I modify the constant. Here's a breakdown of whats going on in that gif:
- Sliding the constant value is a little laggy. Lame.
- Disconnect the constant
- Middle-click on the attribute input, choose 'promote parameter'. Makes a little stub node.
- Right click on the stub node (usually have to zoom in a bit, tiny hit area!), choose 'expose input' to see the node
- Give it a nice name, eg 'Num rays'.
- 'u' to go up and exit the vop network
- The vopsop now has a new param, 'Num rays'. Slide it, performance is much better.
What's happened? The vop network has been recompiled, but this time it now takes an argument, 'num rays'. The argument is external to the vopsop, therefore it doesn't need to be recompiled when the argument changes. This equates to much better performance. You can (and should!) expose as many arguments as you need, and you're not limited to just float values; there's handy ramp UI's, dropdowns, toggles, whatever you require.
Using point to move edges
Download hip: move_edges.hip
Bit flakey, but its the same as the SOuP example I made. An annoyance with houdini (and soup) is edges aren't first class citizens, so you have to always think in terms of points. Not a dealbreaker, but now and then you find yourself with an edge based problem, and think 'shit... wish I could access edges...'. You could probably make a group and work that way, but its still a workaround.
Of minor interest here was deleting every 2nd row from the grid, but in a way that my expressions would be happy. Double modulo to the rescue! If the grid is 20 polys across, I modulo the face id (primitive id, or $PR as a local variable) by 19, then again by 2 to get every second row. The delete expression looks like this:
vex
($PR%19)%2($PR%19)%2To make it always work no matter what grid size you use, I use a channel reference to the grid rows (and drive the grid columns by the same thing, so it all stays aligned)
vex
($PR%(ch("../grid1/rows")-1))%2($PR%(ch("../grid1/rows")-1))%2Also did a vop based one, like the previous examples it scales much better the more points you throw at it.
Point and attribute transfer together
Scene: Download file: point_and_attrib_transfer.hipnc
![]()
Again, point and vop examples. Realised the soup one wasn't quite right, so i tidied this one.
Houdini doesn't make a distinction between a single point, or many points, or objects, as the source for an attrib-transfer. In this case, if I set the input to be a line of points, the combined effect gives a capsule falloff region like the soup demo.
Beyond that there's nothing special. The main difference is that I create the same attr on the plane and a line called 'weight'. I set it to 0 for the grid, 1 for the line, then attribtransfer the line to the grid, choosing 'weight' as the attribute, with distance set to 0, and blend region wide enough to give a nice falloff.
Why set 'weight' on both the source and target? If you don't, no blending occurs. Try bypassing the attribcreate on the grid, you'll see the blend zone disappears, and you get a solid chunk of transfer that clips at the falloff distance.
Usual story, the vop node performs much better than the point one blah blah.
Point and attribute transfer with lag via solver sop
Houdini version: Download file: attrib_transfer_lag.hip
The solver sop is a good way to do accumulation effects.
Most houdini nodes work 'in the now', similar to formula's in an Excel spreadsheet. Change any value or formula (or sop), and the rest of the network tries to update itself as fast as possible. Both regular sops and excel spreadsheets have no knowledge of older value changes, or previous frames.
The solver sop looks like a subnet, when you dive inside it gives you 2 interesting inputs; the 1st input as you'd expect of a subnet, and a purple 'prev_frame' input, that gives you the result of the previous frame.
Armed with this, you can do things that would otherwise be difficult. Take the previous frame and add a number to accumulate a result, or compare the previous frame to the current frame, or do other interesting things.
For this example, I do a attribtransfer of colour within the solver sop. Because this will add onto the result onto the previous frame, this leaves a trail. To make the trail fade, I use a point vop after the attribtransfer that blends the trails with the original grid colours. Altering the weight of the blend alters the length of the trail.
Outside and after the solver sop are 2 nodes to help visualise the trails a little easier. The pointvop drives the y-height of the points with the trail colour. The second sets the point colour based on the bounding box.
Solvers can be a little unintuitive at first, and have a few caveats. They're actually a simple dynamics simulation in disguise (a dopnet, discussed elsewhere on the wiki), so they need things like a number of steps per frame, a start frame, they need to be cached and simulated rather than working instantly if you scrub the timeline etc. They also have an odd trait that takes some getting used to; you can't edit and view from inside the solver sop; make sure to pin the viewport before you dive inside.
I explain more on The solver sop page.
No really, don't use the point sop
A lot of pre-v12 Houdini tutorials rely heavily on the point sop, using it to set point positions, normals, colour, velocity etc. It has a few problems though:
- It doesn't scale well to high point counts
- It has a lot of local variables that aren't used anywhere else, and are hard to remember
- You have to type expressions in 3 times for xyz/rgb, irritating
I'd say in nearly every case where people would use a point sop, it's better to use a point vop, or a point wrangle, or an attribcreate, or a randomize attribute sop. They all rely on vex so they're multithreaded, the consistency of using just point attributes rather than point+local+global+standard hscript variables is much cleaner, and the knowledge you gain from these maps directly into modifying attributes for shaders, or particles, or dynamics.
Sidefx are trying to move everyone over to the vex way (the ability in H15 to use @var syntax in hscript and group fields is a great bridging tool). They can't just remove the point sop because there's a lot of older setups that still rely on it, but as of H16 they've replaced the old point sop with a bizzaro vex wrangle/point sop hybrid mishmash that's very awkward to use. Avoid it.
Remember kids: "Friends (and now SideFX) don't let friends use Point Sops."
Attribute transfer via object
Houdini scene: Download file: point_and_objects.hip

Again, Houdini doesn't care if you feed it a point, or line, or object, it just looks at the points that make up the object(s) and does the attribtransfer on that. Dead easy. Only thing to keep in mind is to have enough points in your source geo to get the result you expect; if the points are too sparse, you'll get lumps and artifacts.
Groups
Group and delete
Houdini scene: Download file: group_delete_hou.hipnc
A group in houdini is a selection of components, with a name. The closest analogy in maya would be a selection set of verts or faces. Most houdini operators have a group selector at the top of their parameters, meaning they'll only affect those components.
Unlike maya sets, a group can be defined in a variety of ways; a user selection like maya (boring), a pattern (every nth point), an expression (all points with their Y value > 4), or several other ways. In this case, I'm defining them via the intersection with a teapot. I can keyframe the teapot, the group updates its membership on the fly. The delete node is set to use the group, meaning you get an animated teapot shaped delete.
This example also uses 2 transform nodes. A transform (in sops) is basically a cluster, ie, a transform handle at the shape level. It too has a group input, so if you wanted to use it to just translate a sub-section of geo, you'd group it first, then feed the group name to the transform.
Group and persistent delete
Houdini scene: Download file: group_delete_hou_accum.hipnc
To make the delete accumulate over time so it leaves a trail, put the group inside a solver node. Here's how:
- Create a solver node
- Connect the grid to input 1
- Connect teapot to input 2
- ctrl-x the group node, go into the solver, ctrl-v.
- Connect 'Prev frame' to the group's input1
- Connect Input 2 to the group's input2
- Set the groups merge mode to 'union with existing'
- 'u' to go up a level
- connect the solver to the delete node
- set the display flag to the delete node, hit play
So what's going on here? As before, the solver gives you access to the previous frame. Sticking the group node within the solver means it'll add the current frame to the previous frame, building up a trail. Or it would, except the groups default behaviour is to always replace the previous contents of the group. By setting the merge node to 'union with existing', this ensures it adds to the group membership rather than replaces.
Solvers are a little hard to grasp at first, I've written a separate long form tutorial to help: The_solver_sop
Attributes as groups, or groups with @ syntax
The group field at the top of most sops will give you a dropdown of group names you've defined upstream.
You can also use this field to define group expressions. Say you want to delete all the points below 0 in Y. Put down a delete sop, and use the group
vex
@P.y<0@P.y<0
What's powerful about this is you don't need a group node at all; in any sop that has a group field, you can use that expression where you'd normally type the group name, and it'll work.
Make sure you don't have spaces in the expression though! Group fields let you specify multiple groups like 'group1 group2 group3', so if you use the expression
vex
@P.y < 0@P.y < 0Houdini parses that into 3 groups, one called '@P.y', another called '<', and one called '0', which of course won't work. If you need spaces (say you're matching against multiple point id's), enclose it in double quotes.
This is often used with a blast or delete node, eg delete all points that have full red in their colour ( @Cd.x==1 ), or their id is 5 or 10 or 23 ( @id="5 10 23" ). The help for this is kinda buried in the docs here:
http://www.sidefx.com/docs/houdini14.0/model/groups
Groups as attributes in VEX
The previous example uses attributes as groups. You can go the other way and use groups as attributes. Look in the geometry spreadsheet, you'll see colums for groups. An element will have a value of 1 if it's in the group, 0 if it's not.
To use this in vex you refer to the pseudo attribute @group_yourgroup.
Eg you have a (vex) attribute wrangle node, and you want to run some code only for points NOT in group 'mygroup':
vex
if (!i@group_mygroup) {
    // do thing
}
if (!i@group_mygroup) {
// do thing
}Ie, you can refer to the group by using '@group_' as a prefix. Don't overthink the syntax btw, its literally @, type the word 'group', then underscore, then your group name, no spaces.
Calling it as a conditional here uses a little trick, cast it to an int, and negate it (that's the 'i' before the '@').
You can also create groups in a similar way with a wrangle node; just pretend you're creating an attribute and setting it to 1, houdini will make a group for you. Eg
vex
if (@ptnum>chi('threshold')) {
 i@group_mygroup=1;
}
if (@ptnum>chi('threshold')) {
i@group_mygroup=1;
}Can see that in the following amazing animated gif:
I learned this ages ago, forgot, learned it again, forgot, learned again. If you're skimming this page for the first time, you'll forget too, and relearn it a few months later. 😃
Very briefly covered in the docs here (along with lots of other handy vex tips):
http://www.sidefx.com/docs/houdini14.0/vex/snippets#traverse
Instance and copy to points
Instancer
Houdini scene: Download file: instancer.hip
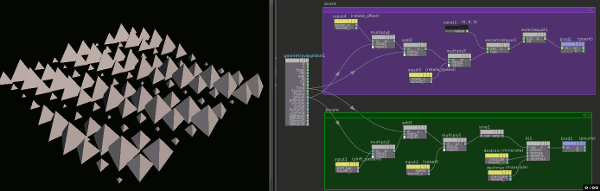
(Edit, update 30 sep 2015)
Only realised recently that this scene and description are more complex than required. Previous builds of houdini treated the copy sop and instancing as separate things; instancing for low memory, fast rendering, but limited edits, and copy sops for full editability, but memory and cpu hungry.
The copy sop is now capable of both. Its explained elsewhere in this site in a little more detail, but essentially the trick is the 'pack geometry before copying' toggle on the stamp tab of the copy node. This puts the copy sop into fast instancer mode. The output geo just has a single point for each thing being copied, and the things themselves aren't editable. You can push incredible amounts of geo this way, and its fast and easy to setup.
I'll tidy up this example at some point, but for now, I'll leave it as-is.
(end edit)
Instancing in Houdini is fairly straightforward. An instance node will take the geometry you specify as a parameter, and instance it onto the points inside the instancer node. A fresh instance node contains just one point, you're expected to delete it and make the points you want, or more likely, object merge the points from somewhere else.
The only other thing to set is to use fast or full point instancing (the default is off). Fast is good enough for most cases, full is if you need full control of each instances shading properties.
But wait! There's more!
The instance node (and its cousin the copy sop) look for attributes on the points. These can control basic translate/rotate/scale, as well as material assignment. The full list is in the docs:
http://www.sidefx.com/docs/houdini14.0/copy/instanceattrs
For this demo I use an attrib vop (called a point vop in h14) to create 'pscale' and 'orient' attrs, and drive them with combinations of time, sin, pointid. Some key parameters are promoted to control the animation. Hours of C4D mograph style fun, perfect for making trippy animatedgifs.
Instance with rotation
Here's another demo to placate a mate of mine:
Houdini scene: Download file: instance_onto_normals.hip
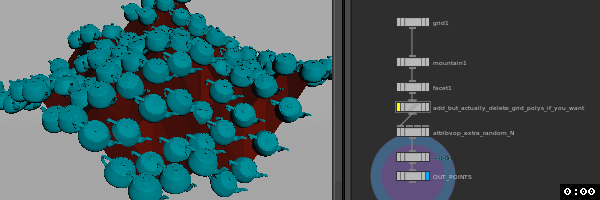
He asked if it was possible to instance onto geo, and have the instances rotate to match the normals of the surface. Yes, yes it is.
In this scene, I have a grid, fed to a mountain sop with animated offset, to get a jiggly thing. I then append a facet sop with 'post-compute normals' turned on. This generates normals for each point, and updates per frame.
Now if I feed that geo to an instancer, and the geo I wanna instance has its up-axis along +Z, it'll track with the surface.
For bonus points, I use an attrib vop after the facet to add a bit of extra random (driven by the point-id so it doesn't jitter over time), just because.
Enjoy Sandy!
Instance with effector
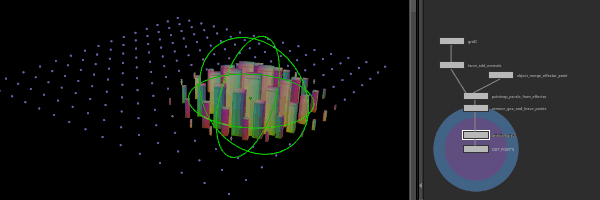
Download scene: Download file: effector.hipnc
Something that C4D is good at, and apparently ICE in XSI, thought to try it in Houdini.
Here I have a null and a grid. Houdini's null will give you a single point at its center, which is handy, makes it easy to incorporate into vop networks. I channel reference the scale of the null onto the point to use later.
In a point vop I bring in the null point, and get the distance from each grid point to the null point. I use this to drive the 'scale' attribute (I also link this to the scale of the null), which is directly picked up by the instancer.
Instance with effector waves

Download scene: Download file: box_waves.hipnc
Answering this forum post.
Similar to the previous example, just doing something different after we calculate the distance of each point to the null. In this case I'm mapping the distance through a parameter ramp setup in a decaying sawtooth pattern.
Parameter ramps are a nice way to drive things when you don't wanna think too hard about maths n stuff. If you can get your points with an attribute that has values between 0 and 1 where you need them, stick a parameter ramp in and you can quickly edit the ramp in a nice UI to get what you need.
Effector for scale, rotation, colour
Download scene: Download file: effectors_vex_and_vops.hip
If you're gonna do it, may as well go all the way. Someone asked how to create a random effector C4D style in Houdini, the examples above didn't show how to add randomisation nor animation, so here they are.
Two different perfectly valid methods, one mostly node based with vops and attrib transfers, the other with vex wrangles.
The vops one goes something like:
- Create a cube of points, and a separate 'effector' point that will be used to drive the effect
- Set a weight attribute to be 0 on the cube points, and 1 on the effector point
- Attribtransfer weight from the effector to the cube points, using the attribtransfer parameters to control the blend falloff
- In a point vop network, setup a random colour (or scale or rotation) per point, and blend to it using the weight value
- Drive a copy sop to copy a small cube to each point.
The vex one is similar, but more of the grunt work is done in code:
- Create a cube of points, and a separate 'effector' point that will be used to drive the effect
- In a wrangle do the following...
- Measure the length between each point and the effector
- Fit that length to the required falloff distance, and pass it through a ramp to adjust the falloff shape, fit it to a value between 0 and 1
- Create a random scale/colour/rotation per point
- Blend to it using the processed weight value
- Drive a copy sop to copy a small cube to each point.
As per other examples, this takes advantage of certain point attributes that the copy sop will recognise and use to modfiy the copied geometry, in this case @Cd for colour, @pscale as a uniform scale, and @orient for rotation. The full list of attributes is here: http://www.sidefx.com/docs/houdini15.0/copy/instanceattrs
Even though the vops one is probably simpler on the surface, I'd end up using the vex one because... reasons? I guess I find having all the important stuff in one location is more useful to me, and the more vex I force myself to write, the more practice I get. 😃
Random Instance with Copy to Points and Piece Attribute
Download hip: Download file: random_copy_to_points.hip
Finally updated this. Hooray! In 2021, not many people are using the instance sop anymore, a copy to points should cover most of your needs.
In this case, if the shapes you want to dstribute have an attribute, say @variant or @name, and the points you're copying on to have a matching attribute, you can tell copytopoints to copy only matching shapes to matching points via the 'Piece Attribute' parameter. This used to be mildy complex to setup, now its very easy.

Intermediate
A very vague section heading, mainly just to seperate sections so the contents menu down the side looks a little nicer...
Attribute from Texture
Download scene: Download file: texture_attributes.hipnc
The easy way is to use an 'attribute from texture' sop that does all the following steps for you, but nice to know how to build it from scratch if required.
Setup is as follows:
- Take a poly grid
- Point vop to translate the points around with noise
- Uv project node to create uv coordinates
- Another point vop, this loads a texture via the 'texture' vop, applies colour to @Cd, and the luminosity to an attribute @pscale
- A delete to remove the polygons but keep the points
- A copy that applies a disk to each point. Because the points have colour and pscale attributes, the discs will inherit colour and be sized accordingly.
This setup keeps the texture static while the points move; if you want the texture to stick with the points, just move the uv project node before the first point vop.
I tried a similar thing when I first got into Houdini, I applied the texture via a shader, and got confused when I couldn't access those colours in sops/vops. I could see the texture in the viewport, why wouldn't it work?
The reason is that materials apply their properties at render time, not within the houdini sop context. This is also why you can sometimes apply textures in materials, and they somehow work in the render, but you can't do any uv manipulation in sops. Again, the renderer will create implicit uv's in certain cases where it can.
The viewport display of textures is an extra layer of confusion; that's the extra GLSL features of some materials. It's a convenient display feature, but that's it; for display. If you want to get stuff from textures, you need to explicitly load them like the example above.
Ball of Eyeballs with Copy and Packed primitives
Download scene: Download file: eyeball.hipnc
Fun silly thing to try. First I make a single eye, make it a packed primitive (so houdini treats it as a single point rather than a full poly mesh). Then there's a messy point vop network to do a few things:
- Create a transform matrix that points each eyeball away from the origin (ie, along its normal if it had one)
- Create another transform matrix driven by noise to do a skittish eye dart/saccade
- Create a third transform matrix that makes all eyes look down the z-axis
- Convert all matricies to quaternions, easier to manipulate that way
- Add the normal-orient and the random-orient so that the eyes are all randomly darting roughly around their origin
- Have another noise curve driven by time that does a random pulse between 0 and 1
- Use that to quickly blend between the random-along-normal rotation and the look-down-z rotation
- Use a few fit-range nodes driven by each eye's z-coordinate so that rather than all eyes switching at the same time, it goes in a wave from back to front
- Take the final rotation, convert back to matrix, and push into the intrinsic 'transform' attribute
While the matrix->quaternion->matrix->intrinsic-transform trick is clever, I realized after the fact I didn't need it. I could have just pushed an orient and up value onto the points before the copy, same result with less hassle. Oh well. Still, handy to know how to manipulate packed primtives.
Explicit rotation/orient control for copy and instances
I breeze over this in a few examples on this page, probably worth writing it down as it's a common question, and used so often.
Both the instancer and the copy sop look for certain attributes on incoming points, with a certain order of precedence, listed on the following page:
http://www.sidefx.com/docs/houdini15.0/copy/instanceattrs
The one that takes priority is @orient, and its the one I've come to use by default.
Orient is expected to be a quaternion ( a 4 value vector), which tend to be more stable than euler values (no risk of gimble lock or euler flipping). Quaternions are tricky to manipulate by hand, luckily we don't need to.
A transform matrix can be converted to a quaternion and back very easily, which is slightly easier to edit than a quaternion (ie, still not very easy to edit).
A rotation around an axis is nice and intuitive for humans, so that's what I start with, and use vex calls to convert that into a matrix, and then to a quaternion. Easier than it sounds.
Eg, say you have a flat ground plane, and want to scatter many copies of a tree, each with a random rotation around the y-axis. Here's what I put in a point wrangle before the copy sop:
vex
float angle = rand(@ptnum) * 360;
angle = radians(angle);
vector axis = {0,1,0};
matrix3 m = ident();

rotate(m, angle, axis);

@orient = quaternion(m);
float angle = rand(@ptnum) * 360;
angle = radians(angle);
vector axis = {0,1,0};
matrix3 m = ident();
rotate(m, angle, axis);
@orient = quaternion(m);Breaking that down line by line:
float angle = rand(@ptnum) * 360;
Define a variable 'angle', get a random number using the point-id as the seed. rand() returns a value between 0 and 1, so multiply it by 360 to get a full range of motion.
angle = radians(angle);
Convert angle to radians, expected by the 'rotate' command later.
vector axis = {0,1,0};
The axis we will rotate around, ie, the Y-axis. Often when scattering over geo you might make use the normal instead ( eg, vector axis = @N; ).
matrix3 m = ident();
Create a matrix variable 'm', ident() returns a clean transform matrix, ie, rotate and translate 0, scale 1. A type 'matrix3' is a transform matrix, a 'matrix' matrix, ie, a 4x4 matrix, includes extra elements to deal with shear and perspective transformation, which we don't need.
rotate(m, angle, axis);
This function applies the rotation 'angle' around vector 'axis' to matrix 'm'. Ie, 'm' is now rotated. Note that you don't have to assign it, the rotation is done directly to m.
@orient = quaternion(m);
Create attribute 'orient', convert matrix 'm' into a quaternion, assign it to orient.
Simple right?
Ok, a few caveats. First, to define a quaternion attribute in a wrangle, usually you need the prefix 'p' to tell the wrangle this attribute should be a 4-value vector:
p@myvalue
'p' is short for 'please tell me why it's p and not q'. I think.
But @orient, like @P, @N, @Cd etc are special, wrangles know what they are and what they should be, so you can skip the type definition.
Also, I'd usually not write it out this neatly, there'd be combined lines, and I'd probably add channels so I get sliders to drive the whole shebang. I'd probably be super lazy and use @attrs for everything, cos typing out 'type foo = blah' is boring. Eg:
vex
@angle = radians( rand(@ptnum)* ch('range'));
v@axis = chv('axis');
matrix3 m = ident();
rotate(m, @angle, @axis);
@orient = quaternion(m);
@angle = radians( rand(@ptnum)* ch('range'));
v@axis = chv('axis');
matrix3 m = ident();
rotate(m, @angle, @axis);
@orient = quaternion(m);Save that as a preset, blam. That said, I still haven't saved it as a preset; making myself type it out every time forces me to remember some vex, and that's good.
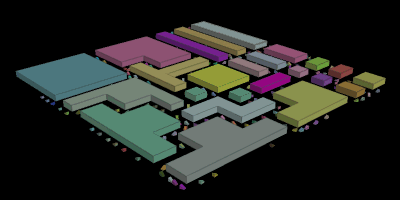
For-each node to make greebles and city blocks
Download scene: Download file: greeble.hipnc
The for-each nodes pre H15 were a little obtuse, even the Houdini docs now say 'meh... use a solver sop'. Still, folk at work say there's times they still come in handy, so figured it was time to try.
Similar to solvers, the for-node is a subnet, and it'll be looped over in various ways. It can iterate on:
- each group
- an attribute per point/prim that varies by a given threshold
- a range of numbers
- each primitive or point.
Inside the 'for' node you'll find an 'each' node. This is a placeholder that has parameters for group, attribute, or prim/point index. This will be updated each time the for loop runs, so if you channel reference these parameters from other nodes, it'll do a different thing each time.
In this example I create a plane with a few city-block like divisions. I split them so they're separate primitives, remove the ones that are too small, then feed it into a 'for' node, which is set to loop over each primitive.
Inside, I divide each poly randomly into building sized grids, then randomly extrude them up into blocks. By sticking a sort node just before the 'for' node, and putting it into random driven by time, I get a different layout of buildings on each frame.
This example uses way more hscript expressions than previous setups, for-each loops tend to lend themselves to this style.
Note that for-each loops don't multithread very well, so they're best avoided if performance is an issue, but sometimes you don't have a choice, and they're a good trick to keep in your back pocket.
The new H15 for loops are still kind of strange, but they don't make you dive into a subnet which is nice, and make it easy to test the loop at any single value, which is also nice. The Jeff Lait masterclass is probably the best way to get an idea of how they work:
https://vimeo.com/142534639 - H15 Masterclass | Loops with Jeff Lait
I ended up making a tutorial page about for loops, you can find it here: ForLoops
Slide points along edges
There's multiple hip files here, be sure to scroll down to see the newer better ones! I kept them all from oldest to newest in the spirit of seeing how I learned, got better over time, and to show there's always 8 ways of solving a problem in Houdini. 😃
Houdini scene: Download file: slide_points_along_edges.hipnc
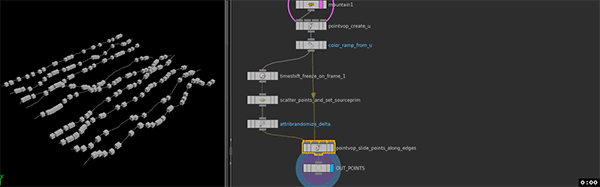
So even though I said earlier that solver sops are good, the smug feeling you get from making stuff move without them is great. This example is totally procedural; no reliance on previous frames, no caching. Neat.
The aim here is given any geo, can points be made to slide along its edges like ants? They sure can.
- Create a grid, set its mode to 'rows' to make it wires (ie, poly edges that have no faces.. can also think of them as degree 1 curves, made of polys)
- Increase the number of points with a resample
- Wiggle it with a mountain sop (I inserted a jitter node, a mountain will have no effect unless the grid rows are jittered slightly)
- Create a u-coord attribute along the length of each wire with a point vop and a vex snippet (connect ptnum and numvtx) : u = vertexprimindex(0, ptnum) / float(numvtx);
- Colour it with a ramp based on u, cos it looks nice
- Scatter some points over the lines, they'll inherit the u-coord from the lines, as well as the ID of the line they're on (called sourceprim)
- Add a new random attribute, 'delta', between -1 and 1, for all the points
- Point vop to slide the points down the lines.
That point vop is where all the neat stuff happens:
- Take time, multiply it by delta. This means per point if the delta value is 1, they move at full speed, if delta is -1, they move in reverse at full speed, values in between are slower.
- Take the u-coord, add time to it, then modulo by 1. This will mean the u-coord will smoothly change, but if it hits 0 or 1 (ie the start or end of the line), it'll instantly warp to the other end of the line.
- Feed the sourceprim, updated u-coord, and the original line geometry to a 'primitive attribute' vop. This node will return the attribute of your choosing at the uv-coordinate you ask, on the primitive you ask. Here, we'll ask it to return P, the position on the line at our u-coord.
- Set that P position as the position of the point
In the example scene I feed this setup to a fast point instancer, to instance cubes onto the points. I also have a few other pieces of geo setup behind a switch node to show that it works for a variety of shapes.
Here's another variation based on this post, moving stuff along multiple paths in one direction.

Download scene: Download file: arrows_on_paths.hipnc
The main differences here are
- The random delta is centered around 1 rather than 0, therefore everything moves in the one direction
- At the very end it uses a trail sop to calculate v, which is the standard Houdini attribute for velocity. This is picked up by the copy and instance nodes, which will orient the copies in the direction of movement.
Here's yet another version:
Download scene: Download file: paths_attrib_interpolate.hipnc
Always nice to find a more elegant way to achieve an effect. The attribute interpolate sop is meant to help you stick scattered points onto deforming geometry. The scatter sop has options to store the primitive each point was scattered on, and the uv of that location. The attribute interpolate uses these to stick the point to the matching location on the geometry you give it it.
Here I use it for a different purpose; rather than have static uvs and deforming geo, I have static geo and shifting uv's. By setting each points uv to run in a loop between 0 and 1, and have them be scattered onto closed curves, they drive around the curves. Add some buildings, a simple car shape, its a barely passable car crowd sim. Fun!
Cubes marching
Download scene: Download file: cubes_marching_v02.hipnc
Cubes that are marching, not marching cubes, what do I look like, some rendering wizard?
I hope this'll be my last 'moving things along curves' distraction, but its an effect I've had in the back of my mind for ages (I think since seeing a short film based around these sort of cubes at siggraph in 2001!), very satisfying to have finally worked it out.
Idea is same as the previous one, curves, scatter points, get uv's, animate their u attribute, interpolate on a curve to make them follow the path, copy packed boxes to the points.
To make the boxes rotate I get the point velocity, cross product to get a rotation axis 90 degrees from the velocity, and use the length of @v to determine a rotation speed. I then also scale it by the 1/@pscale of each point, so big boxes rotate slowly, small ones quickly.
A second wrangle is used to get the bounds of each packed box, and translate them up by the y-component of the lower bound. For some reason I couldn't do this all in the one wrangle. I know there's a few occasions where setting and getting related things in one hit won't work, vex will intentionally delay certain things to the end of the vex call to avoid conflicts. Seems setting transform and getting bounds might be one of those situations.
As an aside, the packed bounds is stored as a float array. How did I know which value in the array had the height offset I needed? Well, I didn't; I just started at 0, and kept going up in numbers until the boxes sat correctly. Lucky for me it was within the first 3 numbers. 😃
Per primitive rotation with vops
Download scene: Download file: per_prim_rot_vop.hipnc
Fun challenge from the forums. The trick here is to repurpose the low-level instancer vops for our own needs. The 'make instance transform' does as it says, it'll make you a matrix that has the regular instancer attributes as inputs (orient, rot, scale etc). Once you have a matrix, you can multiply any points by that matrix, and they'll be duly transformed.
So with that as our end goal, now we need to feed it the right things, namely the pivot of the transform, and the orientation/rotation. The pivot will be the center of each primitive, so using the 'get primitive attribute' vop, we query the primnum the current point belongs to, and return the P position of the center of the implicit uv's (ie 0.5/0.5).
For rotation, if we just want to spin around the normal we can just extract the normal with the 'primitive normal' vop. But here we want to spin perpendicular to the normal (the tangent or binormal). One way to get this is to define a vector from 2 points on each face. Using 2 more 'get primitive attribute' vops, we query the point at uv (0,0), and at uv (0,1), subtract one from the other to get a vector, which we can use as a rotation axis.
Now we have an axis, and a rotation amount driven by the current frame, how do we get this as the orient quaternion needed by the instance transform? I cheated here and found an answer by someone else; the 'rotate' vop is the key. I was surprised to find that although there's a plug for a matrix, its not required. So I feed in the axis and rotation, this vop feeds to a 'matrix to quaternion' vop, and finally this is fed as the orient attribute to the instance transform vop.
Extra fun to be had by adding various multiply and add nodes with promoted parameters to control the fluttery mystique feather effect.
Unfolding polys

Download scene: Download file: grow_polys_v06.hipnc
Seen it come up enough times on odforce, felt like it was worth having a go. There's a very thorough tutorial on vimeo for achieving a similar effect, was curious to see if I could do it without cheating and looking at that method.
This setup takes some geo, generates a point at the center of each prim, and connects them up into a new wireframe. The findshortestpath sop is used to generate paths from one point to all other points, and create some useful attributes. @prevpt is the id of the previous point on the path, and @cost is a measure of how many steps it takes to get from the start point to the current point. Points near the start have a low cost, points far away have a high cost.
With those attributes transferred back to the original prims, you can do the unfolding trick. Use @cost as a timer, delete all prims to start with, and undelete them sequentially over time based on @cost.
Once unhidden, lookup the prim position, the @prevpt position, use that to work out the rotation axis on the shared edge, and the midpoint to use as a pivot. Can then use that to rotate the prim with a method similar to the previous example. I suspect it can be done without the rot matrix->quaternion->instance matrix->out steps, but each time I tried the rotations would always be aligned to worldspace x/y/z axes; fine for a plane, but got ugly with other geometry.
This hip file uses a vex wrangle to do all the heavy lifting, but I did a lot of prototyping and debugging in a point vop before moving it all over to vex.
Works pretty well for the few cases I tested, but strangely not for a torus, not sure why. Changing geo requires some adjusting to the 'connect adjacent pieces' sop, mainly to ensure all points have enough geo to calculate a path to the starting point.
Folding objects (the transformers cube effect)
Download scene: Download file: pack_fold.hipnc
A rehash of a thing I tried a while ago, using basically the same technique as the previous example. This means its not solver based, so there's no simulation required, and by using a packed voronoi fracture, it can work on any input shape. Workflow is:
- Take a shape
- Use 'points from volume' to create an even grid of points inside it
- Voronoi fracture
- Assemble and convert to packed prims
- Isolate the points, use 'connect adjacent pieces' in point mode to create a gridwork of edges to connect everything
- Use 'find shortest path' to generate paths to the center point of the grid
- Create a u-coord for each path, create a point for each path, animate it down the path, delaying the timing per point either randomly, or by a ramp, or by distance
- Match up this new animating point with the original packed prim points, transfer the animation (bit more fiddly than expected)
The motion isn't quite as slick as I'd like, but it's a good start. I know if I needed this for an actual effect it'd be a solid base.
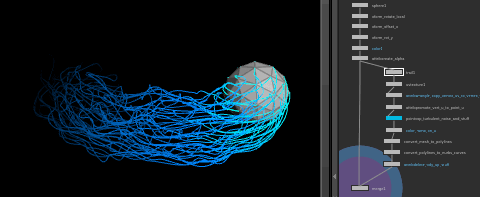
Create edges with vops (and vex)
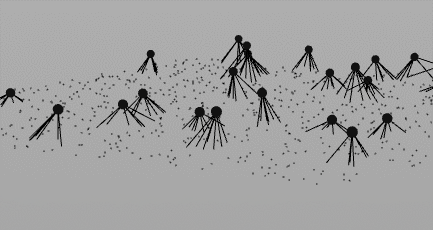
Download scene: Download file: soot_vex_vs_vops.hipnc
Started as an attempt to do cutting edge plexus motion graphics stuff, ended as silly nervous soot spider things from Sprited Away.
This example calls on a few things; create primitives, point cloud lookups, and if/while subnets.
The vop network in this scene is a little hard to understand as its nested several levels down. The thing to keep in mind here is that vop networks work in parallel on all points at once, so you need to structure your logic accordingly. An 'if' subnet seemed the neatest way to keep everything ordered. So:
- if the current point is in a group called 'soot', continue, otherwise skip (ie, we'll assume for the rest of the logic we're working with the bodies, otherwise we'd grow edges from all points to all other points)
- open a point cloud (in this case not a pre-saved cloud on disk, but the live input geo), set the search radius fairly wide, and the maximum returned points to 8
- start a while loop that'll iterate over each point it finds. in the loop:
- create a primitive. this takes an array of points, and will draw edges between them
- add the body point
- get the id of the point found in this loop iteration (if it can't find a point, return -1, meaning no point will be added to the primitive)
- add the foot point
- run the next while loop, iterate to the next point found
I've revisited this setup, and realised this is a good example of when vops gets a little unwieldy. If you've followed this far, and like me quietly resisted vex and wrangles, look how much cleaner this is in code:
vex
float maxdist = ch('maxdist');
int numlegs = chi('legs');
int pts[];
int prim;
int i;

if (@group_soot==1) {
  pts = nearpoints(0,@P,maxdist,numlegs);
  for (i=1; i<len(pts); i++) {
     prim = addprim(0,'polyline');
     addvertex(0,prim,@ptnum);
     addvertex(0,prim,pts[i]);
  }
}
float maxdist = ch('maxdist');
int numlegs = chi('legs');
int pts[];
int prim;
int i;
if (@group_soot==1) {
pts = nearpoints(0,@P,maxdist,numlegs);
for (i=1; i<len(pts); i++) {
prim = addprim(0,'polyline');
addvertex(0,prim,@ptnum);
addvertex(0,prim,pts[i]);
}
}First it sets up a few variables, and then has a for-loop inside an if-block. The if checks if a point is in the 'soot' group. If it does, it uses nearpoints() to find the closest 'numlegs' points, with 'maxdist' distance. It then iterates through the points it found, but note that it starts with 'for(i=1...' rather than 'for(i=0...' which is the norm. This is because nearpoints will find the current point as one of the nearest points. Obviously we don't want that. Luckily nearpoints() stores the results ordered by distance, with nearest first, so we can just ignore the first point (which because of how vex stores arrays, would be referred to as pts[0]), and skip straight to the second ( 'pts[1]').
Anyway, in the for loop, we create an empty polyline primitive, and add 2 verticies to it; the current point (@ptnum), which is the body, and pts[i], which is the foot location.
If you skip the initial group test to allow all points to link to all points, then you get the plexus style motion graphics stuff. Make all the points wiggle, add colour in bounding box mode, you're on your way to vimeo motion graphics rockstar:
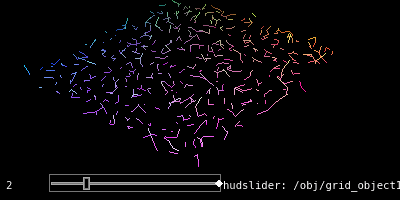
Download scene: Download file: webbing_v01.hip
Create edges with connect adjacent pieces sop
Download hip Download file: plexus_connect_adjacent_points.hipnc
Handy as all that is, found out just recently that a 'connect adjacent pieces' sop, in 'adjacent points' mode, creates edges for you. If you peek inside, you can see similar code tucked in a wrangle node. Oh well.
Plexus effect

Download hip: Download file: plexus.hipnc
I've gone all the way after some forum questions.
There's 3 parts to this setup, dots, lines, triangles.
Dots are just copying little spheres to each of the scattered points.
Lines are using connect adjacent pieces as before. I measure their length using an measure sop, and then drive a colour ramp based on this length. Longer lines are darker, shorter lines are brighter.
Triangles are a little tricky, there's probalby a simpler method. I use a vex wrangle, and have each point lookup its nearest neighbours. The result of this is a list of points, sorted from nearest to furthest. I grab the first 3 points and make a triangle out of it. I then use a measure sop to get the area of the triangle, and colour based on that, again bigger triangles are black, smaller triangles are brighter.
Voronoi cluster and fracture
voronoi cluster pre H16
Keep scrolling down for a more up to date version of this...
Download scene: Download file: voroni_cluster_v06.hipnc
An odforce post led to this video which led to these experiments.
Paraphrasing Vladimir Lopatin, normally a voronoi fracture is given scattered points, which gives you that standard voronoi cell look. If you feed it points with more ordered structures, a wide variety of fracture patterns are possible. Further, using the cluster option to guide the voronoi to fuse cells together leads to even more interesting patterns.
The patterns are loosely broken into 3 categories:
- Geo patterns are derived from how the input points are structured; a grid, a staggered brick pattern, closely spaced triplets etc.
- Texture patterns use vop textures to output a cluster attribute to drive the voronoi cluster+fuse.
- Cluster patterns use the 'cluster points' node to do its own semi-random collating of points, which again are used to drive the cluster+fuse of the voronoi.
Lots of fun experimenting with various settings, seeing what the resultant patterns are. Most of these examples are also animated over time, usually something being randomised per-frame to show even more variations.
Update for Houdini 17
Download scene: Download file: voronoi_cluster_h17.hip
H17 got a new voronoi fracture sop that removed the cluster and fuse functionality. Here's a quick attempt to recreate the behavior. The cluster sop attributes are transferred into the fractured primitives, then a for loop isolates each collection of faces with the same cluster attribute, and fuses them (and optionally removes interior detail, excess inline points etc).
For loops can be a little scary for new users, you might want to read the ForLoops tutorial first and come back to this one.
Update for Houdini 18.5
The lovely Ben Jones pointed out that for loops seemed like a needless complication here, and he was right. Had a bit more of a play, here's the much tidier result:
Download hip: Download file: voronoi_with_clusters_v03.hip
The idea here is to cluster the grid points, transfer that @cluster attribute onto the voronoi fracture. At this point the larger brick shapes are there, but with too much interior detail, basically it's all divided into grids. They can be removed with a fuse, but by default the entire shape will be fused, giving you a simple quad again.
The trick is to use the 'match attribute' parameter on the fuse, point it to 'cluster', so now it only fuses within each single brick. Now a divde with removed shared edges can be used to dissolve those internal points, facet with 'remove inline points' enabled to delete excess points, and we're good to go.
Advanced
Again not really advanced any more than intermediate is intermediate, but I had to fold these sections together somehow...
Tension and wrinkles
Download scene: Download file: tension_and_wrinkles.hipnc
The measure sop calculates perimeter or area per primitive. If you measure the perimeter of a primitive before its deformed, and again after its deformed, subtract one from the other, you can tell if its being compressed or expanded (it'll be positive or negative).
You can map this to colour to get pleasing compression displays, or use it to drive wrinkles.
This example uses a ripple sop to get the base warpy motion on a low-res shape, and a point-deform sop to lattice it onto a high-res shape.
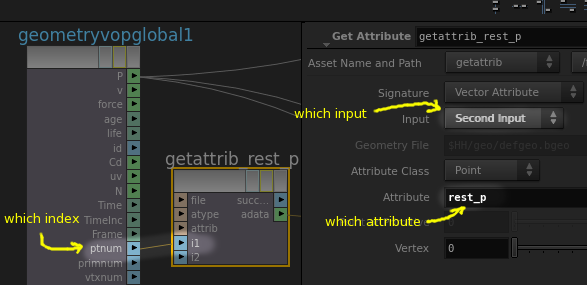
Couple of things here:
1. Getting attributes from 2 connections into a vop network. The "get attribute" vop handles this; it has a drop down to choose the input (by default geo on disk, or the 1/2/3/4th input to the vop network), what the attrib name is (eg "rest_p"), the attrib type, and which point to lookup. Because the static and deformed shapes have the same point count and id's, you can use "ptnum" as the index, meaning it'll match each rest point to its deformed point.
2. Measuring tension on edges. As mentioned earlier Houdini doesn't really deal in edges, so how can we make sure this works with curves or polylines? Other similar tension examples use area, this one uses perimeter. The unroll sop near the top, if enabled, will remove the polys leaving just edges. To my surprise the measure sop still happily calculates the perimeter. I then promote this to points in average mode, which seems to work well enough. I'd be curious what'd happen if I were to just grab a single edge and scale it, but that's pretty unlikely to happen in practice. Right?
My version here is pretty low-tech, Sebkaine on the odforce forums has done a much better setup that can calculate stress in u and v, and other cool tricks:
http://forums.odforce.net/topic/22613-how-to-get-edge-length-for-tension-map/?p=134693
Create curves with points
Download scene: Download file: curve_create_02.hip
Possible answer to this question. The add sop lets you create one or many points in one hit, and if you tap 'enter', you get a little translate gizmo in the viewport to help you place the points.
You can then group those points and use a for-each to connect the points into a line with another add node, this time in primitive mode. To convert the poly line into a smooth curve, use a convert node.
Chops to load audio and create animated waveforms
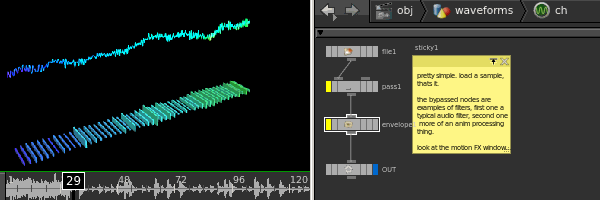
Download scene: Download file: chop_waveform.hipnc
The classic protracker/winamp oscilloscope effect. Chops isn't well documented, found a semi related example on odforce, which I modified into this.
- Create a line with lots of points, I'm using 1000 here
- Create a chops subnet, add a file node, point it to a .wav file. Connect a null, name it OUT
- Go up a level, create a per point time attribute, say 'ptime', that's small enough to capture the audio samples. Most audio is at 44000 samples per second, so to get an interesting output means you need this value to be in the thousandths-of-seconds realm.
- Create an attribute, say 'sample', read from the chops OUT null with the chopt expression: chopt('/path/to/chop/OUT/chan0', $PTIME)
- Use this to do silly things
I was warned that chops can be very slow, and got extra worried when there looked like there's no vex call to read from chops. There was no need to worry, this is plenty fast. Seems the slowdown is if you create lots of extra audio channels within chops, or do heavy audio processing. Used in this way, just loading a sample and mapping it to points, its realtime for 2000 points, and pretty good for 20000.
To make the curve bit smoother and useful for other operations, you could just resample it, or use the chops low-pass filter, and adjust the cutoff to remove the high frequencies.
You'll probably want to enable audio playback:
- Click the speaker icon in the bottom right
- Choose the scrub tab
- Either set the path to the audio on disk (I found this to work best), or to the OUT chop node
- Close the speaker tab, open the playback prefs (icon to the right of the speaker), and turn off 'integer frame values'
While this works, Houdini can get a little twitchy on Linux, and crashy on Windows, at least with the sample I used. Creating a flipbook, and setting the audio path in the flipbook tab options was stable, so I'd suggest that if you find crashes like I did.
Trails
Download scene: Download file: trails_noisey_v01.hipnc
The trails node is basically a time echo effect like in nuke or after effects, but lets you access those echo's in interesting ways. It's simplest effect is just duplicates of the input geo in time. Its most often used effect is to calculate velocity for motion blur (get every point position at the previous frame, record the difference, feed that to mantra for blur). This example uses one of the other trail modes to generate curves.
To map colour along the length of the curves, I use a uv texture set in 'rows and columns' mode. This cheat just maps u+v along and down each contiguous primitive, exactly what we need. You can then just use a color node in ramp mode.
To do the wisping effect, a vop network drives flow noise based on the curve points, scales it based on the u-value, and adds it to the curve position. Near the sphere the noise is scaled down to 0, and its at full intensity at the trailing end.
Finally Alpha is also mapped along the length of the curves, and they're converted from linear curves to smooth nurbs curves.
There's some minor implementation details; all documented in the setup. Uv's are projected onto verts by defaults, we need them on the points, so they get copied from verts to points. Also they're created as a vector (uvw I guess), which seemed to confuse the color node. I create a single float attribute, 'u', and copy just the first value from uvw to u. Finally the trails themselves aren't curves, but meshes with a single edge. Houdini wouldn't let me convert these to nurbs curves directly, so I had to explicitly convert from meshes to polylines, then polyline to curves.
The final delete attribute is just being pedantic; the little hazard lines on merge nodes when there's different attributes on the incoming geo annoy me. 😃
Add sop to make lines from points

Download scene: Download file: add_sop_examples.hipnc
A fundamental thing you'll want to do eventually is take a bunch of points, and wire them together. There's vex methods as outlined earlier, but the non-code way is via an add sop. The most basic example runs like this:
- Create a grid
- Scatter points, set it to 100 points
- Append an add sop
- Switch to the polygons tab, then the 'by group' sub-tab
- The points are now all wired into a polyline, the point numbering determines the order.
As well as joining all points, you can tell it to join every 2 points into a line by setting the add mode to 'every N points', and let N be 2.
With a scatter the point order is intentionally random, which can mean adding every n points together can be a little chaotic. Putting a sort sop before an add sop can be useful, so if you sort the points along x, for example, the resultant lines will be mostly perpendicular to the x axis. Similarly using a sort in 'spatial locality' will try and order points so that close points will have similar numbers, resulting in a less messy layout.
Another handy node to use with an add sop is the cluster points. This is like a sort in spatial locality mode, but it lets you define how many clusters of 'close points' you want created, and will give those clusters their own @cluster attribute. You can then use another mode of the add sop, to add by attribute. Set the attribute to 'cluster', now those clusters will be joined together.
Yet another common trick is to use @id with the add sop. Using the same scattered points, you could use a wrangle to make @id=@ptnum, then use a duplicate sop to make several copies of all the points that move up on y, and rotate on y by a given amount. Feed that to an add sop, set to look for the attribute 'id', you get a line per each original scattered point that is connected to all its transformed duplicates, as if you had extruded the points up and away.
That last one can be handy with particle systems. One thing I missed from maya was the streak particle type. That doesn't exist in Houdini, but its easy to make yourself. Particles always have an @id attribute, so if you append a trail sop after the particles, leave it in its default mode, then append an add sop, polygons mode, by group, add by attribute, using 'id', the trail particles will be wired together into lines. Yes you can use the trail node to do this directly (or better, don't do anything to the particles, just turn on motion blur and each particles @v make streaks for you), but its fun to know how to do it manually if required.
Get correct uvs with a sweep sop
Download scene: Download file: sweep_uvs.hip
Some subtle housekeeping to remember when using a sweep sop; if you have uv's on your input cross section and backbone curves, sweep can copy u from one, and v from the other. 99% of the time it won't work as you expect, here's the important bits:
- Sweep needs to be in 'one primitive at a time' or 'cycle primitives' mode
- If the input cross section isn't closed, the output surface won't be closed, so you'd need to run a post fuse
- If the input cross section is closed, you'll get an ugly uv seam.
- In this case, use vertex uv's on the cross section, sweep will use vertex @uv.v from the cross section, and point @uv.u from the backbone.
- It's almost guaranteed that the uv for your cross section will put the curve uv in @uv.u, not @uv.v, so you need to swap u and v on the cross-section before the sweep.
Volumes
Now on its own page, HoudiniVolumes. All stuff about SDF, VDB etc is now there.
Attribute Wrangle and iq colour ramp
http://i.imgur.com/BFpsjcO.gif
Download scene: Download file: iq_colour_ramp.hipnc
Came across this article by Inigo 'Shadertoy' Quilez about ways to generate interesting colour ramps with 4 input colours and a tiny expression. Attribute wrangle nodes are perfect for this sort of thing; ie, times when you don't need vops, just little bits of vex. A nice feature of wrangle nodes is lazy UI creation. Say I assign the value of a float slider called 'myslider' to a float value 'foo', even though the slider doesn't exist yet:
vex
float foo = chf('wavelength');float foo = chf('wavelength');...you can click the little plug icon to the right of the code window, and houdini will create the slider for you. Great way to quickly get interactive controls. Here's the code for this wrangle node:
vex
vector a = chv('base');
vector b = chv('gain');
vector c = chv('wavelength');
vector d = chv('phase');

v@Cd = a+b*cos(2*3.1415*(c*@uv[1]+d));
vector a = chv('base');
vector b = chv('gain');
vector c = chv('wavelength');
vector d = chv('phase');
v@Cd = a+b*cos(2*3.1415*(c*@uv[1]+d));all that does is create 4 sliders to control each parameter, then create/assign a Cd attribute, and apply the expression from iq's site. Super fun to play with.
To help me understand how the expression works, I create 3 copies of the curve, split it into the r g b values, and map the color to P.y.
Packed Primitives
Intro
Good overview at the start of this bullet masterclass if you'd rather watch than read: https://vimeo.com/80840429
Packed prims are a way to represent lots of geo by a single point. Eg, take the pigs head, which is 2800 points, pack it, and now its a single point. You could almost think of it as a shape transform in maya, or a node in the /obj network of Houdini, but down in sops.

This is handy for many reasons:
- It lets you manipulate loads more geo than you could otherwise; Houdini only processes the one point per pack, so while making 50,000 copies of the regular pig will slow Houdini down substantially, it barely breaks a sweat when you have 50,000 packed pigs.
- Even for smaller numbers of shapes, its easier to manipulate 20 points in sops vs 20 transforms in the /obj context.
- Mantra treats packed prims as instances, so can render more geo in less time with less memory
- Rigid bodies can use packed prims, allowing you to push crazy amounts of geo
- Packs can be hierarchical, so you can pack a leaf, put those on branches, pack the branch, put the branches on trees, pack the tree, scatter many trees, you get savings and ease of editing along the way
- Packed can be unpacked if needed (generally frowned upon, but fine if you only need to unpack and edit 2 specific trees out of 4000 packed trees)
- Hierarchical alembic files are treated as packed prims, so it all conforms nicely
- There's increasing focus on tools to edit packed prims without the need to unpack them; eg you can assign materials to sub-objects of packed prims, and certain other render properties.
There's several ways to create packed prims:
- A pack sop
- A copy sop, on the stamp tab is the toggle 'Pack Geometry Before Copying'
- The file sop lets you load geo as a packed prim via the 'Load' drop down
- The object merge sop has an option to pack before merging
- The alembic sop has several options for loading as packed, or hierarchical packed, or other
- The assemble sop, often used to bind fractured geometry back together, has a 'Create Packed Geometry' toggle
The assemble sop can be emulated with a few steps, nice to know how it works under the hood. Eg, if you run a voronoi fracture, here's how to manually convert those pieces to packed primitives:
- Create a connectivity sop in primitive mode to identify the islands
- Append a prim wrangle sop, enter this code: "s@name=itoa(i@class);"
- Append a pack sop, enable the 'Name Attribute' toggle.
The connectivity sop creates a 'class' attribute, which will be 0 for all prims in the first island, 1 for the next, 2 for the next etc. The pack sop expects the unique identifier per-pack to be a string, so the vex wrangle casts the 'class' attribute to a string, and stores it in 'name'. Finally the pack sop looks up 'name' to do the packing.
While you'd think you could just get the pack sop to lookup the 'class' attribute directly, it seems it requires a string attribute, hence the middle step to cast from int to string.
Why is a int-to-string function called itoa() and not itos()? Beats me.
Manipulating Packed Primitives
If you think of packed prims as a point that represents a shape, that means if you move the point, you move the shape. Use an edit sop for direct manipulation, or a transform sop, or a vop network, translating packed prims around is easy.
Rotate and scale is a different matter. A point by definition has no rotation or scale, so rotating or scaling a packed prim has no effect. How can it be manipulated?
If you look at the primitive view in the geometry spreadsheet, there's an 'intrinsics' drop down you probably haven't noticed before. Mostly these are read-only attributes like curve length, bounding box etc., but for packed prims there's a few more things. Of interest to us is 'transform'. Enable that from the drop-down, and you can see its a transform matrix. This is both read-and-write capable, so we can use this to modify the packed prim rotation and scale.
Put this in a primitive wrangle, and it'll rotate packed prims around their Y-axis:
vex
matrix3 m = ident();
float angle = @Time;
vector axis = {0,1,0};

rotate(m, angle, axis);
setprimintrinsic(0, "transform", @primnum, m);
matrix3 m = ident();
float angle = @Time;
vector axis = {0,1,0};
rotate(m, angle, axis);
setprimintrinsic(0, "transform", @primnum, m);Similar to examples listed earlier, we first setup a default transformation matrix as 'm' ( called an identity matrix, hence the call to ident() ), and setup an angle and axis to rotate around. Then a trusty call to rotate() which will rotate our matrix m. Then we push this matrix into the intrinsic-transform attribute.
Ideally you'd just write something like '@transform = m', but intrinsics can't bet set this way, hence the call to setprimintrinsic(). LIke other similar vex functions, it needs to know the geo to manipulate (0, or the first input to the wrangle), the attribute name ('transform'), the primitive to manipulate ( @primnum ), and the value (m).
Seems fiddly, but scales really well, the performance gains are well worth it.
Note that this is all for modifying packed prim transforms after they've been created. More often you'll be setting up points to feed into a copy sop, and have the copy create the packed prims for you. In that case, its usually easier to define rotation and scale in the standard copy/instance way, ie, use @orient, @pscale, @rot etc as also explained in earlier examples.
Transform packed prims with instance attributes
![]()
Most of the time I create packed geometry via the copy to points sop and turning on 'pack and instance'. If the points I'm copying geometry onto have the usual instance attributes like @orient and @scale, the packed geo will be transformed.
If I create or modify those attributes after the copy to points sop, or create the packed geo via other means (assemble sop, pack sop), the packed geo won't update. In this case I'll shrug, and set the transform intrinsic as explained in the previous tip. I never thought about why this should be different, or if there's a better way.
Chatting with FX sup and Dear Leader at Animal Logic Miles Green about a packed anim problem I was having, he mentioned off the cuff 'oh, set that other intrinsic to make packed geo use instance attributes'. Had a look, sure enough, it exists. Set pointinstancetransform to 1 for every packed geo point:
vex
setprimintrinsic(0,'pointinstancetransform',@ptnum,1);setprimintrinsic(0,'pointinstancetransform',@ptnum,1);And hey presto, packed geo will be transformed. All this time I've been setting transform intrinsics like an idiot...
TIME PASSES
Well, be careful. Matt Ebb pointed out several issues with this trick:
- it will multiply with intrinsic transform, not replace
- dops constraints can get very confused if given both orient and packed transforms
- dops will write all the transformations to transform intrinsic and leave the orient scale etc intact, more confusion
- I'm finding that the day after using this trick, I have this attribute active, but the prims refuse to transform. I'm back to doing it manually.
Ugh. Packed prims vs fragments vs alembics vs intrinsics vs instance attribs vs dops are still a bit tricky to wade through, hopefully they'll be cleaned up and unified in future builds of Houdini...
Misc
Cycle keyframes
If there's one thing that drives me into a quivering rage, its setting out-of-range keyframe behaviour in houdini. The ability is there, but its so buried and hidden I always forget, and flail about for 20 minutes trying to find it. This is me, reminding me, that its alt-E. Alt-e matt, to cycle keyframes it's alt-E. Yeah? Remember? Cycling? It's alt-E.
ALT-E.
Or to be all menu-esque about it, r.click, channels -> Edit Displayed Channels Properties...
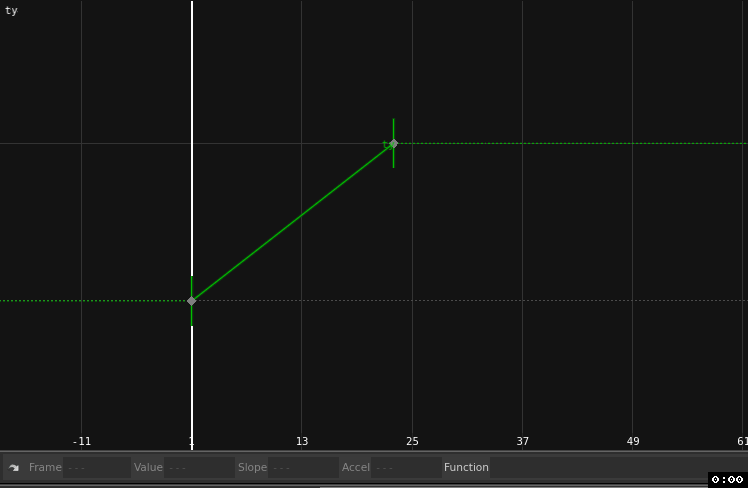
Level of detail preview
Download scene: Download file: lod_pig.hipnc
Hacky LOD. 3 pig heads of high/med/low detail, packed, and @start and @end attribs are defined to set the ranges for each pig. They're merged, and this wrangle is used to delete pigs based on distance to camera:
vex
matrix m = optransform('/obj/cam1');
vector cam = cracktransform(0,0,0,0,m);
float d = distance(cam,@P);
if (d<@start || d>@end) {
  removepoint(0,@ptnum);
}
matrix m = optransform('/obj/cam1');
vector cam = cracktransform(0,0,0,0,m);
float d = distance(cam,@P);
if (d<@start || d>@end) {
removepoint(0,@ptnum);
}FBX import via agent sop
With alembic, you get the choice to load in /obj context or in sop context. Obj will create parent-child obj nodes, and pull each part of the alembic into each node, which while clever, is generally sort of useless for fx work. The sop alembic loader just throws it all into a big bin of packed geo, with a @path attribute there if you need it.
Annoyingly, there's no FBX equivalent; your only choice is to use the main File menu and go File -> Import -> Filmbox FBX.
OR IS IT???
The always busy Atom from discord/odforce found a brilliant workaround; put down an agent sop, set the input type to FBX, and point it at your file. Hey presto, animated fbx geo brought in as a single packed shape. Unpack it, there's all your packed geo, with @name attributes. Thanks Atom!
Procedural growth via edge transport
![]()
Download scene: Download file: edge_transport_clip_growth2.hiplc
Combining techniques from Jake Rice and Henry Foster, here's another take on the always popular growth/infection, but doesn't require simulation. The new edge transport sop will calculate distances of points from a location, along the geometry rather than in worldspace. Using that I store the real positions of the points with a rest sop, and then temporarily lay all the geometry so that their y position corresponds to that distance. A couple of clip sops then smoothly slice away the geo I don't need, so that when you set @P again from @rest, you get this nice looking thing.
This post has bonus points for being created and uploaded on a flight from Singapore to Sydney. Wifi at 10km in the sky is the future!
Polyextrude and attributes
Download scene: Download file: polyextrude_by_attribs.hip
The polyextrude sop has parameter sliders for the extrude length, amount of inset, amount of rotation. On the local control tab are a bunch of disabled parameters. Enable them, and the length/inset/rotation will look at attributes on the poly faces, and multiply the effect by that amount. The default attribute names are zscale, insetscale, twistscale, but you can rename them to whatever you want.
Here I'm using a metaball that is randomly moving around, I colour it red, and transfer its colour with a soft falloff to half a sphere. I then create a @zscale attribute based on this red, and use that to drive the polyextrude. Fairly straightforward, but looks cool. I expect ManVsMachine/Aixsponza/Panoply to email me with job offers any second now... 😉
Wave deformer
Download hip: Download file: vex_wave.hip
Many years ago I saw a demo of a wave deformer built using SeExpr. It was remarkably good, but I couldn't get a binary of the SeExpr plugin. That made me look at SOuP, which in turn made me look at Houdini. So in a way, it was lucky I could never get that plugin! You can find a bit of that history over on the Soup page wave deformer entry.
The setup starts with an ocean plane (a wave spectrum generator driving an ocean evaluate). I have a control sop, which is basically a handle generator, like a null in maya, which I use to define the translate/rotate/scale of the wave effect.
The wave effect itself ultimately is a rotate, which here is achieved with a matrix. In vex you can define a transform operation with a matrix, and multiplying positions by a matrix will move your geometry. To setup the matrix to do a rotation is simple enough, the rotate() function takes a matrix, an axis to rotate around, and an amount.
For the wave though the trick is to control the amount of rotation with a falloff. By measuring the distance of each point from the origin, I can scale the amount each point is rotated. Further, by running that falloff through a power function, I can make it have a really high rotation at the center, and rapidly calm down with distance, making the rotation look like a sharp twist.
This all happens around the origin, no good if we want a moving wave. The trick here is simple. Read the position and rotation of the control sop. Move the entire grid so that wherever the control sop is is slid back to the origin. Do the rotate, then move the entire grid back to its original location, but now with the rotation on top.
That explanation will make sense if you've read the JoyOfVex pages, but won't if you haven't. Learn Vex, it's good for you. 😃
You can tilt the deformer around for more interesting effects:
Or tilt it 90 degrees and make a cool whirlpool (here I also subtracted some height from the points the closer it gets to the center):
Variable tricks with set and setenv and varchange
Use Houdini for a bit and you'll start to lean on its unix style underpinnings. A common thing is to use $VAR variables to proceduralise workflows. Eg, $OS to refer to the name of the current node, $HIP for the path where the current hip is saved.
Pipelines take advantage of this, so Shotgun or the shell where you launch houdini might set $SHOT or $SEQUENCE, and you can setup render paths to always save to the right location, or an alembic sop to always load the right shot animation.
You can get a list of the variables from Edit -> Aliases and Variables, and go to the variables tab. You can also set variables here too.
BUT BE CAREFUL. If you set variables here, these are saved with the hip, and they can take priority over variables set by the shell/pipeline. How can you protect yourself against this?
If you open a texport pane (click the plus button New pane -> New Pane Type -> Misc -> Texport), you can set variables with setenv and set.
setenv COOLVAR = "woo"
or
set COOLVAR = "yeh"
The difference is setenv is persistent, and will show up in the aliases and variables tab and be saved with the hip, while set is transient, and will disappear when you restart Houdini. Handy to know how to do both.
Note that if you update a variable, Houdini won't automatically cook your network. To force this you run varchange in a texport, which will find all nodes that are using variables, see if they require an update, and cook 'em.
time passes
Well this has proven unreliable in production; sometimes the vars are persistent, other times they're not. Annoying.
Curvature vector via measure sop

Download file: curve_banking.hip
Great trick from Pawel Bernaciak. The measure sop has a million options and tricks, one of them is to generate the banking vector for a curve. Super handy!
Isolines

Download file: isolines_via_clip.hip
Saw this great video by Jose L. Molfino, thought I'd have a go at recreating it. Asked around, some people suggested a boolean seam, others suggested a clip, others suggested volume trails. The cleanest and fastest to compute so far has been a clip technique as suggested by Tighe Rzankowski, which you see here.
The torus is run through a for loop to peak it by a small amount on each run, to make a bunch of nested shells. This is run through another for loop to clip it at regular intervals. These clips are run through a divide sop with 'delete unshared edges', which has the effect of deleting all edges except the open cut point, ie, it leaves the cut as a curve. These curves are swept into tubes.
To generate interesting swirls I first store the default positions with a rest sop, then distort the shapes with noise, or sine waves or whatever else takes my fancy. After the slices are created I then swap @P for @rest, which restores the torus shape, but now in swirly form. This is basically the same idea as Henry Fosters animated clip in rest or uv space linked a few posts earlier.
Font sop can use disk paths
Behold, the king of tricks courtesy Ben Skinner. Working with custom fonts can be fraught, as you have to make sure whatever font you're using is installed on every artist workstation, every render machine, every remote machine in case its being shared around etc.
OR DO YOU?
Ben realised there was a trick hiding in plain site; the selector has a file browser button on the right. Put your font near your hip somewhere, don't use the dropdown to find 'synthwave bold', instead you can use the browser and find '$HIP/fonts/synthwave_bold.ttf'.
Awesome tip Ben!
The end
You've made it to the end! You know all of Houdini now!
Well that's not true. You've skimmed a few sops tricks, there's still loads to cover. If you use the menu's at the top of the page you'll see there's a lot of other pages.
If you've been finding this stuff useful, I'd appreciate some support via Patreon or Paypal. You get access to my discord, chat with other friendly Houdini folk.
But maybe all this text isn't your style. I understand. There's loads of video tutorials out there, both free and paid. Sidefx are always updating their youtube channel with fantastic stuff, and on the paid side you can't go wrong with Steven Knipping. If you want a combination of free and paid, Entagma are the best around.
If you prefer just to dive in and look at hip files, Head to Christian Bohm's site https://hdbp.io/ right now! He's somehow made a setup where you get a interactive houdini session with animation, nodes, parameters etc IN YOUR BROWSER. You can inspect quite a lot about a setup, and you choose to, download a hip. It's incredible.
Anyway, hope you've found this page interesting!
-matt