Appearance
For Loops
Introduction
'Looping' could mean a few things:
- running a process multiple times,
- looping over every prim/point in your geometry,
- looping over every uniquely named thing in your geometry.
For-each loops can handle all these cases.
In H16 for each loops were a little obtuse, in H16.5 some presets have been added to make it easier, we'll go through each.
Note that this is all covered in way more depth and in much higher quality in Jeff Lait's masterclass. This page is a quick overview for folk who haven't used the different for loop types much, and don't have time to sit through the full video. 😃 It's worth making time though, its very good, and covers lots of interesting edge cases: https://vimeo.com/142534639
Run a process multiple times
 Put down a sphere and append a 'for each number'. If you keep an eye on the geometry spreadsheet (or mmb on the for-each end node), you'll see that its made 10 copies of the sphere. That's because the end node has it's gather feedback method as 'merge'; each run of the loop is merged over itself, so you get 10 spheres.
If you change the mode to 'feedback', you get dropped back to a single sphere; this is because the geometry that arrives at the end sop is literally fed back to the begin sop, so with nothing else to change the geometry inside the loop, you should get the same geo out that we initially put in.
Now stick a transform sop in the loop, and set the translate x to 1. The loop is set to run 10 times by default, so now that we're in feedback mode, and each loop will move the sphere by 1 unit, we should have the sphere move 10 units right? Right.
View the end node again, and you'll see the sphere has been translated.... 1 unit. Huh?
Look at the parameters of the begin node, its method is 'fetch input'. Even though the end sop is feeding its output to the begin sop, the begin sop is ignoring it, and pulling in geo from its input each time the loop runs, in this case the sphere sop sitting at the origin.
Change the mode to 'fetch feedback', display the last node, and now you'll see the sphere has been moved 10 units.
There's more interesting things we can do than just move sphere around!
Fractal polyextrude
 Create a box, and again append a 'for each number' loop, set the begin and end modes to 'feedback', and for now set the iterations on the end node to 1.
Now create a polyextrude sop, and put it within the loop. Set 'divide into' to 'individual elements', inset to 0.3, and display the end node of the loop. Each face has been inset, the same as if you had done this without the loop, because we've set the iterations to 1.
Select the end node again, and (carefully!) set the iterations to 2. An interesting pattern arises. If you (again, carefully) go between iterations of 0, 1, 2, you can see what happens.
- At 0, no iterations occur, so its the original box
- At 1, the polyextrude runs once, so you get each face inset.
- At 2, the result of the first polyextrude is fed back into the loop. Now each of those faces are inset (because the extrude sop is in 'individual elements' mode), so you get the start of an interesting pattern.
What happens when you go to 3 or higher? Visually, nothing. The polyextrude inset length is in world units, if the polygon is smaller than the inset length, it'll make extra geo, but can't move the edges. Beyond 2 iterations the faces are too small to allow for more insetting, so it appears stuck. The distance and twist settings on the polyextrude sop still work though. Set distance 0.1, twist to 3, and ( carefully! ) set the iterations to 4, 5, 6. You can see there's an explosion of geometric detail and complexity.
Why do I keep saying 'carefully'? Well, compare the number of prims as you increase the iterations; it's gone from a a box at 0 iterations with 6 polys, to 93,750 polys at 6 iterations. The number of faces increases exponentially, if you go all the way up to 10, you'll probably lock-up your machine. (Actually you can escape out of the new style for loops fairly easily, but its still not pleasant to see). A handy feature of the for loops is the 'max iterations' toggle on the end of the loop, you can set this to protect yourself from runaway processes.
Loop over items
 The more common use case for loops is to say 'for every point/prim in my mesh, do a thing'.
Create a grid, and append a 'for-each primitive'. Within the loop put down a bounds sop, and change it to sphere mode. View the end of the loop, and you'll see that you now have a grid of spheres. This loop is more intuitive, whats happened here is the end loop has been set to work over primitives, and to merge together all the results, and the begin node is set to fetch each primitive from the input geometry.
A handy feature of these new for-loops is that you can run a single pass if you need to debug things. In the above gif you can see I turn on the 'single pass' toggle on the end node, then I can slide through the primitives, inspecting what goes on that point in the loop.
 Above is a more showy example, this takes advantage of the fact that within the loop, the nodes inside only ever see a single prim at a time.
I resample the edges of the prim to get more points, smooth, then use the bounds I made earlier to get the center of the prim. A wrangle scales every second point towards the center, making star patterns.
You could do this without the for loop of course, but there's something nice about being able to use a sop style workflow, even using the 'single pass' option, knowing that it will then be automatically applied to all the prims.
Loop over names
 Download scene: loop_piece.hip
Here's some voronoi fractured geometry with a @name attribute per piece. It's not packed geo (to make life hard for ourselves and make this example make sense), but we want to process each piece, in this case using a font sop to display the name above each piece.
Putting the loop into piece mode allows this. You tell it the attribute name to iterate over ('name' by default), and within the loop you get that chunk of geometry isolated for you to what you want.
The font sop uses a details (Detail String) hscript call to get the name of the current piece, and a bounds to get the approximate center of the piece, to move it to the right location.
The metadata node
When you make these loops in 16.5, you'll get a third node created off to the side. What's that for?
It provides extra information about the loop. When making loops in vex you usually have a counter, usually called 'i', that you use to track where you are in the loop. The metadata node can provide the same info.
The parameter pane for the metadata node hints at where this info is stored, as detail attributes with descriptive (and annoyingly hard to type) names:
 You can refer to those detail attributes as you would any detail attribute, so using the detail() hscript expresion for parameters, or the detail() vex function. Both are mildly fiddly. There's some caveats with the hscript version I'll cover shortly, for now I'll use the vex call.
So going back to the fractal box, remember that when we first inset by 0.3, the box looked identical beyond 2 loops. That's because the inset can't work on faces any smaller than those you get beyond the 2nd loop, so its stuck.
Ideally we'd tell the polyextrude to use smaller inset values as the loop numbers get higher. Using the metadata node, we can. The polyextrude sop can read a prim attribute to drive an inset scale (by default called @insetscale), so we'll create a prim wrangle that reads @iteration attribute from the metadata node, creates a correctly sized @insetscale, then activate that on the polyextrude.
 In the gif I do exactly that. I insert a primwrangle before the polyextrude, and connect the metadata node to the second input. To get the @iteration attribute, its a standard vex call:
vex
detail(1,'iteration');detail(1,'iteration');The full vex code to setup @insetscale is this:
vex
@i = detail(1,'iteration');
@insetscale=pow( ch('constant') ,@i);
@zscale=@insetscale;
@i = detail(1,'iteration');
@insetscale=pow( ch('constant') ,@i);
@zscale=@insetscale;So I'm setting up insetscale by taking the value of a 'constant' slider (which I set to around 0.33), and raises it to the power of @i.
When insetscale is enabled in the polyextrude I can then precisely control the inset width, meaning I can fit in a lot more polys. Doing a similar process for @zscale so I can control the polyextrude distance, gets some cool shapes.
Download scene: forloop_polyextrude_metadata.hipnc
Spare inputs
So getting the metadata attributes through the vex detail() call is easy enough, what about hscript? It's contrived example time again!
Here's a single poly of size 20x20, and I want to insert a cut line at x = 0, then x =1, x =2, up to x = 10.
A clip sop can do these cuts, and if we run it in a for-loop, should be able to cut at the places we want. It's one of the older sops, so it can only be controlled with hscript, so lets see how that works.
 After setting the clip to aim in the right direction and keep both sides of the clip, I setup an expression on the distance.x parameter as
vex
detail("../foreach_count2","iteration",0)detail("../foreach_count2","iteration",0)Ie, go up one level, across to the foreach_count2 sop, find the iteration detail attribute, and grab the first (0th) element. If @iteration was a vector or array, you'd swap 0 for the element you want.
That works, but...ugh... hscript. All that typing. That tiny parm window where you can't see what you've typed. Surely there's a neater way?
There is! If you've done a few wrangles, you'll be familiar with things like point(1,'P',@ptnum), which means go to input1 of the wrangle, and lookup @P on point @ptnum. Spare inputs are an extension of this idea, so that in the detail hscript above, you can refer to a input number rather than a geometry path.
To set this up you use the parameter interface menu and choose 'add spare input'. You get a new parameter named 'spare input 0'. Now you set the path to the metadata node (or be lazy like me and just drag and drop the metadata node directly into that parameter).
Once that's done, you can rewrite your detail expression as
vex
detail(-1,"iteration",0)detail(-1,"iteration",0)-1 refers to the first spare input, you can add another one and it'll be referred to as -2, next one as -3 etc... the negative numbers are to make sure they stay out of the way of the usual vex inputs, because yes, you can add spare inputs to wrangles and use them in calls there too. It's not just for within for loops either, you can add spare inputs from anywhere to any wrangle, and refer to it within the wrangle with something like point(-1,'P',@ptnum).
Here's me rewiring the above setup to use spare inputs:
 Neat right?
Loops in loops
This setup combines many of the previous tricks, and if you've read up to here, it should be easy to pull apart. The main thing here is that its a loop in a loop:
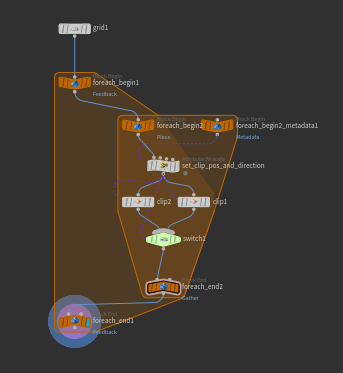 The outer loop is in 'by count' mode in feedback mode on both the begin and end blocks. This means its purely a 'repeat the inner process x times' loop.
The inner loop is in a 'run this process over each prim individually, and merge the results'.
The guts of the inner loop is essentially a clip driven by a wrangle, which gets values from the metadata node. Similar to the clip example earlier, this clips every prim in two. To determine where to clip, I get the middle of each prim and store that as a detail attrib, then use a detail hscript call to set the center of the clip.
Because this looked boring, I then added some randomness to the midpoint calculation.
Because every cut going in the same direction was boring, I made a second clip node that clips perpendicular to the first.
I then drive a switch using detail attributes from the metadata node, so each loop can switch between cutting along x or z.
Werner has taken this setup and made some really pretty renders, which were inspired by the work of Dimitris Ladopoulos:
- http://forums.odforce.net/topic/32014-need-help-with-loops-and-foreach
- https://www.sidefx.com/gallery/algorithm/
Compiled loops
You didn't really buy my answer about spare inputs being neat did you? It seems like a bit of pointless misdirection, but honestly I do use them when I'm doing more complicated hscript expressions, it does make them a little easier to follow.
But no, that's not the real reason we have spare inputs. The Big Sell of for-loops when they first arrived is that they could be multi-threaded. So if you're looping a sequence of sops over every prim in your geometry, and they're in merge mode rather than feedback, houdini can try and run each primitive in parallel, giving a substantial performance boost for heavier setups. The older for loops couldn't do this.
To do this trick, you create a compile block, put your for-loop inside the compile block, and on your for-loop end node, enabled 'multithread when compiled'. Simple!
There's a few caveats with compile blocks though, which Jeff Lait covers in detail in the second half of his masterclass. A key issue is that the loop within the compile block must be self contained; it can't refer to nodes outside the loop. This seems easy enough to enforce, unless you use hscript expressions within the loop that contain references to other nodes. Even if those other nodes are within the loop (like if you refer to a metadata node), the compile block can't know for sure it won't change over time, so won't compile.
This is the real reason we have spare inputs. The compile block can track these dependencies (hence the subtle purple lines you get in the network view), and do what it needs to do.
Loop with timeshift
 Download scene: foreach_timeshift.hipnc
Been a few grumblings in forums that using a timeshift within a for loop doesn't work. I was sure I'd tried it too without success, but tonight I tried it, works fine. Maybe cos I understand it better after writing this tutorial? ¯\(ツ)/¯
Simple enough setup, I have an animating sausage shape, and a for loop running in count mode, fetch input and merge iterations. Each loop is transformed by a certain amount using a fetch input from the loop metadata, a timeshift sop is setup in a similar way.
Loop with timeshift in piece mode
Well I spoke too soon. There's definitely strangeness if you don't use 'by count' mode, which I wrote up in this forum post ( https://www.sidefx.com/forum/topic/53471/ ), and subsequently got an answer from Tomas Slancik, and a separate similar answer from Jeff Wagner and Jeff Lait.
The core issue is that the for-begin node doesn't split and cook the geo as you'd expect. Instead you have to set the begin node into 'fetch input', so it just grabs everything, then use a split sop to get the element you want, using the metadata node to read the value or iteration detail attribute.
Here's a recording where each copy should be timeshifted a certain amount, and how I re-wire it to work as expected:
 Cute, but not very performant. If you want this sort of thing to behave robustly, you want to bake animated sequences to disk, and set file paths via prim intrinsics. Toadstorm explains all at the end of this very good article: https://www.toadstorm.com/blog/?p=493
De-intersect a scatter with heavy geometry
 Download scene: for_loop_deintersect.hip
Inspired by one of the students I'm teaching at the UTS Animal Logic Academy, cheers Calum! Simon Schreibt has also solved the same question in a similar way and put it on youtube, have a watch: https://www.youtube.com/watch?v=Qp-VjCHTrzo&feature=youtu.be
 As well as being nested, you can have multiple for loop begin nodes that are linked to a common end, and they (mostly) do what you expect.
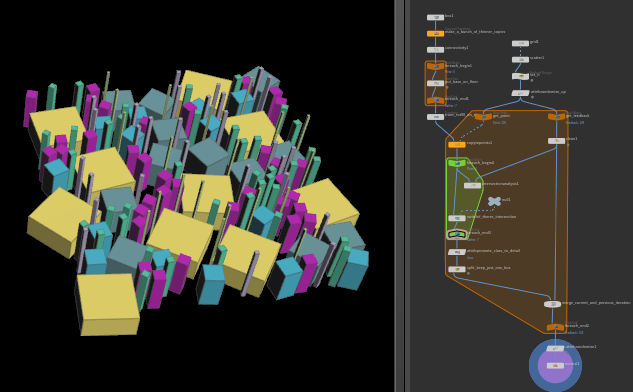
Here we have some high poly buildings, and we want to copy them onto some scattered points to make a city. That's simple enough, but beyond a certain density, its easy to have buildings intersect and look lame. The relax feature on a scatter sop assumes for a spherical radius, which isn't accurate enough for our city.
The high level idea is to loop through the points one by one, copy the correct building onto each point, do an intersect test against all the previous de-intersected buildings. If it intersects skip that building, otherwise merge with the previous buildings.
To do this requires the top-right foreach_begin to be in point mode, which will grab each point from the scattered locations. A delete sop using a spare input references that node, gets the @buildingid from the point, and isolates to the building required, and feeds that to a copytopoints sop. So now we have a single high res building in the right place.
The top-left foreach_begin is in feedback mode. This grabs the previous run of the loop which contains all the previous merged deintersected buildings. So if the current loop is on point 50, the foreach_begin contains all the buildings in their right place up to point 49.
All the previous buildings and the current building are fed to a intersection analysis sop. If they are intersecting, it will generate points where they touch, or no points if they don't touch.
A switch sop uses this result to switch between either the current building, or a null. A expression uses npoints() to just get the number of points; if its greater than 0, switch to the null, otherwise the building.
This building (or null) is merged with the previous buildings then fed to the end of the loop, which is in feedback mode. The result is that as the loop runs, buildings that would intersect previous buildings are skipped, but the rest are merged.
In practice, you'd either have buildings which are very heavy, or in our case, USD buildings that aren't compatible with the intersection analysis sop. What to do?
Here we extended the setup so that each building is run through a bounds sop, and that low res box is merged with the high res building. Each building is tagged with @res of 'high' or 'low'. In the for loop, we can split to just the low res buildings, meaning the intersect test runs much faster, but continue to merge all the high and low res buildings together. When the loop is complete afterwards we can just run another split to return either the high or low res buildings.
Homework: How would you make a network to do space filling? Ie, assume your input buildings were ordered from biggest to smallest. I think you'd be able to setup a nested for loop that'd put the biggest building it could into a space, but if it fails the intersection test, try the next size down, test, and the next size down again. Hmm.
Pack fattest to thinnest boxes
 Download hip: forloop_building_packing.hip
Got it! Took a a few goes, but it works. Basically as I outlined above, it copies the entire set of boxes to each point, then iterates through each box and runs the intersection test, breaking the inner loop once there's no more intersections. Afterwards it deletes all the smaller boxes, and merges the results. A bit slow though, could do with some optimising.
Stacking boxes
 Download scene: stack_boxes.hipnc
Some points are scattered, and are given a random @stackheight attribute. This drives a pointreplicate sop to generate that number of points, which all inherit the same @stack id.
This is fed to a for-loop in sops that is set to iterate over named points, the name in this case being @stack. Thus, each run of the loop is working on what will become a single stack of boxes.
Inside the loop a box is copied to each point, then there's vex tricks to jitter position, reduce the scale of higher boxes and stuff. The main trick is in 2 wrangles; both get the bounds of each copied box, one wrangle lifts the boxes to sit on the ground plane, the other uses a vex for-loop to iterate through all the boxes under the current box, get their heights, add them together, and lift the current box to that height.
If you had asked me to make this setup last year, I probably would have done the whole thing in a single huge wrangle. Lately I'm moving away from the mega-wrangle, and using lots of attrib randomize sops, sops for-loops, keeping stuff a little more modular. What was nice abut this setup was I originally worked on a single stack, eventually thought 'hmm... many stacks would be nice...', and got it working largely by wrapping the original setup in a sops for-loop. Nice bit of procedural smugness there.
Stacking boxes without vex
I saw someone ask if this would be possible without vex, here's an attempt at that:
Download scene: stack_forloop_novex.hip
The base idea of the for loop is the same; use the feedback to get the previous entire stack, test the current block against the stack. I use a ray sop instead of vex here, so I lift the new box well above the stack, ray sop it onto the stack, but rather than move the geometry, I store the distance. The minimum distance is promoted to detail level, and a transform sop subtracts this distance to place the box on top of the stack.
Compiled recursive 3d clip
 Download hip: forloop_3dclip_compiled.hipnc
The incredibly talented Paul Corfield got in touch asking if there was a clean way to extend the 2d grid clip example from earlier into 3d. Had a think, this is the result. Bit of work to make it work generically on (almost) any shape, and make it compilable, pretty happy with this.
It's 2 loops, the outer one in number-feedback mode to set the number of clip iterations, the inner one set to run on piece mode, to clip each 'chunk'. The clip sop direction and center are calculated in a detail wrangle. A clip sop won't cap the ends of a 3d shape its clipped, so I use a polyfill sop to create that face.
For loops in place of sop solvers
Luke Van generously donated two examples that show you don't need a solver sop to do solver sop style things. You can find them both on the solver sop page.
Loop over cross sections
 Download hip: for_loop_crosssections.hip
From this reddit post.
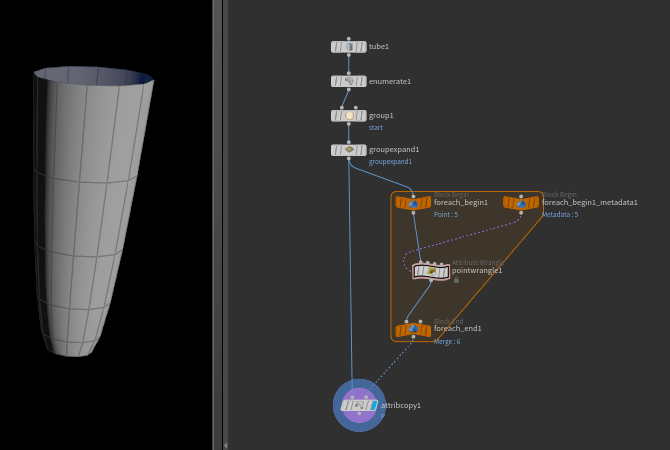
If we have a cylinder with 5 cross sections, how can we loop over the cross sections? Probably lots of ways, here's the first way that came to mind, with bonus workflow of all my mistakes along the way. I decided to write this up as a timeline of start -> problem -> solution -> problem -> solution -> end, as it gives some insight to the houdini way of solving problems, hopefully you'll think of a cleaner path to the end and let me know. 😃
First we need a way to identify those cross sections. One way is to use a 30 second tip from the cgwiki discord and use a group expand. Group one end of the cylinder, call it start. Put down a group expand, and enable the 'step' parameter. This sop essentially flood fills the group you specify across the shape. The step parm will record how far away from the original group each point is. Set the distance to more cross sections than you'll ever have in your cylinder, now we can identify the cross sections.
Next you can use a for loop in 'named piece' mode. By default it looks for @name on prims, you want to go to the last node in the loop and change it to look for @step on points.
But you'll see a problem here; the cylinder will be replaced by only points. Why?
When the for loop looks for the named sections, it pulls in only the points, ignoring the polygons. Ugh.
A lazy fix is to just copy the point positions of the points back onto the original cylinder, which you can do with an attribute copy.
When you try this, the cylinder will look inside out! Arrgh! The ordering of the points is being changed by the for loop.
To fix that, we need a way to track the points and where they go. The easiest way to do this is with an enumerate sop. Put that in before the for loop, in point mode, so each point gets an @index. That attribute won't be altered by the for loop, so then afterwards we can tell the attribute copy to match by @index.
To prove that we're doing something different per loop, I'm just moving each cross section by its iteration value.