Appearance
Kinefx
Overview
Kinefx covers a lot of ground, but there's a pleasing DNA share with a lot of established houdini workflows. It also makes a point to seperate a few rigging and animation concepts which other packages tend to merge together. More explainations below, but at a high level:
Joints
As you think they are, joints or bones like in other packages. They're represented as points and lines in sops (unlike Houdini's old bone system which was up at the /obj level), so that allows for some interesting joints vs sops vs geometry interplay.
Skinning
The act of binding a mesh to joints. This is all assumed to be done on a static skin mesh and a static skeleton, and note that it doesn't actually move the skin, it just sets up weighting attributes. The actual moving is done via...
Deformation
Given a skin with weights, and a bind pose (called a rest pose in Houdini) and a moving set of joints, move the skin. But how do you move those joints?
Rig
TLDR: Kinefx treats points connected with lines as a hierarchy. If you move a 'parent' point with a kinefx node (eg rig wrangle, rig vop, rig pose) its children will inherit the motion. This is mostly done via the 4@localtransform attribute. This is the core of how kinefx rigs work.
A rig is way to move joints around. Self evident, sure, but spend some time thinking about this.
If joints are just points like everything else in sops, you could use a transform sop to move them around. And just like everywhere else in sops, if you do this, its totally freeform; it won't care about the lines between the points, or the connectivity, do what you want, use an edit sop, soft transforms, fine. That's a rig.
It's likely that you'll want to maintain the relationships between your joints though. So if you rotate a shoulder, the elbow and wrist and hand joints should rotate too. A Rig Pose sop gives you this, its a transform sop that is aware of joints, and gives you FK abilities. So a rig pose sop is a rig.
But you probably want IK too right? Well what do you need at the minimum for IK, a skeleton and a IK target? Well lucky for you there's an IK chains sop, give it those inputs, you get your IK. So the IK chains sop is a rig.
'Wait a sec, if this is houdini, and sops has great vex and vops support, and kinefx is in sops... can I use vex and vops in rigs?' Why yes you can! A Rig Wrangle and a Rig Vop are designed for this, giving you manipulation of points which is skeleton hierarchy aware. So vex and vops are also rigs.
And there's more, like foot roll vops, and FBIK sops, and skeleton blend sops etc. Rigs are sops.
Sop modelling vs sop rigging
Quick aside to talk about sops for modelling.
In sops for modelling, you chain nodes together, and geo flows and gets modified from one node to the next.
If you have a 'live' modelling chain of box, polyextrude, bevel, smooth, copytopoints, you generally don't expect to see all those controls on screen at once. You select each node, do a thing, go to the next node. If you DO want a master control, you have to wire them up to a controller null, or make an HDA and expose all the controls at the top.
Now lets do a search and replace on the above statement, for how kinefx operates:
In sops for rigging, you chain nodes together, and animation+joints flow and get modified from one node to the next.
If you have a 'live' rigging chain of skeleton, rig pose, FBIK, foot-roll, you generally don't expect to see all those controls on screen at once. You select each node, do a thing, go to the next node. If you DO want a master control, you have to wire them up to a controller null, or make an HDA and expose all the controls at the top.
Breaking that down, each node does its one particular operation, and passes its modified animation to the next node. This is exciting in that the rigging process itself can now be procedural, freeform, as exploratory as sops allows you to be.
It's also a quite a paradigm shift, as animators generally DON'T want this, they want their uberrig with fk/ik/fbik/spaceswitch/bendybone/layering crazyspace, and then complain the rig is too slow.
This ability to do true modular rigs, approach animation as a node based layering of motion from one node to the next, is gonna take some time for people to get their heads around.
Motion clips
Take some motion, like a skeleton walk cycle, and 'freeze' it so you see all the frames in one hit. This is a motion clip. Now that it doesn't have any animation, but is just a collection of shapes, you can apply modelling operations to it, delete shapes, duplicate it to make it run longer etc. You then run it through a 'motion clip evaluate' to convert it back to animation.
This covers similar ground to what chops does (the idea of swapping time for modelling and back again), but much simplified, and staying in comfortable sops land.
Right, enough overview. Lets move onto details!
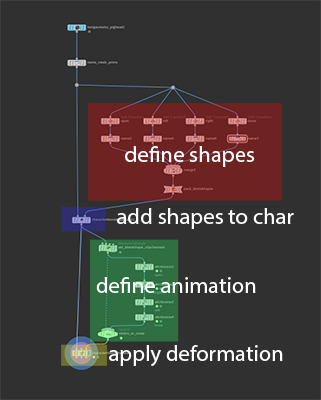
Rig vs deformation
Or the alt title "Why doesn't my character move when I load it?"
Unlike most other 3d apps, kinefx defines a clear split between rigging and deformation. What does that mean? If you grab an fbx from Mixamo and load it into any other app, you'll see the character moving.
In Houdini, you'll see this:
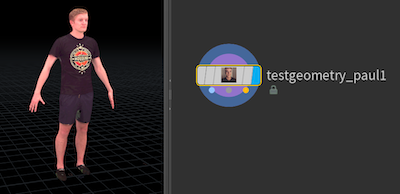
60fps gif of complex dance. Damnit Paul, move!
If you connect a null to the last output you'll see the bones dancing away, but to actually see Paul shake his booty, you need to connect a bone deformer sop, which as implied, deforms the skin, using the skinweight attributes on the points, with the bone animation.
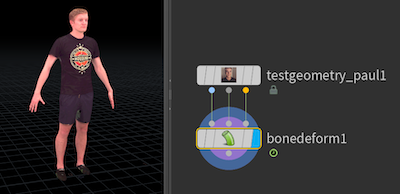
Shake it Paul!
Oh wait a sec, there's no anim defined in this. Silly me. If I animate the bones with say a rig pose (similar to a transform sop, but designed to work with kinefx joints and respects parent/child relationships), he'll move:
 Or better, swap for some mocap I saved in another fbx:

No words for such beauty.
'Yes yes, but why all this hassle?' Well quite often you don't need to see the skin deformation. Eg if exporting to a game engine, you save the skin weights and the joint animation to fbx, but you don't need to pay the cost of the expensive skin deformation. The updated fbx export rop has you covered:
 Or if you're gonna do a crowd, then you export the skin+rig+animation through a different agent process. The separation of deformation from rig seems needless at first, but it's actually quite powerful, and opens the door to whole new ways of processing and applying animation procedurally.
Motion clips
Use Houdini for long enough and you get very attuned to time dependency; do your nodes need to recalculate every frame, or can they just cook once? Knowing how to control this becomes an important trick for efficient setups.
But here we are on the Kinefx wiki page, surely 'kine' implies motion, there's nothing to be done right?
WRONG!
Kinefx steals a trick from chops, and lets you freeze all the frames of an animation into a static moment, called a motion clip.
 Now that this is done, we can do whatever silly modelling operations we want, treating it like a big bunch of curves (cos its a big bunch of curves). When done, we can convert it back to animation with a motion clip evaluate.
 What's cool is that you can do quite drastic modelling operations to the motionclip. Delete frames. Delete entire limbs. Apply smooth operations. Swap from each-frame-as-a-skeleton to each-bone-as-a-motion-path, do stuff, swap back. Super powerful stuff. Chops always had the promise of 'treat time as a modelling operation', but never really delivered, this delivered. It's also worth pointing out it's not limited to kinefx rigs, lots of potential here!
Some ideas to think about:
- Transporting hips with animation has always been tricky unless you can take bgeo sequences or alembics with the hip. Now you can convert to a motionclip, and stash it in the hip.
- Fix ground intersections with a modelling operation; convert stuff to a motion clip, ray stuff to the ground, convert back
Motion clip editing via motion trails
 Download hip: kinefx_adjust_motionclip_trail.hip
A cool feature of motion clips is the motion clip extract sop, which lets you swap from entire-skeleton-as-a-snapshot-per-frame, to motion-trail-per-joint. You can edit these curves however you want, then update the original motion clip with the motion clip update sop. Just remember to turn off 'prefer using local transforms'.
This is a lame example, as are all my examples, but shows the potential behind this workflow.
Motion clip editing RBD
 Download hip: rbd_moclip_edit2.hip
I've had a few situations where I've run an RBD sim and been asked 'thats almost perfect, but could that chunk on screen left land about 10 centimeters more left?'
Via some sneaky sending of RBD to motion clips and back again, here's a nice visual way to do it. The important bits:
- Take the point animation output from a rbd sop solver
- Rigdoctor with 'convert point instance attributes' to make kinefx friendly transform attributes
- Motionclip
- Motiontrail
- Select the trail you want to change, soft transform it into place
- Motion clip update and motion clip evaluate to convert back to motion
- Transform pieces to move the original rbd chunks with this updated motion.
Localtransform and kinefx wrangle
For me one of the most exciting things is the core ability to treat curves as joint chains. I've experimented with doing this in the past (see CurveUnrollTutorial ), but it's quite a lot of work. Now all that stuff comes for free!
When you get into kinefx, the sections of a line are treated as joint chains. Each point gets a @localtransform matrix4 attribute. If you rotate it, it is treated as a FK rotation in a joint chain, ie, rotate the elbow, and you'll have the wrist, hand, fingers all come along too in a FK style.
This means if you animate all the rotations of all the joints, you get easy wiggly waggly setups. So:
- Make a line with 10 segments
- Append a skeleton sop which will create @localtransform for you
- Append a rig wrangle
- Try something like this:
vex
rotate(4@localtransform, @Time, {1,0,0});rotate(4@localtransform, @Time, {1,0,0});When you scrub the timeline, you'll see the line curl up as each 'joint' is rotated over time. What if you increase the amount of rotation from the start to the end of the curve?
vex
rotate(4@localtransform, @Time*@ptnum*0.1, {1,0,0});rotate(4@localtransform, @Time*@ptnum*0.1, {1,0,0});or drive with a sine wave and tweak the values a bit?
vex
rotate(4@localtransform, .2*sin(-@Time*3+@ptnum*0.2), {1,0,0});rotate(4@localtransform, .2*sin(-@Time*3+@ptnum*0.2), {1,0,0});or just be really silly, do this, and copy some lines to a sphere:
vex
rotate(4@localtransform, .4*sin(rand(@primnum)-@Time*2+@ptnum*.05), vector(curlnoise(@P+rand(@primnum)+@Time*0.2)));rotate(4@localtransform, .4*sin(rand(@primnum)-@Time*2+@ptnum*.05), vector(curlnoise(@P+rand(@primnum)+@Time*0.2)));
Thumper DLC time
Download hip: kinefx_starfish.hip
Unroll curves with kinefx
 Download hip: kinefx_unroll_curves.hip
As I just mentioned, you can recreate what the CurveUnrollTutorial does much more elegantly with kinefx, as well as some other helper sops that arrived after writing that original tutorial.
The orient along curve sop does what it says, and gives you a clean orient attribute at each point on a curve. A rig doctor is used to get curves ready to be manipulated by kinefx, specifically setting the @localtransform to be driven by the orient we just calculated.
The rig wrangle is basically the same ideas as the unroll tutorial. For each joint calculate the dihedral between its local z-rotation, and a vector pointing directly down the z-axis. Rotate each joint by this amount, staggering the timing so the curve gets an animated unroll, done. Here's the snippet if you're in a hurry:
vex
vector4 q;
vector r, angleaxis, axis;
float angle, acc;

// generate a z-axis of rotation per joint
r = {0,0,1}*matrix3(4@localtransform);

// dihedral will give us a quaternion to align {0,0,1} to r
// prerotate() requires angle and axis, so convert
q = dihedral(r, {0,0,1});
angleaxis = qconvert(q);
angle = length(angleaxis);
axis = normalize(angleaxis);

// stagger rotation along curve
acc = ch('acc');
angle *= clamp((1-@uv.x)*acc-acc+ch('mult')*acc,0,1);

// rotate!
prerotate(4@localtransform, angle, axis);
vector4 q;
vector r, angleaxis, axis;
float angle, acc;
// generate a z-axis of rotation per joint
r = {0,0,1}*matrix3(4@localtransform);
// dihedral will give us a quaternion to align {0,0,1} to r
// prerotate() requires angle and axis, so convert
q = dihedral(r, {0,0,1});
angleaxis = qconvert(q);
angle = length(angleaxis);
axis = normalize(angleaxis);
// stagger rotation along curve
acc = ch('acc');
angle *= clamp((1-@uv.x)*acc-acc+ch('mult')*acc,0,1);
// rotate!
prerotate(4@localtransform, angle, axis);Wait, prerotate? What? Better keep reading...
Proper rotation in a rig wrangle with prerotate
Much thanks to Stephan Walsch and Henry Dean for this one.
Short version: When rotating @localtransform attributes in a rig wrangle, use prerotate() instead of rotate().
Long version:
You could swap prerotate() for rotate() in the previous wrangle and probably not see any change due to the sheer number of joints. For more regular style rigs with a small number of joints, rotate() behaves unexpectedly. Here's a simple root/middle/tip 3 joint chain to represent a shoulder/elbow/wrist. If I use a rig pose to select and rotate the elbow, it behaves as expected; the joint itself rotates, the wrist comes along for the ride:
 To replicate that in a rig wrangle, I'll use the rotate() vex function:
vector axis = {1,0,0};float angle = radians(ch('angle'));rotate(4@localtransform,angle, axis);
If I run this in points mode so it applies to all the joints, the arm curls up as expected:
 But if I limit it to just the elbow (ie point 1), it doesn't behave as expected; it rotating everything from the shoulder!
 If I make it just animate the wrist (joint 2), it looks correct at first glance:
 But look closely, the elbow is wrong. Yes it's staying in the right location, but it's also not rotating (the axis handles aren't moving). More importantly, we shouldn't have to employ tricks like "if you want to rotate the elbow in a wrangle, remember to select the wrist", that's crazy.
Luckily the fix is simple. Go back to rotating the elbow and instead of rotate(), use prerotate():
 Why? It's easier to play with than to explain in words, but its a combination of how matricies combine, and how they're defined, and how kinefx applies joint transformations.
First, when combining matricies, order is important. If matrix A represented 'move forward 1 unit' and matrix B represented 'rotate 45 degrees right', multiplying those matricies will combine them, but AxB will look different to BxA:
More info...
Stephan Walsch loves to point out every time I link to this section that this gif is incorrect, and that the order is the opposite of what's written below each example. If you're talking purely in terms of vanilla transformation matricies, purely in worldspace, yes he's probably right.
But here I'd argue that 'right' is less important than getting the point of AxB != BxA.
I'd also argue that Stephan getting so annoyed by this is really funny, so the gif is staying as is.
Cheers Stephan!
Secondly, a matrix could be defined in worldspace, or defined in relation to other matricies. The kinefx @localtransform matrix is the latter, it's describes each joint rotation relative to its parent. That means if you use rotate() on localtransform, it too rotates relative to the parent. Hence rotate() on the elbow ended up rotating from the shoulder.
The prerotate() vex function does as the name implies, it applies the rotation to the matrix first. Ok, but first compared to... what?
Well, a key job of a rig wrangle, a rig pose, a rig vop etc is to update the positions of the joints, ensuring transforms of parents are passed to children. By pre-rotating, the matrix of the joint you specify is rotated first, then when the rig pose updates transforms, it then gets moved to the right position relative to the parent.
Interestingly as a bonus aside, I happened to look at the help for the rig pose node, and it explains how you have a choice per animation to work in premult or postmult modes, and check it out, the default mode is premult, so this actually aligns with what I've just learned about rotate vs prerotate in vex. Go figure.
https://www.sidefx.com/docs/houdini/nodes/sop/kinefx--rigpose.html
 In other words, if things are behaving strangely, use prerotate. 😃
IK Chain Legs Setup
 Download hip: kinefx_ik_chain_legs.hip
Video walkthrough: https://youtu.be/ZEFYdbhsVi0
The Ik Chain sop is relatively simple, but can be a bit of a puzzle the first time you get it going. This hip starts with a basic IK chain rig, and adds features until it ends up with a leg IK setup that could be animated, and present a clean interface to the user.
The challenge lies in the base differences of how sops works vs what you expect from an animation rig. Sops lets you display a single node, and have a single active tool context. You can use template flags, but that can get complicated with more than 2 nodes, and it definitely doesn't let you interact with 2 nodes at once.
An animation rig isn't compatible with this at first glance; you need to display and edit the ik handles for the feet, display and edit the 'fk' handle for the hips, while also displaying the full posed skeleton and potentially skinned geo, all at the same time.
You can get what you want out of kinefx with a bit of juggling. The trick here is to pull all the handles you want into a single rigpose, then split them out again to send to the relevant nodes. Here the hips go to a skeleton blend sop, while the ik handles go to the ik chains sop.
When you get a handle on this workflow its pretty powerful and freeform, allowing for interesting rig layering tricks that'd be hard in standard animation packages. The flipside is it can create a bit of a node salad. Ideally you'd wrap all this up into HDAs.
The display+selection, plus some of the gotchas can be hard to understand just from a hip and text, so I've made a little walkthrough, linked above.
Note for 19.5: Anemotionalrobot on Youtube comments: "With the new Skeleton Blend node, I had to specify the hip joint in the group parameter. Match by Attribute 'name' didn't seem to work. It was blending the whole skeleton into the hip joint otherwise!" - thanks for the heads up!
FBIK
 Download hip: kinefx_fbik_hips.hip
Not sure if this is the right way to use it, but its fun.
Bring in a rig, here I've loaded mocapbiped3, chose a walk, and imported it with the scenecharacterimport node. Split off the feet and hips, move the hips, feed those to the second input of the fbik sop, and the original rig to the first input.
FBIK will do its best to push the rig to match the positions of the bones you specify.
It's not perfect, things like knees will wobble everywhere, but like I said, its fun.
The two things everyone notices when you first do full body ik is that the ankles don't lock, and the hips often don't track well with the target hips. To fix:
- Add a configure multiparm, select the ankles, give them a higher weighting, say 10.
- The default damping of 0.5 is often too high for the hips, so the system is trying to blur/soften the overall solve, which means the hips don't hit the pose you want. Try lowering damping until the hips track better.
- The default tolerance of 1 is also too high, especially if you want really accurate hitting of targets, like controlling the end of a robot arm. Oleg posted a nice example on the sidefx forum, tweaking tolerance (and the fbik config) helped the robot arm hit its target: https://www.sidefx.com/forum/topic/86702/
Also for you young folk, Shynola did a fantastic take on this vector skeleton style for Beck 17 years ago! SEVENTEN YEARS, OH GOD I'M OLD: https://www.youtube.com/watch?v=RIrG6xBW5Wk
Proximity skinning
 Download hip: kinefx_skin_simple.hip
The launch docs gloss over this a little bit, you can work it out by reverse engineering some of the later examples.
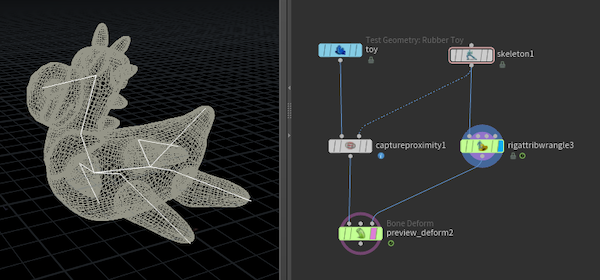
Captureproximity sop is what you want. Geo to the left, rig to the right, feed that and your animated skeleton to a bone deform.
Play with the weights tab on the capture proximity to boost the number of influences, smooth out the reuslts.
If you want to refine the weights, use a capturelayerpaint.
Biharmonic skinning
 Download hip: kinefx_biharmonic_skin.hip
Update for 19.5!
Several people asked 'Why did you do proximity skinning? Why not biharmonic?' The answer was 'I didn't know how'.
Luckily several nice people shared their setups, so here it is, and the results are impressive. No wonder everyone thought I was silly.
Before 19.5 it took a few steps, which I could never remember:
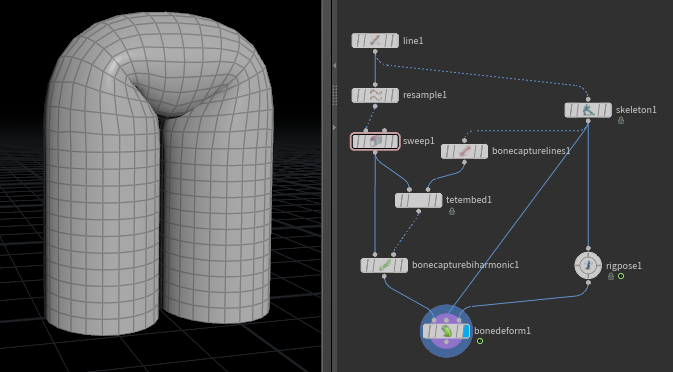
- Make your skeleton and a reasonably high res skin
- BoneCaptureLine to define capture regions for the joints
- Tetembed, skin to first input, capturelines to second; this creates the tet mesh and weightings
- BoneCaptureBiharmonic, skin to first input, tetembed to second, this transfers the weight to the skin geo
- BoneDeform, previous node to first, skeleton to second, skeleton via rigpose to third
In 19.5 this has been wrapped up into a HDA, jointcapturebiharmonic. It has the added advantage of supporting the rapidly-becoming-standard 3-in-3-out wiring style, so first is the mesh, middle is the bind pose or rest pose rig, third is animated rig.
Mark Wallman pointed out the setup broke in 19.5 originally. I had a look, seems the other tet mesher used within the hda doesn't like open shapes. Putting caps on the sweep made it happy again. I've included both the old and new setups in the hip.
Manually drawing a skeleton
The skeleton above was drawn directly in the skeleton sop, it has lots of options to help you draw joints, mirror them, constrain to planes or inside geo etc, detail are in the sidefx docs.

Take 2 mins to go over the shortcuts and various modes, its pretty good fun. In the mp4 I'm doing the following:
- Mostly in 'freehand' mode to click-click-click the core hips-to-head joint chain
- Hit enter to swap to edit mode, tweak on, child compensate on, drag on joints to fix placement
- Select a joint, hit enter again to draw arm, leg, tail
- r.click, split to create elbow
- select shoulder/elbow/wrist, r.click, mirror and duplicate to create opposite side.
Rig from labs straight skeleton
 Download hip: kinefx_straight_skeleton.hip
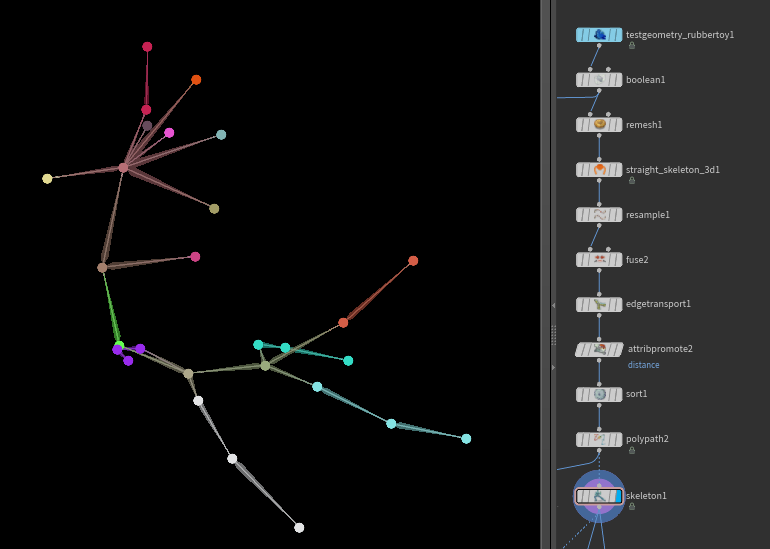
Takes a bit of cleanup, but it works. The key thing is for the curves to have their orientation correct, ie if you were to follow the vertex ordering, the joints must flow like joints. No child joints pointing back up to the root or backwards joints, most of the errors I had were due to this.
A fix here after chatting with Henry Dean is to select the 'hips', use edge transport to calculate distance to the hips, sort by that distance attribute, and polypath to force a rebuild of the vertex order based on point/prim order.
Rig doctor to help debug curve direction
 When you get warnings of cycle errors, that implies some of your curves are backwards. Append a rig doctor, turn on 'show parent to child', and you'll see a little arrowhead to show how the curves are flowing. Red is bad. In the gif the red arrows appear if I take the resampled straight skeleton. The good one is using the edge transport, sort, polypath trick outlined above.
Procedural weights
 Download hip: kinefx_procedural_weights.hip
Skinning sounds like an artist thing yeah? All that falloff stuff and painting weights? Ew. You left all that behind when you joined the houdini party.
If you know ahead of time exactly what your weights are, you can 'fake' what the capture proximity sop does through vex. It's a little tricky, Edward Lam from SideFx gave some great pointers here.
The weight attributes made by capture proximity are awkward to manipulate with vex, so there's 2 helper sops, capture pack and capture unpack to convert stuff into vex friendly attributes and back again.
This setup fakes what the capture unpack node does, creating arrays of the joints and their weights per point. It also creates a tricksy detail attribute used by some skinning related nodes.
There's 2 setups in here, the first takes some circles, makes the same number of joints, and procedurally weights the skinned circles to the joints and wiggles them.
The second setup could potentially be more interesting (but ultimately does what the labs rigid bodies converter does if you need a full solution). It takes packed animation, creates a joint for each, transfers the packed animation to joint animation, and skins the unpacked shapes back to the joints. <s>It's slightly off, you can see the cubes are rotated 45 degress compared to the packed source, something I'll need to work on.</s>
Update 1: Noël Froger noticed the misalignment that happens in the conversion, and kindly offered a fix. He adds:
In the RigDoctor sop enable 'Convert Instance Attribute' as well as 'Initialise Transform'. And before that you have to use the packed intrinsic transform to generate orient.
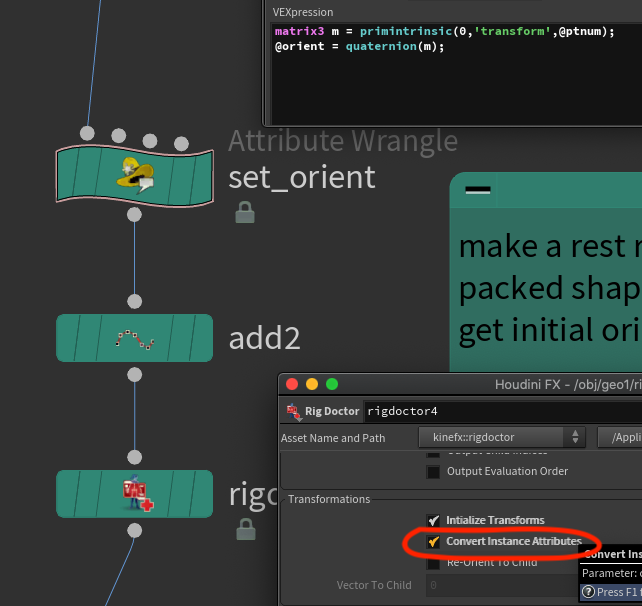 Thanks Noel!
**Update 2:**But there's more! Jim Meston pointed out I was needlessly converting from localtransform to transform, a few extra nodes to pointlessly confuse. That's been tidied up. Thanks Jim!
I also noticed that the chramp that drove the block animation suffered the issue where chramps no longer have an implicit modulo after Houdini 19 or so, so I fixed that too.
Kinefx to agents to lops to arkit
 Download hip: kinefx_to_agents.hip
First, a series of yay/boo points to build tension:
- ARKit on iOS uses USDZ.
- Houdini can export USDZ!
- ARKit doesn't support arbitrary shape animation.
- ARKit does support skeletal animation!
- USDZ doesn't support arbitrary standalone skeletal animation.
- USDZ does support USDSkel, which was originally designed to handle crowds!
- Houdini can export crowd agents to USDSkel via Lops!!
Exciting right?
This hip takes the previous animation, defines an agent from the static rig joints, imports the skinned geo to the agent, creates a motion clip from the rig animation, attaches that to the agent, and exports that to lops.
Like the previous example there's a few rough edges I want to sort out, but it's almost there. Again thanks to Edward Lam at SideFx for helping with some of the tricky details. In particular the line earlier about 'tricksy detail attributes'? This is where it's used; the agent sop requires that attribute.
Rig vop
So this is a new way of working, only just got my head around it after watching a few videos.
Where kinefx is concerned, forget what you know about vops. Paralellism, magic of all-things-at-once, stop it. The default mode of rig vops is closer to maya rigging with the network editor, or hypershade if you're old like me... remember hypershade?
The biggest clue here is that it's set to detail mode by default. Why? Well in a 'proper' character rig context, you're doing specific things to 3 or 4 joints, not every joint. Eg:
- Make a 2 bone ik solver, which might be just the joints of the arm.
- Make a reverse foot setup which is just the feet and some helper joints.
- Make a clavicle/shoulder correction rig involving only the upper arm joints.
Rig Vops are designed for these kind of operations; joint specific stuff that's more finnicky than sops, but doesn't involve running on every joint in parallel.
Easier to explain with an example.
Floating parent constraint
 Download hip: kinefx_rig_vop_parent.hip
Fancier rigs in Maya or Houdini might have bones parented to other bones, but not via a straight parent/child bone link. Maybe its a null in between, or a group, or a parent constraint. All fine if you're dealing with obj style transforms, but how can you replicate this in kinefx if ultimately its all about points and lines and how they're connected?
In this example I've parent constrained some bunny ears to Paul. Animating Paul is not interesting, nor are modelling the ear or their lag animation (though I quite like it), whats interesting is the workflow to setup the constraint animation.
First, lets get the rig vop and viewport ready:
- Make a rig vop
- Connect the ears to the first input, Paul's skeleton to the second
- Set the display flag to the vop, hit enter in the viewport to active its state (the joints should get dots), dive inside.
Now imagine you're back in Maya, about to make a ribbon ik or something. You'd drag joints from the viewport or outliner into the network, add some other nodes, wire it all up right? It's the same here!
- Drag the head joint from the 3d view into the vop network. Yes really. It will make you a get transform vop for the head.
- Click the root of one bunny year. It splits in 2. Drag the upper one to the viewport, above the head transform vop. This will make a get transform for the ear.
- Click the root of the ear again, it splits, this time choose the lower dot. Drag it in and put it over on the right, this will create a set transform for the ear.
- Make a parent constraint vop, put it in the middle.
- Setup the inputs; Connect ear xform to xform, head xform to newparent
- Setup the outputs; outxform to the xform of the setTransform on the right, ptnum from the ear gettransform to pt of the settransform.
- click 'update offset' to set the offset of the ear to the head
Done! See? Feels very 'I'm rigging in Maya'. Repeat for the other ear, hey presto, parent constraints.
Why did selecting and dragging the head just work, while the ear gave an option? Well, the head is from the second input. If you know vex and vops, that means its read only, so you it'll just give the option to read its transform. The ear is connected to the first input, meaning you could set or get attributes, hence you get the choice.
Quick gif summary:
Misuse of a rig vop in point mode
 The above tip shows how rig vops are meant to be used, but say you wanted to pooh-pooh all that work, and do the crazy 'work on all the things the same way', like the silly bendy tentacle trick I'm so fond of. You can do that, just change the mode from 'detail' to 'point' on the top of the vop network.
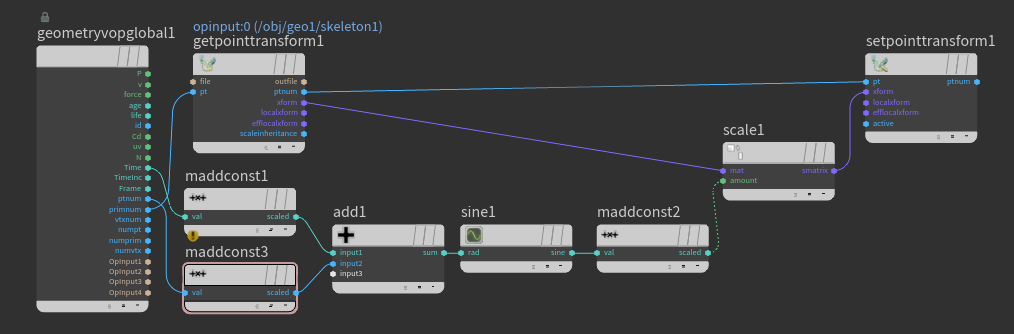
Note that because you'd likely require several bind and bind export vops to get transforms, parents, whatever else, you can use the getpointtransform and setpointtransform vop nodes instead. They're convenience vops to help you get and set what you need, while also having a handy passthrough for the point number, to help make the networks a little tidier. Nice.
Also note that rig vops have a lot of python under the hood for the view state stuff (so you can see joints from all the inputs, the drag-n-drop stuff). This can get confused if you happen to wire inputs that aren't joints, and the node will complain and error annoyingly. If this happens, you can go to the rig tab at the top of the rig vop and turn off 'compute transforms for input #N', for that particular input.
Rig pose and rig wrangle for packed shapes
 Download hip: kinefx_modify_packedprims.hip
Animating packed shapes could be a little tricky with vanilla transform sops and wrangles. Rig pose and rig wrangle nodes give much better local feedback for joints, they can be repurporsed to directly modify packed shapes too. Add the extra tricks you get for 'free' with functions like prerotate, its fun town.
The trick is to append a transform by attribute sop, and set the attrbute to be 'transform'. No messing around with packed intrinsics anymore, just tasty packed animation.
Convert packed prim animation to kinefx for glb
 Download hip: kinefx_packedprim_to_glb.hip
Well, as it happened the packed prim animation I did the previous day had to be exported to glb. I'd used dem bones before, as well as the glb expters blendshape based export, but neither really worked here; dem bones got confused by the rotation, and the blendshape based export is expensive. The best way is to directly convert the packed animation into joints, bind the mesh to those joints, export.
Here's how to do that. The core trick is pretty simple, just a few things to keep track of:
- capture packed geometry can match meshes to joints by @name. it expects packed geometry as input, while the glb exporter expects non-packed, so set the checkboxes to do that
- the glb character rop doesn't like floating joints, so make sure to parent everything to a single root joint
- the glb rop will also export materials, lights, cameras, by default, even though its down in sops, so make sure to turn those off if you don't need them.
Blendshapes with kinefx
 Download hip: kinefx_blendshapes_v02.hip
Kinefx introduced a new method for working with blendshapes, keeping in line with the kinefx idea of separating the mesh from the animation from the rig.
How kinefx stores blendshapes
At a high level, blendshapes are stored as hidden packed shapes. They require 2 prim attributes, s@blendshape_name and s@blendshape_channel, which are usually the same value. In kinefx concept land, this is like the skeleton setup.
Blendshape animation is stored at the detail level. That will have attributes that are the same names as the blendshape_name, with a float value which animates over time. Think of this like the rigpose, its animated data, but it's not actually doing anything with the blendshapes yet. You can create and animate these values however you want, but if you expect a usual blendshape slider panel, you can use a character blendshapes channel sop.
To actually apply the blendshapes, a character blendshapes sop is used, which will read the animated detail attributes, lookup the matching packed blendshape, and deform the mesh. Setup, anim, deform, classic kinefx.
Creating kinefx blendshapes
The examples in the help use a character import sop which does a lot of heavy lifting, as is my style I wanted to build it from scratch in sops to understand how it works under the hood.
Here's a workflow to create all that.
- Create your morph targets, name and pack them, and add them to your character with a characterblendshapesadd sop.
- Define a clipchannels detail dictionary attribute which maps detail attributes to shape names
- Animate those detail channels
- A characterblendshapes takes the character shape with blendshapes, and the animated channels, and deforms the model.
Creating the dictionary attribute is the tricky bit. As mentioned earlier the character import sop does this for you, to do this yourself requires some vex. I use an attribute wrangle in detail mode to create the dictionary, and I do this by reading the named shapes from the model (connected to input 1), and in a for loop construct each entry in the dictionary, then store it as an attribute called clipchannels:
vex
// get shapes from the character
s[]@shapes = uniquevals(1,'prim','blendshape_channel');

// construct a clipchannels dictionary
dict a;
foreach(string shape; @shapes) {
    a[shape] = set('attrib',shape);
}

d@clipchannels = a;
// get shapes from the character
s[]@shapes = uniquevals(1,'prim','blendshape_channel');
// construct a clipchannels dictionary
dict a;
foreach(string shape; @shapes) {
a[shape] = set('attrib',shape);
}
d@clipchannels = a;With that done you can animate the detail channels, which should match up to the names in the clipchannels dictionary. In this setup I use several attribute noise sops, or channel sliders directly on the wrangle, and you can switch between them.
What's surprising is that there's no automatic way to create the sliders should you need them. Could be an issue if you're pulling blendshapes from an Apple facekit/animoji setup with 52 sliders, not fun to do by hand! If this bothers you, send in those RFE's to Sidefx. 😃
Ah, this must've changed in 19.5; the character blend shape channels sop will create blendshape sliders for you. Playing with it as I live type, but it looks like this:
- The node will look for those blendshape detail attributes. If you've followed the above steps they should be riding on the skeleton (if they haven't, well, they should, and I'll go fix the hip). If you use a fbx char import sop, the blendshape attributes definitely live on the skeleton output, not the mesh!
- Put down a character blendshape channels sop
- Connect the skeleton to the first input, ie the thing that has the blendshape detail attribs
- Click 'update from input'
- It pops up a dialog asking for framerange and wildcards, just go with the defaults, confirm
- You should get all the sliders created, but all disabled.
- Click 'toggle entries'
- Shift select all the sliders you want enabled, confirm
- Now you can access the sliders, woo
- Append a character blend shapes sop, mesh to first, the charbendshapeschannel sop to the last
- View the char blendshapes node while playing with sliders on the char blendshapes channels sop, you should see animation.
I'm sure I didn't have to do the toggle entries step the first few times I played with it, but I can't work out what I did. Hmm.
Kinefx Blendshapes to FBX and GLB

Unity and UE still prefer FBX for most animation related things. I had a particular need to export a mesh with kinefx flavour blendshapes to Unity via FBX, but it requires some gentle massaging.
FBX blendshapes
To be clear about my requirements, I need to export the mesh with blendshapes as a rig, for further animation to be done in unity. I did NOT require animation export. This is one of the advantages of this new blendshape design, rig can be saparated from final deforming performance.
Anyway, the ROP FBX Character Output sop can be used to export the mesh+blendshapes, but I found it assumes you have a skeleton. I didn't, so I needed to do some tricks:
- Create a ROP FBX Character Output
- Connect your mesh with hidden blendshapes to the first input.
- Create a single point, connect to rigdoctor with
initialise transformsenabled, connect to second input. - On the rop you'll get warnings about clipinfo, set the
frameoption to single frame.
Despite warnings, that will export a fbx with blendshapes that Unity can understand. Hooray!
It's a little annoying that it requires that dummy bone connection to the second input, but hey, it works, I'm happy.
GLB blendshapes
What about a glb with blendshapes? Right now you can't do it from Houdini, its gltf/glb rop is pretty limited. Amusingly it can export blendshapes, just not your blendshapes (it will convert any animation to a series of one-blendshape-per-frame keys, but won't let you just export a blendshape library). Instead you need to use Blender, which is a pain. At least its relatively straightforward:
- Open Blender, choose File -> Import -> FBX
- Find your fbx, the default import settings should be ok
- Expand the outliner until you find the mesh for your shape
- In the parameter pane click the green upside down triangle, that's the object data properties
- In that panel will be a shape keys section, that should contain your blendshapes. Slide some of these to prove they work, reset all to zero when done
- Select the mesh, File -> Export -> GLTF
- In the options set 'limit to' to 'selected objects', and ensure 'shape keys' is selected under animation
- Export, wait a bit
- Drag and drop into your glb previewer of choice (yay Don McCurdy), shapes should be available and tweakable.
Change lots of blendshape detail attributes at once
Here's one way, get all the detail attribs via a detail intrinsic, then set them all in a for each loop:
vex
string attrs[] = detailintrinsic(0,'detailattributes');
string bs;
float scale = ch('scale');
float val;
foreach(bs; attrs) {
    val = detailattrib(0,bs,0,0);
    setdetailattrib(0,bs,val*scale);
}
string attrs[] = detailintrinsic(0,'detailattributes');
string bs;
float scale = ch('scale');
float val;
foreach(bs; attrs) {
val = detailattrib(0,bs,0,0);
setdetailattrib(0,bs,val*scale);
}Trigger one blendshape per frame
Same as above, but with a little foreach trick to also get an index, and use it to match @Frame. Handy for QC and whatnot. This uses @Frame-2 because the array of returned values will often include a clipchannels attrib you wanna avoid, and then you also need to account for time starting at 1, while the returned array starts at 0.
A cleverer person would just filter the array first. I'm not a cleverer person.
vex
string attrs[] = detailintrinsic(0, 'detailattributes');

foreach (int i; string bs; attrs) {
 if (i == (@Frame-2)) {
 setdetailattrib(0,bs,1);
 }
}
string attrs[] = detailintrinsic(0, 'detailattributes');
foreach (int i; string bs; attrs) {
if (i == (@Frame-2)) {
setdetailattrib(0,bs,1);
}
}Robot Arm with FBIK
) Setup here: https://www.sidefx.com/forum/topic/86702/
Olegzv setup a cool industrial robot using FBIK and constraints on the sidefx forums, but wasn't getting the results he expected.
All it required was a couple of minor tweaks. FBIK will read per joint attributes for ranges of motion and adjust itself accordingly, in this case the setup was over-constrained. I went through and found which joint constraint was not allowing FBIK to solve correctly, loosened it, and it all worked really nicely.
Definitely worth your time to go download his setup from the forums and have a play!
What FBX node should I use
Not quite kinefx related, but more closely aligned to kinefx than anything else I suppose.
Houdini's support for FBX has always been a bit rough. Understandable considering its a very old proprietary format designed for motion capture, but it's still the format of choice for Unity and Unreal, so it's a necessary evil.
One of the goals for KineFX was better support for game engines, as such it came with a bunch of improved tools.
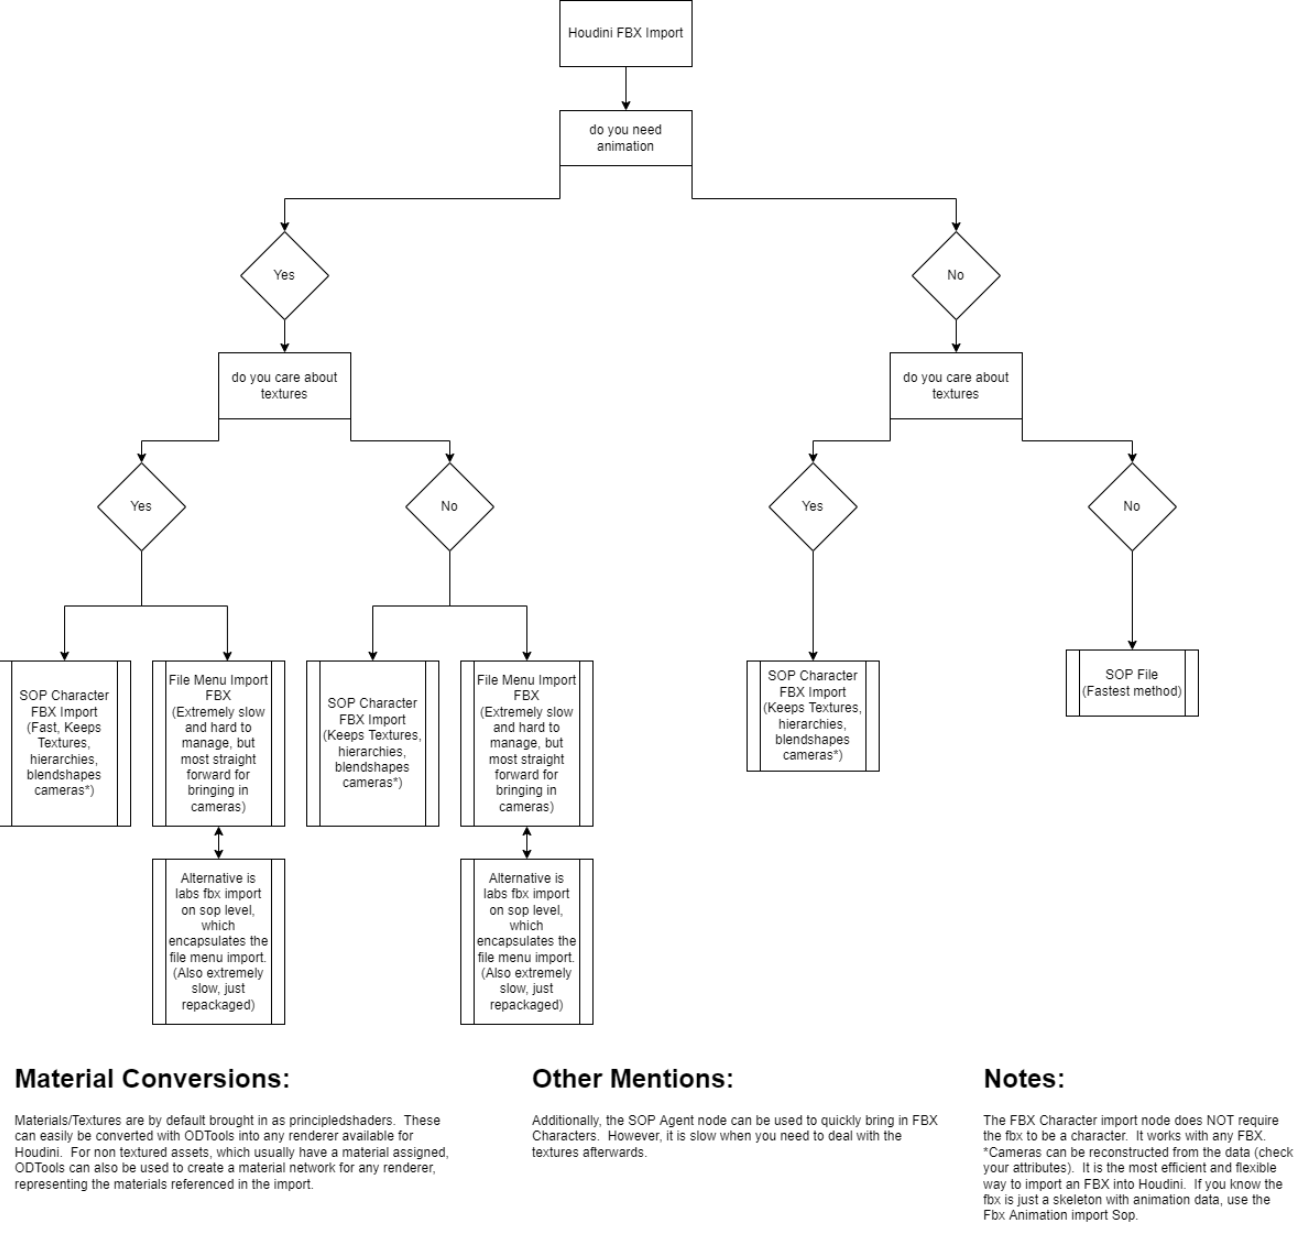
Oliver Hotz, the person behind the great OD Tools suite, did some digging and found that the new FBX nodes can deal with a lot of different use cases. Further, the old method was very destructive (it would import nodes into you /obj network and generaly make a big mess), while the new nodes are much more procedural in nature.
Oliver created a 'choose your own adventure' style flowchart, and kindly agreed to share it here. Enjoy!