Appearance
Vellum
Sim a forest of l-system trees
 Download hip: vellum_forest_lsystems.hip
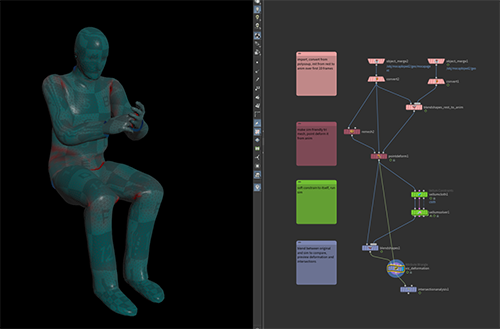
A thing I found surprisingly tricky was to take the default lsystem tree and convert it to vellum. It'd flop about, fall apart, no matter what I tried. I got a better feel for vellum after watching the John Lynch masterclass a few times, taking notes (see below).
So, here's the summary:
- create a lsystem
- append a vellum configure hair. This was my first aha moment: when simulating wire/skeletal things, use vellum configure hair, not cloth!
- append a solver, watch it fall to its doom. Better pin the root down.
- insert a group sop after the lsystem, set group type to 'points', base group 0, ie, the first point
- on vellum configure hair, set pin points to group1
- sim now. floppy tree.
- on vellum configure hair, the bend stiffness is too low. set it to 1, sim. Less floppy. 10? Little less floppy. 100? Hmm, not much change. 1000? 10000? 1000000?
- Next aha moment: If you do powers-of-ten jumps in stiffness but don't see any change the higher you go, the constraint iterations are too low!
- Jump to the solver, set constraint iterations from 100 to 1000, sim. Aha! Stable tree!
- Dive inside the solver, connect a popwind before the force output null, wind strength 0.1 on x, noise amplitude 0.25. Nice subtle rustling.
That's one simple tree. Lets see what we can do to push this a bit and learn some more.
- On the lsystem increase the generations from 7 to 8, which grows an extra set of twigs
- Sim again, the tree will slump. More iterations?
- This time we'll use substeps. Set substeps to 2, sim again, the tree is stable. Can play with the ratio of substeps to constraint iterations, remember 1 substeps with 100 constraint iterations is roughly the same as 2 substeps at 50 iterations, but will solve more accurately (and be a little slower).
- can disable collisions to speed things up a little, don't need them for now
The hip does more stuff (colliders, breakable pin constraints, plasticity, scale to a forest etc), but recognizing wireframe things need hair constraints rather than cloth, and how to identify when the number of constraint iterations are too low, were the important lessons here.
Probably worth pointing out what the second vellum configure node is for. In the first stage I pinned using the existing vellum configure hair node. When done this way the pins will inherit the same stiffness values as the rest of the hair. To control stiffness and breaking, I removed the pins, made a new vellum constraints node, mode 'pin to target', and gave it the root group from before.
By default this is a permanent pin, which has almost no controls. By swapping the mode from 'permanent' to 'soft', the strength can be controlled and breakable can be enabled. To work out the breaking threshold I just hit a single tree with the sphere, gradually increasing the threshold until it looked like it snapped at the right time.
Softbody dance
 Download hip: vellum_footwork.hipnc
Watched a few Entagma and Sidefx vids, saw a fun walking setup on Twitter, had a go myself. Knowing that vellum happily supports multiple constraints doing different things, this has:
- a cloth constraint to pin to the animated feet and animated head
- a pressure constraint to keep the mesh inflated a bit
- a strut constraint for internal strength
- a strut constraint with inverted normals to pin the overall mesh to itself so arms are pinned to legs etc
There's a few delta mush nodes here and there to keep it smooth, and the final connectivity sop and split was because only after I simmed did I notice the eyes had fallen out of the head and rolled around on the floor, those 2 nodes tag and delete them.
Vellum hair headbang
 Download hip: vellum_hair_headbang.hip
Simple take on vellum for a hairstyle that needs to retain its shape when driven by animation. This uses a single vellum hair constraint with bend stiffness of 1,000,000. I use a resample sop to get @curveu for the guides, and create a group of @curveu<0.2, and define that as a pin-to-animation group on the hair constraint.
A important part of this setup is how to have the hair follow the head.
How to NOT constrain the hair to the head - Attach to Geometry
Like most people I first left the groom static, had the animated head geo, and used a 'attach to geometry' to bind one to the other. This is fine for binding a vellum flag to a moving pole, or other simple effects, but for hair the hair acts as if its on a frictionless 360 hinge at the root; it has no sense of maintaining its orientation relative to the head, the system just collapses into a heap.
The right way - Guide Deform
What you really want to do is make the guides inherit the scalp animation pre-sim, then let vellum layer on the jiggly sim parts of the motion afterwards. You can do this with a guide deform. Give it the hair, the static head, the animated head, the guides will bind themselves onto the scalp in a rigid way. Now that the guides are doing the right thing, you can use the 'pin to animation' controls so that the roots are locked, but the rest can slop and slide around.
Possibly more interesting here is how myself and the fine students at ALA are doing groom; its all in sops, no hybrid hair obj things. We think this is easier to read and work with, you may think otherwise.
Also note the absence of guide groom nodes; I've watched a few demos that make it seem amazing, but you only have to play with it for a few minutes if you're familiar with Houdini to realize its alarmingly non procedural. It's the edit sop on steroids, and all that that implies. Great for fast tweaking, but doesn't fit well into a procedural workflow. I totally get that there'll be cases where you have no choice but to work that way, but I'll be avoiding it as much as possible.
But hey, don't listen to me, watch this amazing demo by Igor Velichko that proves I know nothing at all. 😃 https://vimeo.com/331103963
Vellum leaves in tree
 Download hip: vellum_leaf_shake.hip
Similar idea here; don't attach static leaves to a tree with vellum constraints, unless you want to use super high substeps and iterations. Instead get the leaves following the animation of the tree with whatever sops tricks (this is just copy-to-points the leaves onto the animated tree), THEN convert to vellum cloth, sim.
A pin is used with an expression to keep the lower 20% of the leaves (ie the stalk/stem) rigidly pinned, the rest of the leaf will follow along.
Vellum and the labs tree
 Download hip: vellum_labs_tree_v01.hip
After being challenged by this post I had a closer look at the labs tree stuff.
If you haven't played with it yet, the labs tree nodes are a nice procedural toolkit to make trees, but they don't come with a method to simulate or animate it. It's inevitable that if you're in Houdini you'll want to do this, so here's one method.
I looked at John Lynch's 18.5 vellum masterclass where he talks a lot about making an l-system tree work with vellum. My solution was to get the labs tree to be as similar to the l-system tree as possible, which involved a few things:
- The labs tree wire's aren't fused at all; if you run an explode view sop over it, it falls apart. The vellum setup assumes the tree rig is all connected, this took some playing with the fuse sop and a resample.
- The lsystem tree wires are quite sparse point count wise, the labs tree isn't. To make it ballpark correct I used a group sop expression to isolate the excess points and remove them.
- With it fused and reduced, Johns trick of using varying thickness and density worked. Keep the trunk thick and dense, the outer twigs thin and light, the tree stays upright even when pinned with a single point at the root.
- While it's possible that I could go all the way and sim the leaves in the same setup, the leaves don't really affect the trunk at all, so I felt it was better to do them as a second sim.
- That technique is the same as above; point deform the leaves (this time as packed to speed it up), then unpack, vellum cloth, pin the leaf stems to animation, sim
- I tried another way that doesn't involve sim; just wiggle the packed leaf @orient with some noise, looks pretty good.
Pleased with how fast this is, should scale nicely to all sorts of trees.
Fix collisions with disableexternal
 Download hip: vellum_disableexternal.hipnc
Handy tip from Tomas Slancik I thought I should include here. Here I've got hair with thickness set intentionally too wide so that it intersects with the collision geo, and the root of the hair soft pinned. You can see that vellum does what it's meant to do, and tries to resolve the collision, but it's not really the intended effect.
If you create a point wrangle for the roots, and set
vex
i@disableexternal=1; i@disableexternal=1;Then collisions will be disabled for just those points, calming the overall simulation down and making things much happier.
Softbody tet anim using force
 Download hip: vellum_tet_animation.hip
Similar to one of the rbd tricks earlier, a rest and deforming copy of the object are read into dops. Each point on the sim reads its matching rest and deforming point, one is subtracted from the other to form a vector, that vector is used as a @force.
I'm surprised how well and how fast this works, and that it really moves through space; other attempts so far would just wobble and flop about at the origin, but never actually move forward. Lots of gross fleshy things to be done with this setup!
All the setup of the tets, solid embed etc were shamelessly stolen from the shelf 'vellum tet' preset'. 😃
Grain sticky cookie
 Download hip: vellum_grain_cookie_sticky.hip
A question from a patreon supporter landed at the right time, I'd been doing a lot of vellum the past few weeks, so had ideas of how to tackle this question. Look at the John Lynch masterclass from about 2hrs51m to see the basis of this. Usual disclaimers, probably better methods, not tested in production, but I think it's a fun little example.
 The cookie shape is booleaned and connectivity'd so each piece can be identified. It's then converted to vellum grains, but because the vellum grains sop doesn't keep the connectivity information, I run this in a for loop to restore it.
There's then 2 glue constraints and a pin-to-target constraint. The first glue is internally per piece, note that the group types are all set to 'point', and the cluster field is enabled. The second glue is similar, but I explicitly limit the constraints to act on the firsts piece, and to only try and find targets in the second piece. In other words, its glue across the gap of the break.
The pin to target is so the grains will follow the pieces when they're animated, but here I want pretty much all the grains to follow, with just a thin layer of grains at the gap to be allowed to flow freely. Rather than select these by hand, I grab the boolean cutting plane, colour it black, colour the grains white, and use an attrib transfer with a short distance and a little blur so that most of the grains are white, and fade to black over the cut. I can then make a group from colour, and use that group for the pin to target constraint. Note that the pin group type also needs to be in 'point' mode, grains expects points for all the things (obviously), but vellum by default uses prim groups.
The pieces are animated, and end in a TARGET null. The vellum solver is told to use that as the anim target (on the advanced tab), with 5 substeps.
To get the sticky/stretchy behavior involved some quick wedging of stiffness, damping, breakable and plastic values for the constraints. Having done this a lot the past week I'm getting better at dialing in values, and predicting what needs to happen. Low stiffness allows more give and stretch. Setting plasticity values allows for less elastic rubbery behavior and more sag/slump. Raising damping can help reduce vibrating grains, but can introduce slowmotion dragging as the constraints eventually seek their target. Breakable constraint values are similar to finding stiffness, you want to find the value where everything breaks, then where nothing breaks, then find that middle value so things juuuust start to pull apart, but not too much.
Post sim is an attempt to apply this motion back onto the original geo. Again a for loop is used to treat each piece separately, which has been subdivided and uv'd.
Hair walker
 Download hip: vellum_walker.hip
Sasa Budimir is brilliant. He frequently posts lovely things that show pairing a talented animators' sense of timing and style with the power of Houdini is an unbeatable combination. When he posted an amazing hairball creature, I felt compelled to have a go.
The vellum side is pretty minimal, just hair constraints with pin-to-target on feet, knees, hips. The stuff that took some head scratching was how to procedurally generate the animated foot locations. It's a bodge of truncs and lerps and chramps, but does the job. Sasa was kind enough to allow me to post this quick cover version of his way more detailed and character filled post, thanks Sasa!
Here's a better take where the movement is driven by distance traveled rather than @Time, so it supports stopping and starting:
 Download hip: vellum_walker_v02.hip
Foot planting setup
This foot planting setup is based off Sasa's gif, but I think the core approach is a little different. It starts the same, a point is animated along a path, then a set of feet points are generated at origin, that set of feet is copy-to-points'd to the animated point so they slide along the path.
I trail the feet points for the length of the sequence, and timeshift to the last frame. Then an add sop converts these trails to lines (oh, just remembered I could do this in the trail sop directly, idiot).
Those trails are lifted a bit, then ray'd onto the terrain. Now we have a terrain-avoiding path per foot.
And now the tricky bit, the walk cycle generation. I decide the number of foot steps I want, say 15. Multiply the timing information from the original point by 15, so that each point has a timer that is 0 at the start of the sequence, 15 at the end, lets call this @timer.
Now split that into the numbers before and after the decimal point; before is t = trunc(@timer),after is f = frac(@timer). I could reconstruct the original @timer by going t+f, but before doing that, we'll put f through a chramp.
Why? Because now we have a variable that cycles 0 to 1 on each step. If left in a default ramp it will smoothly and linearly go from the start of the step to the end, but with some ramp shaping I can make the foot hold still for a bit, move forward quickly, hold at the end.
Now I add t and f again, divide by the number of steps, so these values go 0 to 1 again, and use that to lookup the matching location on the path with primuv.
Hopefully this gif makes it clearer:
 To get the foot to lift and drop, I use f in a chramp again, start it low, go high, then low again, and add that to @P.y.
This works, but all the feet move at the same time. By adding a little per-foot offset to the @timer value, eg @timer += @ptnum*ch('foot_offset');, you get staggered feet timing.
Make a copy of all the feet, lift them a bit, make another copy, lift and scale together, you've made knees and hips. Join those points together, there's legs.
There's still issues with all this, if I increase the number of feet the whole system stretches too long, it bunches up at the end, it's hard to get the exact timing I want, buuuut... it sorta does what I set out to do. Makes you really appreciate Sasa's work and how much character he gets in his creatures, he's putting way more care into them than I am!
Vellum drape to drive point deform
 Download hip: pointdeform_with_drape_align.hipnc
Bacon and eggs anyone?
Point deform is one of the most useful sops in houdini, letting you quickly drive a shape with another shape. If you've used the wrap deformer in maya its the same thing, but actually fast and not a crashy memory hog.
The main thing it requires is some kind of correspondence between the shape you're driving (the egg) and the source of deformation (the pig run through a mountain sop). Usually you'll get things nicely aligned at origin, or you can do uv tricks, but what if you can't?
Vellum to the rescue! Here I remeshed the egg so it was vellum ready, and moved the egg and the pig so that I can drape the egg with gravity onto the face of the pig. Set a high friction, some struts for internal strength, the egg pleasingly plops onto the pig eye.

plop
Once its settled I timeshift and stash that sim. I now have the egg post cloth sim, the pig lined up perfectly beneath it, and the deforming pig. Connect all 3 to a point deform, the egg is now stuck to the face of the deforming pig.
I then go back to the original egg, and make a high res beveled version of it. Now I have the high res egg, the cloth egg that matches it in world space, and the cloth egg that is animated and stuck to the pig. Connect all those to another point deform, now the high res egg is stuck to pig.
Much more fun than faffing about trying to create your own clean rest geo.
Vellum jelly with embedded rigid object
 Download hip: vellum_jelly.hip
Just regular tet vellum, but with a cheap trick to grab a point near the center of the tet mesh and copy a pig there. Doesn't handle rotation, that's left as an exercise for the reader...
Vellum confetti
 Download hip: vellum_confetti.hip
Lots of planes, cloth constraints, tangent drag really high, a bit of pop wind noise in the solver.
Vellum twirly things
 Download hip: twirly_paper_vellum.hip
Same, but twirly. Been a while since I did this, but my intuition setting this up from scratch is that it should be opposite to the previous post. High normal drag (ie polys that are travelling in line with their normal should be slowed down), and low tangent trag (ie faces that are slicing through the air at 90 degrees to their their normal should move quickly).
There's some added soft struts here to help the pieces keep their shape.
Inspired by this reddit post: https://www.reddit.com/r/Houdini/comments/m9psgp/how_to_achieve_this_kind_of_effect_in_houdini/
Memory foam
 Download hip: vellum_memory_foam.hipnc
Quickie from a sidefx forum post. I original thought to use plasticity which sorta worked, but the end results was that the dents stayed in place. Reading through the notes I skimmed below I realised that's exactly what its meant to do, so plasticity wasn't the answer here.
Instead damping ratio on the cloth bend and stretch was probably better. My mental image of it is that after vellum works out the correct amount of force to apply on the cloth, damping ratio subtracts that ratio from the force; so if the ratio is 0.9, 90% of the force is removed. This means it takes longer to get back to a default state, giving that memory foam look.
Pile of worms
 Download hip: worm_pile_vellum.hipnc
Nothing flash.
- Scatter some points in a volume
- copy lines to those points
- make them wavey
- sweep them into worm shapes
- run the 'vellum configure strut softbody' preset
- vellum solver
Pile of sand
 Download hip: vellum_grain_pile_simple_v01.hip
For some reason this eluded me for a while, got some advice from helpful folk, cracked it, then reverse engineered back to where I started, and it more or less worked without all the extra stuff. Weird.
If you just setup vanilla vellum grains and let them emit, they act like greased ball bearings; they start to pile up, but always find a way to slip past each other and stay low to the ground:
 Boosting friction and adding some pop drag helps, but still the piles don't really go as high as you'd expect:
 The problem is the grains at the bottom of the pile can still shift and move, trying to make room for the grains above. Adding a sleep threshold will force the grains to become inactive if their velocity drops below a threshold;
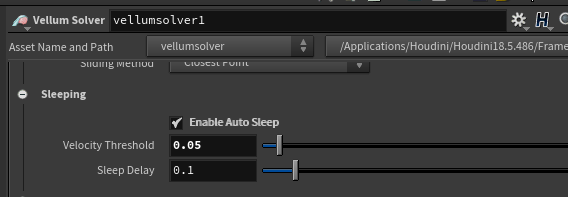 Here's visualising that sleep state, when grains go red they're frozen, allowing the pile to build up.

Grabbing tentacles
 Download hip: vellum_tentacle_grab.hip
This isn't really production ready, but I had it lying around on a hard drive, figured it was worth uploading.
This is basically a standard vellum tet setup with a pop wrangle to drive the forces. The torus is an sdf, in the sim each vellum particle queries its distance to the sdf and the gradient. If it's further than a threshold it creates a force driven by a sine wave tentacle animation created in sops. If it's closer than a threshold it uses the gradient and cross product to create a force that swirls around the sdf, making the tentacles wrap around the collider.
It looks ok at first glance, but would need more work to define more accurate forces on arbitrary collider shapes, avoid intersections etc. Or maybe it just needs more substeps? Like most of my experiments I proved it works well enough, lost interest to take it any further. 😃
Beating heart
 Download hip: vellum_heart.hip
A question from the sidefx forum inspired this quick test. I grabbed a heart model from sketchfab, reduced it, set it up for a vellum tet and pin to target constraints. I then used a taper sop to broadly animate the expand/contract, and fed it to a vellum solver. From there it was tweaking the stiffness settings and velocity damping to get something that read like flesh. Cheap and cheerful, mostly works.
Spinning rigid shapes
Download hip: vellum_shape_match_spin.hip
Sorta not really the right thing, but some interesting things to play with.
Vellum shape match gives you rigid(ish) objects, but not ways to impart @v or @w to spin shapes like you would in RBD or pops.
Instead you have to be a little creative, working out how to give each surface point the correct @v so that when all the points update their velocity, it makes your shapes spin.
Here's 3 ideas to do this. One imparts @v on the first frame, another just uses pin to target to drag shapes around in circles, the last uses a wrangle to copy @v from sops into the sim each frame.
Ideally you'd use a vellum rest blend, or even work out the overall rotation of the shape, correct @v accordingly, so that you could impart constant local torque (eg an american football with spin on its long axis while travelling). If anyone has ideas, lemme know!
Animated crumple
) Download hip: vellum_paper_crumple_through_grad_v02.hip
Via this odforum post.
Stretch constraints calculate their target length from @restlength. Bend constraints calculate their target angle from.... @restlength. Of course. If you use groups to isolate to just the bend constraints, set @restlength to whatever value you want, you can get crumpling, which you can see in the first setup.
The interesting part of the question was 'now animate the crumple to fade in with a gradient'. I'd assume that would work the same as standard restlengths and a Vellum Rest Blend, but weirdly it did nothing at all.
I also tried using a Vellum Constraint Properties node with a vexpression to copy restlengths, but again, nothing.
Eventually I stumbled across the middle solution. I recalled others had tried more advanced vellum tricks, and found that the primnum's change when moving between sops and dops. With that i mind, I setup animated restlengths in sops, and give the constraint lines unique @id's. Within the vellum solver I use a geo wrangle to lookup the matching prim id, then lookup the restlength of that prim:
js
int pr = idtoprim(1, @id);
@restlength = prim(1, 'restlength', pr);
int pr = idtoprim(1, @id);
@restlength = prim(1, 'restlength', pr);The sim swirls a little strangely, but we'll get to that shortly. I still didn't understand why the Vellum Constraint Properties or Vellum Rest Blend didn't work, lucky for me John Lynch helpfully explained.
Essentially, a Vellum Rest Blend isn't blending restlengths! A better name for it would be 'Vellum Calculate Rest Lengths, then Blend', but that's a mouthful.
A Vellum Rest Blend compares the point positions of the vellum sim and the target you specify, and uses that to calculate the required restlengths, and then blends to those values. Because the point positions of my flat-grid-with-animated restlengths don't change, there was no difference to calculate, therefore no animation.
This lead to the third solution in the hip suggested by John:
- use the second sim to get the required crumple shape, pick a nice frame
- stash that frame, use it as a blendshape target
- create a mask for the blendshape to control the transition from flat to crumpled
- use this blendshape as a target for the Vellum Rest Blend.
The bonus here is that it seems to calculate 'good' restlengths for the entire shape, and doesn't suffer the swirly phantom forces the middle setup has.
John added that there's more than just restlength at play under the hood (things like restvector and restmatrix which are hidden away from the user), which is probably why my brute force setting of stuff causes artifacts.
He also explained that while I assumed the Vellum Constraint Properties would do the prim id matching for you, it doesn't, as such, copying the vex from the geo wrangle and pasting it into the vexpression for a VCP will work too. Just remember to set the correct input, and to set the group to 'bend' at the top of the parameters.
Carpet roll
Download hip: vellum_carpet_roll.hip
Simple but fun. Bend sop to roll up a grid (don't look too close, its not physically correct, the shame), and soft vellum 'pin to target' to make the sim follow the animation.
2 minutes to setup, then 20 minutes tweaking density, gravity, drag, constraints strength etc to make it look juuuuuust saggy enough.
Zipper
Download hip: vellum_zipper_v01.hip
 Could also be called 'healing a tear' or 'per frame vellum control', these tips are more about workflow than the actual example.
Vellum is surprisingly tolerant when animating attributes it cares about. What can be a little confusing is how to actually get those animated attributes into the system, and knowing which of the many constraint setups to use.
Before getting to the vellum bit, we need to create some zipper geometry that'll be easy to control. The generically named edge fracture sop is great for this. It's a vellum helper sop designed to break up shapes along poly edges. By default it'll break up into pseudo Voronoi tiles, but you can turn that off and feed it a secondary curve; it will split vertices in your shape near that curve.
To drive an animated value along that curve could be done in many ways. Here I use a carve sop to grow the line, then a sweep sop to convert it into an animated sausage of polygons. I can use a distance from geometry sop to measure how far away each point on the cloth geo is from the sausage, stored as @dist.
On the vellum side, these split vertices could be joined with a weld constraint, or a stitch constraint.
Weld constraint
Weld will do what it sounds like, actually alter the vellum geo to fuse points and rebuild the nearby polygons so that they become a single piece of geometry. As per usual it doesn't actually do this within the constraint sop, it does something to the geo so that later on the vellum solver knows to do things. So it's worth looking at the geometry spreadsheet to see how its passing that information down.
The key takeaway from this zipper section is:
To manipulate vellum constraints, look at the geo spreadsheet, look at the points+prims on the vellum geo, AND look at the points+prims on the constraint geo until you find something interesting. That will give you clues of how to proceed.
For a weld we get lucky early, straight away on the vellum geometry at the point level is a new attribute, @weld. This seems to be storing an integer, likely the ptnum of the other point to weld to. Any point that isn't welded has a @weld value of -1.
I could copy the @weld values to another attribute, @weldtarget, and set @weld to -1, which should allow the broken edge to fall apart. Then inside the vellum solver, if I can change @weld to the correct value over time, those points should pop together, getting that zipper effect. This prep is done in a wrangle just before the vellum solver.
The vellum sop solver works like most solvers in that by default it won't read animated inputs by default, so if we want to have animated values, we'll need to dive inside.
A geometry wrangle is connected down here. It is setup in the following way:
- data bindings tab, geometry is 'Geometry' (the default)
- inputs tab, first input is 'myself'
- inputs tab, second input is 'first context geometry' (so its referring to the first input of the vellum solver)
- code tab, run over is 'points'.
The vex code in the wrangle is pretty simple; read @dist from 'upstairs' in sops. If @dist is less than a certain threshold, update @weld:
vex
@dist = point(1,'dist',@ptnum);
if (@dist<0.01) {
  i@weld = i@weldtarget;
}
@dist = point(1,'dist',@ptnum);
if (@dist<0.01) {
i@weld = i@weldtarget;
}Run the sim, points weld away.
However....
If you play with this for any length of time, you'll spot issues. The weld is a binary system, either points are welded or they're not. This means the weld will 'pop' into effect over 1 frame, which can look a little nasty. This can also cause issues if the cloth is in a vaguely tangled state just before the weld. The weld operation takes the shortest path it can, baking in tangles. Imagine an impatient dad zippering up his kids jacket, and the snagged zipper issues that'll cause. You can help it by taking more substeps, but it gets slow. If your can get away with it use weld, but otherwise, you might need to use...
Stitch Constraint
A stitch constraint creates a polyline to pull two points together. Think of it as a little elastic cable. You can use @stiffness, @restlength, @thickness to control the properties of this elastic, ideally we could animate the @stiffness of this to start all floppy and weak, then tighten up. Because this isn't a purely on/off weld, it should get a more controllable, less poppy result.
Like before, inspect the geo spreadsheet after the constraint sop to see what needs to be done. Look at the points on the geometry, there's nothing in there about stitch. Nothing on the prims either. Hmm. Append a null to the pink constraint output, look at the points. Nothing there. The prims? Ahhh here it is. It can help when doing this step to toggle the bypass flag on the earlier constraint nodes; bypass the cloth, then toggle the stitch constraint, you see this is where the action is. These prims have @stiffness, and a @type string attribute of 'stitch'.
Some more prep work is needed here. The distance from geometry sop needs to run over the constraints geometry, so we'll be working with the pink wires. Distance from geometry stores @dist on points, so we need to promote that to prims. Finally we setup a wrangle to copy @stiffness to @stifftarget, so we can refer to it later.
Inside the solver is another geometry wrangle. Knowing that we need to be modifying the constraint prims, this requires different settings to the weld setup:
- data bindings tab, geometry is 'ConstraintGeometry'
- inputs tab, first input is 'myself'
- inputs tab, second input is 'second context geometry' (so its referring to the pink wires from sops upstairs)
- code tab, run over is 'primitives'.
Most of those make sense, but how did I know about the 'ConstraintGeometry' thing? There's two clues here. One is to look in the geo spreadsheet while inside the vellum solver, expand vellumobject1. You can see several things, among them are 2 entries, one called 'Geometry', the other is 'ConstraintGeometry'. This is how vellum tracks the two separate things. By default a geo wrangle assumes you're wanting to affect the actual sim object, ie the Geometry, here our needs are different.
If you forget this or find the geo spreadsheet scary, the other clue is to pup down a VellumConstriantProperties node. Jump to it's bindings tab, you'll see it points to 'ConstraintGeometry'. Makes sense considering what its purpose is.
The code here is a little more involved than the weld one:
vex
int pr = idtoprim(1,@id);
@dist = prim(1,'dist',pr);
float min = 0.0000000001;
float max = 1;
@stiffness = @stifftarget * fit(@dist,0,1,max,min);
int pr = idtoprim(1,@id);
@dist = prim(1,'dist',pr);
float min = 0.0000000001;
float max = 1;
@stiffness = @stifftarget * fit(@dist,0,1,max,min);My first impulse here was to use...
@dist = prim(1,'dist',@primnum);
...but got strange behaviour. This is because vellum (and dops in general) doesn't make any guarantees that the geometry down here will be identical to the incoming sop geo. Remember, dops could be creating new vellum geo every frame, or new particles, or deleting rbd objects. You can't just use @primnum.
Instead, you use the standard sops trick of pre-tagging stuff with @id (or whatever, but @id is the one most people use), then lookup by id later to get the primnum you need. In fact the operation is so common that vex has helper functions to do this for you, idtoprim() and idtopoint().
So, back in sops make sure to store id (I use an enumerate sop), then down here lookup by id, read @dist from the correct prim, and use that to drive stiffness.
Incidentally this implies the earlier weld setup is also likely to break if you do anything special. It's an exercise for the reader to go back and add @id to the points, and update the geometry wrangle!
Details
There's a few other things to be aware of:
- Using type='stitch' in the group field to limit the wrangle to just the stitch prims
- Adjusting the stiffness values so that they pull a little more slowly. The default strength is 10^9 strong,ie a 1 with 9 zeros after it. I was doing a fit range of a multiplier between 1 and 0.1 This would knock the stiffness down to 'only 10^8. Either you need to set the range crazy small, so its 1 to 0.0000000001, or adjust the stiffness to be not so impossibly high. The range values used by vellum constraints ( 10x10^9 through to 10x10^-9 ) can need some extra attention.
- Don't let stiffness get down to 0 though! That often makes vellum unhappy, and things explode.
- Never just look at the first frame of a sim when looking in the geo spreadsheet. Often the first frame is just for import and initialising, the second frame actually calculates attributes and is better for debugging. Don't be like me and stare at the first frame for hours wondering why my attributes weren't correct...
- Try changing the switch sop to use the draw curve. It works, but gets tangled in both setups. More substeps? Slower adjusting of stiffness for the stitch constraints to give the cloth time to untangle itself?
- I tried some stuff post sim to fuse the stitch setup, works for the simple straight line tear, fails for the curved one. Hmm. Maybe a combo of both a stitch AND weld? So stitch to pull it together slowly, weld just for the final 1mm snap together, so the pop won't be so visible, and it'll do the proper in-sim fix to the surface?
The core ideas here should help with trickier setups; work out how a given vellum constraint is setup, then exploit that down in the vellum solver.
Note that if you want more in depth tutorials on this stuff, Paul Esteves has great setups on his Patreon. Go there!
https://www.patreon.com/paulesteves28
Body deintersect
Download hip: vellum_body_deintersect.hip
TIP
After I wrote this example, someone pointed out that this idea is covered in the sidefx docs already. I'm an idiot. Their notes are more precise than mine, but I guess you can still use this hip as a starting point.
You'll find the sidefx notes at https://www.sidefx.com/docs/houdini/vellum/intersect.html
I come across this issue every 6 months or so; I want to sim some cloth, but the animated body I'm using has all kinds of self intersection. How to fix?
This is one of those niche Houdini problems that I'm always surprised has no easy answer (deintersecting scattered shapes is another one, rbd being so hard is another). There's a bunch of clever procedural solutions out there using intersection analysis, sdfs, smooths and whatnot, but I always seem to hit edge cases where those methods fail.
Enter this hack. I can't remember if a co-worker or discord person suggested it first and I dismissed it, but I'm fairly sure I only tried it after seeing bubblepins on youtube offer a teaser of the approach, so I went and investigated it myself.
Simply, convert the body mesh to vellum, use itself as a soft pin constraint. As always there's esoterica to deal with, this hip I think covers a lot of those. Trusty mocapbiped is always full of niggles and gotchas.
Vellum expects vanilla polys, mocapbiped here is a polysoup, hence the convert sops. Also vellum works best when it starts from a deintersected pose; this clip starts with the fingers clipping the thighs, few other annoyances. As such I blendshape from the rest pose to the anim over the first 10 frames.
Vellum prefers evenly meshed inputs; mocapbiped has big polys on the legs, small polys on the fingers, they'd get snagged in the default layout. A remesh and pointdeform takes care of that.
The cloth config is vanilla, except for the pin to animation section, which has pin points filled out with an asterisk, pin type 'soft', and match animation enabled.
The solver has gravity turned off, the rest is at defaults.
After the sim I use a blendshape to compare before/after, a wrangle to preview the deformation as colour, and an intersection analysis to see where the points are actually clashing. If you use the blendshape node to slide between pre and post sim, you can see the knees and thighs have a lot of collision that vellum solves. Is the vellum fix physically plausible? Lord no. Would it be enough to get a cloth solve through? Maybe. You could do a lot more with this setup, I leave that as an exercise for the reader:
- Use a delta mush pre/post vellum to help calm things down
- Intersect analysis early on to identify the intersections first, limit vellum/smooths etc to only those zones
- Incorporate some of the sdf/peak tricks others do
- If you get chattering with super compressed parts being held for a long time, often extra substeps can fix.
At any rate, this is a cheap and cheerful fix, worth trying if you're in a pinch.
John Lynch Advanced Vellum workflows
https://youtu.be/NwabG-znu9Y - part 1 for H17
https://www.youtube.com/watch?v=zPQZ8KJTjzo - part 2 for H18, starts with trees
https://www.youtube.com/watch?v=5s8I2fs8kMs - part 3/4 for H19.5, tets and shape match
Just some scribbling while I watch the masterclass for the 5th time, I keep forgetting the important bits...
Nothing revelatory yet from my part, this is all just bullet points from John's presentation! I'll do another sweep at some point to add gifs and stuff. John has made a collection of hips to go with his presentation, you can find it here: https://www.sidefx.com/tutorials/advanced-vellum-workflows-h17-masterclass/
Integration
- 1st vs second order integration. 1st is what old grains used, vellum default is second. pbd projects where the particle will go based on its velocity, then takes short steps moving towards that goal until its 'solved', or you run out of iterations. 1st order integration doesn't take into account curved motion, ie constraints, so often inaccurately predicts where the particle should go. This means 2 things, it requires more iterations to get to a good result, but its also constantly losing precision, losing energy, getting less accurate results that take more time.
- second order does a more accurate prediction of where the particle should go, meaning both less solver iterations required, and the result is more accurate. The example is a swinging rope with only gravity; 1st order loses energy and stretches, 2nd order suffers that much less.
- This can be visualised by peeking at @Ppre (P predicted), compare results.
- 5 substeps is recommended, make sure to lower constraint iterations to compensate, otherwise you're needlessly oversolving
- in real world sims, turn on wind drag (default 0.1)
- xpbd /2nd order's kryptonite is collisions; without being taken care of it does a bad job of predicting where things will go post collision, and can look like bouncing/too much energy. Max acceleration can fix this, 100 is the default and possibly too high, lower to 25.
Graph coloring
- Way to split apart constraints into batches that won't directly affect each other. Why? So they can be run in parallel on the GPU
- LIke usual GPU stuff you want to send a few batche of lots of things to the GPU only once, vs lots of little batches once, or worse, lots of little batches multiple times. Graph colour should generate as few sets as possible, and if you want to update stuff over time better to change attributes rather than be adding/deleting primitives, which require a expensive GPU update
- visual analogy is funky tartan patterns; each prim doesn't have any neighbours with the same colour.
- default will calm to around 8 batches
- the batch color sop is clever to understand connectivity and whatnto, so more separate pieces of cloth don't slow down as linearly as you'd expect
- hair batches even more efficiently, often batches of 4
- tet meshes graph colour worse, cos there's more internal connections, eg 80 batches
Solver iterations
- 5 substeps at 20 will get better results than 1 substep of 100 (lower velocities per substep, therefore predictions more accurate, therefore less work for solver and constraints, but of course slower sim times)
- smoothing iterations = how to solve the unsolveable. eg you have infinite stiffness constraints, but you've pulled your cloth into a shape where they HAVE to stretch.
- example of cloth with only distance (stretch) constraints, no bend, but reduce rest length to half. The solve is biased so that later graph colour batches are correct, but the first ones run are undersolved, get unnatural prim sizes where some are big, some are small; those sizes correspond to the graph colouring batches.
- smoothing iterations just averages the result and distributes evenly.
- can't just use this by default though, as it takes too long to converge.
- example here was sphere bound over a pig, convert to cloth, high stiffness, rest length low, collide. Ears get bad stretching. Boosting smoothing iterations helps, but doesn't eliminate.
- this is due to undersampled collisions. Collisions are expensive, and by default are solved less often than constraints. in this case, boosting constraint iterations fixes rest of the issues (the demo went up to 50)
Jeffs Iteration Crib Notes
How to deal with Iterations:
- Substeps - More expensive, but gives a better solve - especially for higher stiffness values
- Constraint Iterations - Increase for higher stiffness value to control excessive deformations - great for cheaper solver at high resolutions
- Smoothing Iterations - smoothing ops, to smooth out errors of excessive deformations, or constraint errors
- Collision Iterations - Uses the Detangle sop - lower frequency iterations - complicated and time consuming - increase when collisions are fighting against constraints or other collisions
- However, its probably better to increase substeps and decrease constraint iterations for a more accurate solve - and to reduce load on the constraints - but is more expensive
Pins
- the way to make old grains follow animation was to change mass to to 0. Don't do that with vellum (ok you can, but it's discouraged)
- instead look at the pin types, the permanent type uses pops 'stopped' to just follow animation directly for 100% 'this follows target animation'.
- as a matter of style, vellum constraints assume you're feeding them static geometry. when passed to a solver constraints generally only set the initial state, so having them recalculate over animated geometry is a waste. You you need to feed a solver animated geo, you can use the target option instead.
- That said, if target isn't specified, and vellum is expecting animated geo, it looks to the first input. A valid workflow in that case is to timeshift lock stuff, setup your constraints, then reapply animation just before the solver. There's no penalty for working that way.
- soft constraints when done on the cloth node use the same stiffness values as the rest of the cloth. if you don't want that, use another vellum constraint node in 'pin to target' mode, set the stiffness you want.
- to remove these over time, dive inside the solver, use the 'vellum constraint properties' dop. make sure to set a named group earlier in sops, refer to it down here, and towards the bottom of its parameters you'll see a 'remove' toggle. use an expression on activation at the top of the dop node like $SF>30 to animate it.
- making cloth from patterns?
- planar patch from curves, joined with vellum constraints, weld points.
- use the auto generated groups for left/right/top/bottom to setup weld pairs
- vellum post process, apply welds to hide the seam completely, do proper subdivision as a single surface
- simple tearing, on the constraint, enable 'breaking', set a limit. on the solver, visualise stress, set the upper limit to the breaking number you set.
- to keyframe in dops, vellum configure constraints, use a wrangle or something to set weld to -1 at a given time.
- stitch points is a soft (like a spring) constraint vs the hard weld constraint. softly bind the front of a jacket, collar to shoulders etc
- 'rewire verticies' is the sop under the hood for a weld. it detaches the first point completely, and binds everything to the second. in sim the first point position is updated, but is floating free. its updated in case you decide to use breaking constraints, where the prims will be reattached to the first point again.
- edge fracture is the node to break a shape up into triangles of cloth, ready to be welded and go through the process above.
- if you use the 'scale by attribute' option for vellum and that attribute doesn't exist, it defaults to scaling by 1.
- example to animate welds off used a group sop with bounding box, animated the box. in vellum use a geo wrangle to look up that sop, if point in group, set weld to -1
- edge fracture also lets you define a curve input. can use this to draw on surface, then fracture on that curve
- balloon inflate and burst example: (about the 1h17m mark)
- inflation done in dops, configure constraint, animating rest length to increase over time.
- if weld break in this state, the balloon stays kind of rigid and full. the pressure constraints don't understand the baloon has popped, still trying to measure the volume and apply their constraint.
- instead use a wrangle to compare number of welds to input geometry; if different, delete the pressure constraints.
- to make the balloon fly across the room rather than just collapse, 2 things are done; detect where the broken welds are, and generate info to feed to pop wind to boost it in a certain direction
- broken welds are put in a 'broken' group, can get the average location of these to setup a vector
- this vector is stored as v@air
- in vellum constraints, drag for normal vs tangent is what gives lift, confetti motion. it links to pop wind, hence here he drives the pop wind with the @air vector
- edge fracture with draw curve, you don't have to have curves fully intersect; you can just draw a small curve in the middle of a section, it'll put an isolated tear at that point which can be welded
- to use voronoi shapes with edge fracture, delete inline/shared points (divide -> remove shared edges?) , use that as a curve input to edge fracture
animating constraints
- best done in dops with 'vellum constraint poperty' dop
- similar to pop property which you've never used. 😃
- thing to keep in mind is to not be changing constraint count, geo count. that forces a graph recolor, a recook for the gpu, that kills performance
- better to be changing attributes, leave geometry alone. JUST LEAVE IT ALONE
- example here is a bed-sheet reenacting the mission impossible scene; its suspended from wires
- set rest length to 0.5, it smoothly moves up
- why smooth? high damping on the constraints, low stiffness. remember that trick.
- aha, keyframing restlength on the cloth constraint has no effect. vellum just looks at the state on the first frame, ignores the rest. explains a lot!
- could randomize those initial restlengths by inserting a attribute randomize, multiply for example
- dive inside the solver, make a vellum constraint property (VCP), set the group to match the constraint, enable restlength, can keyframe this.
- fiddly example to lookup animated attributes from sops within the VCP vexpression, match from point to constraint prim, change lengths.
- vellum rest blend (VRB) is another way to feed animation, similar to wire/fem
- [ question: does that only affect profile+inflation, or can it translate, follow targets? ]
- VRB in sops can be used to 'bake' in an initial state, like a drape
- complicated example here with trees, tori, cloth, need to pull that apart
dynamic constraints
- 1:56:58
- stuff made during sim like objects get close together, that sorta thing
- Vellum Constraints DOP (VC)
- sticky collisions this way
- example of hair bead curtain over sinewave swinging sphere
- VC node, each frame, group type primitive, target path chref'd to static object sop path
- 'keep unique within group' enabled, will make sure constraints are only made once instead of the usual solver replication/breeding madness
- example using VCP to get stretchy non-breaking tentacles
- he uses 'dopconstraintgeo', its the same as using 'opinputpath' as far as i can tell
- to make sticky wall walkers, ( 2:10:00 ) make a vellum constraints in dops, merge it with your vellum source. set the following:
- create constraints on 'each frame'
- constraint type 'attach to geometry'
- target path your wall (its the third input to my dopnet, so `opinputpath('..',2)`
- max distance short, i use 0.012
- low stiffness, say 50
- breaking enabled, low threshold of 0.01
- hoop toss, throw lots of loops of rope/hair over a column ( 2:13:30 )
- in vanilla state its all a bit bouncy and jittery
- quick way to fix is to enable auto sleep on the solver, set a velocity threshold. Works, but a little heavy handed (its setting permanent pin constraints by setting @stopped)
- can see the autosleep working by enabling 'pin to target' in the vellum object visualizer (might need to expand the constraint radius a bit)
- getting fancy is to use the layering+layer shock; add a point attrib on the incoming geo (not the constraints) which is i@layer = int(@Frame);. The layer shock feature of the solver will detect this, and for collisions treat geo with a higher layer as 'lighter', imparting less energy.
- going from default, to layer attributes, to auto sleep, the visual feel is water balloons, vs water balloons filled with gravy, to water balloons filled with quick drying cement; each one has less energy, less oscillations than the previous.
- handy cheat for working with hair in dops for viz; enable thickness, also enable 'extrude' checkbox at the end to get tubes rather than spheres per point
- the cunning solution here is to create a manual constraint setup that is like autosleep, but soft pin constraints with low stiffness and high damping. Create a pop group named 'slow' set its vexpression to if (length(@v)<0.01) ingroup = 1;. Append a vellum constraint:
- create constraints: each frame
- constraint type: pin to target
- group type : points
- group name : slow
- pin type : soft
- stretch stiffness: 10
- damping ratio: 0.5
- balloons 2:19:35
- strings are setup with sop vellum constrain hair
- balloons are setup with sop vellum constrain for cloth and pressure
- groups are made for string start+end, balloon knot
- separate vellum source nodes are used for strings vs balloons
- means can use isolated pop forces for each; strings get drag, balloons get pop wind on +Y
- dop vellum constraint weld from string end to balloon knot (mentioned elsewhere that its better to constrain from string/hair to cloth),
- dop vellum constrain string start as a target constrain to lock to origin, this will set @stopped to 1
- can use a pop wrangle to set stopped to 0 after a given time to detach balloons:
- float t = fit(@Frame,30,70,0,1);
- @stopped = rand(@ptnum)>t?1:0;
Plasticity
- Can have the rest state for geometry change over time, mostly in reaction to forces and collisions. So the rest angle can be adjusted so things stay bent, restlength can be adjusted so that things stay stretched.
- threshold, rate, hardening are the primary controls:
- threshold : what is the angle/length ratio beyond which rests values will start to be altered
- rate : how quickly will it blend to that updated rest value; metal will update quickly, springy bamboo very slowly (it can be bent for a long time and still return to its original state. Higher numbers mean it'll be bent (and stay bent) more easily.
- hardening : how will it behave after being bent; can use this to dampen down how much plastic-affected grass will continue to be moved by wind, for example
- the grass example is fast and stable if you give it appropriate initial conditions; no self collisions, scale is important, not too many points on the line. Like most of vellum, stray beyond that and you'll spend a lot of time wedging and testing.
- quick example setup:
- line, 10 points, length 0.2
- group the root point
- scatter lots of them on a 2x2 grid
- hair constraint:
- pin to animation, group 'root'
- bend stiffness 10
- enable plasticity
- threshold 6
- rate 5
- on solver:
- self collisions disabled
- no ground plane
- gravity set to 0
- inside solver, add a pop wind, wind velocity -0.5 on x, 0.5 noise
- keyframe a sphere to run over them, the stalks will bend down
- as mentioned, turn on anything seemingly innocuous (ground plane, gravity), get all kinds of weird stretching or jittering.
- can take this sim, timeshift freeze it, gamedev sweep into lines, point deform for simple renderable setup.
- false colour mode on the solver visualize tab, 'bend angle', can be used to determine a good threshold for plasticity.
soft bodies and tets
- your assumption that there was a Right Way you were missing, no, its as it should be:
- take your geo, remesh it, solid conform it. VC distance for surface behavior, VC tet volume for volume, sim. Point deform your original mesh by this.
- need to play with the tet fibres stuff next...
grains
- can do funky fresh things with grain glue, if you cluster the point the VC glue at those clusters with low stiffness, you get clumping
- make sure to set the group type to 'points', even if you don't use groups, otherwise the constraints won't be made properly.