Appearance
Lighting and Shading (Old school style)
What? You're looking at this page after the year 2022? Wow.
Almost all of this page is depreciated now. Houdini's workflow for lighting and rendering was unchanged for many years, built around the /obj context for scene organisation, rops for rendering, using Mantra as the renderer.
Since 2019 Houdini has been transitioning to Lops, aka Solaris, a new lighting/layout context based around USD. The guts of it are built around USD, and a new renderer called Karma (Mantra is basically end-of-life now).
If you're just after the lighting+rendering side, maybe start with the LopsLightingQuickstart guide.
Anyway, there's still a few handy tips on this page, so it'll stay here for a while.
There's probably other quick mantra light/shade/render overviews, but I couldn't find any, at least not in the impatient 5 mins or less category that I require. This is my usual kick-the-tyres process I do for any new renderer, thought other curious lighter/shader folk would find it interesting.
Build a simple test scene
Summary: Teapot on floor, with sun, sky, camera.
These quick tuts all assume you're using the 'Build' desktop ( Windows -> Desktop -> Build ), youre famliar with the tab menu and basic houdini navigation.
- Create a grid
- Create a platonic solid, dive inside, set its mode to teapot, radius 3
- Dive up, translate it up about 1.39 so it sits on the ground
- Create a distant light from the shelf, rotate and translate so it looks nice, tint it yellow
- (hint: click the mini colour wheel, then tap where it says RGB, then HSV, until it reads TMI. This is a much better slider for light colour, the first slider controls colour temperature in warm/cool)
- Create an environment lights from the shelf, tint it blue
- Frame the camera nicely, ctrl-click the camera shelf button which will duplicate a camera for you with those settings
Setup a render node, render
Summary: Create a ROP ( Render OPerator, ie, a render globals node) in PBR mode, which is the preferred renderer these days in most cases.

- Create a rop network. While you can create rops in the high level '/out' network, I find it easier to keep track of everything in subnets, the jumping around becomes more localised.
- Dive inside, create a mantra node. The default settings will point to the camera you just created (/obj/cam1).
- Under the 'rendering' tab , set the rendering engine to 'physically based rendering', (called PBR for short by the cool kids)
- In the main view, switch to the render view tab
- Hit render
- Gasp in awe at your sunlit teapot
Material creation
Summary: Create a material from the palette, assign.
Get back to the top of the /obj network if you're not already,
- Create a SHOP network
- Find the 'Material Palette' tab on the lower-right tab
- On the right side of the material palette, click the upside-down arrow next to the /shop/ title to collapse it. You should now see that closed.
- Click the triangle next to /obj/shopnet1 to open it (this is the shopnet you just made)
- On the left, find the mantra surface node under general (6 from the top)
- Drag it under the /obj/shopnet1 title. After a short delay, you'll see a shader square named 'mantrasurface'
- Go back to the network tab, dive into the shop network, there's the material you just made.
- Drag the mantrasurface node directly onto the teapot (can do this in either the opengl view or the render view). This will assign the material.
Another way to assign materials is directly from the object node:
- Go back to the /obj network, find the grid node, go to its 'material' tab.
- Click the mini node icon, a selector will appear.
- Select /obj/shopnet1/mantrasurface'. Enable 'export relative path', hit accept.
If you've left the render view running, you should see the updated material on the objects.
Things to note
The material palette is similar to the maya visor, ie, a place to get and store presets. Like the Visor, its clunky and no-one really uses it. For some strange reason, SideFx decided this is the place to store the mantrasurface node, rather than the expected tab-complete menu in SHOPs, which itself is unusually empty. Fixed in a future version perhaps? (note to self; find a way to add nodes to the tab menu...)
I find using relative paths ( ../shopnet/mymaterial ) easier to read than explicit paths ( /obj/shopnet1/mymaterial ). Also means if you have to copy and paste setups, its less likely to clash with existing nodes in other shots.
The mantrasurface node is the latest attempt by SideFx at an all purpose, mia_material/vray/arnold style all-in-one physically correct shader. It does diffuse, 2 reflect (for base and clearcoat), refract, translucence, emission, opacity, with support for maps on most parameters. The one in H14 has had a bit of a tidy up, the tabs are cleaner, shader parameters better named than previous versions. Prior to the mantrasurface node was the surfacemode node (which you can still find in the palette underthe mantrasurface)
A great feature of the mantrasurface node is you can dive inside and see how it works. A horrible feature is that its pretty messy under there and a bit overwhelming at first! Don't try and understand it all in one hit, its better if you have a specific interest to just dive into that section and poke around, most of it is clearly labelled.
Other Houdini users have made their own versions of an all-in-one physically correct shader. The layered pbr shader on the orbolt store is very nice. A key difference is that its written in vex rather than vop nodes, so isn't designed to be pulled apart. There's also been attempts to recreate the disney bsdf shader, also worth a look. (provide links here)
Material attribute overrides
Summary: Take a material attribute name (say baseColor), create an attribute with the same name at an object or point level, give it a new value, and it will override the material default at that object/point. Very powerful!
Override at object level
- Edit the base colour of the material, render. Both the teapot and floor go green.
- Hover over the baseColor label, note that its name is 'baseColorr baseColorg baseColorb'. ie, its a vector of name 'baseColor'.
- Select the teapot, go to the material tab
- Click the dropdown at the far right of the material name, choose 'select and create local material parameters'
- In the popup, choose 'baseColor', Accept
- Make this colour red
- The render view now shows a red teapot and green floor, even though both are using the same material
From that same dropdown you can choose to replicate the complete material interface on the object, or reset it to defaults, or remove the local overrides. Next we'll override at the point level.
Override at point level
- Dive into the grid object, append a point vop, make it the renderable/displayed node
- Dive into the point vop
- Create a bind export node, set type to 'color', name 'baseColor'
- Connect P directly to the bind export node
- The 'baseColor' material attribute for the grid has been overridden by the point colour.
The minor complication of point level overrides is knowing the name of the attribute you want (I find the tooltip hover the laziest way), and setting that attribute (my preference is with a point vop, that way I can drive it with vop textures or other tricks).
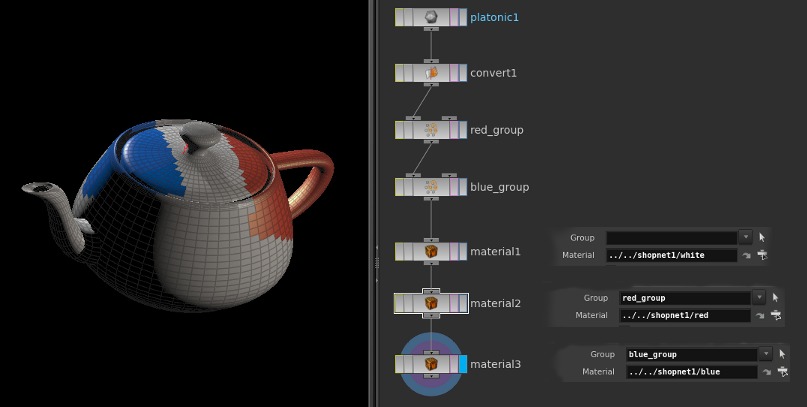
Assign materials to faces
Summary: The material sop node lets you do per-face assignments.
 Example scene: per_face_material_assign.hip
Doing per-face assignments in maya is risky, changing them with render layers is disasterous. Doing the same in houdini is perfectly fine. Append a material sop, tell it which material you want, done. You can also assign to face groups if you have them defined.
- On left hand side of viewport, make sure the mode is primitives (or hotkey '4' in the viewprot)
- On left hand side of viewport, click the arrow to get into selection mode (hotkey 's' in the viewport)
- Drag a rectangle to select some faces
- Tab IN THE VIEWPORT (important!), choose 'group', it will make a group with the faces you chose
- Do the same with another selection of faces
- Append a material node, choose a material, and choose a group from the group dropdown. The material will be limited to just that group.
Point Colour (Cd) and Alpha
Summary: Colour attribute is 'Cd', alpha is 'Alpha' (note the capital-a).
The mantrasurface node is setup to read point colours and alpha if they exist (they'll be multiplied against the shader colour). The only trick to remember is to use the right attribute names. Colour is easy enough, as within a vop network its listed on the output node: Cd. Alpha isn't listed though, everyone goes through the same false start of trying the seemingly obvious (Af), then something else (af?), other things (opacity?) until finally remembering the right format: name 'Alpha', of type float.
AOVs or Extra Image Planes
Houdini calls them Extra Image Planes, everyone else calls them AOVs (a renderman acronym for Arbitrary Output Variables). A little more work than in other packages, but the flipside is a lot more freedom to do whatever you want (like most of Houdini really).
Defining AOVs in a shader
In a shader, anything which you connect to a 'bind export' vop becomes available to use as an AOV.
- Dive into the shopnet, then into the mantrasurface shader
- Create a 'bind export' node, name 'myaov', type 'vector'
- Connect N to its input.
You now have 'myaov' ready to be used as an AOV.
Add AOVs to Rop
- Dive into the ropnet, select the mantra node
- Choose 'Image' Tab, then 'Extra Image Planes' sub-tab. There's some pre-defined AOVs, but we need our new custom one.
- Click the + button next to the 'Extra Image Planes' Field, a new sub-collection of parameters will appear
- Type 'myaov' into the vex variable field
- Make sure the vex type is 'vector type'
- Render. Pop out the view bar at the top of the render view (under the render button), and where it says 'C', use the dropdown to choose 'myaov'.
- There's the AOV you defined earlier.
Mantra, like most modern renderers, doesn't incur a big speed hit when adding AOVs, more a memory and disk space hit. Its common to add several standard AOVs automatically to most materials and rops, as they're so useful in compositing. Usual suspects are P-cameraspace, P-worldspace, N-world, Diffuse, Reflect, Indirect.
Houdini rendering setup from a maya perspective
Questions to answer:
- load in published assets (cameras, animation/FX alembics, vdb volumes, shaders etc)
Yes to all the above. The last time I used Maya it was still in the mindset of 'you load a thing in, thats a one-shot deal, now it belongs in the maya scene. You don't get to swap out for another obj on disk, or another fbx, or another camera'. You could use referencing of course, but that's specific to maya mb or ma files, and was super brittle and prone to failure. You could refer to particle caches or occasionally ncaches in a more general hot-swappable sense, but it seemed fraught.
Houdini by comparison is completely built around this idea of 'load stuff from anywhere in a myriad of formats, process it, spit it out as something else'. The file sop, the general purpose get-something-from-disk loader, can handle houdini's native geometry format ( bgeo, which in itself can be polys, or particles, or volumes, or any combo of the above), but also abc, and vdb, and more esoteric formats like fbx (rapidly getting better and better due to Sidefx's focus on games, which uses fbx a lot), and plenty of esoteric formats ( obj, ply, collada, blah blah)
The upshot is that you can load a high level format like alembic or vdb, and build a network that does stuff to it, assigns shaders, hides/shows things, and preps it for rendering. If you design the network in the right way, you can swap the path on the file rop, the rest of the network just updates. Best analogy is nuke; you can use it in a super custom way with lots of manual roto and paint nodes, so that if you swap the initial read node you have to start from scratch, or you avoid manual brittle nodes, keep your comp network procedural, and you can reuse the setup across similar shots.
Alembic itself is a special case. Alembic can be brought in via the file sop, as I mentioned above, and it essentially brings in whatever geo you have as a point cache. The geo itself will have lots of attributes (think like particles and per particle attributes), and houdini has excellent tools for manipulating data in this format. That's one of the key mode switches of moving from maya to houdini; maya is mostly high level transforms with mesh data carried underneath, and you mostly work at that top level. Houdini is better down below, so you tend to bring lots of geo into a single transform (which you barely touch, it functions like a null at the origin normally), while you do lots of manipulation to the mesh data underneath.
Anyway, you don't have to do this. Alembic can also be loaded as a high level thing if you need it, and houdini will create the full transform heirarchy with local mesh data. Normally this is avoided, unless, and this is a big unless. you need cameras. Cameras are inherently not mesh data, a camera is a fancy transform, so this is how you load camera data. While this method isn't as flexible as the other, it still allows the hot swap reloading for cameras like the file sop method.
The other thing that makes Houdini good for mass shot work is its heavy unix underpinnings. Again last I checked maya was terrible for data based file paths, both for input and output, so if you wanted to define a path to a shot cache via code, you need python/mel to be fiddling file paths.
Houdini on the other hand allows for unix style variable substitution in paths. A path to a shot cache might look like
/jobs/$SHOW/$SEQ/$SHOT/assets/${CHAR}.abc
And either from your shell, or from houdini's own environment variable editor, or from an asset management tool like shotgun, you'd have all those variables defined, like:
$SHOW = beemovie2$SEQ = sk02$SHOT = sk02_050$CHAR = joe
You can middle click on the file path, and see the path get the variables substituted in. Again, the idea is you setup the file sop to be procedural and data driven, and let the system swap the paths around for you.
Shaders are of course more render engine dependent. This is where I must confess I don't do much setup (I've been spoiled in my film fx career, and we have lots of pipeline tools to pre define shaders, or its handled downstream), but you've got a few options here. Maya uses shading groups, which is a set containing a link to a shader, and a link to either transforms (preferred) or shapes (also ok), or sub-shape selections (fraught). Houdini lets you assign shaders to the top level transform, or in that per-particle attribute style I mentioned earlier applied to the polys, or using stylesheets, similar to web css stylesheets. The latter is very powerful, but a bit arcane, I only know a few studios using it. Yet another thing you can do is material parameter overrides; say your material has an attribute called 'basecolor', and its red. If you have an extra attribute on your transform also called 'basecolor', and its green, because the names match, it will function as a local override. You can even do this per poly, which is pretty cool. This can also be defined via stylesheets if you want.
- connect stuff in a procedural, non-explicit fashion (like dynamically assigning shaders to geometry based on names/attributes/metadata/whatever)
What I alluded to above; houdini has excellent geo data manipulation tools, so within your sop network (the closest thing to maya's construction history but much cleaner to use and more powerful), you can put in things like switch nodes, and drive that switching from an expression, so that if its shot 10, it will assign materialA, but if its shot 20, assign materialB. Or you can do assignments based on geo attributes, so if the geometry sub-name is 'fred', assign the fred shader, but this can be as baroque or as simple as you want; again the maya particles analogy comes into play; you can do lots of 'if this do that' behaviour with particles, imagine that times 100, and to drive whatever attributes, wherever.
- keep a 'root' assembly/tree (like everything needed for a particular sequence of shots), that can then be branched out into multiple shot outputs with local overrides on attributes, caches and render output.
not so much. you can kindasorta do this, better than maya can, but not in the way katana can. you can do tricky tricks with branching switch nodes based on shot variables and stuff, but its not elegant.
- defer loading to rendertime for heavy assets
yep. right on the file sop is a toggle, 'delay load geometry'. this also has the effect that when translating geo to pass to the renderer, it will just use a reference to the cache on disk rather than trying to load it all into a big binary blog, so translate times are quick, and all the heavy lifting is left to the renderer.
Renderstate vop
 Download scene: renderstate.hipnc
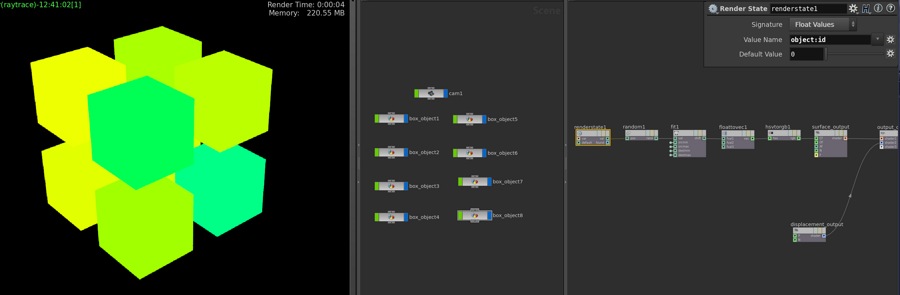
When people first start houdini, they tend to treat it like other apps, and make a separate high level object container for each 'thing'. Eventually you realise its easier and more controllable to keep everything within a single object network, and use point/prim attributes to do things like drive colour variation and whatnot.
But what if you do need to keep things seperate, like these cubes, but you want them to all have the same shader, yet be able to give each cube random values? One way is to do parameter overrides as listed above, but another way is with the renderstate vop.
This gives your shader access to render time attributes about your geometry. Here I've used a simple one, object_id, which I've then feed to a random vop, which in turn drives colour variation. There's loads of attributes you can use, very handy.
Note that op_id is volatile, and changes any time you add or remove objects, or even reload the scene. A better way is to generate random numbers from the object names rather than the object_id, which is less likely to change (or if it does change, at least you'll be aware of it). An example of setting that up is here:
Download scene: renderstate_by_name.hipnc
(And a note to myself, if you need primnum, use a Get Primitive Id Vop. Thanks to Thomas Slancik, of course)
Material wrangle via snippet
 Download scene: material_wrangle.hip
Amazingly cool trick from Jonathan Mack.
Point wrangles have made me very lazy; I love being able to type @foo = 2; and have it immediately be exposed as a geometry attribute.
Wrangles are a hda wrapper around a snippet vop. Snippets let you write vex code directly in a vop network, I've used them occasionally within materials, but they're not as freeform as using wrangles; to define outputs, you need to define inputs, which can be boring if you have lots.
I asked on the sidefx forum if we could get a material wrangle, and Jonathan pointed out its possible to do right now.
The trick is to tell houdini what context the snippet is running in, which you do with a spare parameter. Click the gear icon in the parameter panel and add a string attribute named 'vop_force_code_context'. Set the context to be 'surface', and you're good to go. Interestingly the only reference I could find to this trick in the docs was on this page about vopnets, so clearly Jonathan is some kind of wizard to know this. 😃
Here's the full steps I did to create the example hip:
- Create a snippet vop in a mat network
- Drag it onto my pig geo (make sure the pig has 'add shader' turned off in its creation options, or that will take precedence)
- Add the vop_force_code_context parameter, set it to 'surface'
- I want to make 2 extra image planes, 'foo' and 'mything', so I I created a mantra rop and defined those 2 planes
- In the snippet, type something like "v@foo = {1,.5,0};", render, switch to the foo image plane, and you should see the result
I kept a globals vop next to the snippet, so I could remember the built in attributes I can use. Within the snippet, you don't require the @ prefix for global attributes, and remember that P within materials is relative to the camera, but this is a powerful way to prototype material ideas. Thanks again Jonathan!
Trail from sampling an SDF and a material wrangle
 Download hip: colour_thief_trail_setup_v01.hipnc
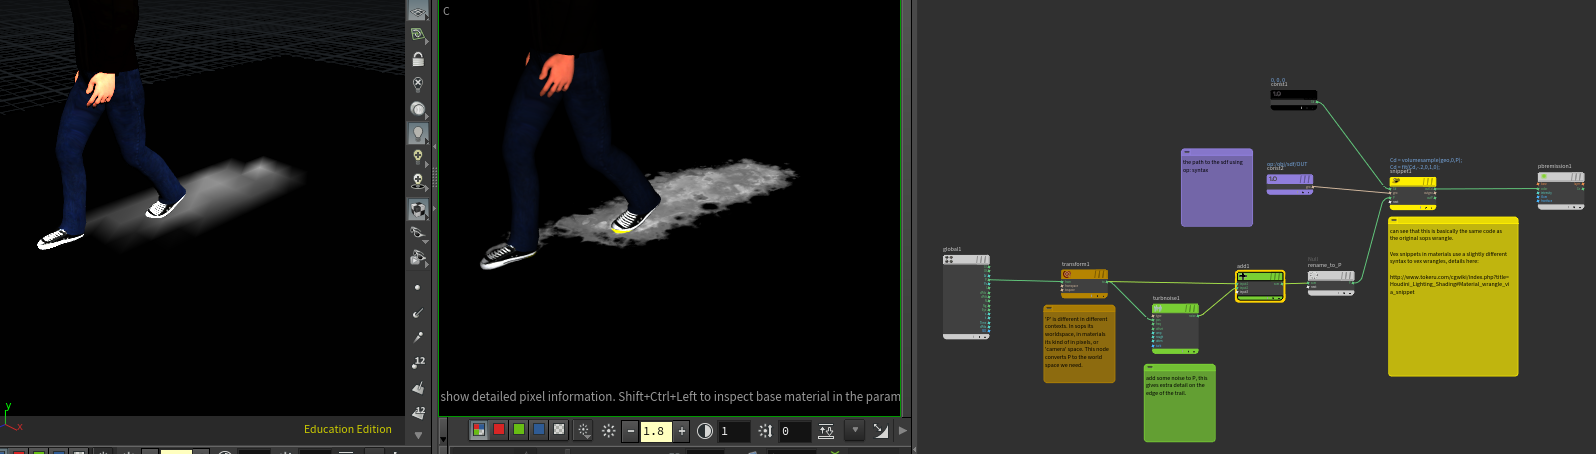
Kinda relies on a material snippet trick, so thought I'd put it here. This is the technique we used to generate colour trails for 'The Colour Thief, which I explained in this talk I did for Sidefx: https://www.youtube.com/watch?v=Y22rYfJE64o&t=11m06s
A sdf is generated from the characters feet, you can write a simple wrangle for the groundplane geo to query the sdf, if its inside, be white, othewrise black. The downside of doing this in sops is you're limited by the resolution of your ground geometry, as shown on the left. But we can run pretty much the exact same vex snippet in a material context, and now it runs per pixel/sample instead of per point, offering much higher quality.
Bonus trick here of not requiring the sdf to be written out to disk. Dchow pointed out you can use op: style syntax in a material snippet, you just have to make sure the sdf is available to the renderer by exporting it as its own object, but then also making sure 'renderable' is turned off so it doesn't render.
Projection setup
 Download hip: polar_projection_hdr.hip Download hip: polar_projection_hdr_redshift.hip
Quick go at taking an hdri, building proxy geometry in the viewport while seeing the projection in the viewport, then dropping in some other models to reflect/get bounce light and shadows from these objects. A photogrammetry setup like this is common in commercials and vfx. Mantra and redshift setups are provided.
Redshift
Egads, its been SO LONG since doing any serious rendering.
Make volumes react to lights
It's not a volume thing, its a light thing! Go to the lights, and turn up 'volume contribution'.
Make objects emit light
A few ways, each have pros and cons.
- You can turn up the emit slider on a RS material (jump to the 'overall tab). Use a RS point attrib to read material and connect to emit (its in the last folder of vop inputs). This will look emissive, but by itself won't really cast light.
- Create a RS light, and under shape, change to 'mesh', and slot in your object. Does light, great, but has no ability to read @Cd, annoying. You can bake to a texture and use that.
- Stick with the emit material, turn on brute force gi. Slower, but works.
Light baking
Rendermaps tab, enable, simple.
Things not working? Check the uv parm matches what you have on your geo, AND that its of vec3 type. I shouted at redshift for ages until I realised the crappy fbx I was using had it named as @UVMap, and then shouted some more until I realised it was vec2.
Todo
Following need to be added to this page...
- gif for Cd and Alpha
- gif for aov setup
- per light aovs
- setting up lightgroup aovs
- parameter ramps and fit range
- bind vs bind export
- viewport preview and GLSL
- viewport preview modes (standard, high quality, shadows, ambocc, headlight, flat)
- whats missing (layered shaders, link to shader td's amazing showreel)