Appearance
Vex Section 2
Parallel processing part 2
Earlier I mentioned that vex is inherently parallel, running your code on all points simultaneously. This implies some tricky situations. Say you want to delete another point based on data from the current point. What if another point, or another 500 points, that are all running in parallel, all happen to want to delete that same point? If 2 points try to change colour of a third, which one wins? What if you make 20000 points, and simultaneously try to delete 1000 points?
To ensure parallel execution runs reliably and safely, vex groups operations together and runs them in batches. All reading of geo attribs is done together, creating new geometry is done together, setting of attribs on new geometry is done together, deleting of geometry is done together. There's a specific order these are run in, but because I never remember, I try to not write vex that expects deletes to be done before reads, or vice versa. Artists who aren't familiar with this function-batching often try to write vex that'll create points on line 1, delete other points on line 2, set attribs on line 3, read attribs on line 4, delete more geometry on line 5 etc, and be surprised when it doesn't work.
My current tack is to keep wrangles as simple as possible. Most of my wrangles are under 10 lines, and more importantly tend to do one of three things; set attributes, create geo, delete geo. It's possible to do all 3 at once in a wrangle, but as mentioned previously, you have to be pretty confident that the order of execution isn't going to stomp on things in ways you don't expect. I'm not that confident, so I tend to play cautious. 😃
Here's a very work-in-progress list that kindasorta tracks from simple vex parallelism to more complex tasks. Still haven't really thought of a good way to explain how to not approach vex, will keep thinking...
- Attribs on the current point setting attribs on the current point (@Cd = @P) is clean and fast.
- Attribs on the current point driving functions to set attribs on the current point ( @Cd = noise(@P) ) is clean, fast, and powerful. Lots of vex functions to play with!
- Attribs from another point setting attribs on the current point ( @Cd = point(0,'P',4) ) opens up tricks where geo can be reactive to other geo.
- Attribs from another point driving functions to set attribs on the current point ( @Cd = noise(point(0,'P',4) )) ), yet more tricks
- Accessing lists of points based on locality (nearpoints() ) or attribute ( findattribval() ), to then in turn look at their attribs, opens up yet more interesting tricks
- Accessing the filtered results of attribs from other points with pointcloud lookups goes off the deep end of tricks
- You can simulate looking up nearby points by prepping data before you get to a wrangle, eg an attribpromote/demote can be used to average attribs between points that share a primitive
- When you need to lookup data from other things, getting it from an identical mesh with different attribs is fast (see the next section)
- It's often cleaner to lookup attribs from other points to set attribs on the current point, vs doing the opposite (ie, set attribs on other points based on the current point)
- Similarly, creating points and setting attribs on those new points can get messy. Not impossible, but often its easier to break it into 2 wrangles; create new geo in one wrangle, modify in the second
- Sometimes you'll have a problem that just doesn't cleanly map into a parallel workflow. That's ok; you can set a wrangle to 'detail' mode, now the wrangle runs once rather than automatically on every point. As such, you can create a for loop to access each point, giving you total control (and can still be fast compared to python/mel), but its definitely slower than using parallel processing.
- While all the above (and most of this page) assume you're working with points, don't forget you can also run wrangles over verts and prims.
That's hard to read, summarise please
Ok fine. Imagine you're a point:
- Me affecting me, good.
- Others affecting me, good.
- Me affecting others, bad.
Gross oversimplification, but that's the general idea.
Get attributes from other inputs
As mentioned earlier, you have 2 similar meshes feeding into the one wrangle, and you want to access the matching P of the 2nd mesh:
vex
vector otherP = point(1,"P", @ptnum);
// do something with it
vector otherP = point(1,"P", @ptnum);
// do something with itAn alternative method is to prefix the attribute you want with @opinput1_ . This implicitly uses the same ptnum, saving you a call to point() :
vex
vector otherP = @opinput1_P;vector otherP = @opinput1_P;The same rules apply as for normal @ syntax, it will guess the type of known attributes (P, N, v etc), anything else will default to float unless you tell it otherwise:
vex
float foo   = @opinput1_myfloat;   // fine, default is float
float bar  = f@opinput1_myfloat;   // explicit type
float myvector  = @opinput1_thevector;   // bug, as thevector will be returned as float
float workingvector  = v@opinput1_thevector;   // better
float foo = @opinput1_myfloat; // fine, default is float
float bar = f@opinput1_myfloat; // explicit type
float myvector = @opinput1_thevector; // bug, as thevector will be returned as float
float workingvector = v@opinput1_thevector; // betterOf course to access any other geo connected connected to the 3rd or 4th slot, increase the number (you might've guessed by now that 0 is the first input):
vex
float two   = @opinput1_myfloat;
float three = @opinput2_myfloat;
float four  = @opinput3_myfloat;
float two = @opinput1_myfloat;
float three = @opinput2_myfloat;
float four = @opinput3_myfloat;I wish they'd picked a shorter string that opinputN_, as in practice sometimes it almost feels like typing point() is faster, but hey, nice to have options. 😃
Arrays
Standard vex array variables are like most c-style languages:
vex
int myarray[] = {1,2,3,4};

int foo = myarray[2];
int myarray[] = {1,2,3,4};
int foo = myarray[2];You can create array attributes too by inserting '[]' between the type declaration and the @:
vex
i[]@things = {1,2,3,4};

int foo = i[]@things[3];
i[]@things = {1,2,3,4};
int foo = i[]@things[3];You can use the opintputN syntax from before too, looks messy but it works. Eg, reading a float array from the 2nd input and storing it in a local vex variable array:
vex
float otherthings[]  = f[]@opinput1_thearray;

int foo = otherthings[4];
float otherthings[] = f[]@opinput1_thearray;
int foo = otherthings[4];You can append the array index you want and get even more hard to read:
vex
int foo = f[]@opinput1_thearray[4];int foo = f[]@opinput1_thearray[4];Search an array with find
Super nice tip from one man Houdini army Tomas Slancik.
Say you want to set an int attib to be 1 on Frame 1, 25, 225,35. Ie, there's no pattern here, just specific frames.
My original naive approach is to throw it all in a if statement with a bunch of ORs (in Vex, like most C-derived languages, OR is 2 vertical pipes, ||):
vex
int myint = 0;
if (@Frame == 1 || @Frame == 25 || @Frame == 225 || @Frame == 35) {
    myint=1;
}
int myint = 0;
if (@Frame == 1 || @Frame == 25 || @Frame == 225 || @Frame == 35) {
myint=1;
}Tomas suggested a much cleaner way using an array, and the find() function:
vex
int myint = 0;
int frames[] = {1, 25 , 66, 225 ,35, 666, 999, 123, 534};
if (find(frames, @Frame)>=0) {
     myint=1;
}
int myint = 0;
int frames[] = {1, 25 , 66, 225 ,35, 666, 999, 123, 534};
if (find(frames, @Frame)>=0) {
myint=1;
}Nice!
Search a string with find
I always forget this, seems appropriate to write it here.
The vex find() function can search in strings as well as arrays:
vex
string haystack = 'mylongstring';
string needle = 'str';
if (find(haystack, needle)>=0) {
     i@found=1;
}
string haystack = 'mylongstring';
string needle = 'str';
if (find(haystack, needle)>=0) {
i@found=1;
}CamelCase to snake_case with regex and re_replace
Had some attributes in a csv saved as camel case like 'thisAttributeName', I needed to convert to snake case like 'this_attribute_name'.
Stackoverflow had a python example, was pleased that vex's re_replace() could use the same regex string. I just had to run tolower() as a seperate thing:
vex
    string a = 'thisAttributeName';
    a = re_replace('(?<!^)(?=[A-Z])', '_', a);
    a = tolower(a);
    // a is now 'this_attribute_name'
string a = 'thisAttributeName';
a = re_replace('(?<!^)(?=[A-Z])', '_', a);
a = tolower(a);
// a is now 'this_attribute_name'Access group names procedurally in vex
Download scene: Download file: group_random_delete_vex.hipnc
Chuffed with this one. A friend (hey Jonno) had a big complex object with lots of primitive groups, and wanted to randomly delete primitives by those groups. My first reaction was 'bah, easy', but on closer inspection it wasn't that clear cut. Yes you can use the group dropdown at the top of the blast or delete node, and even use wildcards and simple expressions to select things, but unless there's a text processing style trick you can use (eg, all groups are named 'group_123'), this isn't any good.
What was needed was to get an array of all the groups, and then you could refer to them by index (so rather than saying 'left_foot', you could say 'grouplist[2]'). Bit of digging, found that the group names are stored in a detail intrinsic attribute. Houdini hides a few 'bonus' attributes around, like a full transform matrix for prims, or their surface area, they can be found from the geo spreadsheet dropdown. The geo groups are stored at the detail level. Armed with this, we can extract the groups into a string array, and do what we want:
vex
s[]@groups  = detailintrinsic(0, 'primitivegroups');
i[]@prims =  expandprimgroup(0, s[]@groups[1]);
s[]@groups = detailintrinsic(0, 'primitivegroups');
i[]@prims = expandprimgroup(0, s[]@groups[1]);The first line gets the array of groups, and stores it in another attribute 'groups', just so we can look at in in the geo spreadsheet and see it worked.
The second line reads the 2nd group ( groups[1] ), gets a list of all the primnums in that group, and stores that in an attribute, again to see it working.
Here's taking it further, using the above logic, and deleting a random group every frame:
vex
string groups[]  = detailintrinsic(0, 'primitivegroups');
int rand = int(rand(@Frame)*len(groups));
int prims[] =  expandprimgroup(0, groups[rand]);

// delete the prims
int p;
foreach (p; prims) {
 removeprim(0,p,1);
}
string groups[] = detailintrinsic(0, 'primitivegroups');
int rand = int(rand(@Frame)*len(groups));
int prims[] = expandprimgroup(0, groups[rand]);
// delete the prims
int p;
foreach (p; prims) {
removeprim(0,p,1);
}It's worth pointing out that if you're defining the groups yourself, you're better off using an attribute to identify the pieces, and use that to do your random whatevers. Eg, assign every prim a @piece attribute, and do deletions based on that:
vex
i@piece = @ptnum%3;

if (@piece==1) {
 removeprim(0,@primnum,1);
}
i@piece = @ptnum%3;
if (@piece==1) {
removeprim(0,@primnum,1);
}Doesn't work though if you have overlapping groups though, in which case its fancy shmantz intrinsic vex magic for you.
Random colour groups with vex
An extension of the above snippet:
vex
string groups[]  = detailintrinsic(0, 'primitivegroups');

foreach (string g; groups) {
    if (inprimgroup(0,g,@primnum)==1) {
        @Cd = rand(random_shash(g));
    }
}
string groups[] = detailintrinsic(0, 'primitivegroups');
foreach (string g; groups) {
if (inprimgroup(0,g,@primnum)==1) {
@Cd = rand(random_shash(g));
}
}Solver sop and wrangles for simulation
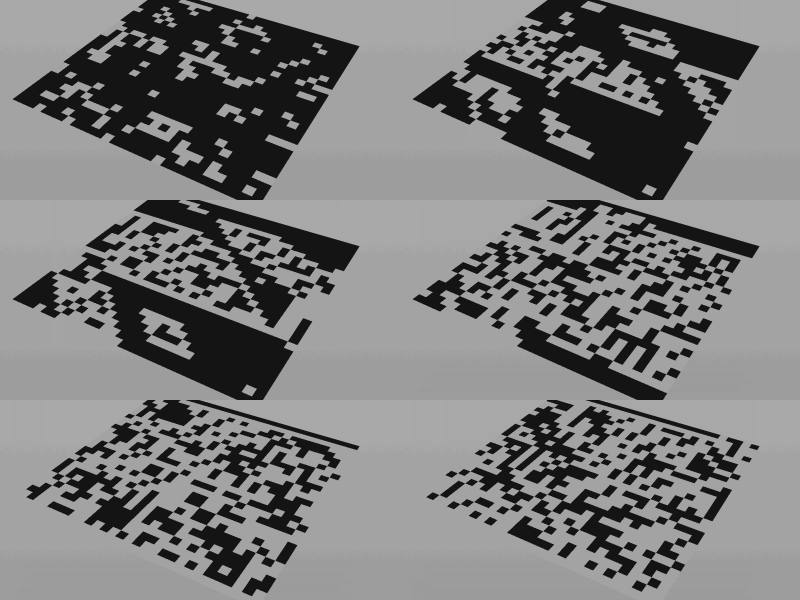
Download scene: Download file: game_of_life_solver.hip
A whole other level of fun opens up when you drop a wrangle into a solver. As stated a few times elsewhere, a solver sop gives you access to the previous frame, meaning you put a wrangle inside and wire it up to the 'prev_frame' node, you can do simulation and accumulation effects. In this example I do a loose approximation of Conways 'game of life', simple cellular automata. I half remembered the logic from many years ago, but it's something like this:
- look for active neighbours north/south/east/west, and my own active state.
- if there's 1 active neighbour, and I'm active, then i'm now dead.
- If there's 2 active neighbours, and i'm dead, then I'm now active.
- if there's 4 active neighbours, I'm dead.
Setup some random pattern as a starting point, and running the solver, you'll get a changed pattern. This is then fed into the next frame, which changes the pattern, which is fed into the next frame etc.
The wrangle within the solver is very simple:
vex
int left = prim(0,'Cd',@primnum-1);
int right = prim(0,'Cd',@primnum+1);
int top = prim(0,'Cd',@primnum+30);
int bottom = prim(0,'Cd',@primnum-30);

int total = left+right+top+bottom;

if (total==1 && @Cd ==1 ){
 @Cd =0 ;
}

if (total==2 && @Cd ==0 ){
 @Cd =1 ;
}

if (total==4)  {
 @Cd =0;
}
int left = prim(0,'Cd',@primnum-1);
int right = prim(0,'Cd',@primnum+1);
int top = prim(0,'Cd',@primnum+30);
int bottom = prim(0,'Cd',@primnum-30);
int total = left+right+top+bottom;
if (total==1 && @Cd ==1 ){
@Cd =0 ;
}
if (total==2 && @Cd ==0 ){
@Cd =1 ;
}
if (total==4) {
@Cd =0;
}Solver and wrangle for branching structures

Download scene: Download file: vex_brancher.hipnc
I watched this great video by Simon Holmedal about his work for Nike, lots of interesting branching structures, organic growth, fractals, really inspiring stuff.
So inspiring in fact, I had to try and replicate one of his experiments. The vex code at the core of it is pretty simple. I tag a starting point (or points) with @active=1, then in the solver sop run this code:
vex
if (@active ==0) {
    float maxdist = ch('maxdist');
    int maxpoints = 5;
    int pts[] = nearpoints(0,@P, maxdist, maxpoints);
    int pt ;

    foreach  (pt;pts) {
        if (point(0,'active',pt)==1) {
            @active=1;
            int prim = addprim(0,'polyline');
            addvertex(0,prim,@ptnum);
            addvertex(0,prim,pt);
            @age = @Frame;
            return;
        }
    }
}
if (@active ==0) {
    float maxdist = ch('maxdist');
    int maxpoints = 5;
    int pts[] = nearpoints(0,@P, maxdist, maxpoints);
    int pt ;
foreach (pt;pts) {
if (point(0,'active',pt)==1) {
@active=1;
int prim = addprim(0,'polyline');
addvertex(0,prim,@ptnum);
addvertex(0,prim,pt);
@age = @Frame;
return;
}
}
}Seeing as I've posted it here on the vex tutorial page, I'll explain it line by line:
vex
if (@active ==0) {if (@active ==0) {Only run the following code on non-active points, ie, on points that haven't been connected into lines yet.
vex
    float maxdist = ch('maxdist');
    int maxpoints = 5;
    int pts[] = nearpoints(0,@P, maxdist, maxpoints);
int pt ; float maxdist = ch('maxdist');
int maxpoints = 5;
int pts[] = nearpoints(0,@P, maxdist, maxpoints);
int pt ;Setup some variables to feed the nearpoints() function. Give nearpoints() a position, it returns an array of the closest points (an array of their id's, or @ptnum's if you're using the vex terminology). You can also tell it the total number of points to return, and a maximum distance to search (which here I set using a channel slider). I also create a pt variable to use in the following loop.
vex
foreach (pt;pts) { foreach (pt;pts) {This is a handy way to call a loop in vex; rather than the usual C way of incrementing a counter, you can ask vex to just loop over the elements in an array. Here, each time the loop runs, pt will be set to the next point found by the nearpoints() function earlier.
vex
if (point(0,'active',pt)==1) { if (point(0,'active',pt)==1) {Get the @active attribute of the point we're testing, if its active, run the next bit of code.
vex
@active=1; @active=1;Because we've found an active point, we'll mark myself active. Because this vex will only run on non-active points (remember the first line of this wrangle), this stops all points from constantly trying to find connections.
vex
            int prim = addprim(0,'polyline');
            addvertex(0,prim,@ptnum);
            addvertex(0,prim,pt);
int prim = addprim(0,'polyline');
addvertex(0,prim,@ptnum);
addvertex(0,prim,pt);Create a line from the found point to myself. This is covered elsewhere in more detail, but the idea is that you create an empty primitive in line mode, then add 2 verticies to that primitive, forming a line.
vex
@age = @Frame; @age = @Frame;Store the current frame as an @age attribute. We can use this later to colour the structure by age; points near the starting point(s) will have a low age, points far away will have a high age.
vex
return; return;Stops the foreach loop running as soon as its found an active point. If this line is commented out, it will try and connect itself to any of the nearest active points. This can create edges that link to existing edges, which loses the branching look. It's a cool look in itself (comment out the line and see), but I wanted branching.
There's a slightly fancier version in the hip that also tries to only chose points that follow the flow lines of some curl noise, which generates interesting swirly branches. It also works fine with points scattered inside a volume, making cool 3d structures.
Get transform of objects with optransform
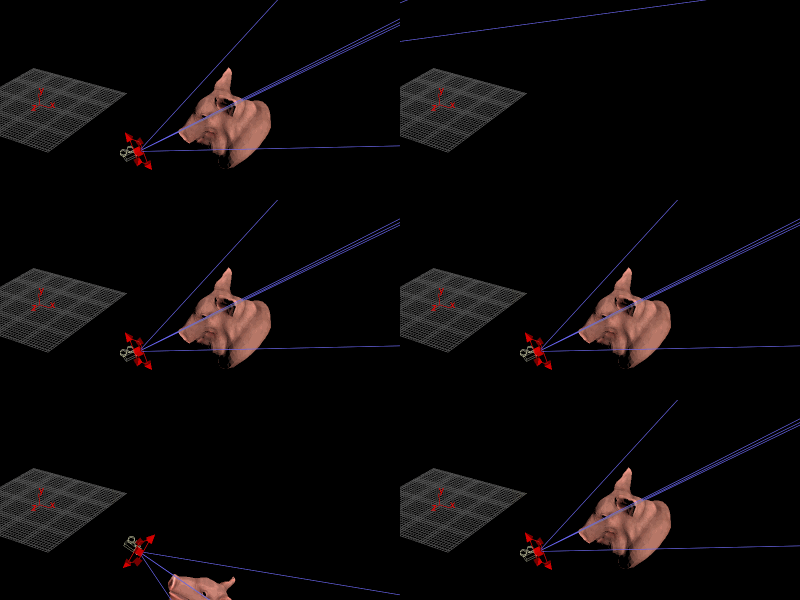
Download scene: Download file: optransform_pig.hipnc
Copy positions from points to other points is easy enough, but if you want to read the transform of, say, a camera, the naive way might be to channel reference all the translate/rotate/scale values from the camera parameter pane.
A better way is with the optransform vex function. It returns the matrix for a given object, which you can then multiply your points by, or use cracktransform() to just extract the information you need.
Syntax is pretty simple:
vex
matrix m = optransform('/obj/cam1');
@P *=m;
matrix m = optransform('/obj/cam1');
@P *=m;optransform to do a motion control style camera
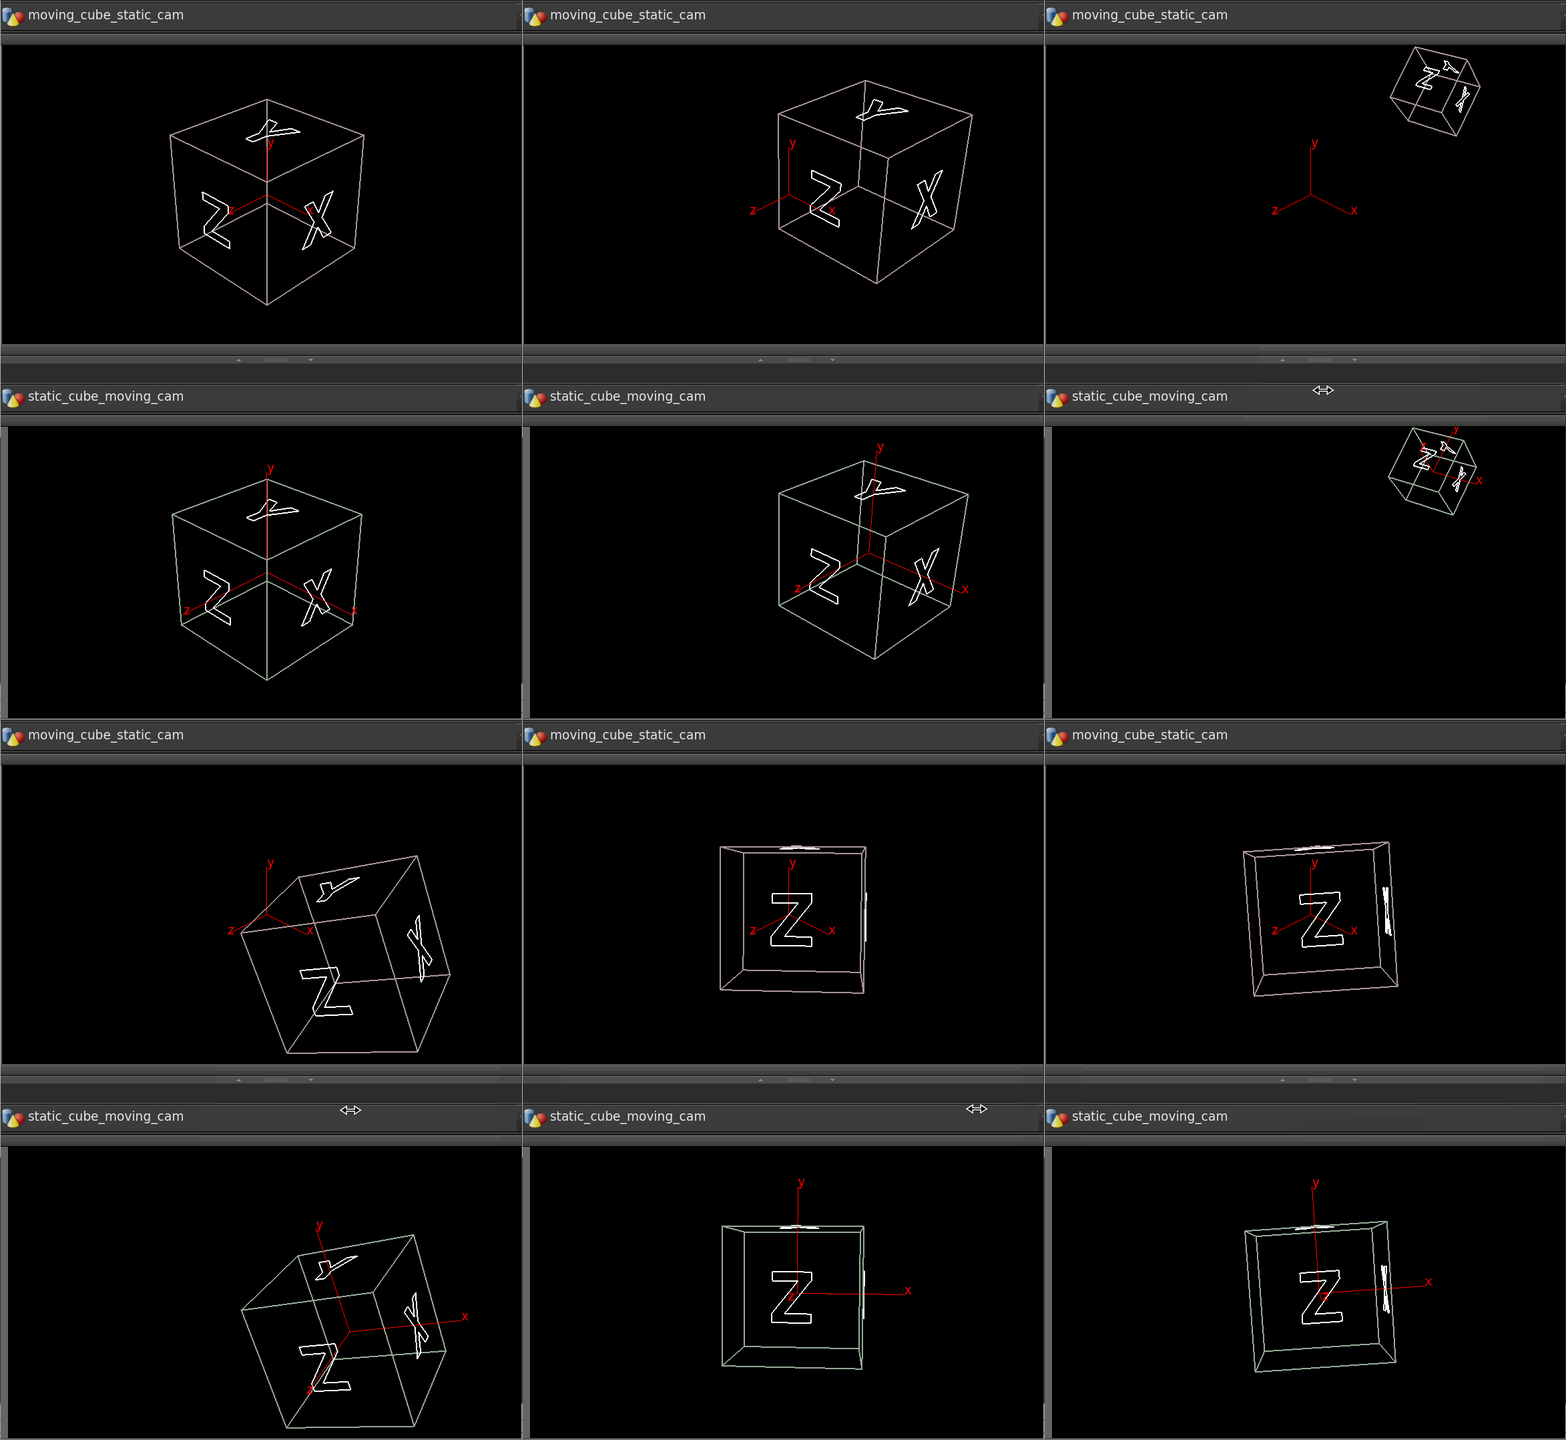
Download scene: Download file: moco_example_scene.hip
Question Gary Jaeger asked on the Sidefx list, its something I've had at the back of my mind for years, finally got a chance to try it out.
We have an flying cube and a still camera, and we want to invert this, ie, have a still cube and flying camera. Think back to classic motion control shots of star wars, the spaceships models would be mostly static, and the camera would zoom around them to make it appear that they were flying.
If this were 2 pieces of geometry this is easy; read the matrix from one, invert it, apply to the other in vex. Unfortunately because we have a camera, and camera's can't be manipulated in vex, we have to find another way around.
Instead, we can use a rivet. In its simplest form, its like a copy sop with a single point; give it a path to a point, and you can then parent objects to the rivet, they'll stick to the point. As such I've made a geo object with a single point, and in a wrangle read the animated cube transform, invert the motion, apply it to the point:
vex
matrix m = optransform('/obj/moving_cube');
@P *= invert(m);
matrix m = optransform('/obj/moving_cube');
@P *= invert(m);But what about rotation? Looking at the rivet parameters, it supports rotation, but only via @N and @up. At this point I realised I knew how to go from @N and @up to a matrix or quaternion, but not the other way. After sleeping on it, realised its easier than I expected, and added this to my wrangle:
vex
matrix m = optransform('/obj/moving_cube');
@P *= invert(m);
matrix3 m_rot = matrix3(m);
@N = {0,0,1}*invert(m_rot);
@up = {1,0,0}* invert(m_rot);matrix m = optransform('/obj/moving_cube');
@P *= invert(m);
matrix3 m_rot = matrix3(m);
@N = {0,0,1}*invert(m_rot);
@up = {1,0,0}* invert(m_rot);When using @N and @up for rotation, @N points along the z-axis, @up points along the y-axis. As such, to recreate @N and @up from a matrix, just take a z vector {0,0,1} and multiply it by the matrix, and do the same for a y-vector {0,1,0}.
This didn't work for me at first, after sleeping on it again (yes I'm very sleepy) I realised it was because I was using the full 4x4 (rotate+position+shear) rather than the correct 3x3 (just rotation). Explicitly casting to a 3x3 matrix fixed it.
In theory you could also use a cracktransform() to get the euler rotation values, and plug those onto the camera using hscript, but I find I'm now actively avoiding hscript more and more. This seems cleaner to me. That said, I'm sure someone will have an even cleaner solution than this...
More on rotation: Orient, Quaternions, Matricies, Offsets, stuff
This stuff has taken a while to sink into my brain, so don't worry if it doesn't make sense at first. A lot of this can be achieved via other means and a few more steps, but its good to have an elegant target to aim for.
So first, create an @orient that smoothly rotates. To recap, Houdini offers several ways to deal with rotation, ranked in order of precedence, with @orient being the highest. Orient is a quaternion, which is a 4 value vector.
Previously we've used a matrix for this (a 3x3 matrix to be exact), rotated it, and generated orient via the quaternion() function:
vex
float angle = @Time;
vector axis = rand(@ptnum);
matrix3 m = ident();
rotate(m, angle, axis);
@orient = quaternion(m);
float angle = @Time;
vector axis = rand(@ptnum);
matrix3 m = ident();
rotate(m, angle, axis);
@orient = quaternion(m);Turns out I've been doing way too much work. A 3x3 matrix and a quaternion are mostly interchangeable, so it makes sense that some of the functions to create and manipulate them are also interchangeable. You can create a quaternion directly from an angle and axis:
vex
float angle = @Time;
vector axis = rand(@ptnum);
@orient = quaternion(angle, axis);
float angle = @Time;
vector axis = rand(@ptnum);
@orient = quaternion(angle, axis);Nice and clean. But there's a subtle problem with this, namely the random axis. Turns out that rand() vectors aren't as random as you'd expect, they tend to all aim along positive values along the x y and z axis.
If we want truly random vectors, Houdini provides several ways to generate this over a sphere, a cone, a hemisphere etc. It's a handful to type, but autocomplete is your friend, and the results are much better:
vex
vector axis = sample_direction_uniform(rand(@ptnum));vector axis = sample_direction_uniform(rand(@ptnum));Ie, you give it a random value between 0 and 1, it will return a random vector on a unit sphere. Neat. Here it is displayed with a visualizer in axes mode:
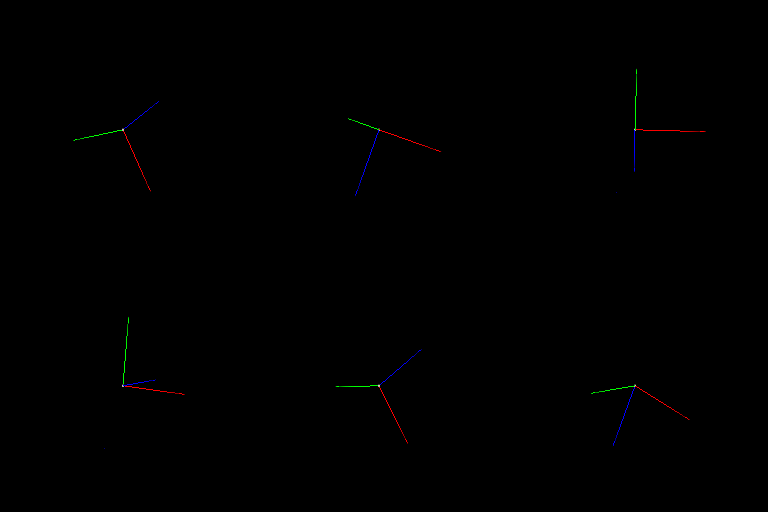
If we create a 1 unit tall box and a pig, and copy sop it onto the point, we get this:
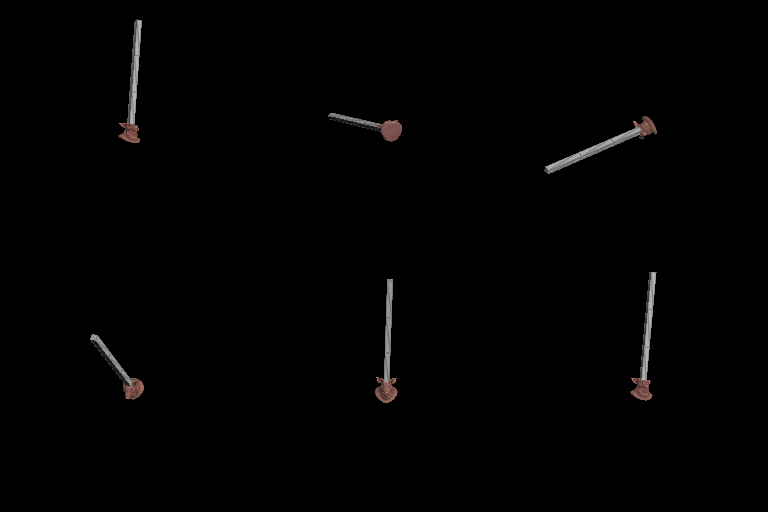
What if we want to offset the pig to the end of the box though? (Yes ok, you could transform the pig first, then copy it on, but pretend we couldn't.) A way to do this is to take a vector that's 1 unit on the y axis (which was the original orientation and height of the box), rotate it to match @orient, then take a point and offset it by this modified vector.
That's what the qrotate function does; rotates a vector by a quaternion. In a second wrangle I take the same point, and shift it (the result needs to be normalized):
vex
vector pos = qrotate(@orient, {0,1,0} );
@P += normalize(pos);
vector pos = qrotate(@orient, {0,1,0} );
@P += normalize(pos);Now if we use the second point and copy the pig onto it, and leave the box on the first point, then merge the result, we get this:
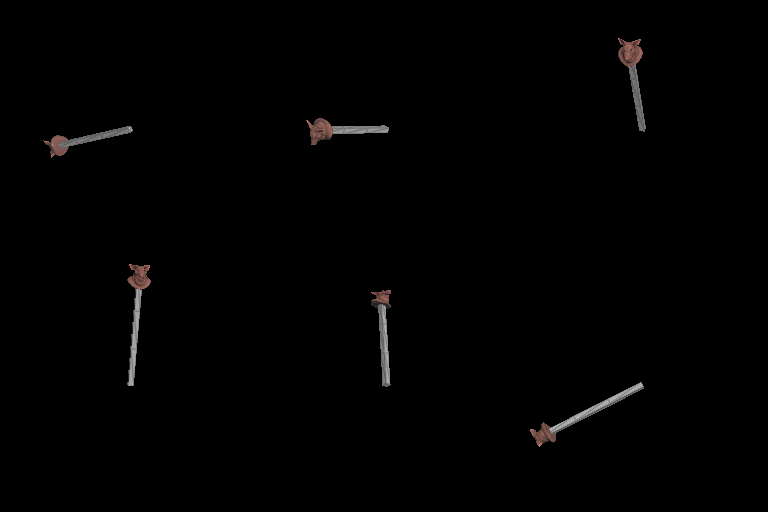
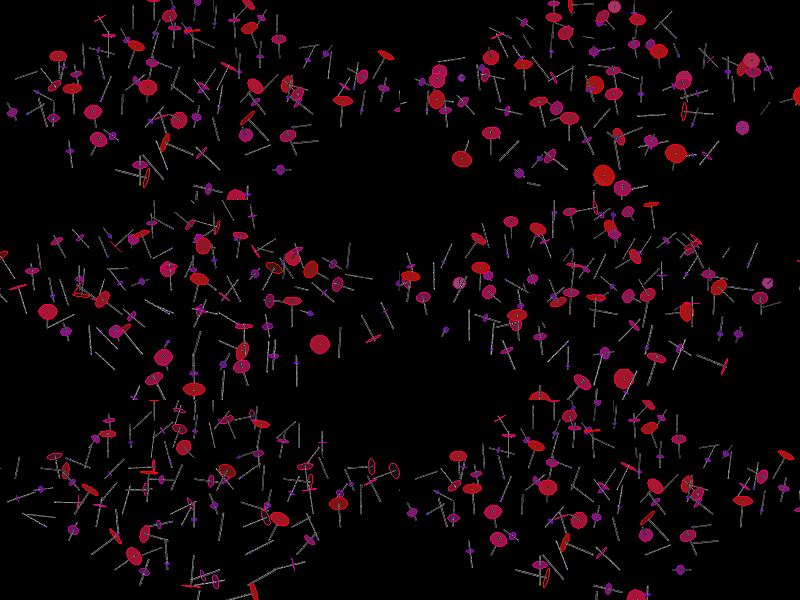
Contrived example, sure, but the ability to shift a point in the orient space of another is pretty cool. Here's an even sillier example, where I setup a variable that cycles between 0 and 1, and mulitply that by the rotated vector, which has the effect of sliding the geo (circles in this case) up and down the boxes. I use the same variable to colour the circles and scale them because, well, why not? To do this without qrotate would probably involve stamps and other ugliness.
Incidentally, here's another way to rotate a vector by a quaternion. qconvert converts a quaternion back to a 3x3 matrix, then mutiply it with the vector as we've done before.
vex
vector pos = {0,1,0};
matrix m = qconvert(@orient);
pos *= m;
@P += pos;
vector pos = {0,1,0};
matrix m = qconvert(@orient);
pos *= m;
@P += pos;Download scene: Download file: offset_along_orient.hipnc
Ps: Neil Dickson offered some handy tips re random rotation; I had originally used sample_sphere_uniform, he corrected me thusly:
Note that sample_sphere_uniform will sample uniformly from vectors *inside* the unit sphere, whereas sample_direction_uniform will sample uniformly from vectors on the surface of a unit sphere, i.e. unit vectors a.k.a. direction vectors. The code that figures out the transformation to do should normalize the vectors, so it should be okay either way, but sample_direction_uniform is a little faster. You can also get uniform random orientation quaternions using sample_orientation_uniform, or uniform within some angle of a base orientation using sample_orientation_cone.
Thanks Neil!
Convert N to Orient with dihedral
You have some geo that you want to copy onto points, matching @N, but save this as @orient so it won't be ambiguous.
The copy sop assumes your geo points down the z-axis, so you need to work out how to rotate {0,0,1} onto @N.
Dihedral() does exactly this, it gives you a matrix that rotates one vector onto another.
We know by now that a rotation matrix and a quaternion are interchangeable, so all we do with that matrix is convert it to our orient quaternion:
vex
matrix3 m = dihedral( {0,0,1} , @N);
@orient = quaternion(m);
matrix3 m = dihedral( {0,0,1} , @N);
@orient = quaternion(m);But there's a better way! Keep reading...
Convert N and Up to Orient with maketransform
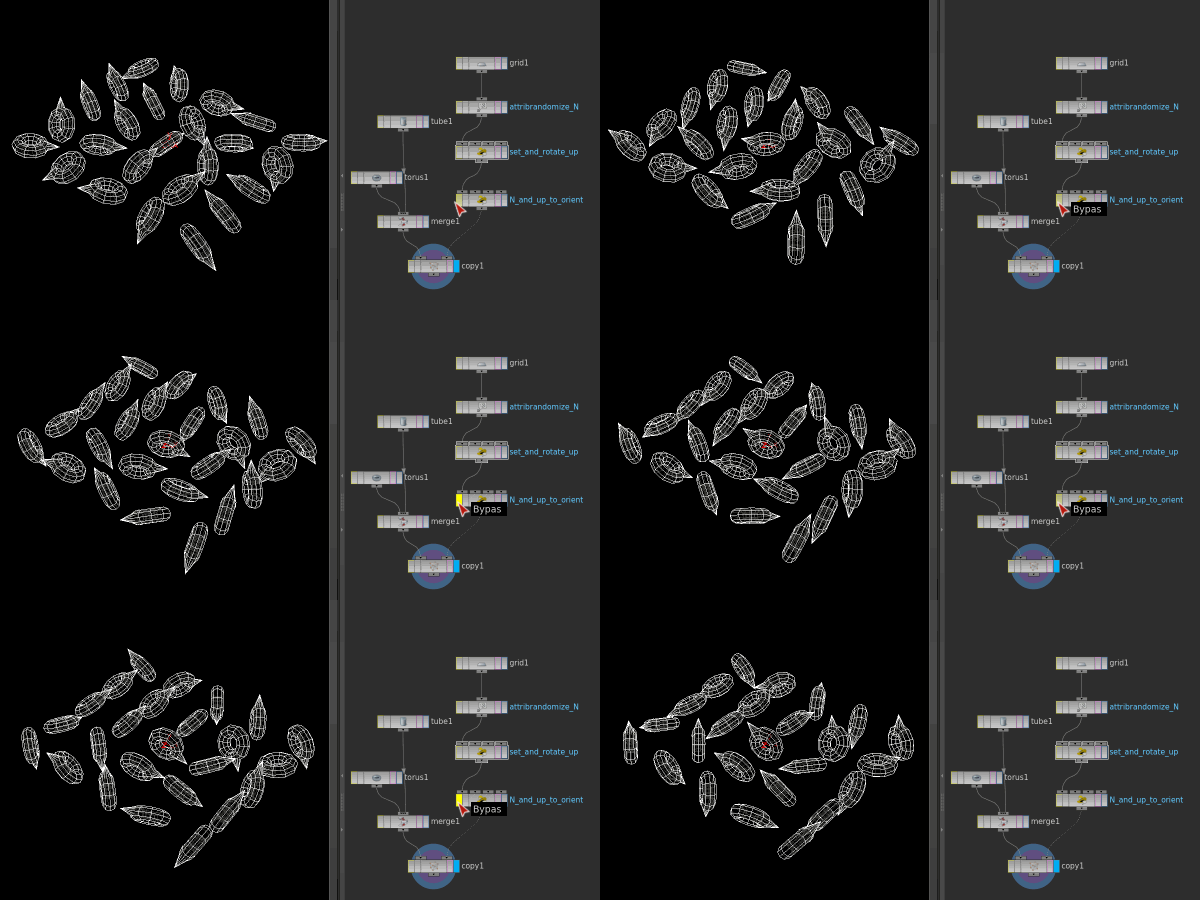
Swapping between @N+@up and @orient, looks identical, hooray!
Download scene: Download file: convert_n_and_up_to_orient.hipnc
'Hang on' you might say, 'how is the previous solution not ambiguous?'. And you're right, without calling an up vector, we've not really determine a stable rotation at all. This has been bugging me for a few months, and as it typical for me, I was too proud to just ask people who would know.
For a while I thought the answer was the lookat() function, which according to the docs is
vex
lookat(vector from, vector to, vector up);lookat(vector from, vector to, vector up);So knowing that a copy sop aims the z axis down @N, I figured this would work:
vex
lookat( {0,0,1}, @N, @up);lookat( {0,0,1}, @N, @up);The result was... not right. Sort of stable, sort of wrong, and trying every permutation of vectors didn't work. Boo.
Today I read a forum post about makebasis, which seemed to be right thing, but no. By accident I started typing 'make' into the houdini help, and it popped up maketransform. Hey presto, that's the function:
vex
matrix3 m = maketransform(@N,@up);
@orient = quaternion(m);
matrix3 m = maketransform(@N,@up);
@orient = quaternion(m);The ultimate test is to setup some random @N and @up, rotate @up, then in a second wrangle convert to @orient. Enabling/disabling the second wrangle should cause no visual change, which you can see in the gif at the top of this chapter.
Dihedral to align fractured pieces
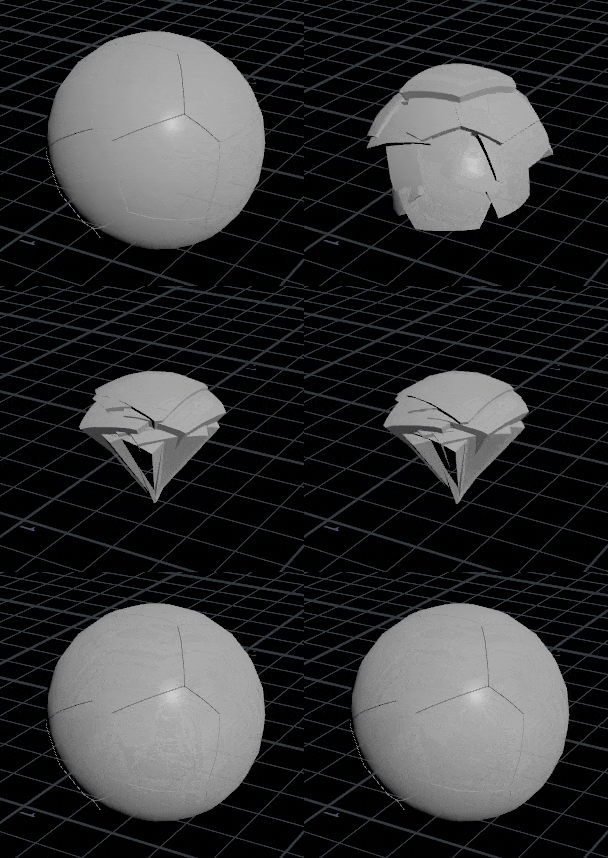
Download file: dihedral_sphere_pieces.hip
Another example along similar lines to the above, prompted by a question from Arvid Schneider. He had fractured a sphere, and wanted all those pieces to be aligned back at the origin, with the outside of the sphere facing up. Yet again, dihedral to the rescue, with a slight variation:
vex
@N = @P;
3@xform = dihedral(@N, {0,1,0});
@P = {0,0,0};@N = @P;
3@xform = dihedral(@N, {0,1,0});
@P = {0,0,0};Ie, calculate a normal based on position (its a sphere, so tracing a line from origin to the piece position is the same as the normal), dihedral to calculate the matrix that would align the normal along Y, store that as @xform, reset position to 0.
Rather than get the wrangle to do the rotation work, a transfom by attribute is appended after the wrangle. Tell it to look for 'xform', done.
Copies to sit on a surface, with random rotation, with orient
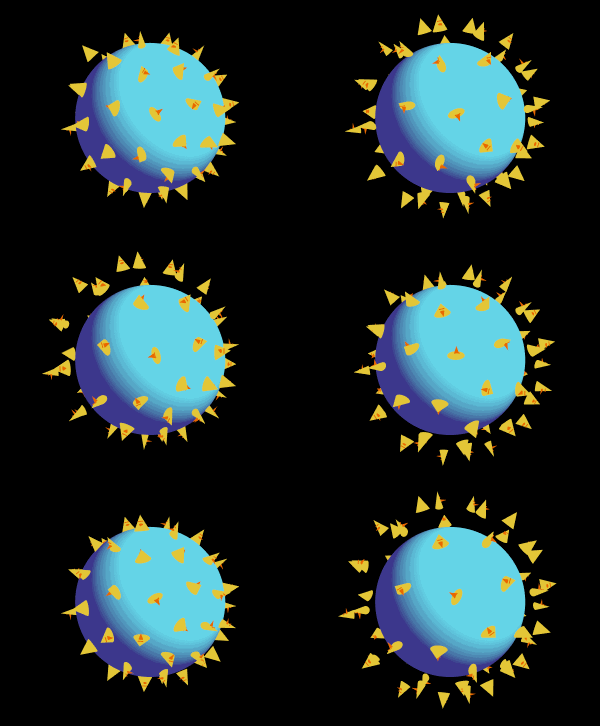
Download scene: Download file: rotate_around_n.hipnc
Trees on a lumpy terrain, pigs on a bigger pig, graphic chickens on a sphere, usual drill. Sitting on a surface is easy enough, scatter, inherit @N, the copied objects will point their z-axis down @N. To randomly rotate them around @N you can use a random @up, but say we want something more controlled?
You can do this in 2 steps; use a dihedral to create a matrix that will rotate the {0,0,1} vector to @N, then rotate that matrix around @N. Convert that matrix to @orient, and you're done.
vex
matrix3 m = dihedral({0,1,0},@N);
rotate(m, @Time+rand(@ptnum)*ch('rot_rand'), @N);
@orient = quaternion(m);
matrix3 m = dihedral({0,1,0},@N);
rotate(m, @Time+rand(@ptnum)*ch('rot_rand'), @N);
@orient = quaternion(m);I'm sure there's an even more efficient way, if you know it, get in touch! (Update: There is, see below...)
Combine quaternions with qmultiply
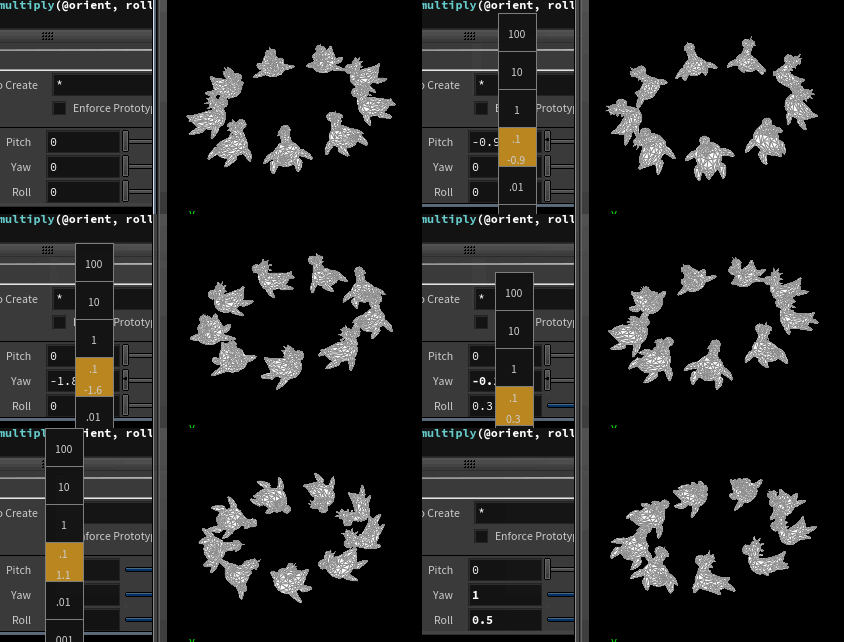
Download scene: Download file: orient_qmultiply_compose.hip
A trick I learned from Raph Gadot, cheers!
Somewhere in the above examples are 2 quaternion tricks, using qmultiply for things, and creating quaternions from an angle/axis pair. Raph showed me an elegant way to combine these bits of knowledge. Say you had a bunch of points with arbitrary orients, and you want to rotate them all by 20 degrees on x, but in their local rotation axis.
What you can do is create a temporary quaternion which is 20 degrees around x around the origin, then qmultiply that with the original quaternion. Simple!
To create that temp quaternion is easier than you'd think; the quaternion function can take an angle and axis, or even lazier, define the axis vector, then scale that vector. The length of the axis vector will be used as the rotation amount. Eg:
vex
vector4 foo = quaternion({1,0,0}*0.2));vector4 foo = quaternion({1,0,0}*0.2));So that's a rotation around the x axis ( 1,0,0 ), of 0.2 radians (which is about 11 degrees).
To add that to the existing orient, use qmultiply:
vex
@orient = qmultiply(@orient, foo);@orient = qmultiply(@orient, foo);Extending this, you could define temp quaternions for the local x, y, z, with channels to set the rotation amount, and qmultiply each onto @orient. That's what the following wrangle does, giving simple x y z controls (which I've named pitch/yaw/roll cos it sounds cooler).
vex
vector4 pitch = quaternion({1,0,0}*ch('pitch'));
vector4 yaw   = quaternion({0,1,0}*ch('yaw'));
vector4 roll  = quaternion({0,0,1}*ch('roll'));

@orient = qmultiply(@orient, pitch);
@orient = qmultiply(@orient, yaw);
@orient = qmultiply(@orient, roll);
vector4 pitch = quaternion({1,0,0}*ch('pitch'));
vector4 yaw = quaternion({0,1,0}*ch('yaw'));
vector4 roll = quaternion({0,0,1}*ch('roll'));
@orient = qmultiply(@orient, pitch);
@orient = qmultiply(@orient, yaw);
@orient = qmultiply(@orient, roll);A nice extra trick for this is to drive the rotation amount by @ptnum, eg
vex
float speed  = rand(@ptnum,123) * @Time;
float offset = rand(@ptnum,456);
float flap = sin(speed+offset);

vector4 pitch = quaternion({1,0,0}*flap);

@orient = qmultiply(@orient, pitch);
float speed = rand(@ptnum,123) * @Time;
float offset = rand(@ptnum,456);
float flap = sin(speed+offset);
vector4 pitch = quaternion({1,0,0}*flap);
@orient = qmultiply(@orient, pitch);So that way all the orients will flap along their local x-axis, but with independent speeds and offsets.
Remove points that don't have normals directly along an axis
Brilliant tip from the brilliant Matt Ebb. I have scattered points over cubes, they should have normals that point along one of X, -X, Y, -Y, Z, -Z. This being real life, some points are slight rotated, which ruins my end result.
I needed a way to identify points that didn't have normals directly along the X/Y/Z axis, and delete them. Matt came up with this gem:
vex
if (max(abs(normalize(@N))) != 1) {
  removepoint(0,@ptnum);
}
if (max(abs(normalize(@N))) != 1) {
removepoint(0,@ptnum);
}What's going on here?
normalize(@N) - takes @N and makes it be of length 1.abs() - makes the values positive, so {1,0,0} would be unchanged, but {0,-1,0} would become {0,1,0}max() - given a vector, returns the biggest component of that vector.
So, what does that mean? Let's take 3 example vectors and run it through that process:
{1,0,0} - if we normalise it, it returns the same vector. Abs it, also the same. Getting the max of that will return 1. We test if its equal to 1, it is, so the point remains.{0,-1,0} - normalise it, again its the same. Abs it, it becomes {0,1,0}. Max returns 1, so this point also stays.{1,-1,0} - normalise it, returns { 0.707, -0.707,0}. Abs it and its now { 0.707, 0.707,0}. The max of that is 0.707, so it fails the test.
Simple, clever. Cheers Matt!
Scaling with vex and matrices

Download scene: Download file: vex_matrix_scale.hipnc
There's lots of ways of course, here's probably the simplest way if you have polygons:
vex
matrix3 m = ident();
scale(m,chv('scale'));
@P *= m;
matrix3 m = ident();
scale(m,chv('scale'));
@P *= m;First we define an empty matrix with ident(). Next we scale that matrix using a vector, here I'm being lazy and getting that vector from the UI, so chv('scale') reads the vector from the channel, and scale(m, myvector) directly scales the matrix in place, note that there's no return type on that call. Finally to apply this, you just multiply the points by the matrix as discussed earlier.
If you have primtives though, like a primitive sphere or primitive cone, remember that there's only a single point at the center of the primtive, so scaling that will have no effect. Instead primitives have their own hidden matrix, call the intrinsic transform. To set this you use the setprimitiveintrinsic function, the setup and scaling of the matrix is the same.
vex
matrix3 m = ident();
scale(m,chv('scale'));
setprimintrinsic(0,'transform',0,m);
matrix3 m = ident();
scale(m,chv('scale'));
setprimintrinsic(0,'transform',0,m);Strictly speaking this is a primitive operation, so we really should change to a primitive wrangle, but in this case the point and the prim share the same id, so it doesn't really matter. The function call needs to know which geometry input to process, the name of the intrinsic attribute, which prim, and finally the value to set.
So
vex
setpriminstrinsic ( input, instrinsic_name, which_prim, what_value);setpriminstrinsic ( input, instrinsic_name, which_prim, what_value);becomes
vex
setpriminstrinsic ( 0, 'transform', 0, m);setpriminstrinsic ( 0, 'transform', 0, m);Generate a disk of vectors perpendicular to a vector
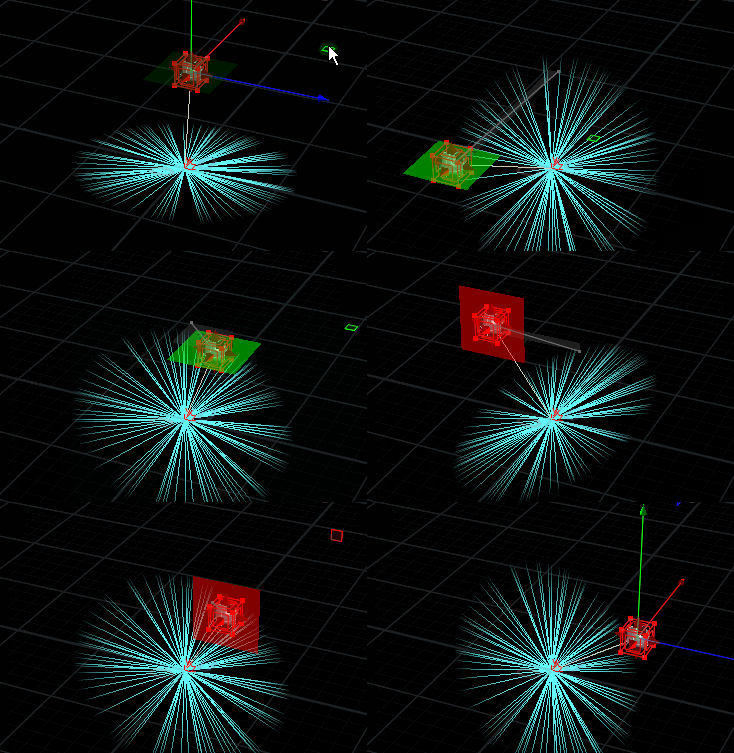
Download scene: Download file: disk_around_vector.hip
My first H16 demo scene, hooray!
vex
vector aim;
vector4 q;

aim = chv('aim');
@N = sample_circle_edge_uniform(rand(@ptnum));
q = dihedral({0,0,1}, aim);
@N = qrotate(q,@N);
@N *= ch('scale');
vector aim;
vector4 q;
aim = chv('aim');
@N = sample_circle_edge_uniform(rand(@ptnum));
q = dihedral({0,0,1}, aim);
@N = qrotate(q,@N);
@N *= ch('scale');Using another of the super handy sample_something_something functions, sample_circle_edge_uniform generates random vectors on the edge of a circle if given a random number between 0 and 1. The location of the disk is fixed on the xy plane (ie, perpendicular to {0,0,1}). To rotate that disk of vectors to where we want, use dihedral/qrotate tricks as outlined earlier. Here I have a sphere and read its position as the aim vector.
What? You want more Vex? Wow. Better head to HoudiniVex3.