Appearance
Joy of Vex Day 9
Dot and cross product, fake lighting, combing normals to a surface
Dot product
Switch to a more complex model now, like tommy, make sure his textures are disabled and 'show uv texture' in the viewport is disabled so we're not distracted by those.
vex
@Cd = @N.y; @Cd = @N.y;That looks like he's lit from above. If you use @N.x or @N.z, he looks lit from the right or front. Can negate to make him look like he's lit from underneath/left/behind.
vex
@Cd = -@N.y; @Cd = -@N.y;So that's fine, but what if we want him lit from an arbitrary direction? This is where a dot product comes in handy. It compares the directions of vectors, if they are pointing the same way (ie, parallel), it returns 1. If they're perpendicular, 0, if facing in exact opposite directions, -1, and angles in between those extreme positions will smoothly vary between 1, 0, -1.
Eg, compare the normals to a vector pointing along the y axis {0,1,0}:
vex
@Cd = dot(@N, {0,1,0}); @Cd = dot(@N, {0,1,0});Replace that hard coded vector with a chv slider, now we can light from any angle:
vex
@Cd = dot(@N, chv('angle')); @Cd = dot(@N, chv('angle'));Adjusting angles with vectors can be a little tricky if you're not used to it, think of it as 'how much x, how much y, how much z', so for a light to come from the left, slightly up, and to the front, would be a value like {1, 0.1, 1}.
An alternative way to think about this is if you had a point in space. You move that where you want, draw a line from the origin to the point, thats your light vector. You can do exactly this; make a single point with an add sop, feed it to the second input, retrieve its @P, and treat it as a vector to do the dot product test:
vex
 vector pos = point(1,'P',0);
 @Cd = dot(@N, pos);
vector pos = point(1,'P',0);
@Cd = dot(@N, pos);The point function here goes to input 1, and retrieves the @P attribute of point 0. (Remember that the point function doesn't need the @ prefix).
This works, but the light gets brighter as the point gets further away. As I mentioned a while back, a lot of functions expect the input vectors to be normalised, this is one of those cases. To do that you just use the normalize function.
vex
 vector pos = point(1,'P',0);
 pos = normalize(pos);
 @Cd = dot(@N, pos);
vector pos = point(1,'P',0);
pos = normalize(pos);
@Cd = dot(@N, pos);
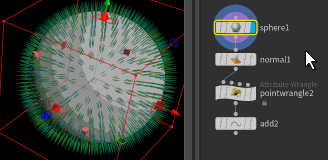
To adjust this interactively, put your display (blue) flag on the pointwrangle, single click the add sop so it gets a thin yellow outline, and hit enter while your cursor is in the viewport. That will enable its viewport handle, so you can move the point around with your mouse while seeing the end result.
Cross product
Switch to the sphere now (or if you're not using my hip, create a sphere in polygon mode, frequency around 5, append a normal sop in point mode). Turn on 'view point normals' in the viewport. You see a ball with spikes pointing away from it. Check what happens here:
vex
@N = cross(@N, {0,1,0}); @N = cross(@N, {0,1,0});It can be a little hard to see against the mesh, append an 'extract all points' sop, to make it easier to see. The normals are now rotating around the surface of the sphere.
The cross product will take 2 vectors, and generate a 3rd perpendicular vector. Easiest to think about with normals at the equator, and doing a vector vulcan hand shape:
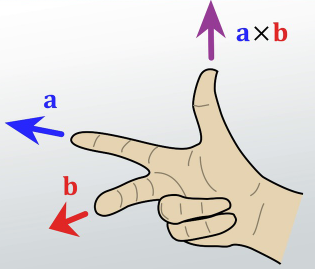
Point your thumb up along the y axis, middle finger along a normal at the equator, your index finger now points along the equator. Turn your hand to represent normals at various points around the equator, you can see that it will swirl the normals (or 'combs' the normals as this operation is sometimes called) flat to the surface.
Try giving it different values to cross against, see what happens.
What can be interesting is to cross the normal with an axis, save it in a temp vector, and then cross the normal with that temp vector:
vex
 vector tmp = cross(@N, {0,1,0});
 @N = cross(@N, tmp);
vector tmp = cross(@N, {0,1,0});
@N = cross(@N, tmp);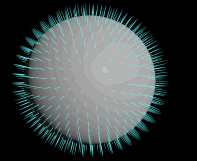
This 'double cross' operation as its often called really combs the normals along the surface. A lot of grooming tools will start with this kind of operation to force hairs to flow along the surface. You can keep doing this operation, and it will rotate the vectors another 90 degrees:
vex
 vector cross1 = cross(@N, {0,1,0});
 cross1 = cross(@N, cross1);
 @N = cross(@N, cross1);
vector cross1 = cross(@N, {0,1,0});
cross1 = cross(@N, cross1);
@N = cross(@N, cross1);vs
vex
 vector cross1 = cross(@N, {0,1,0});
 cross1 = cross(@N, cross1);
 cross1 = cross(@N, cross1);
 @N = cross(@N, cross1);
vector cross1 = cross(@N, {0,1,0});
cross1 = cross(@N, cross1);
cross1 = cross(@N, cross1);
@N = cross(@N, cross1);vs
vex
 vector cross1 = cross(@N, {0,1,0});
 cross1 = cross(@N, cross1);
 cross1 = cross(@N, cross1);
 cross1 = cross(@N, cross1);
 @N = cross(@N, cross1);
vector cross1 = cross(@N, {0,1,0});
cross1 = cross(@N, cross1);
cross1 = cross(@N, cross1);
cross1 = cross(@N, cross1);
@N = cross(@N, cross1);vs
vex
 vector cross1 = cross(@N, {0,1,0});
 cross1 = cross(@N, cross1);
 cross1 = cross(@N, cross1);
 cross1 = cross(@N, cross1);
 cross1 = cross(@N, cross1);
 @N = cross(@N, cross1);
vector cross1 = cross(@N, {0,1,0});
cross1 = cross(@N, cross1);
cross1 = cross(@N, cross1);
cross1 = cross(@N, cross1);
cross1 = cross(@N, cross1);
@N = cross(@N, cross1);will get you back to where you started.
Little aside, think about the coding trick we're using here. We first define cross1 as a vector, and calculate a result. Then we calculate the cross product using cross1, and store it in cross1. And again. And again. This idiom is pretty common, to calculate something using a variable, then store the result in the same variable.
Vector maths
This is a good time to have a quick refresher on some vector maths basics. It's way easier than it seems (especially if you half remember stuff from high school or first year uni), with Houdini you get direct visual feedback which is great, and direct useful applications. Once you know how to add, subtract, multiply, dot and cross vectors, that's pretty much all you need to know for 90% of your Houdini needs!
Vector addition
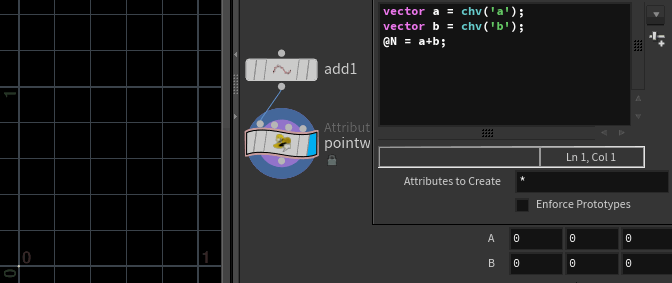
The maths textbook definition of adding vectors is to lie the vectors tip-to-tail, then draw a new vector from the start of the first to the end of the last. This is much easier to understand visually with a wrangle. I define 2 vector parameters, and set @N as the addition of both. Adding {1,0,0} (ie a vector pointing along x) and {0,1,0} (a vector pointing along y) will result in {1,1,0} (a vector pointing 45 degrees up and along):
vex
vector a = chv('a');
vector b = chv('b');
@N = a+b;
vector a = chv('a');
vector b = chv('b');
@N = a+b;To view this I've used an add sop to make a single point, switched to the front view, hovered over the wrangle node and clicked the 'i' button to bring up a persistent middle-mouse panel, and clicked on @N. This will show normals with a yellow line, to the correct length (see that I've zoomed the view so I can see the 0-1 range on the XY plane):
Here's a similar thing, but this time taking the normals from a sphere and adding a vector to it; you can see it bends the normals towards whatever new vector I specify. Handy for steering and adjusting initial velocities for particles, for example:
vex
vector a = chv('a');
@N += a;
vector a = chv('a');
@N += a;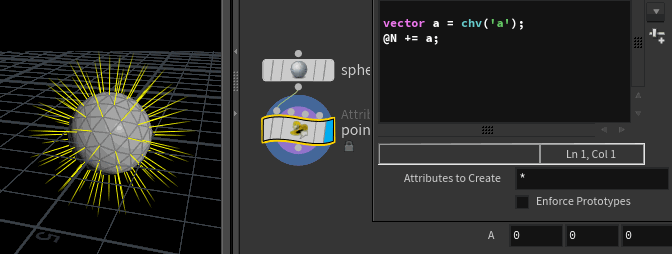
Vector subtraction
The textbook definition of vector subtraction is.... something? Frankly I don't remember. In Houdini, I know it as a common way to create a vector from 2 points. Store @P of the first point as 'a', @P of the second point as 'b', and set @N of the first point as 'a-b'. Now its normal aims at the second point:
vex
vector a = point(0,'P',0);
vector b = point(1,'P',0);

@N = b-a;
vector a = point(0,'P',0);
vector b = point(1,'P',0);
@N = b-a;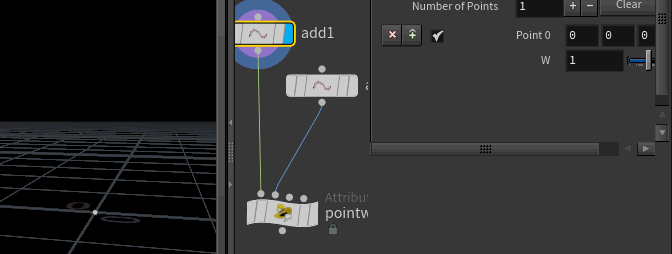
Notice that I stated its 'a-b' in the intro paragraph, but the vex code is 'b-a'? That's because I can never remember the order; I'll try it, find my vectors are pointing in the opposite direction to what I expect, swear, and reverse the terms. You'll do the same. 😃
Extending this to a sphere again, we can make every normal on the sphere aim at a point:
vex
vector a = @P;
vector b = point(1,'P',0);

@N = b-a;
vector a = @P;
vector b = point(1,'P',0);
@N = b-a;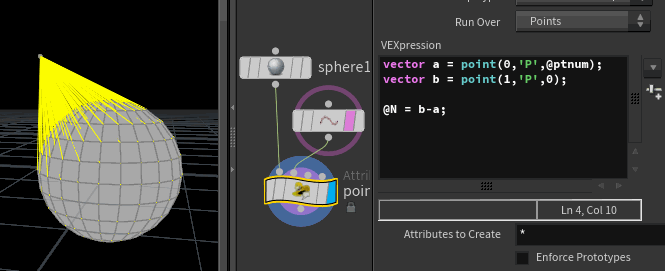
If you reverse the terms, this can be a way to set the initial velocity for an explosion for example, where the point defines the center of the explosion:
vex
vector origin = point(1,'P',0);
@v = @P-origin;
vector origin = point(1,'P',0);
@v = @P-origin;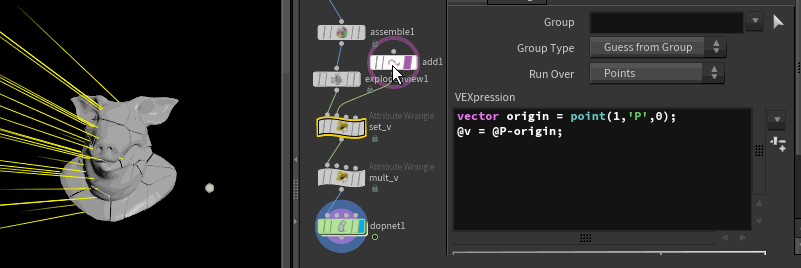
Note that I've swapped @N for @v, you'll need to update your visualiser to see this, or swap @v for @N if you're lazy. Also note that if you use the viewport 'display point trails' button, it displays velocities in the opposite direction! As the button name implies, its to help you see the trail behind particles in motion, rather than their direction of travel, don't be fooled.
Download hip: jov9_rbd_v_origin.hip
Vector multiplication
Multiplying a vector by a single number just multiplies each number inside the vector by the single number. This has the effect of scaling the vector, making it longer or shorter, but maintaining it's direction. Multiplying by 0 cancels out the vector completely.
vex
@N *= ch('scale');@N *= ch('scale');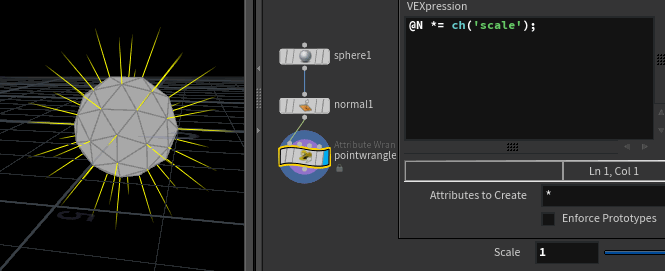
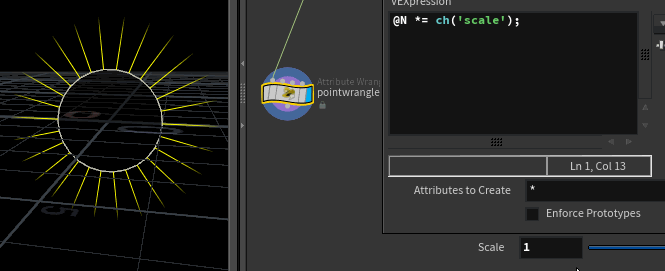
Multiplying by a negative number will reverse the direction of a vector (turn on wireframe if you're using the sphere still):
Multiplying 2 vectors together will multiply the x components together, the y, the z. In practice, its a way to scale or even cancel out an axis of vectors. Eg, I have a sphere with normals, if I multiply it by {1,0,1}, I cancel out all the vertical parts of the vectors. Increasing the x component so that its {2,0,1} will mean the vectors will be twice as long in that axis:
vex
@N *= chv('scalevec');@N *= chv('scalevec');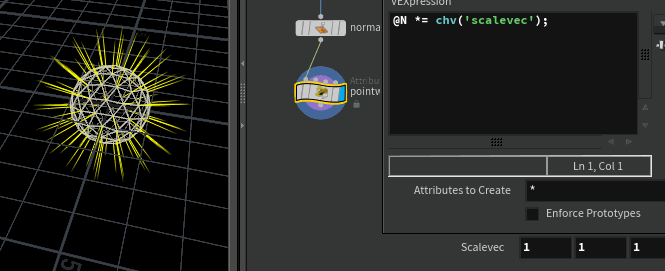
Exercises
- Cross against @N and noise, what happens?
- double cross @N and noise?
- Against @P?
- Can you fix the colours going negative in the shadowed areas of the dot product examples? (Hint: You'll need to clamp colours to stay within a valid range)
prev: JoyOfVex08 this:JoyOfVex09 next:JoyOfVex10
main menu: JoyOfVex