Appearance
Joy of Vex Day 14
creating geometry, deleting geometry, debugging vex
Create geometry
For once I promise not to do ramp falloffs or waves. 😃
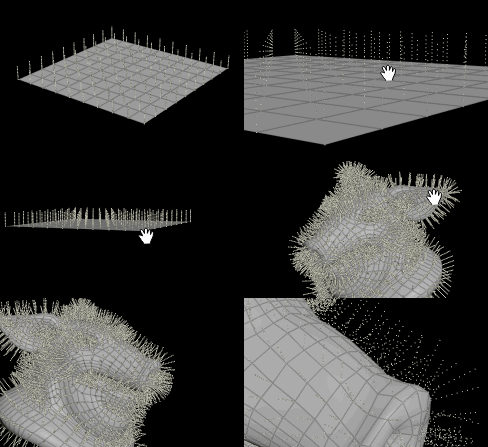
Vex can create points with the addpoint command. Like a lot of functions in vex you have to define the geometry to output to (always 0, ie, the first geo, ie 'this' geometry), and a position. It returns an integer, which represents a ptnum you can refer to later.
vex
int pt = addpoint(0, {0,3,0}); int pt = addpoint(0, {0,3,0});Running that on the grid will create what looks like a single point above the grid, at 0,3,0. But remember that this a point wrangle runs this code in parallel on all the points, so what you really have is a new point for every point on the grid, all at {0,3,0}. You can verify this by middle-mouse-button hold on the wrangle, and look at the number of points, vs the number of points in the original grid.
As a quick aside, you could collapse this down to a single point afterwards with a fuse sop, or try and control when the addpoint function runs, so it only fires on a single point. Eg:
vex
 if (@ptnum==0) {
   addpoint(0, {0,3,0});
 }
if (@ptnum==0) {
addpoint(0, {0,3,0});
}Or better still, use the group field at the top of the wrangle to limit it to run on a single point (just type 0 into that field)

But back to exploiting the parallelism of vex. Rather than setting the location of the new point manually, we could do it relative to the current point being processed. Eg, to make a new point that sits 5 units above every point (make sure you remove the 0 from the group field if you haven't already):
vex
addpoint(0, @P + {0,5,0}); addpoint(0, @P + {0,5,0});Note that here I'm not storing the returned value; I'm not doing anything with it, so I can ignore it.
We could create a point that sits 4 units away in the direction of the normal:
vex
addpoint(0, @P+ @N * 4); addpoint(0, @P+ @N * 4);We can combine what we learned about for loops, and run over each point 10 times, generating a new point each time that sits 0.1 units further away from the original position:
vex
 for (int i = 0; i<10; i++) {
  addpoint(0, @P+ @N *(i*0.1));
 }
for (int i = 0; i<10; i++) {
addpoint(0, @P+ @N *(i*0.1));
}So to explain that a little, the loop starts a counter, i, that is initialised at 0. It checks if its less than 10, if it is, it runs the loop, and after the loop is run, adds 1 to i. Within the loop, it multiplies @N times i * 0.1. So the first iteration its @N times 0, so its a new point that sits directly on the original point. The next time its @N times 1 * 0.1, so it moves 0.1 units along the normal. Next loop its @N times 2 * 0.1, so it moves 0.2 units along the normal, and so on.
That's points. What about lines?
Addprim
Assuming you've read the points/verts/prims page by now, you should have an intuition that to create a polygon requires linking points together into a prim via verticies. Doing this in vex used to be exactly that, but in H16 some convenience functions were added, so you can just define a prim with points, vex will take care of the verts for you.
The function is addprim, here you tell it the geo reference to use (always 0), the type of prim as a string (often 'polyline'), and then a comma separated list of point id's.
Taking the first example, if we wanted to join every point on the grid to a single point at {0,3,0}:
vex
 int pt = addpoint(0,{0,3,0});
 addprim(0,'polyline', @ptnum, pt);
int pt = addpoint(0,{0,3,0});
addprim(0,'polyline', @ptnum, pt);That creates a point at {0,3,0}, and stores its ptnum as an integer pt.
Then it creates a polyline that goes from the current point (@ptnum) to the point we just generated (pt). Of course its making a new {0,3,0} point for every point in the grid, so again afterwards you'd want to fuse it to avoid having needless extra points floating around.
You could make a polyline along the normal:
vex
 int pt = addpoint(0,@P+@N);
 addprim(0,'polyline',@ptnum,pt);
int pt = addpoint(0,@P+@N);
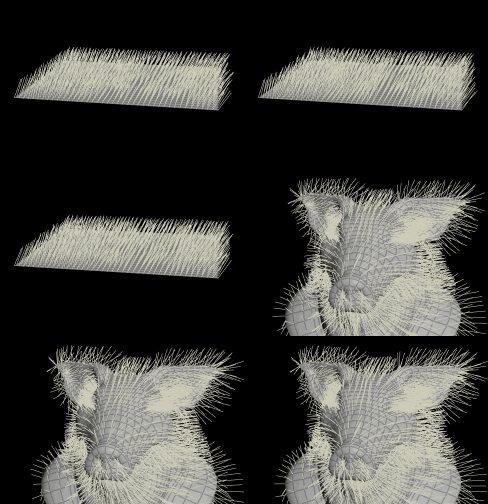
addprim(0,'polyline',@ptnum,pt);And move that top point with some noise to simulate a field of wheat. I limit the vertical movement so the wheat doesn't look like its scaling too much:
vex
 vector pos = @N+noise(@P+@Time)*{1,0.1,1};
 int pt = addpoint(0,@P+pos);
 addprim(0,'polyline',@ptnum,pt);
vector pos = @N+noise(@P+@Time)*{1,0.1,1};
int pt = addpoint(0,@P+pos);
addprim(0,'polyline',@ptnum,pt);Because this is based on @N, it should switch to the pig head or any geometry with normals and mostly work.
Lets go all the way, and generate multiple points along the normal, each are moved by slightly different noise, and joined into a line for more of a seaweed feel:
vex
 vector offset, pos;
 int pr, pt;
 float stepsize;

 pr = addprim(0,'polyline');
 stepsize = 0.5;

 for (int i = 0; i < 6;i++) {
   offset = curlnoise(@P-@Time+i)*0.2;
   pos = @P + @N * i * stepsize + offset;
   pt = addpoint(0,pos);
   addvertex(0,pr,pt);
 }
vector offset, pos;
int pr, pt;
float stepsize;
pr = addprim(0,'polyline');
stepsize = 0.5;
for (int i = 0; i < 6;i++) {
offset = curlnoise(@P-@Time+i)*0.2;
pos = @P + @N * i * stepsize + offset;
pt = addpoint(0,pos);
addvertex(0,pr,pt);
}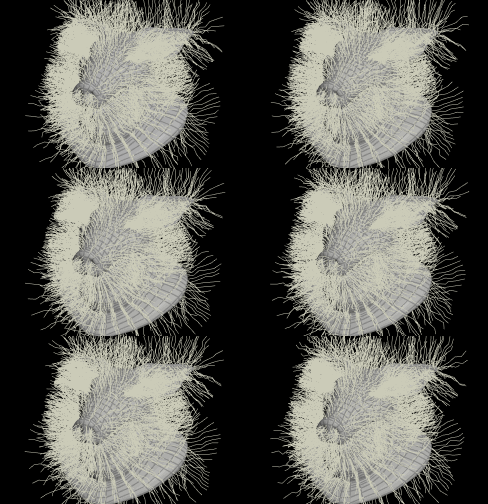
There's a bit to unpack there!
Here I've done something thats fairly common, which is to define all my variables up front. You can see that if you have multiple variables of a single type, you can define the type and then specify the names as a comma separated list, eg 'vector offset, pos, otherpos, mycolor;' etc. This also has the benefit of keeping the main code you're doing a little cleaner, as you don't have vector/float/int definitions cluttering things.
Before the main loop, I initialise the new prim and store its id as 'pr', and create a stepsize.
In the loop I create an offset based on curlnoise, and a position based on that offset and the normal, stepsize, and current i value. Then I define a point, and use a new thing, addvertex.
Why this way? Well, this is the older method for creating prims I mentioned earlier. You'd define an empty prim, then manually bind points to your prim with addvertex. Addvertex takes a prim id and a point id, and whatever order you add them in, defines the ordering of the sub-sections within the polyline.
Other primitive types
Check out the helpfile for addprim:
https://www.sidefx.com/docs/houdini/vex/functions/addprim.html
It tells you that there's quite a few choices other than 'polyline'. 'poly' will make a closed polygon, or you could use 'circle', and get a circle prim placed on the point you specify (you don't need the addvertex function here, prims like circle or spheres aren't connected to anything else, so just a point id is enough).
Remove Geometry
To add a point you use the addpoint function. To remove a point you...
vex
removepoint(0,@ptnum); removepoint(0,@ptnum);To remove a prim is similar, but you also have tell it what to do with the points that make up the prim, so keep them around:
vex
removeprim(0,@primnum,0); removeprim(0,@primnum,0);or delete the points too:
vex
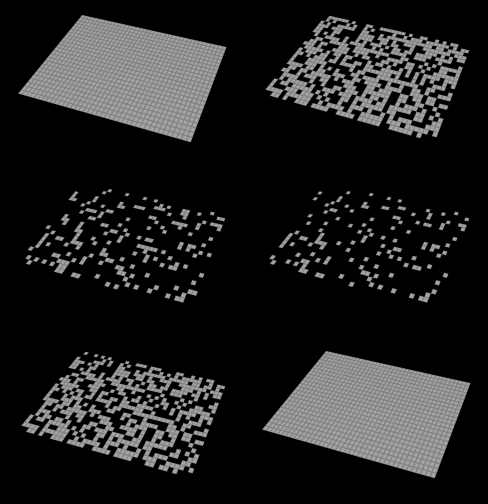
removeprim(0,@primnum,1); removeprim(0,@primnum,1);The most useful application of this is a random delete (do this in a prim wrangle) :
vex
 if (rand(@primnum) < ch('cutoff') ){
   removeprim(0,@primnum,1);
 }
if (rand(@primnum) < ch('cutoff') ){
removeprim(0,@primnum,1);
}Rand generates a random number between 0 and 1. It's tested against a slider, and if the random value is less than the slider, the prim will be deleted.
You can add an extra parameter to rand, which makes it generate a new set of random numbers. Slide the 'seed' slider to see this in action:
vex
 if (rand(@ptnum, ch('seed')) < ch('cutoff') ){
   removeprim(0,@primnum,1);
 }
if (rand(@ptnum, ch('seed')) < ch('cutoff') ){
removeprim(0,@primnum,1);
}
Remove geometry, nearpoints, parallel code
Great bonus tip courtesy of walking Vex encyclopedia Stephen Walsch.
Say you had a bunch of scattered points with no relax, and you wanted to remove points that are too close together.
The correct method is to use a Fuse sop; never code when a sop can do the work for you.
But lets say you want this in code. We could use nearpoints to get a list of the closest points to each point. If we have parameters to control the maximum distance searched, and a threshold of how many points can be near 'me', we can then delete me:
vex
float max = ch('max');
int limit = chi('limit');
int pts[] = nearpoints(0,@P,max);
if (len(pts)>limit) {
   removepoint(0,@ptnum);
}
float max = ch('max');
int limit = chi('limit');
int pts[] = nearpoints(0,@P,max);
if (len(pts)>limit) {
removepoint(0,@ptnum);
}That works, but look closer; if you set the maxdist relatively low, and the limit high so that you only remove the most crowded points, you'll see a problem: It can never delete single points, it will always remove at least 2 points, often more.
This is Vex parallelism at work. Remember that Vex will batch operations so that you can't get into paradox states, so it will read attributes first, then push the remove points operation to a final step. This means that if point A thinks its too close to point B and will remove itself, then point B will also think its to close to point A and also remove itself.
Mr. Walsch has a nice fix. The result of nearpoints is an array of ptnums, with the first point being 'myself'. We can use this to filter the results; check each point, and only delete if my ptnum is lower than the one from nearpoints.
So if we have point 8 and point 12 near each other, 8 will know its lower than 12, remove itself, but 12 is not lower than 8, so won't be removed.
vex
float max = ch('max');
int limit = chi('limit');
int pts[] = nearpoints(0,@P,max);
if (len(pts)>limit) {
   foreach(int pt; pts) {
    if (@ptnum<pt);
        removepoint(0,@ptnum);
   }
}
float max = ch('max');
int limit = chi('limit');
int pts[] = nearpoints(0,@P,max);
if (len(pts)>limit) {
foreach(int pt; pts) {
if (@ptnum<pt);
removepoint(0,@ptnum);
}
}This sort of stuff doesn't come up too often, so don't feel too bad if that doesn't make sense, but know that there are tricks to use if you need them.
Debugging vex
Something I noticed watching people go through this tutorial series; vex is awesome and makes you feel like a wizard when it works, but when you get errors can be a pain to work out why, especially when first starting out. A core problem is due to one of its key features; because its running in parallel on all points/prims, you can't easily do a 'print foo' debug statement, as you'll get 40,000 copies of that if you have 40,000 points.
Further, do a little research into multithreaded programming, it's known to be a tricky thing to deal with. Vex takes care of a lot of that complexity for you, but that has some caveats you should be aware of.
Here's a quick overview of vex debugging techniques, or things to watch for.
- Find the real error in a text wall of errors - Sometimes when you get a syntax error and middle-click on the wrangle, you'll be presented with a huge error statement. Over time you get used to skipping all the boilerplate text, and zeroing in on the bit of text in the error that doesn't look like the rest. A key one to watch for is 'undeclared variable', which you start to spot faster and faster
- missing brackets - vex being a C-derived language is bracket heavy, and being a language largely designed for 3d, means lots of vectors. This means you'll get a syntax error, scan it for 20 minutes, be convinced the code is perfect then notice you missed a closing ), or swapped a { for a (. A common one i miss is with if statements, I'll be testing against a channel and frequently miss the double bracket at the end, eg if ( foo > ch('testme') {
- Syntax error line number - The error statements will usually give you a line and column reference, note that there's a row/col indicator in the lower right of the wrangle text field. Use it!
- Syntax error off by 1 - Often the error will be on the line after the real problem, like missing a semicolon on the previous line.
- Auto creation of attributes by mistake - Coding languages can be categorised as 'strict' or not, by how they let you create variables and functions. Vex in its pure form is mildly strict, but wrangles, for the sake of ease of use, aren't very strict at all. The classic example is to misspell an attribute name, using @dC rather than @Cd for example. Vex won't know that's a syntax error, and instead will just create a @dC attribute. Another common mistake is to use a local variable, eg 'float foo', and in your code start using @foo instead, which is an attribute. Again, no syntax error, just incorrect behaviour that can be hard to track down.
- Not setting the data type on attributes - Another mistake I make too often; I'll have a wrangle that defines v@mycol, and in another wrangle later on I'll use @mycol. Vex can't detect the data type for attributes (it only knows about the handful of built in ones like P, Cd, v, orient etc), so it will be treated as a float, and just read the x (ie red) component of @mycol. Try to get in the habit of always using the data type prefix on attributes. I'm not in that habit, and frequently suffer for it. 😃
- Problems around equals signs - A single '=' is an assignment. A == in an if statement is a comparison for equality. A += is 'add something to the variable'. When typing at speed, its easy to mentally think 'ok, here I'm adding this variable', but your fingers type a single equals, and you'll go into a rage for 20 minutes trying to understand why your code isn't working. If in doubt, double check anywhere you've put down an equals sign, and make sure you haven't mistyped the wrong thing.
Exercises
- The seaweed example above doesn't lock the roots in place, fix that. You want to multiply the offset by 0 at the start of the loop, and gradually ramp it up until it has a large effect at the end. If only there were some counter, starting from 0, that you could multiply by a small fraction, that you could use for this...
- Make the seaweed move in very computery circles, offset slightly from each other (gif and answer is below, look at the gif first, try and avoid the code. Hint: You'll be moving each point's x and z position based on sin and cos...)
- colour the lines from root to tip somehow
- take the stocastic slider based prim delete example from above, change its mode to a point wrangle, and make it remove points instead.
- Stephan Walsch points out that if your point ordering has bias in it (say across X, or sorted as distance from origin), that can be revealed as bias in the parallel-remove trick above. How would you remove that bias? Hint: You could do it in code, but there's an easier single node based fix you can do before the vex...
- rand is pure white-noise static, sometimes you want more structure for the delete trick. try and make the delete work based on noise. Note that noise() doesn't take a seed variable, but you'll probably want controls to scale the size of the noise, and to offset it, maybe even animate the noise over time.
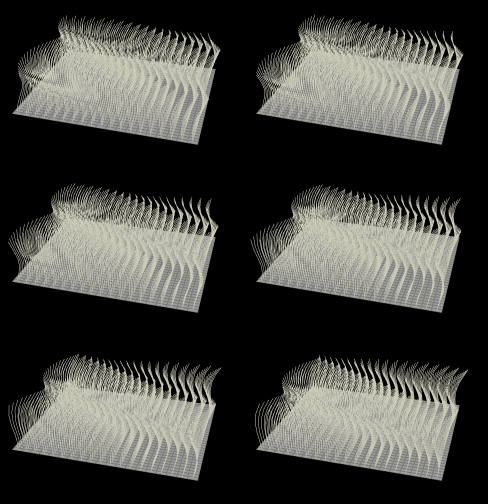
vex
 // spirally seaweed using sin and cos
 vector offset, pos;
 int pr, pt;
 float stepsize;
 float x, y, inc;
 pr = addprim(0,'polyline');
 stepsize = 0.5;

 for (int i = 0; i < 6;i++) {
  inc = @ptnum*0.3;
  x = cos(i*0.6+@Time+inc);
  y = sin(i*0.6+@Time+inc);
  offset = set(x,0,y)*0.1*i;
  pos = @P + @N * i * stepsize + offset;
  pt = addpoint(0,pos);
  addvertex(0,pr,pt);
 }
// spirally seaweed using sin and cos
vector offset, pos;
int pr, pt;
float stepsize;
float x, y, inc;
pr = addprim(0,'polyline');
stepsize = 0.5;
for (int i = 0; i < 6;i++) {
inc = @ptnum*0.3;
x = cos(i*0.6+@Time+inc);
y = sin(i*0.6+@Time+inc);
offset = set(x,0,y)*0.1*i;
pos = @P + @N * i * stepsize + offset;
pt = addpoint(0,pos);
addvertex(0,pr,pt);
}prev: JoyOfVex13 this: JoyOfVex14 next: JoyOfVex15
main menu: JoyOfVex