Appearance
Joy of Vex Day 1
Basic assignment, component assignment, arithmetic manipulation
Download this:
To save time its a hip file preconfigured with some interesting geo behind a switch node, then a transform sop, normal sop in point mode, point wrangle. As you work through these tutorials you can adjust the switch sop and transform sop to try different geometry, change the scale and rotation, see how your code works in different contexts.

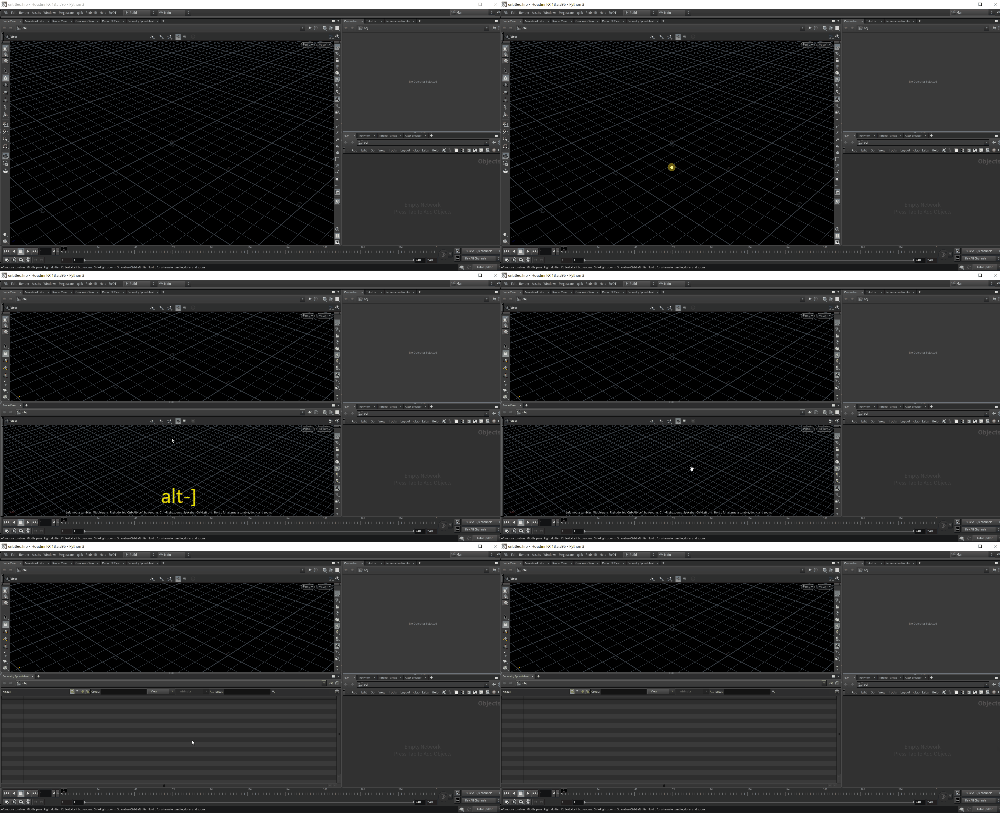
Being able to see your geometry attributes is important when using vex (and for Houdini in general). A quick way to do this is to split your viewport, then set the lower pane to be a geometry spreadsheet. A fast keyboard combo to do this is alt-] for the split, then alt-8 in the lower pane to load the geo spreadsheet. Do this, save it as your default desktop, you'll thank me later. 😃

Colour
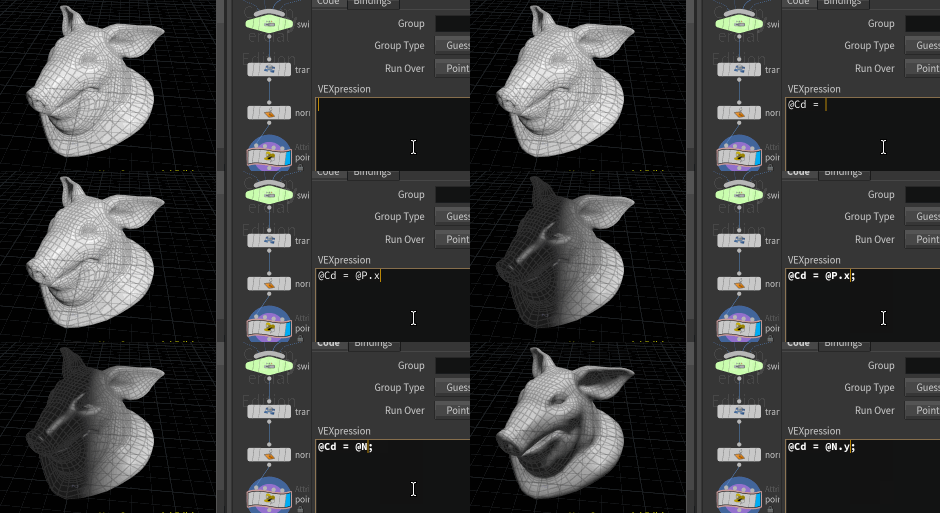
One of the easiest things you can do with vex is to set the colour of your geometry based on attributes. Try the following in the point wrangle text editor, hit control-enter (or command enter on OSX) after you finish typing to make Houdini execute the code:
vex
@Cd = @N;@Cd = @N;and
vex
@Cd = @P;@Cd = @P;Rotate/translate/scale via the transform sop, see values change.

Attribute components
@Cd is a vector, so is @P and @N, so its easy to assign them to each other, as the types are compatible.
You can also refer to sub-components, so just the x component of @P for example, with the format @P.x:
vex
@Cd = @P.x; @Cd = @P.x;Same goes for @N:
vex
@Cd = @N.y; @Cd = @N.y;Vex is doing a bit of hidden work for you, taking that float value (say 0.2), and converting it into a vector where each component is the same ( 0.2, 0.2, 0.2). Handy.

Basic maths
Vex is based on C (like a lot of computer languages), meaning that simple arithmetic is easy to do.
For example, if you switch to the grid, and use @Cd = @P.x, if you look at the geometry spreadsheet you can see that everything on one side is black, because @P.x goes to 0 at the center, then negative values on the other side. To change where the values start going to black, you can add an offset:
vex
@Cd = @P.x + 3; @Cd = @P.x + 3;or subtract an offset to push the black point the other way:
vex
@Cd = @P.x - 6; @Cd = @P.x - 6;or multiplying or dividing:
vex
@Cd = @P.x -6 * 0.1; @Cd = @P.x -6 * 0.1;Can use brackets as you'd expect to control order of operations:
vex
@Cd = (@P.x-6) * 0.3; @Cd = (@P.x-6) * 0.3;Assigning to components
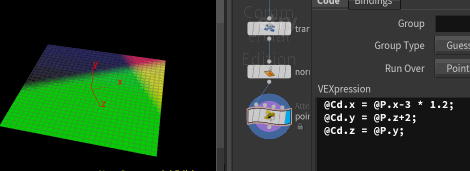
Earlier we were reading components and assigning to @Cd. You can also assign to components, so we could do different things to the red, green, blue channels of @Cd:
vex
 @Cd.x = @P.x-3 * 1.2;
 @Cd.y = @P.z+2;
 @Cd.z = @P.y;
@Cd.x = @P.x-3 * 1.2;
@Cd.y = @P.z+2;
@Cd.z = @P.y;
So far we've been using @P and @N and @Cd, but if you've used Houdini a bit you'll know that each point gets its own id, which you can see as the first column in the geometry spreadsheet. You can use this too, using the attribute @ptnum (point number):
vex
@Cd = @ptnum; @Cd = @ptnum;Not hugely interesting visually, the first point will be black (because its @ptnum is 0), the next point is white (@ptnum is 1), then every other point is 'superwhite', which the viewport just displays as white. What can we do to fix this?
Alongside @ptnum is another handy built in attribute, which is the total number of points, @numpt. So a simple way to get a 0 to 1 colour ramp across all your points, where the first point colour is {0,0,0} and the last point is {1,1,1} would be to divide the current point number by the total number of points:
vex
@Cd = @ptnum/@numpt; @Cd = @ptnum/@numpt;Except that... it doesn't work. The reason comes back to how most programming languages deal with numbers. @ptnum and @numpt are integer attributes, meaning they have no fractional component, no ability to deal with values after a decimal point. When you divide an integer by an integer, you get an integer, which is no good to us here.
If we can convert the first number to a float, a float divided by an integer will return a float.
You can do this in a process called casting. You wrap the value you want to convert in brackets, then before the bracket tell it the type you want it to be:
vex
@Cd = float(@ptnum)/@numpt; @Cd = float(@ptnum)/@numpt;If we wanted, we could replace @numpt with any number, which will change where the whitepoint of the ramp occurs:
vex
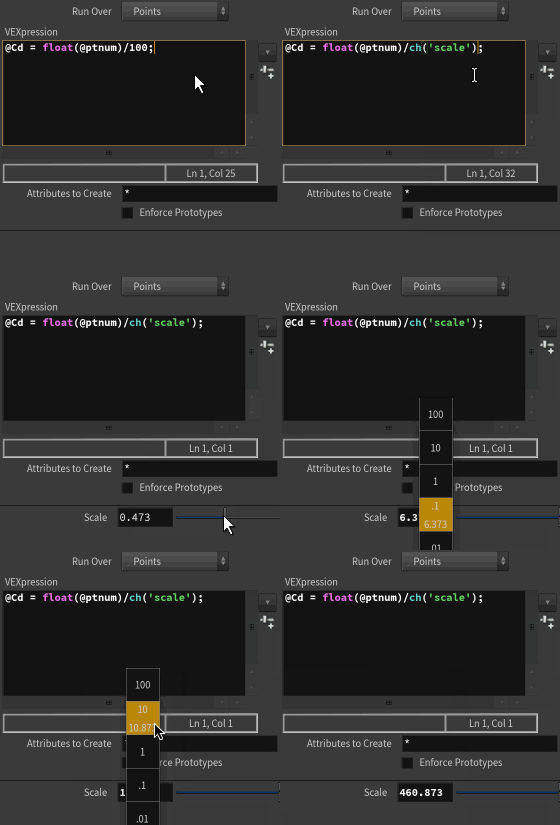
@Cd = float(@ptnum)/100; @Cd = float(@ptnum)/100;Channels
When using wrangles, you'll find that you'll get certain values you want to keep changing, like the second part of the wrangle code above. Rather than constantly editing the code and hitting ctrl-enter, you can use the function ch. This creates a channel reference, where the code will look for a UI slider and read its value. Creating these sliders used to be a bit complex, now it's a simple as clicking the little button to the right of the wrangle editor. It will scan your vex code, look for any channels that haven't been created, and make them for you. The text within the ch call becomes the name of the parameter:
vex
@Cd = float(@ptnum)/ch('scale'); @Cd = float(@ptnum)/ch('scale');Note that while the default slider range is 0 to 1, like other parameters in houdini you can go as high above 1 or lower into negative numbers as much as you want):

Sine
Time to introduce our first vex function, sin:
vex
@Cd = sin(@ptnum); @Cd = sin(@ptnum);This gives a basic wave function that oscillates between -1 and 1. Because vex is for nerds, sin uses radians, meaning it does a 0, to 1, to 0, to -1, to 0 every pi*2 units (so because we're using ptnum, we get a wavelength roughly each time @ptnum is a multiple of 3.1415 * 2, or 6-and-a-bit).
If we want to change how often the wave repeats, change how fast ptnum changes. Divide it for example:
vex
@Cd = sin(@ptnum/100); @Cd = sin(@ptnum/100);Doh, that pesky int divided by int again. Cast to float first:
vex
@Cd = sin(float(@ptnum)/100); @Cd = sin(float(@ptnum)/100);Or via a slider, now can art direct repeating patterns:
vex
@Cd = sin(float(@ptnum)/ch('scale')); @Cd = sin(float(@ptnum)/ch('scale'));That as a one liner is nasty, break over 2 lines:
vex
 float foo = float(@ptnum)/ch('scale');
 @Cd = sin(foo);
float foo = float(@ptnum)/ch('scale');
@Cd = sin(foo);Variables
Debated bringing this up on day 1 or wait until later, but you're a big kid, you can handle it.
Things prefixed with an @ are attributes, data sitting on the geometry. You can both read attributes and write to them as we've done already. A lot of the time though you'll want to do some calculation first, work out this times that plus that, run through a function, adjust with a slider etc, until you finally decide to write that out to an attribute.
If those intermediate values are temporary, and you're unlikely to use them later on, then you can just create data that exists only within the wrangle. These are called variables, and you define them by setting the type first (float, int, vector etc), a name, and optionally a direct assignment as we've done here.
To be more explicit about this, variables exist within the wrangle only, they never get transferred into the geometry like attributes. Remember that:
- variables are temp throwaway data that only exists within the wrangle code
- attributes are data that is on the geometry.
These waves are based on @ptnum. If we want to drive them from each points x position, substitute @ptnum for @P.x:
vex
 float foo = float(@P.x)/ch('scale');
 @Cd = sin(foo);
float foo = float(@P.x)/ch('scale');
@Cd = sin(foo);I mentioned earlier that the components of @P are floats (you can have positions at 1.2, 0.0003, 14223.2433 etc), so we don't need to cast it. Clean code = good code:
vex
 float foo = @P.x/ch('scale');
 @Cd = sin(foo);
float foo = @P.x/ch('scale');
@Cd = sin(foo);Exercises
- Sin waves on z? on y?
- cos waves? (wont look hugely different, cos is just sin shifted by 1/4 of a wave)
- waves bases on @N components?
- tight sine waves on red, medium cos on blue, a wide ramp on green, each driven by a different thing (position vs normal vs point number)
Background bonus material
Note that a one liner like @Cd = @P is pretty elegant considering what it's doing. In most other languages you'd have to somehow iterate through all the points, create @Cd and allocate memory if it doesn't exist yet, update @Cd, then probably you'd have to think up your own ways to speed it up when performance suffers, or just accept it will be slow. Vex does all that work for you. That's pretty cool.
A downside of coding, especially in something as barebones as the vex wrangle editor, is that it's pretty unforgiving when you get things wrong. Error messages are arcane, syntax errors are easy to make, the help isn't always helpful. On the flipside most wrangles tend to be 1 or 2 lines, 10 to 20 lines if you're getting fancy, so its not a lot of effort to debug. We'll cover some simple debug techniques later.
prev: ---- this: JoyOfVex01 next: JoyOfVex02
main menu: JoyOfVex