Appearance
Joy of Vex Day 2
Length and distance functions, animate with @Time
Vex has lots of functions. LOTS. Here's an alarming list of them all. Bookmark it, you'll use it all the time as you get more familiar with vex:
https://www.sidefx.com/docs/houdini/vex/functions/index.html
Good to start with the simple, work up. A handy starting point is to measure the length of a vector, which you do with length. (Keep with the grid geometry for now)
vex
float d = length(@P); float d = length(@P);Applied to @P, it tells you the distance a point is from the origin. Put that into colour:
vex
 float d = length(@P);
 @Cd = d;
float d = length(@P);
@Cd = d;Boring. But we can now put this into sin, get something interesting:
vex
 float d = length(@P);
 @Cd = sin(d);
float d = length(@P);
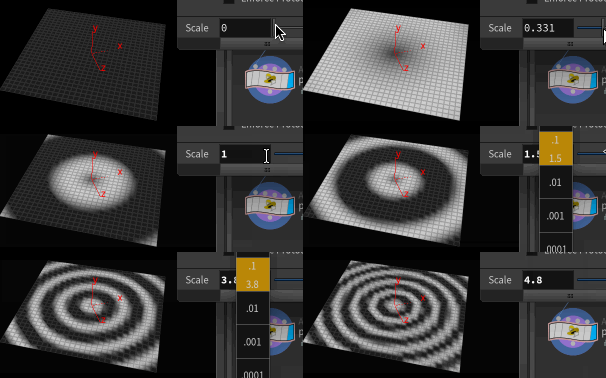
@Cd = sin(d);will probably need to set the range to see the sine waves better:
vex
 float d = length(@P);
 d *= ch('scale');
 @Cd = sin(d);
float d = length(@P);
d *= ch('scale');
@Cd = sin(d);3 lines of vex! woo! Set the scale slider above 1, somewhere between 5 and 10 on the grid to see the waves doing their thing.

If you look at the geometry spreadsheet, you can see that the dark values for @Cd are going into negative values, we can't have that. Can just add an offset to get them out of negative.
vex
 float d = length(@P);
 d *= ch('scale');
 @Cd = sin(d)+1;
float d = length(@P);
d *= ch('scale');
@Cd = sin(d)+1;But our colours still aren't right, as now we're getting values going between 0 and 2. Now we can divide by 2 to get it back to a 0 to 1 range (and use brackets to make sure the operations are done in the right order):
vex
 float d = length(@P);
 d *= ch('scale');
 @Cd = (sin(d)+1)/2;
float d = length(@P);
d *= ch('scale');
@Cd = (sin(d)+1)/2;Some coders frown upon using divide, and prefer to multiply by a fraction. You look cooler if you do, but it doesn't really matter at this stage:
vex
 float d = length(@P);
 d *= ch('scale');
 @Cd = (sin(d)+1)*0.5;
float d = length(@P);
d *= ch('scale');
@Cd = (sin(d)+1)*0.5;Breaking this across 3 lines is a matter of style, its perfectly valid to compact lines together, in whatever way you want. I like to break them out, others write super compressed one liners, all good. This is the same:
vex
 float d = length(@P) * ch('scale');
 @Cd = (sin(d)+1)*0.5;
float d = length(@P) * ch('scale');
@Cd = (sin(d)+1)*0.5;and this (but see how it gets harder to read at a glance):
vex
@Cd = (sin(length(@P) * ch('scale'))+1)*0.5; @Cd = (sin(length(@P) * ch('scale'))+1)*0.5;Distance
Related to length is distance. While length(@P), measures the distance from the point to {0,0,0}, distance lets measure the distance from the point to another value you specify, so we could have these rings start at {1,0,3} for example. That's how you type simple vectors, with curly brackets btw. One of the most common errors you make in vex is accidentally swapping curly brackets for normal ones!
vex
 float d = distance(@P, {1,0,3} );
 d *= ch('scale');
 @Cd = (sin(d)+1)*0.5;
float d = distance(@P, {1,0,3} );
d *= ch('scale');
@Cd = (sin(d)+1)*0.5;There's another channel call, chv, that gives you a vector slider. Lets define a vector variable, 'center', use that:
vex
 vector center = chv('center');
 float d = distance(@P, center );
 d *= ch('scale');
 @Cd = (sin(d)+1)*0.5;
vector center = chv('center');
float d = distance(@P, center );
d *= ch('scale');
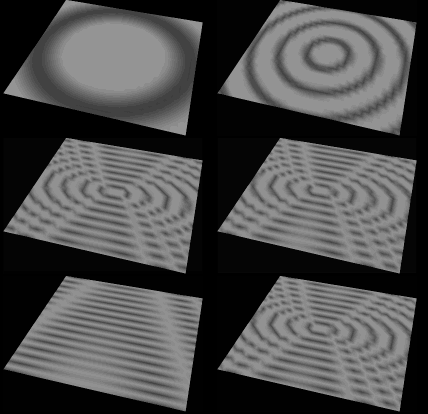
@Cd = (sin(d)+1)*0.5;An interesting trick is to multiply vectors. For example, multiply @P by {0.5,1,1}, you're making x advance half as fast as it normally does. Feed that in rather than vanilla @P, you get squished rings:
vex
 vector center = chv('center');
 float d = distance(@P* {0.5,1,1}, center );
 d *= ch('scale');
 @Cd = (sin(d)+1)*0.5;
vector center = chv('center');
float d = distance(@P* {0.5,1,1}, center );
d *= ch('scale');
@Cd = (sin(d)+1)*0.5;Again my tidy gene wants to kick in and make this easier to read at a glance, as well as easy to edit interactively with another slider:
vex
 vector pos = @P * chv('fancyscale');
 vector center = chv('center');
 float d = distance(pos, center );
 d *= ch('scale');
 @Cd = (sin(d)+1)*0.5;
vector pos = @P * chv('fancyscale');
vector center = chv('center');
float d = distance(pos, center );
d *= ch('scale');
@Cd = (sin(d)+1)*0.5;Check it, movable, squishable rings.

Clashing channel names
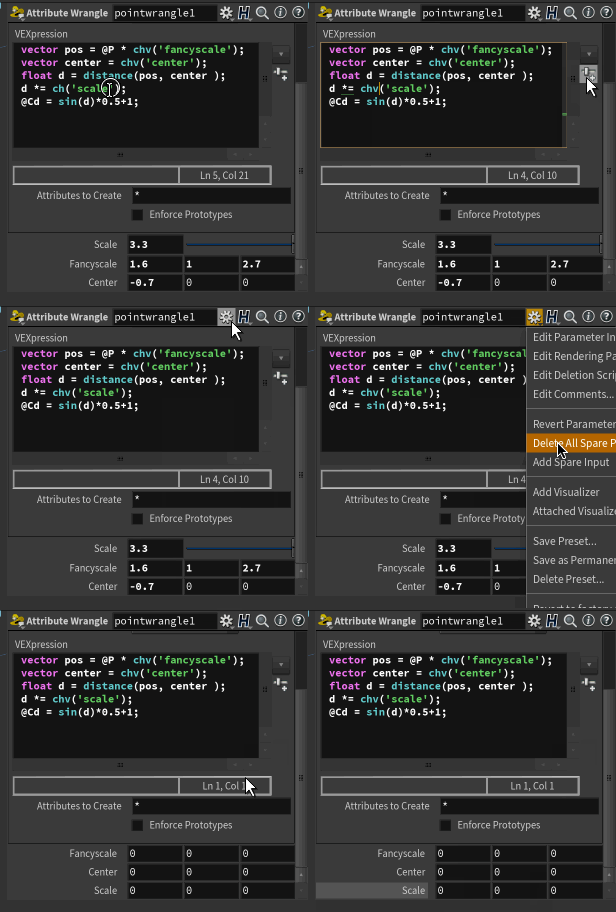
Note that I originally had both chv('scale') on the first line, and ch('scale') on the 2nd last line, which is wrong. You can't use identical names for channels, one will take priority. Moreso, once you've defined a channel by name (say from the previous example), and you change its type in vex (from ch to chv say), the 'make channels' button won't update it.
The laziest way to fix it is to delete all the channel sliders/parameters, and click the 'make channel' button again to recreate it. You can delete all the channels in one hit from the parameter menu, and choose 'Delete All Spare Parameters'.

A more selective way is to right click on a channel name and choose 'More -> Delete Spare Parameter', which deletes one at a time.

Fit
That add one and divide by 2 step can be replaced by another function, fit. You tell it the incoming min and max values ( -1 and 1 in this case), and the new min and max values you want (0 and 1).
vex
 vector pos = @P * chv('fancyscale');
 vector center = chv('center');
 float d = distance(pos, center );
 d *= ch('scale');
 @Cd = fit(sin(d),-1,1,0,1);
vector pos = @P * chv('fancyscale');
vector center = chv('center');
float d = distance(pos, center );
d *= ch('scale');
@Cd = fit(sin(d),-1,1,0,1);And finally, introduce a new handy built in attribute, @Time. If we add this to our d variable, it will push the sine wave along, causing the wave to animate.
vex
 vector pos = @P * chv('fancyscale');
 vector center = chv('center');
 float d = distance(pos, center );
 d *= ch('scale');
 @Cd = fit(sin(d+@Time),-1,1,0,1);
vector pos = @P * chv('fancyscale');
vector center = chv('center');
float d = distance(pos, center );
d *= ch('scale');
@Cd = fit(sin(d+@Time),-1,1,0,1);More on code style
Something I glossed over is a subtle C-style thing that can be easy to miss if you're not used to it.
If you had a variable and wanted to multiply it by 5, you could do this:
vex
foo = foo * 5;foo = foo * 5;But there's a shorthand for that, the *= operator:
vex
foo *= 5;foo *= 5;There's equivalent operators for +=, -=, /=.
Another thing you can do with code is do a bunch of operations on one line:
vex
foo = foo * 3 +1 / @Cd.x + @N.y;foo = foo * 3 +1 / @Cd.x + @N.y;But it can be easier to understand if you break that over several lines, using the shorthand operators to do the operation:
vex
foo *=3; // set range
foo +=1; // make sure values never get below 0
foo /= @Cd.x; // reduce range to within red value
foo += @N.y; // addition normal on y
foo *=3; // set range
foo +=1; // make sure values never get below 0
foo /= @Cd.x; // reduce range to within red value
foo += @N.y; // addition normal on yetc. What can trip you up is if you accidentally use an = by itself, eg:
vex
foo *=3; // set range
foo +=1; // make sure values never get below 0
foo /= @Cd.x; // reduce range to within red value
foo = @N.y; // addition normal on y
foo *=3; // set range
foo +=1; // make sure values never get below 0
foo /= @Cd.x; // reduce range to within red value
foo = @N.y; // addition normal on yIn that code, foo on the last line is just assigned the value of N.y. In other words, I've accidentally wiped out all the work of the previous lines. Its an easy mistake to make at first, watch out for it.
Exercises
- Change the direction the waves move from towards the center to away from the center
- Change the speed of the waves
- Make the waves be blue on black, or yellow on green
- Rather than affect colour, make them affect the y position of the points.
prev: JoyOfVex01 this: JoyOfVex02 next: JoyOfVex03
main menu: JoyOfVex