Appearance
Lops
The previous section treated usd as a cache format. You're probably aware of Solaris/Lops, the USD editing mode within Houdini. Working in Lops exposes a bunch of other things USD can do, but for now lets load in the USD's we just made, and spot the differences.
Go to the desktop menu and choose 'Solaris', this opens a few more panes we'll need.
Oh if you're wondering, Solaris is the marketing name for Lops, so Lops and Solaris is the same thing. Ok? Cool.
Loading a USD in lops
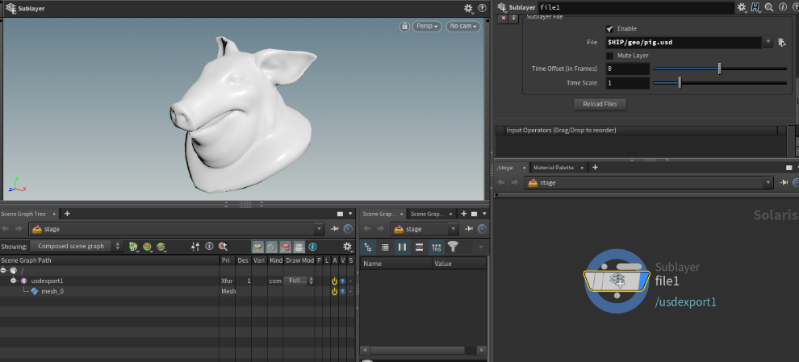
- In the network editor, tab in a 'file' node
- Point it to the pig.usd you made earlier. Careful, the file parameter is about 2/3 the way down the parameter pane, not at the top where you'd expect. Don't be fooled!
- There's the pig, same as before. Big deal.
- Look at the Scene Graph Tree in the bottom left. This is a tree view/outliner style view of your usd file. At the moment you probably see a fully collapsed tree.
- Expand it out. You'll see there's a little hierarchy, very similar to the maya style thing of a transform and shape. In this case its /usdexport1/mesh_0
So far, so dull. Note that in the network editor, the node we're using is of the type sublayer, which is a USD term for loading files from disk. It's the default opalias used by Houdini when you type 'file' cos it's simple, but there's a more interesting alternative, a reference.
- Tab in a reference node
- Paste in the path (again make sure to use the correct parameter 'reference file', not the top 'primitve path' parameter)
- Change /`@sourcename` to /$OS. This will make the name in the Scene Graph Tree come from the node itself, same $OS trick you use in sops.
- Display the node. There's the pig. Note that in the scene graph tree the 'transform' is called reference1, and it's green.

- This is kiiiindasorta like a reference in maya. You ever try lots of references in maya to the same file? No? Well, lets try it here.
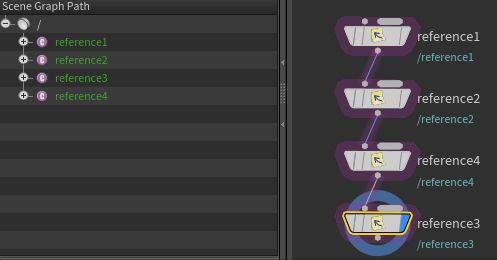
- Duplicate the reference node, append it below the first. Display it. You can see in the scene graph tree there's 2 reference nodes now.
- Duplicate those 2, append them, display the last node. Now there's 4 references.
- Great, buuuut there's no change in the viewport. Makes sense I guess, in that they're all in the same place. What if you wanna move stuff around to see them all?
- In the scene graph tree click 'reference2'. Move your cursor to the viewport, hit 't'. That will bring up the translate tool, you can move that pig somewhere else. Select reference3, move it, select reference4, move it.
- Take a look at what's happened in the node editor and the parameter pane. Lops has appended an edit node, and the parameter has a list of nodes that have changed. You can turn on a toggle to see the modified translate values.
So this is kindasorta like a edit sop, but its also kindasorta a procedural edit node; you can move stuff, and it's recording your changes on a node.
If you want more analogies (of course you do), in terms of what we've done so far in Lops is chaining lots of file sops together, keeping them in packed disk mode, making sure each has a unique name, then appending an edit sop to move them around.
Save a USD from Lops
With all that done, lets save this to disk.
- Append a USD Rop node
- Set the save path to $HIP/geo/lops.usd, save
Easy enough. Let's load this back in.
- Create a file node, point it at $HIP/geo/lops.usd, display it
- There's your pigs, and the hierarchy all as you left it.
References to references
Still pretty dull so far, but take a closer look at the usd files you made:
$ ls -l lops.usd pig.usd -rw-r--r-- 1 mestela staff 1.4K 27 Apr 18:47 lops.usd-rw-r--r-- 1 mestela staff 150K 27 Apr 14:45 pig.usd
The pig.usd is 150kb, about what you'd expect, but the collection of 4 pigs is only 1.4kb. You can guess at what's going on here, when we wrote the 4 pigs out of lops, it was clever enough to know it didn't need to bake out the geo, it just has to store a reference to the pig on disk, and a transform.
Lops lets you see this directly. Right click on the edit node, choose Lop actions -> Inspect Active Layer. That'll pop up a code editor. Ignore the fiddly bits, you should be able to understand what's going on; it loads the pig.usd as a reference 4 times, and moves each one.
So universal
That all makes sense. But think about this. While that's a trick you could do in Maya with references, or Houdini with packed disk prims, or most 3d apps in some form or another, they're all locked on their own platform. This lops.usd is now universal. You could load in Maya, or Katana, or Nuke, or Renderman, or UE4, or Arnold, they'll all see the same thing. No translation, no conversion. That's cool.
Lops is not Houdini, Lops is USD
Worth pointing this out early on. Lops is ultimately about bringing Houdini to USD, not USD to Houdini. Lops is a thin node based wrapper around all the core USD technology, so while it might look like a sops network, don't be fooled; this isn't Houdini points and prims we're manipulating here.
You'll feel the desire to rail against it. Fight that feeling. USD isn't as scary or weird as it seems, you just need to get a quick primer in its terms and workflow. Which is why you're reading this guide. 😃
On to part 3!
prev: UsdGuide01 this: UsdGuide02 next: UsdGuide03 main menu: UsdGuide